
How to add zoho mail to iphone? Sync Emails, Notifications, Access issues
An organized email ecosystem is your haven of productivity in a busy digital environment. The flutter of unopened emails can indicate lost possibilities. Congratulations on moving toward improving your email management if you're among the millions of users who have resorted to Zoho Mail, which is renowned for its feature-rich functionality and intuitive design. But...
Published on May 13, 2024

An organized email ecosystem is your haven of productivity in a busy digital environment. The flutter of unopened emails can indicate lost possibilities. Congratulations on moving toward improving your email management if you’re among the millions of users who have resorted to Zoho Mail, which is renowned for its feature-rich functionality and intuitive design.
But the power of an email platform is enhanced when it’s easily incorporated into your main workhorse, the iPhone.
The ability to read emails while on the road is not only convenient for freelancers, entrepreneurs, and small business owners; it is essential. You can simplify your interactions with digital mail by using Zoho Mail’s features that Zoho Mail offers. In this guide you will learn that how you can add zoho mail to iphone.
Setting up Zoho Mail Account in Iphone: Step-by-step
For iPhone users, Zoho Mail includes a dedicated iOS app. It is easy to use and quite effective. In adding zoho mail to iphone, it also synchronizes your calendar and contacts without messing with the built-in calendar and contacts on the device.
Install the app by downloading it from the App Store.
- Verify that your account has IMAP Access enabled. (Sign in with Zoho Mail.)
- Configuration >> Mail Accounts >> POP/IMAP and email forwarding >> Turn on IMAP
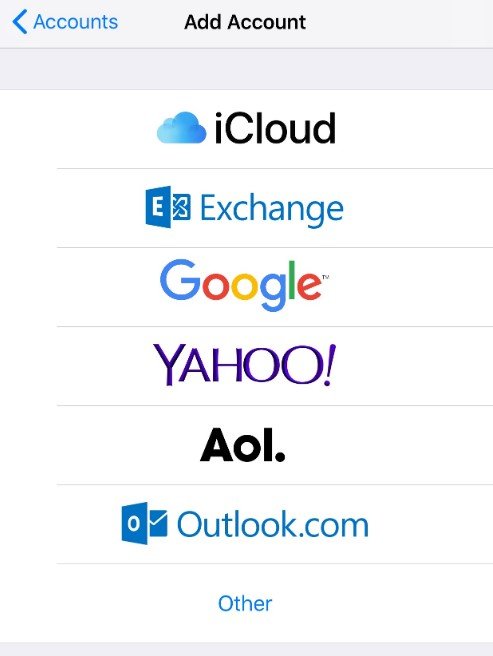
- Press Settings >> Accounts and Passwords >> on your iPhone. Select Other when adding an account. Create a Mail Account.
4.Verify that your account has IMAP Access enabled. (Sign in with Zoho Mail.) Configuration >> Mail Accounts >> POP/IMAP and email forwarding >> Turn on IMAP
5. Press Settings >> Accounts and Passwords >> on your iPhone. Select Other when adding an account. Create a Mail Account.

6.Make sure that IMAP is chosen as the account type at the top of the screen that appears. For information on how to set up your account as POP on your iPhone, click this link.
7.Enter the information below in the “Incoming Mail Server” column.
- Name of the host: imap.zoho.com
- Username: Your email address on Zoho
- The password for your account is this. If you have activated Two Factor Authentication for your account, you might need an Application Specific password to set up your account on other devices.

- After making a connection to the IMAP server, the device verifies the credentials you gave it. Your mobile device creates an IMAP account if authentication is successful.
Utilize the Zoho Mail Web Interface to select the appropriate IMAP Expunge Options.
Common issues Users Face
Emails coming in are not synchronized:
- If you’re having trouble connecting to imap.zoho.com, look at the Incoming Server’s Advanced options—touch Settings on your iPhone, then Accounts and Passwords.
- Press the account.
Select Advanced after swiping down.
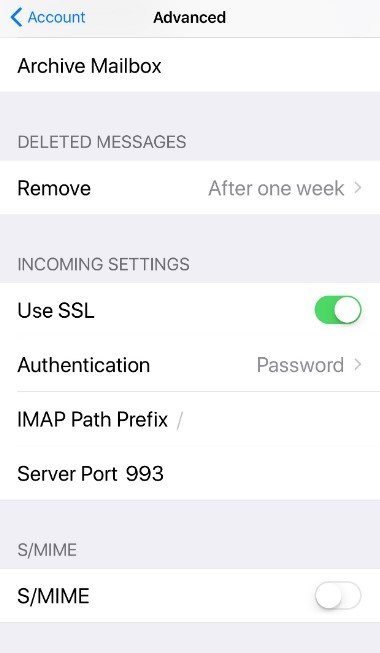
- Verify that port 993 is used and that Use SSL is enabled.
Sending emails out:
Error Message: Refusing to Relay
- Settings on iPhone >> Passwords and Accounts >> Choose the configured account.
- Verify that the email address you supplied is correct.
The supplied email address must be the primary email address or an email alias associated with the account being set up.
Not able to send message due to an error. Smtp.zoho.com cannot be reached.
- Accounts and Passwords >> Settings on iPhone Pick the configured account.
- To view the details of the SSL and port, scroll down and choose “SMTP”.
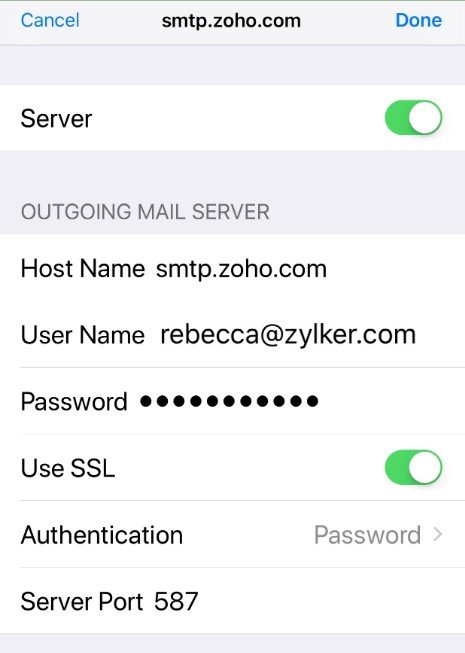
- Make sure that the SMTP port is set to 465 and that Use SSL is enabled.
Enabling IMAP Access in Zoho
- Access Zoho Mail by logging in.
- Navigate to Settings. Select the principal email address from the Mail accounts listing by going to Mail Accounts.
- Check the IMAP Access checkbox under the IMAP section.
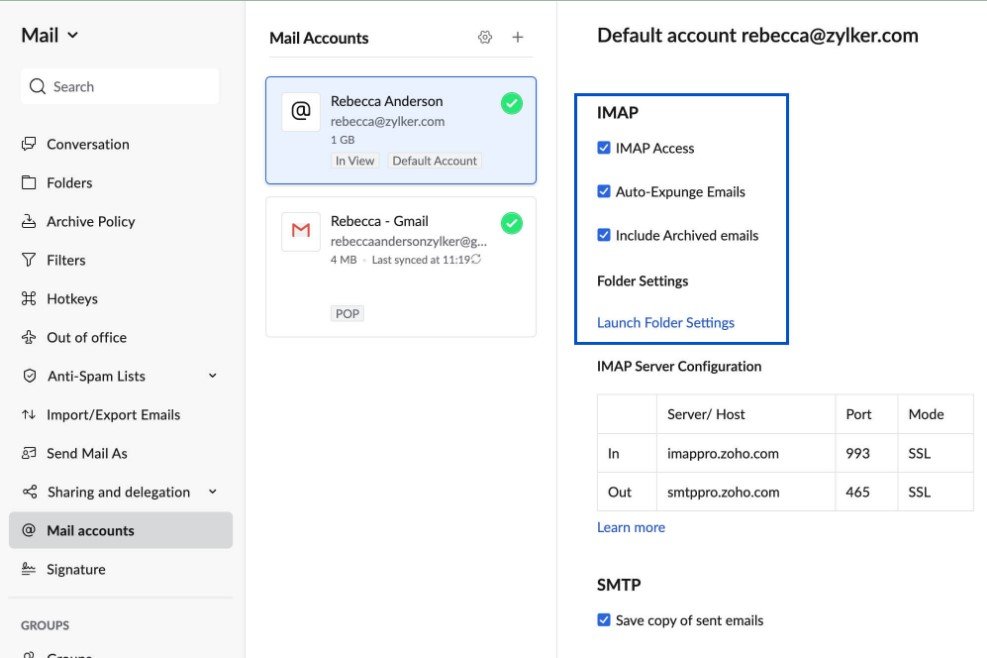
- Additionally, you have the option to set up Folder Settings, Include Archived emails, and activate Auto-Expunge.
- After swiping down, select “Save”.
Folder View Settings for IMAP
- Access Zoho Mail by logging in.
- Navigate to Settings. Select the principal email address from the Mail accounts listing by going to Mail Accounts.
- Click Launch folder settings under the IMAP section.

4.Choose whatever folders in the IMAP clients you wish to view.
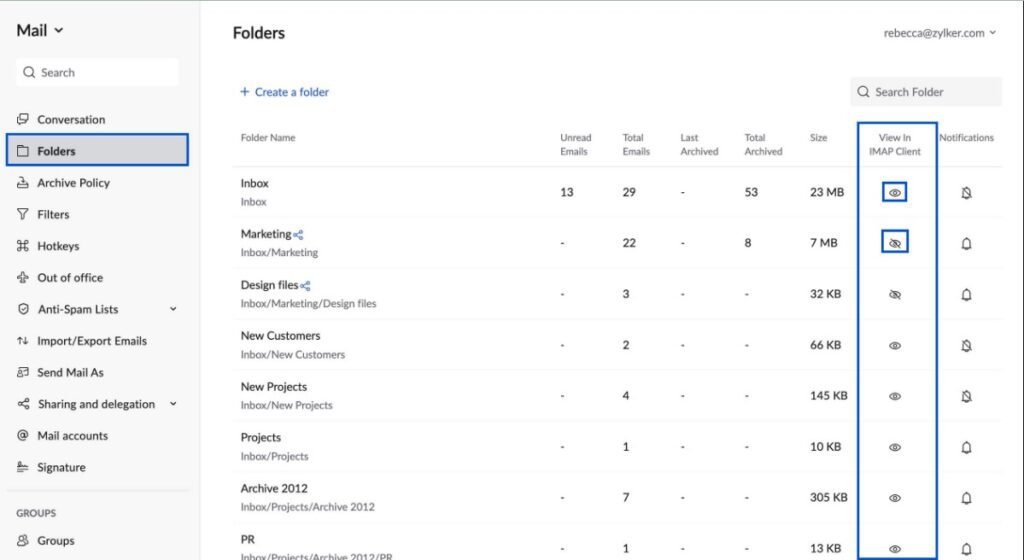
Pay Attention
| ● The IMAP clients you use will only be able to access the folders you designate here.
● IMAP clients on desktop computers and mobile devices allow you to browse shared folders. ● The Zoho Mail Read and Write Folder Sharing features are supported by the Thunderbird Client. Find out more. |
Instructions on accessing the Mail settings within the iPhone’s Settings app
The server details to set up Zoho Mail as IMAP in Apple Devices iPhone or iPad are:
Incoming Server Details in Setting
Host: imap.zoho.com
Port: 993
SSL: On
Outgoing Server Details in Setting
Host: smtp.zoho.com
Port: 465
SSL: On
Zoho Mail as POP account
The server details to set up Zoho Mail as POP in Apple Devices iPhone/ iPad are:
Incoming Server Settings (Personal Users)
For Personal Users with email address as username@zoho.com
Incoming Server Name: pop.zoho.com
Port: 995
Require SSL: Yes
Username: username@zoho.com
Incoming Server Settings (Org Users)
For Organization Users with domain-based email address you@yourdomain.com
Incoming Server Name: poppro.zoho.com
Port: 995
Require SSL: Yes
Username: you@yourdomain.com
Outgoing Server Settings:
Outgoing Server Name: smtp.zoho.com
Port: 465, SSL or
Port: 587, TLS
Require Authentication: Yes
Tips for managing notifications for incoming Zoho Mail messages on the iPhone
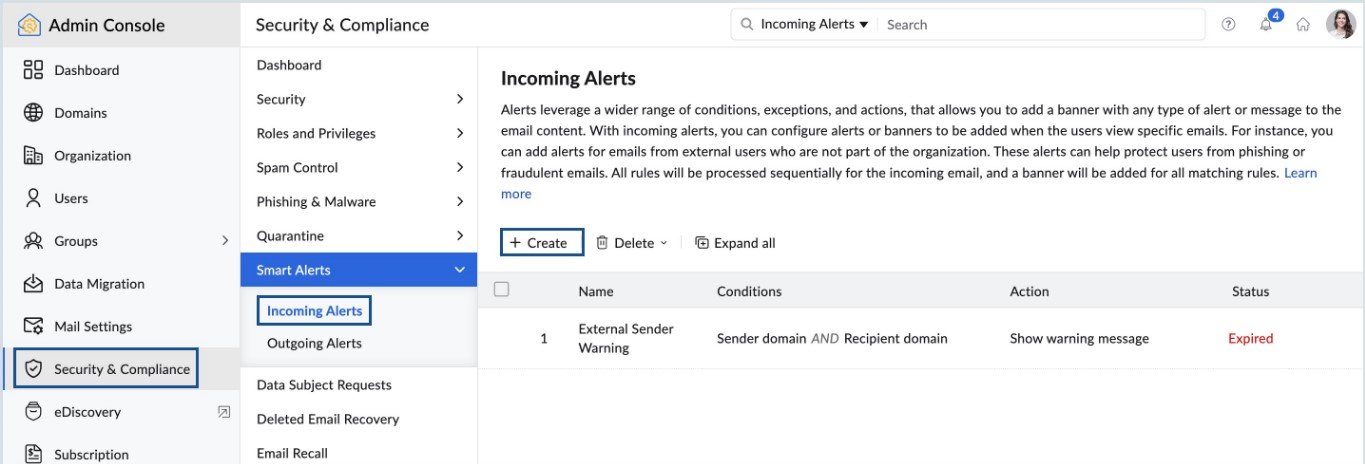
- To create a new Incoming Alert, take the following actions:
- Go to the left pane of the Zoho Mail Admin Console and click Security & Compliance.
- Go to Smart Alerts, then click on Incoming Alerts.
- If any alerts are already in place, click Create Now or choose the Create option from the top menu.
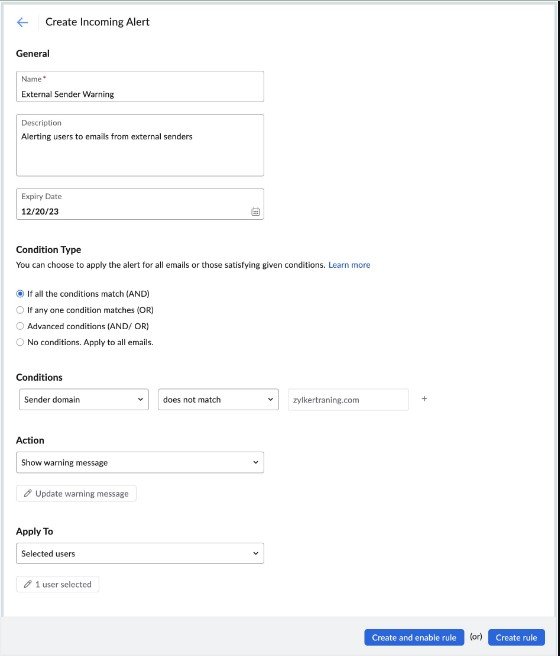
5.Give the alert a name and, if desired, a description.
6.If necessary, include an expiration date.
7.Choose the Condition Type based on your needs:
- AND – The desired action will only be carried out if the incoming emails meet your specified requirements.
- OR – The desired action will be carried out even if one of the conditions you specified is met by the incoming emails.
- Advanced: You can combine both AND and OR condition types into a single condition for the desired action.
- No Conditions: If selected, the preferred action will be followed on all emails you receive.
8.Choose an Action, an Operating parameter, and one or more Conditions.
9.From the Apply To drop-down menu, choose the users you wish to apply the alert to.
- All Users: Every user in your company will receive the notice.
- All users except selected users will be subject to the alert except those who have been added to the list.
- Chosen people: The alert will be sent to the group you have added.
10.Select the appropriate option to include or exclude users and click the Select Users button.
11.Click Proceed after selecting the users you wish to add to the list. Selecting the Delete icon adjacent to a user allows you to eliminate them from the list as well.
12.Review your alert.
Conclusion:
In conclusion, Zoho Mail for iPhone integration provides a smooth email management solution. This is especially important for professionals, independent contractors, and business owners who depend on continuous communication. With the ability to access emails, calendars, and contacts from anywhere, the comprehensive Zoho Mail iPhone setup instructions guarantee a seamless experience and boost productivity.
The article addresses typical problems, including sending errors and synchronization issues, and provides troubleshooting solutions. It emphasizes checking server settings and turning on IMAP access inside Zoho Mail. It also emphasizes how important it is to efficiently manage notifications by letting users tailor alerts according to particular standards.
By utilizing Zoho Mail’s extensive capabilities in the iOS app and optimizing settings for optimal performance, users can optimize their email experience and achieve maximum productivity.
With Zoho Mail’s seamless connection with the iPhone, staying connected in today’s fast-paced digital world is made easy and dependable, whether for monitoring notifications or remotely accessing emails.
FAQs
1.How do I add Zoho Mail to my iPhone?
To add Zoho Mail to your iPhone, go to Settings > Passwords & Accounts > Add Account > Other > Add Mail Account. Enter your Zoho Mail credentials and follow the prompts to complete setup.
2.Do I need a Zoho Mail account to set it up on my iPhone?
Yes, you need a Zoho Mail account to set it up on your iPhone.
3.Is Zoho Mail compatible with all versions of the iPhone?
Zoho Mail is compatible with all versions of the iPhone that support email functionality.
4.What information do I need to set up Zoho Mail on my iPhone?
You need your Zoho Mail email address, password, and the incoming and outgoing mail server settings provided by Zoho.
5.Can I set up Zoho Mail as my default email on iPhone?
Yes, you can set up Zoho Mail as your default email on iPhone through the Settings app.
6.Are there any specific settings I need to configure for Zoho Mail on iPhone?
Configure IMAP settings for incoming mail and SMTP settings for outgoing mail. Ensure SSL is enabled for secure communication.
7.What are the incoming and outgoing mail server settings for Zoho Mail on iPhone?
Incoming mail server (IMAP): imap.zoho.com, Outgoing mail server (SMTP): smtp.zoho.com.
8.Do I need to enable IMAP/POP access in my Zoho Mail settings?
Yes, you need to enable IMAP access in your Zoho Mail settings to set it up on iPhone.
9.How do I troubleshoot common issues when setting up Zoho Mail on iPhone?
Troubleshoot common issues by ensuring correct server settings, verifying internet connectivity, and checking for any app or system updates.
10.Can I sync my Zoho Mail contacts and calendar with my iPhone?
Yes, you can sync Zoho Mail contacts and calendar with your iPhone by adding your Zoho account in Settings > Passwords & Accounts > Add Account > Other.
11.Will setting up Zoho Mail on iPhone affect my existing email accounts or data?
Setting up Zoho Mail on iPhone will not affect your existing email accounts or data.
12.How do I ensure security when using Zoho Mail on iPhone?
Ensure security by enabling two-factor authentication, using a strong password, and keeping your iPhone software up to date.
13.Can I access all features of Zoho Mail on my iPhone, such as folders and filters?
Yes, you can access all features of Zoho Mail on your iPhone, including folders and filters.
14.Are there any limitations or restrictions when using Zoho Mail on iPhone?
There may be limitations or restrictions based on your Zoho Mail plan, such as storage limits or feature availability.
15.Can I use Zoho Mail app instead of the native Mail app on iPhone?
Yes, you can use the Zoho Mail app instead of the native Mail app on iPhone for a more customized email experience.


