
Optimize Access Control: A Guide to Zoho Projects Delete Permissions
This article offers expert guidance on Zoho Projects delete permissions for improved access control and collaboration.
Published on November 10, 2023

Who is this feature for?
- Project Managers & Administrators
- Team Leads & Zoho Project Users
- Business Owners & Decision-Makers
What progress will you accomplish?
- Effective permissions management and minimized data risks
- Efficient project collaboration and optimized project management
- Empowered decision-making and enhanced user role awareness
Introduction
Managing delete permissions is a critical aspect of maintaining a well-organized and efficient project management system in Zoho Projects.
This guide explores the key functionalities related to deleting elements like task layout fields, issue layouts, comments, custom views, and project baselines within the platform.
By understanding these processes and permissions, project administrators and team members can optimize their project management experience.
Task Layout Fields in Zoho Projects
Task layout fields are integral in Zoho Projects, a potent project management and collaboration tool. They crucially structure and organize project information, simplifying effective tasks and project management.
Users customize task layouts to match business needs, ensuring that the project management process aligns seamlessly with their workflow.
Creating Task Layout Fields
To create task layout fields in Zoho Projects, log into your Zoho Projects account and select the Customization option from the Setup, navigate to Layouts and Fields and choose Tasks.
Next, create a new layout by clicking on the Create Layout button located in the upper-right corner. Please note that this option is available for Premium and Enterprise plan users.
Select a base layout to build your new layout on. If you haven’t created any layouts before, the system will display the default layout as an option. Provide a name for your new layout to differentiate it from the default layout.

Finally, click the Create button after filling in the required details to successfully create your custom task layout.
Add fields to your layout by dragging and dropping, customize properties, and click on Add to Layout. Save the layout by clicking Save Layout.
Modifying Task Layout Fields
To edit a layout, begin by accessing the Layouts and Fields section by navigating to Customization > Layouts and Fields > Tasks.

Next, select the layout you wish to modify. Click on it to access the layout editor.
To edit fields within the layout, simply hover over the field you want to change and click the edit icon (pencil icon). This allows you to make necessary adjustments to the field’s properties and field’s permissions.
After making the desired modifications, be sure to click Save Layout to save your changes effectively.
Deleting Task Layout Fields
Deleting task layout fields in Zoho Projects is a privilege typically reserved for users with specific access rights.
To delete a task layout field, start by accessing the Layouts and Fields section. You can do this by navigating to Customization > Layouts and Fields > Tasks.

To delete a layout, hover over the specific layout you intend to remove, and then click on the trash icon associated with it.
After clicking the trash icon, a confirmation prompt will appear. Confirm your intention to delete the layout. It’s important to note that there may be restrictions if the layout has existing project associations.

Task Layout Field Permissions in Zoho Projects
Users can duplicate existing layouts and designate them as private layouts. A private layout is exclusively accessible to users affiliated with the respective projects.
If a layout is classified as private, any associated task automation components such as Blueprints, Workflow Rules, Custom Functions, etc., will likewise be restricted to access by users whose projects are linked with the private layout.
From the Task Layout list view, users can convert an existing layout into a private one by adding a project to it.
To convert a private layout to a public, hover over a layout from the list view. Navigate to the private layouts section located at the end of the list. Click the ‘+’ icon next to the layout.
Confirm the action by clicking Convert to Public on the confirmation message. Afterward, select a project and click Next.
The layout is now accessible to all project users as it has been made public.
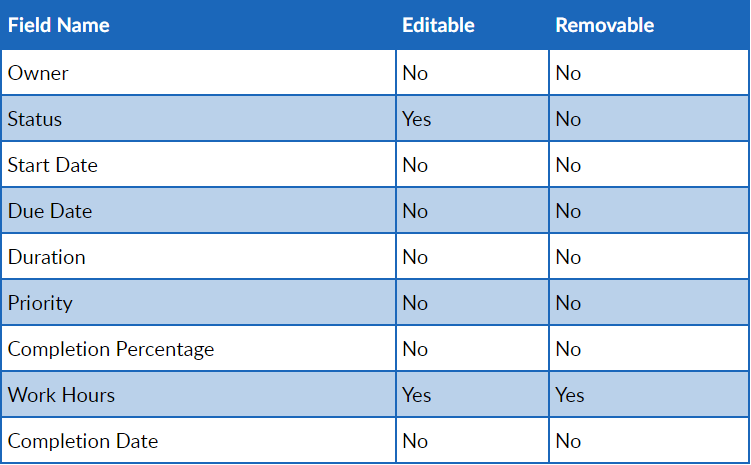
A default task layout field cannot be altered or deleted from a layout; it can only be reordered. Detailed permissions for default task layout fields are elucidated in the accompanying diagram.
You can exercise additional control over permissions for specific layouts by making adjustments. Begin by selecting a layout, then click Edit for the particular field you want to modify.
Next, click on Edit Permissions. From this point, you have the flexibility to modify permissions for Manager, Employee, Contractor, and any other custom roles.

It’s important to note that permissions for Admin and Client cannot be altered. After making the necessary changes to permissions, click Save.
Once all the fields within the layout have been modified as needed, remember to click Save Layout to preserve the updated permissions for that specific layout.
Issue Layout Fields in Zoho Projects
Issue Layouts and Fields in Zoho Projects allow for the customization and organization of issue-related information within the platform.
Issue Layouts serve as forms where users can input details relevant to issues, providing a structured approach to capturing issue-related information. Users can create unique layouts based on their specific business requirements.
Creating an Issue Layout
To access the Layouts and Fields section in Zoho Projects, log in and click Customization from the Setup, then select Issues.

To create a new issue layout, click Create Layout in the upper-right corner. Choose a base layout if needed and provide a unique name.
Click Create to generate your custom issue layout, personalize it, and then save it by clicking Save Layout.
Associating a Project with an Issue Layout
To access the Layouts and Fields section for issues, go to Customization > Layouts and Fields > Issues.
To associate a project with a layout, click the plus icon (+) located to the right of the selected layout. Then, select one or more projects from the drop-down menu to link them with the layout.
Confirm your action by clicking Associate. Keep in mind that this will overwrite the current layout mapping for the project if there is one.
Deleting an Issue Layout
To view the layout, navigate to the Layouts and Fields section by clicking on Customization from the Setup. Then, go to Layouts and Fields and choose Issues. Here, you’ll find a list of created issue layouts.

For editing a layout, simply select the layout you wish to modify, make the required changes, and then click on Save Layout to save the updated layout.
Hover over the layout you wish to remove, and then click the trash icon. Confirm your action to delete the layout.
User Permission for Deleting Issue Layout Fields
In Zoho Projects, the ability to delete issue layout fields is typically available to users with specific access privileges. These privileges are often associated with administrative roles or higher-level permissions.
Users with the appropriate permissions can perform the task of deleting issue layout fields within the platform. Typically, administrators or project owners are authorized to delete task layout and issue layout fields.
Comments in Zoho Projects
Managing comments in a collaborative project environment is essential for fostering clear communication, documenting decisions, and facilitating effective teamwork, ensuring that project stakeholders stay aligned and informed throughout the project lifecycle.
Deleting Comments by Other Users
Deleting comments by other users in Zoho Projects requires permission. Only the author of the comment and the project administrator can delete a comment.
To delete a comment, navigate to the task where the comment is located, and look for the delete option next to it.
Click on Delete to remove your comment. Administrators follow the same steps to delete a comment.
A confirmation prompt may appear to ensure you want to delete the comment. Confirm your action if prompted.
Task and Bug Custom Views in Zoho Projects
In Zoho Projects, you can create and customize your views for tasks and bugs, allowing you to filter and organize them based on specific criteria.
These custom views provide flexibility and convenience in managing your project data.
Creating Custom Views
To create custom views in Zoho Projects, begin by clicking on Projects in the left navigation panel within Zoho Projects.

Once in the Projects section, locate and click on the Project View drop-down menu. In the project view drop-down, select + Create Custom View to start creating your custom view.

Next, you’ll need to define the criteria for your custom view. Click on the ‘+’ icon to add a criteria, and use the ‘X’ icon to delete criteria as needed.
You can use operators like AND and OR to combine criteria as per your requirements. AND ensures all criteria are met, while OR allows for an either-or condition.
Enter a name for your custom view in the Custom View Name field. Optionally, provide a description and enable the custom view column if necessary.

Select the accessibility settings based on your preferences. You can choose to share the custom view with select users, and all users, or keep it for personal use.
After configuring the criteria, details, and accessibility, click Save to create your custom view.
Now, you have successfully created a custom view in Zoho Projects, allowing you to filter and organize project data based on specific criteria.
Deleting Task and Bug Custom Views
To begin, navigate to the relevant project or module where the custom view you want to delete is located. Locate the specific custom view that you wish to delete.
For project-based custom views, hover over the custom view’s name and click on the delete icon.
For global custom views, click on the views drop-down, hover over the custom view you want to delete, and then click the delete icon.
Users and Roles with Deletion Permissions
Project administrators and owners have the authority to delete custom views within the projects they manage. Furthermore, global administrators who oversee the entire Zoho Projects account can delete global custom views that apply to all projects.
By following these steps, you can efficiently manage your custom views by removing those that are no longer needed in your project or across multiple projects.
Project Baseline in Zoho Projects
A project baseline is a snapshot of your project’s initial schedule and plan. It provides a benchmark against which you can measure progress and deviations, helping you identify delays, evaluate performance, and plan future work effectively.
Project baselines are accessible in the Enterprise plan. Users with “Edit – All” permission for tasks can view, create, and edit a project baseline.
Deleting Project Baseline
The first step is to access the Gantt chart. Navigate to the project where you want to edit or delete a baseline. Select Gantt & Reports from the project menu. Choose Gantt Chat and then Milestone Gantt.

Now, to edit a baseline, click the pencil icon located in the upper right corner of the Gantt chart. Hover over the baseline you wish to edit and click on it. Enter a new name for the baseline. Click Save to save the changes.
To delete a baseline, hover over the baseline you want to delete. Click the trash icon to delete the base. Confirm your action when prompted. Note: Deleting a baseline will remove it for all users.
By following these steps, you can effectively manage project baselines in Zoho Projects, making informed decisions based on the original project plan and tracking deviations for better project management.
What Pain Points Does It Solve?
Managing delete permissions in Zoho Projects addresses several pain points commonly faced by users in project management and collaboration:
- Organizational Efficiency: It helps manage layouts, fields, custom views, and baselines efficiently for streamlined workflows.
- Customization Needs: Users can create, modify, and delete customized elements for project adaptability.
- Data Clarity: It organizes data for clear communication, reducing misunderstandings.
- Efficient Collaboration: Insights into managing comments effectively create a focused discussion environment.
- Project Tracking: Solutions for custom views assist in tracking project progress.
- Baseline Management: It explains how to edit or delete project baselines for better project management.
This guide empowers Zoho Projects users for improved project control, collaboration, and informed decisions.
Conclusion
Understanding and effectively utilizing delete permissions in Zoho Projects is crucial for maintaining a well-organized and efficient project management environment.
These permissions empower users to manage project data, layouts, custom views, and baselines with precision, contributing to better collaboration and project success.


