A Comprehensive Guide to Building an Automated Sourcing Pipeline inside Zoho Recruit
This guide is designed to help you optimize your candidate sourcing strategies and stay ahead of the competition. You will gain a deep understanding of how to effectively use Zoho Recruit’s features to build a robust talent pipeline.
Published on February 23, 2024
This guide is designed to help you optimize your candidate sourcing strategies and stay ahead of the competition. You will gain a deep understanding of how to effectively use Zoho Recruit’s features to build a robust talent pipeline.
By implementing an automated sourcing pipeline, you will enhance your recruitment efficiency and improve the overall candidate experience. Revolutionize your recruitment efforts and discover a world of possibilities in finding the perfect candidates for your organization.
Creating a Job Opening Integrated with a Pre-screening Assessment
The traditional method of sifting through numerous resumes and conducting multiple rounds of interviews can be time-consuming and inefficient. Many companies are turning to applicant tracking systems (ATS) like Zoho Recruit to streamline the hiring process and identify the most qualified candidates.
Zoho Recruit offers a wide range of features to simplify and enhance the recruitment process, including the ability to create job postings with pre-screening assessments. This article will explore how to leverage this powerful feature to attract top talent and make informed hiring decisions.
You can follow the below steps to create a job opening in Zoho Recruit.
Log in to your Zoho Recruit account and click on the Job Openings tab in the navigation menu. Then click on the Create Job Openings button or “+” button near Import.

Fill in the job posting details, such as the job title, department, location, and description. Specify the desired skills, qualifications, and experience for the position.
Furthermore, set the visibility of the job posting (public or private) and specify the application deadline and Save the job posting.
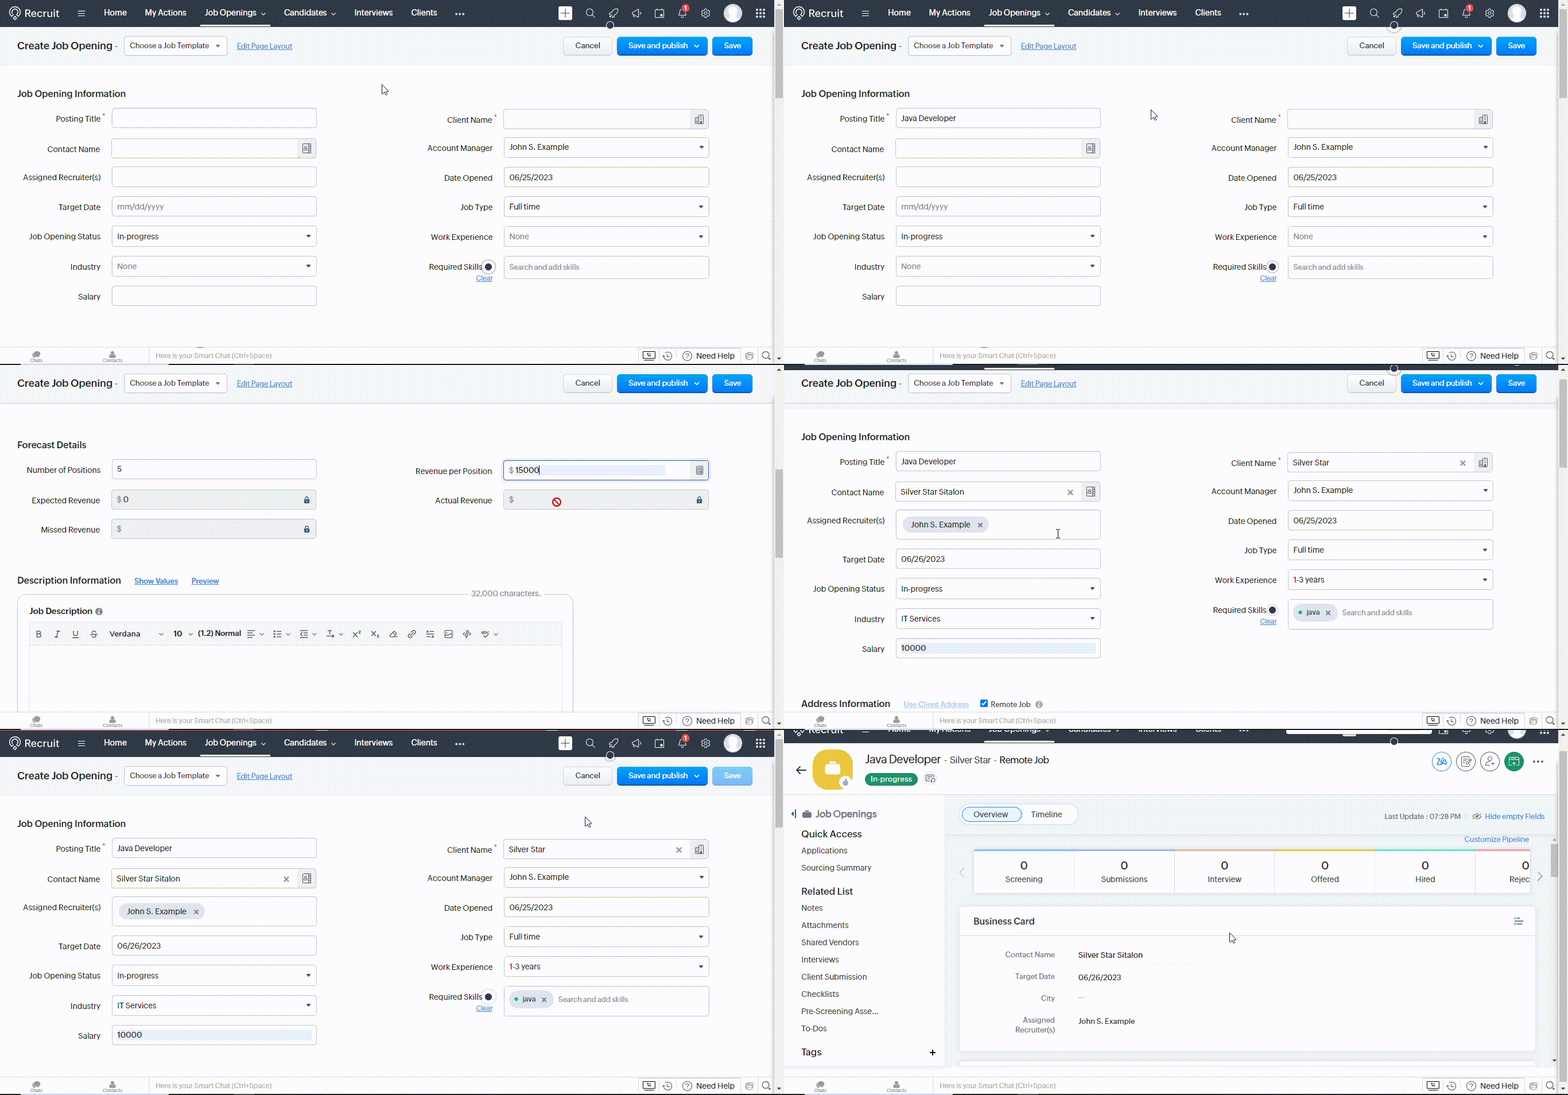
And to create a pre-screening assessment for your job opening, follow the below steps.
Click on Other Modules in the navigation menu and click on Assessments. Click on the “+” button (Create Assessment) on the top right to create a new assessment.
Select Candidate Assessment for screening candidates by associating with a job post while sharing via email.
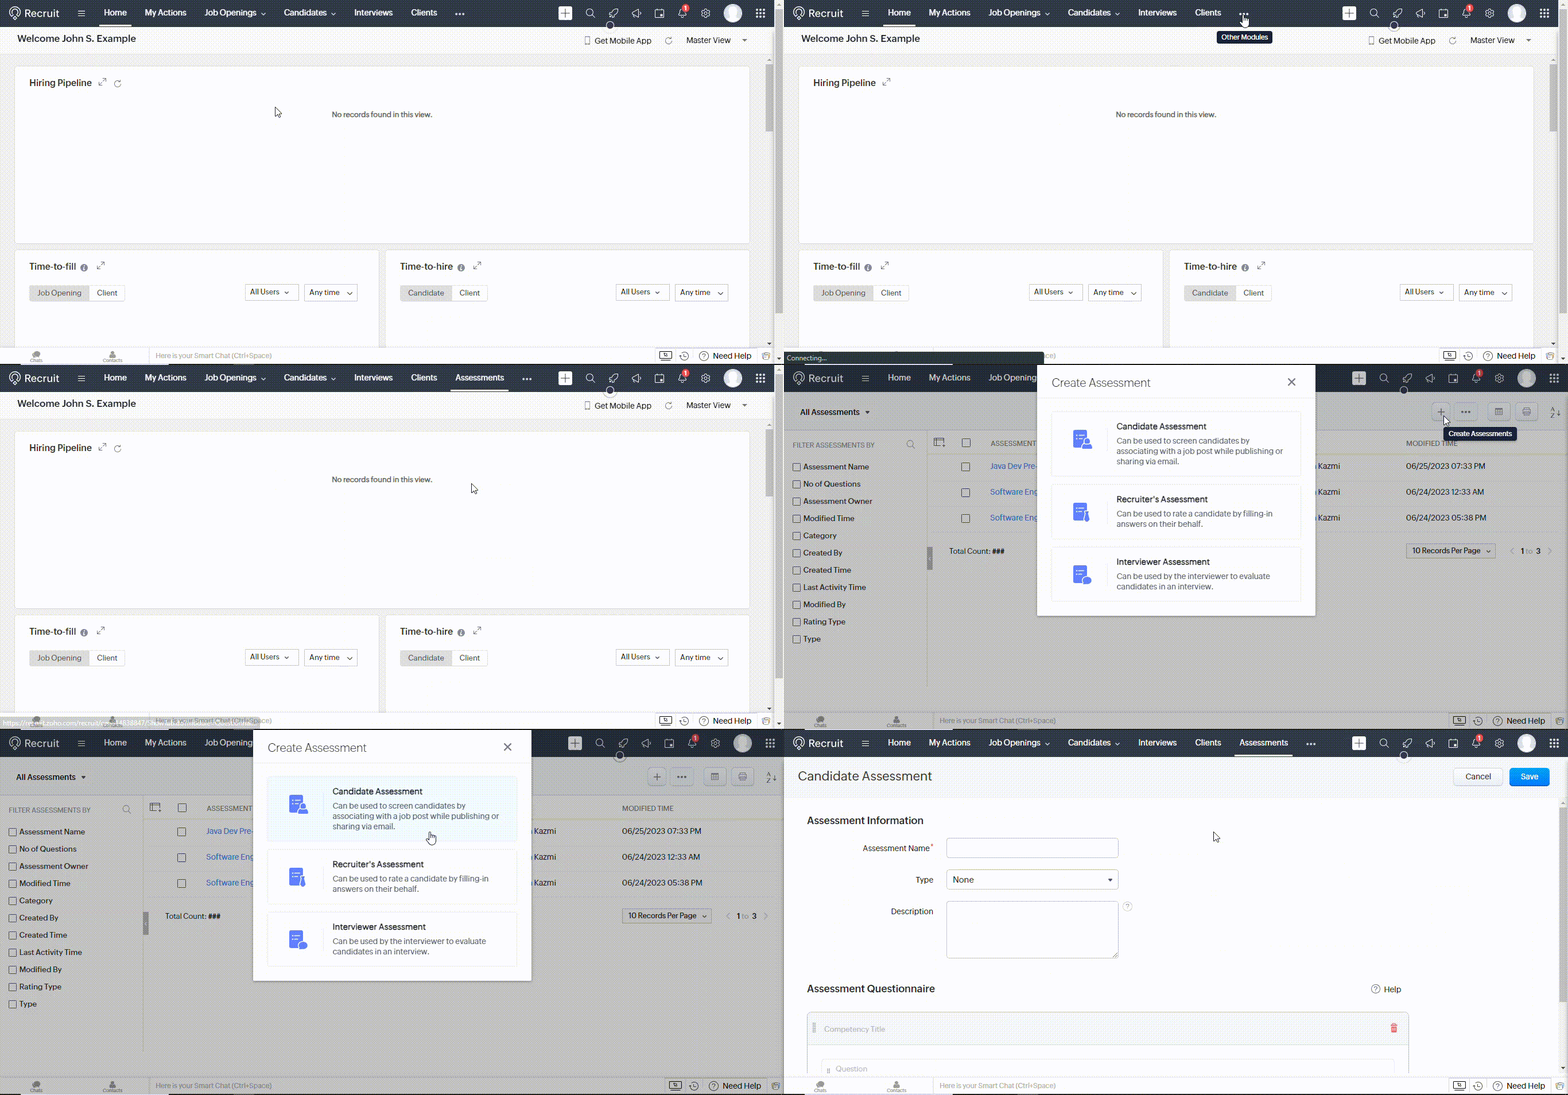
Give your assessment a name, type, and description. Enter the question and specify the possible answer choices or expected response.
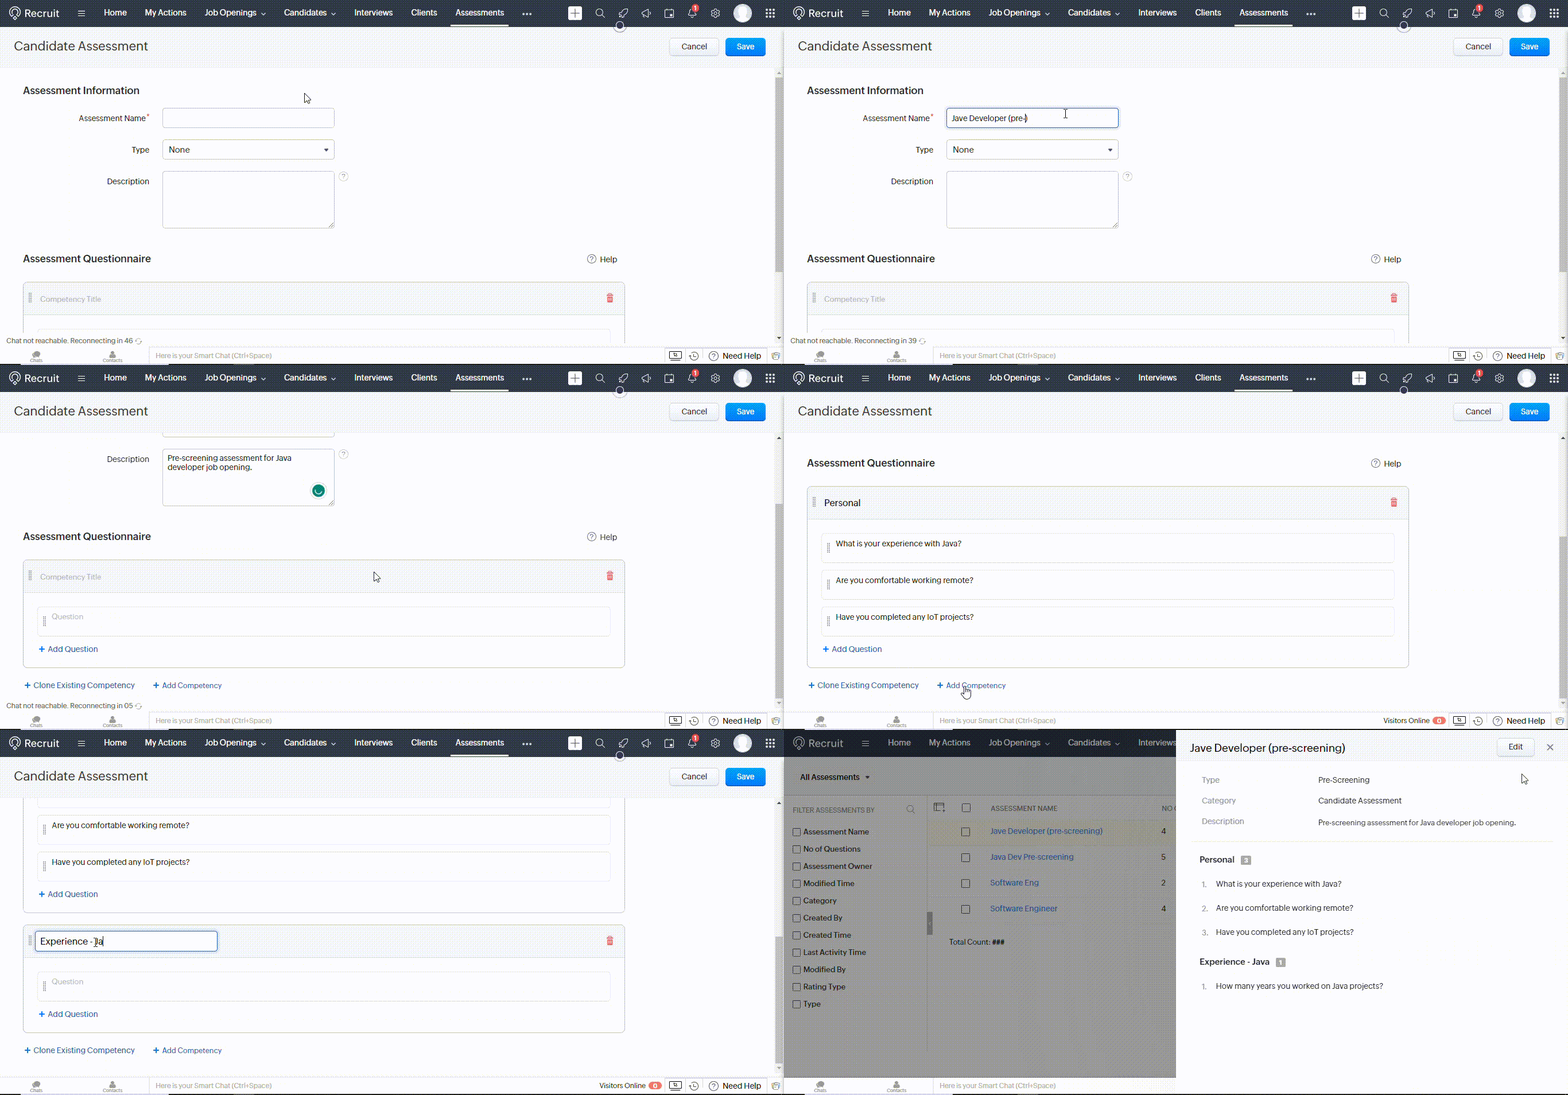
You can add multiple question types to create a comprehensive assessment.
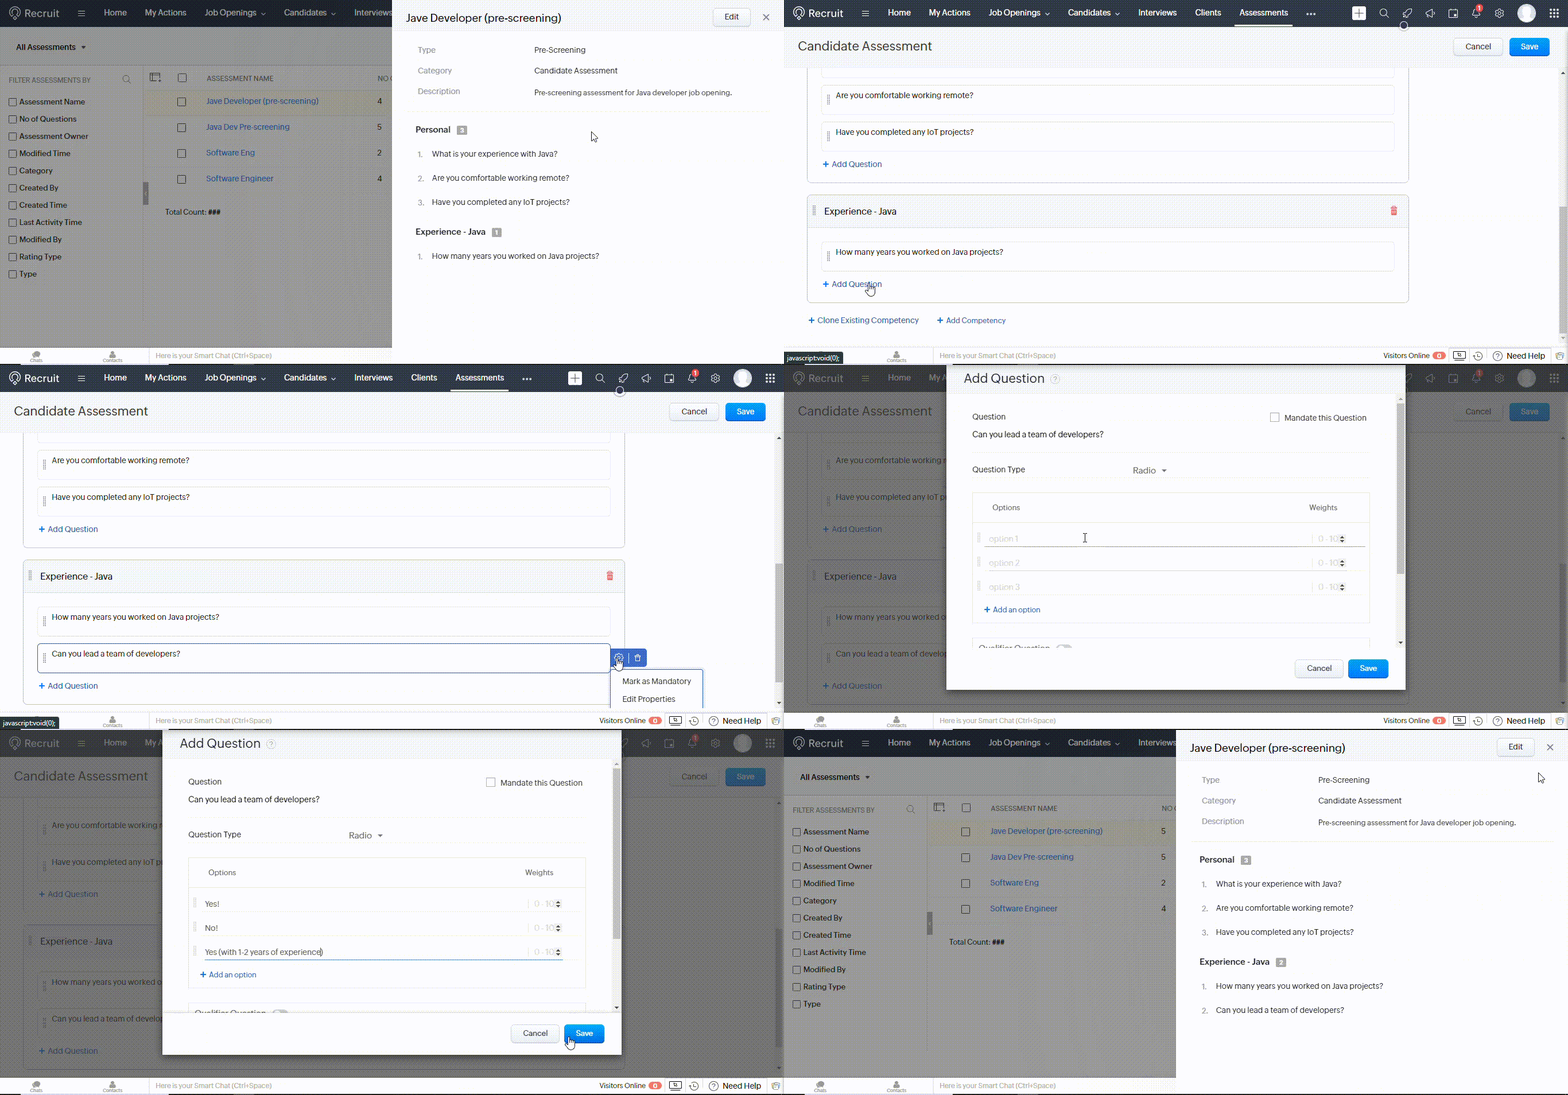
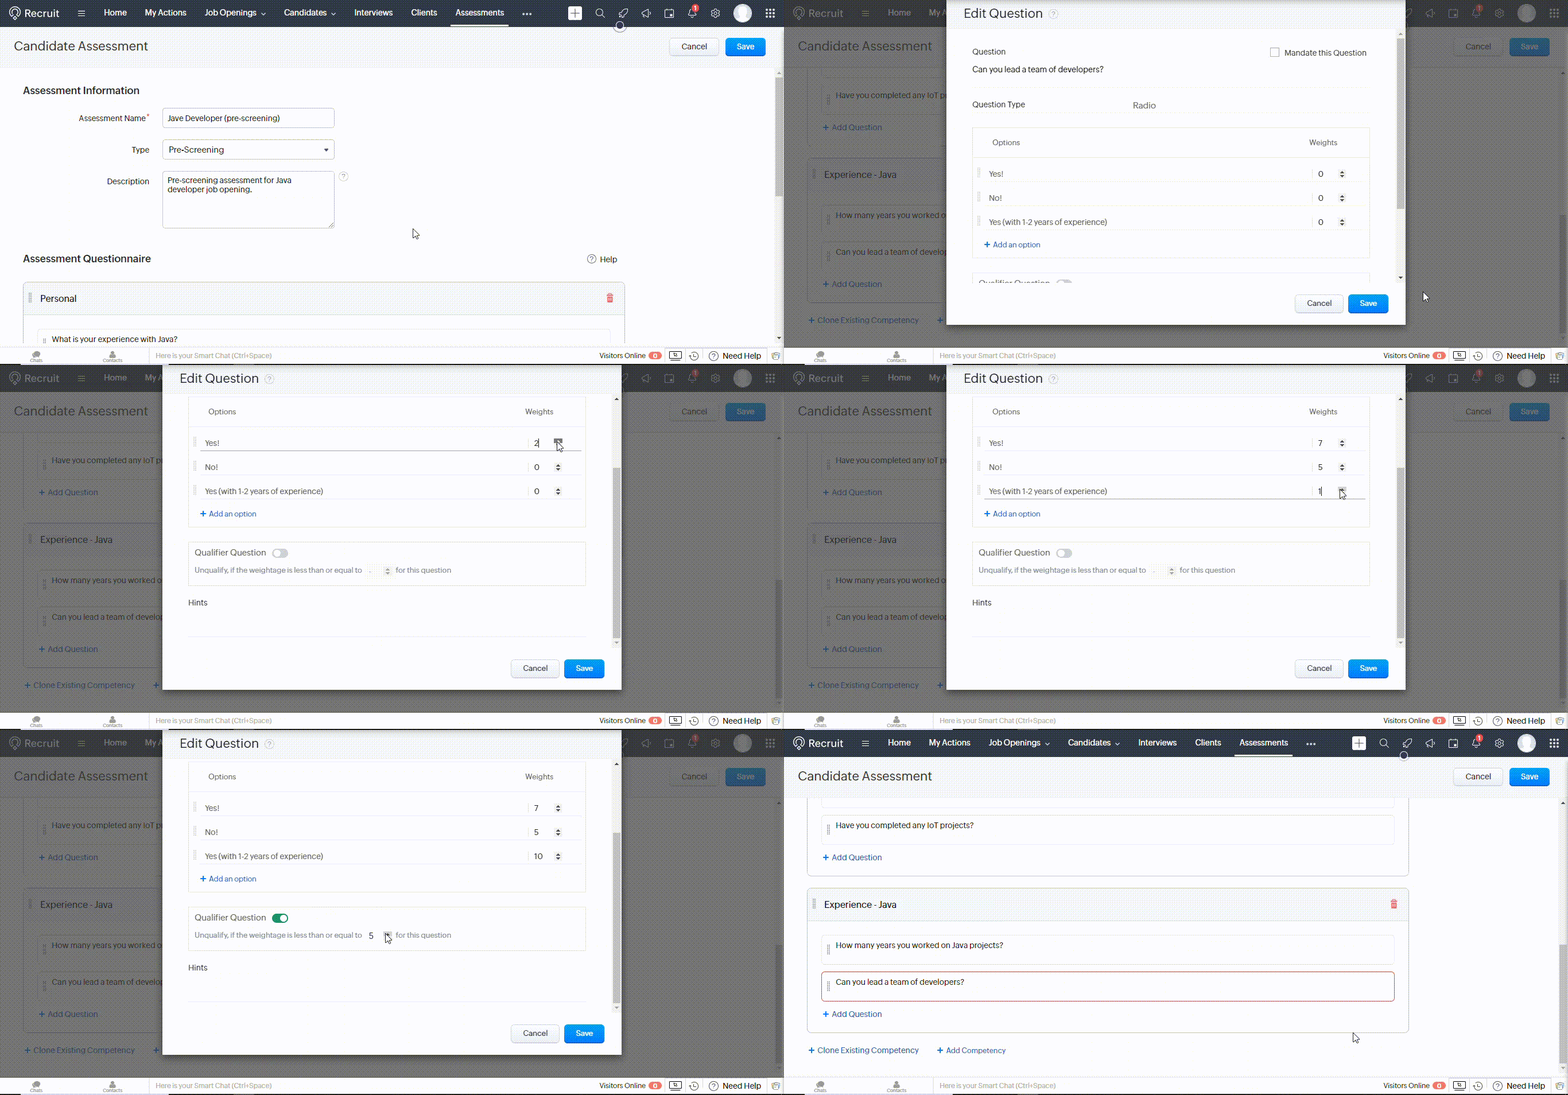
You can also edit the properties of each question and give weight to values to calculate the overall score for the candidate, and this score will later determine whether a particular candidate is fit for the job or not.
Near the right side of any question, click on Edit Properties and set the weight of different values.
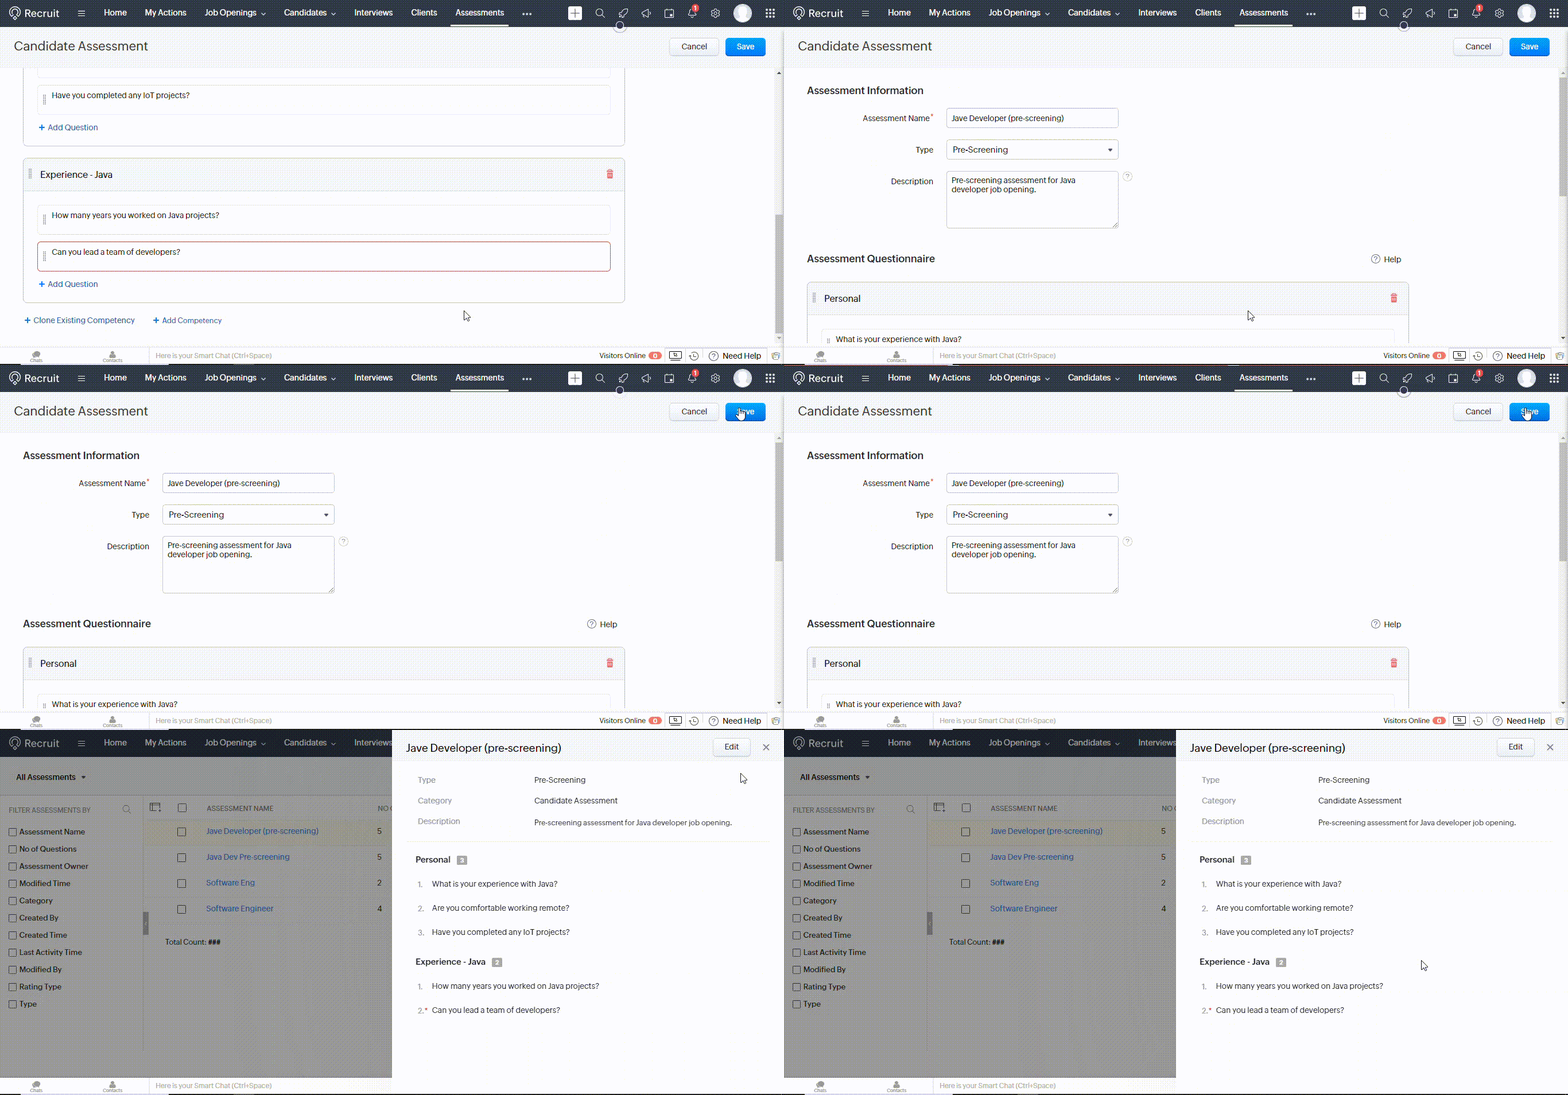
After personalizing the custom assessment, click the Save button to complete creating the pre-screening assessment for your job opening.
To add a pre-screening assessment to your job posting in Zoho Recruit, follow these steps:
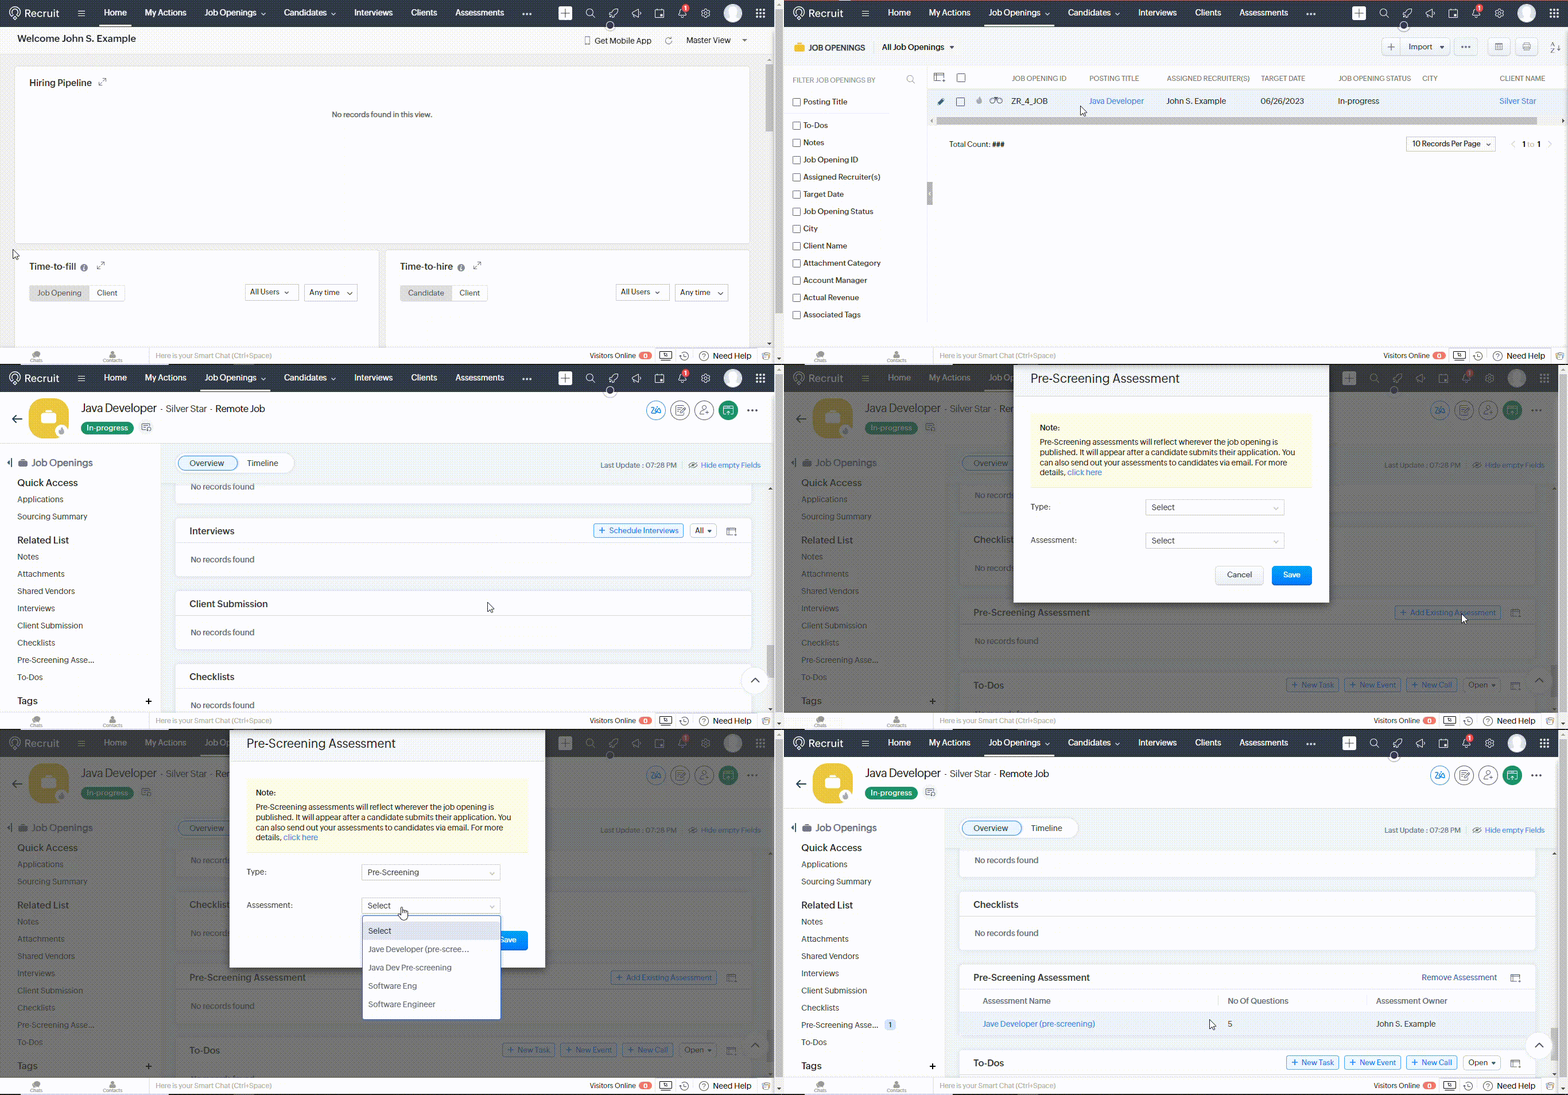
It’s time to add the pre-screening assessment you created to the job opening. You can follow the below steps to achieve this task.
Go to Job Openings and click on a job to which you want to add a pre-screen assessment. Under Pre-Screening Assessment, click on the Add Existing Assessment button. Select the Type and Assessment and click Save.
Integrating pre-screening assessments into your job postings offers several advantages:
-
Efficient Candidate Evaluation: Pre-screening assessments allow you to quickly assess candidates’ qualifications and skills, reducing the time spent on reviewing resumes and conducting initial interviews.
-
Objective Assessment: By utilizing standardized assessments, you can objectively evaluate candidates based on their responses to specific questions or scenarios, enabling fair comparisons between applicants.
-
Filter Unqualified Candidates: Pre-screening assessments act as a filter to eliminate candidates who do not meet the minimum requirements for the job, saving valuable time and effort.
-
Candidate Self-Selection: Candidates who complete pre-screening assessments can better understand the job requirements and self-assess their suitability for the position. This results in a higher likelihood of attracting genuinely interested and qualified candidates.
-
Streamlined Hiring Process: By identifying the most promising candidates through pre-screening assessments, you can focus your efforts on interviewing and evaluating a smaller, high-quality pool of applicants, expediting the hiring process.
To maximize the effectiveness of pre-screening assessments in Zoho Recruit, consider the following best practices:
-
Align Assessments with Job Requirements: Craft assessment questions that directly relate to the skills and qualifications necessary for the role. This ensures that candidates’ responses provide valuable insights into their suitability for the position.
-
Keep Assessments Concise: Long assessments may discourage candidates from completing them. Keep the number of questions reasonable, focusing on the most critical aspects of the job.
-
Provide Clear Instructions: Clearly explain the purpose of the assessment and any specific guidelines or time limits. This helps candidates understand expectations and provides all applicants with a fair and consistent experience.
-
Regularly Review and Update Assessments: Periodically review the effectiveness of your pre-screening assessments and make necessary updates based on feedback from hiring managers and the overall recruitment experience.
By incorporating assessments into your job postings, you can efficiently evaluate applicants, filter out unqualified candidates, and make data-driven hiring decisions. Take advantage of this feature to attract top talent and build a strong workforce for your organization.
Creating a Blueprint in Zoho Recruit
A blueprint in Zoho Recruit helps you execute a business process in a well-defined systematic manner. With a blueprint, you can define every stage in a process and associate people with each stage. You can guide your teams through the execution of the process.
You can mandate and validate important information contextually and automate routine actions. For example, a software house is recruiting programmers for a job, and the stages include advertisements, submission, analysis, interview, job offer, and selection.
In Zoho Recruit, you can simply automate this process by creating a blueprint.
Click on the Setup icon in the top right corner and select Blueprint under Automation. A new page will open, and click on the Create Blueprint button.
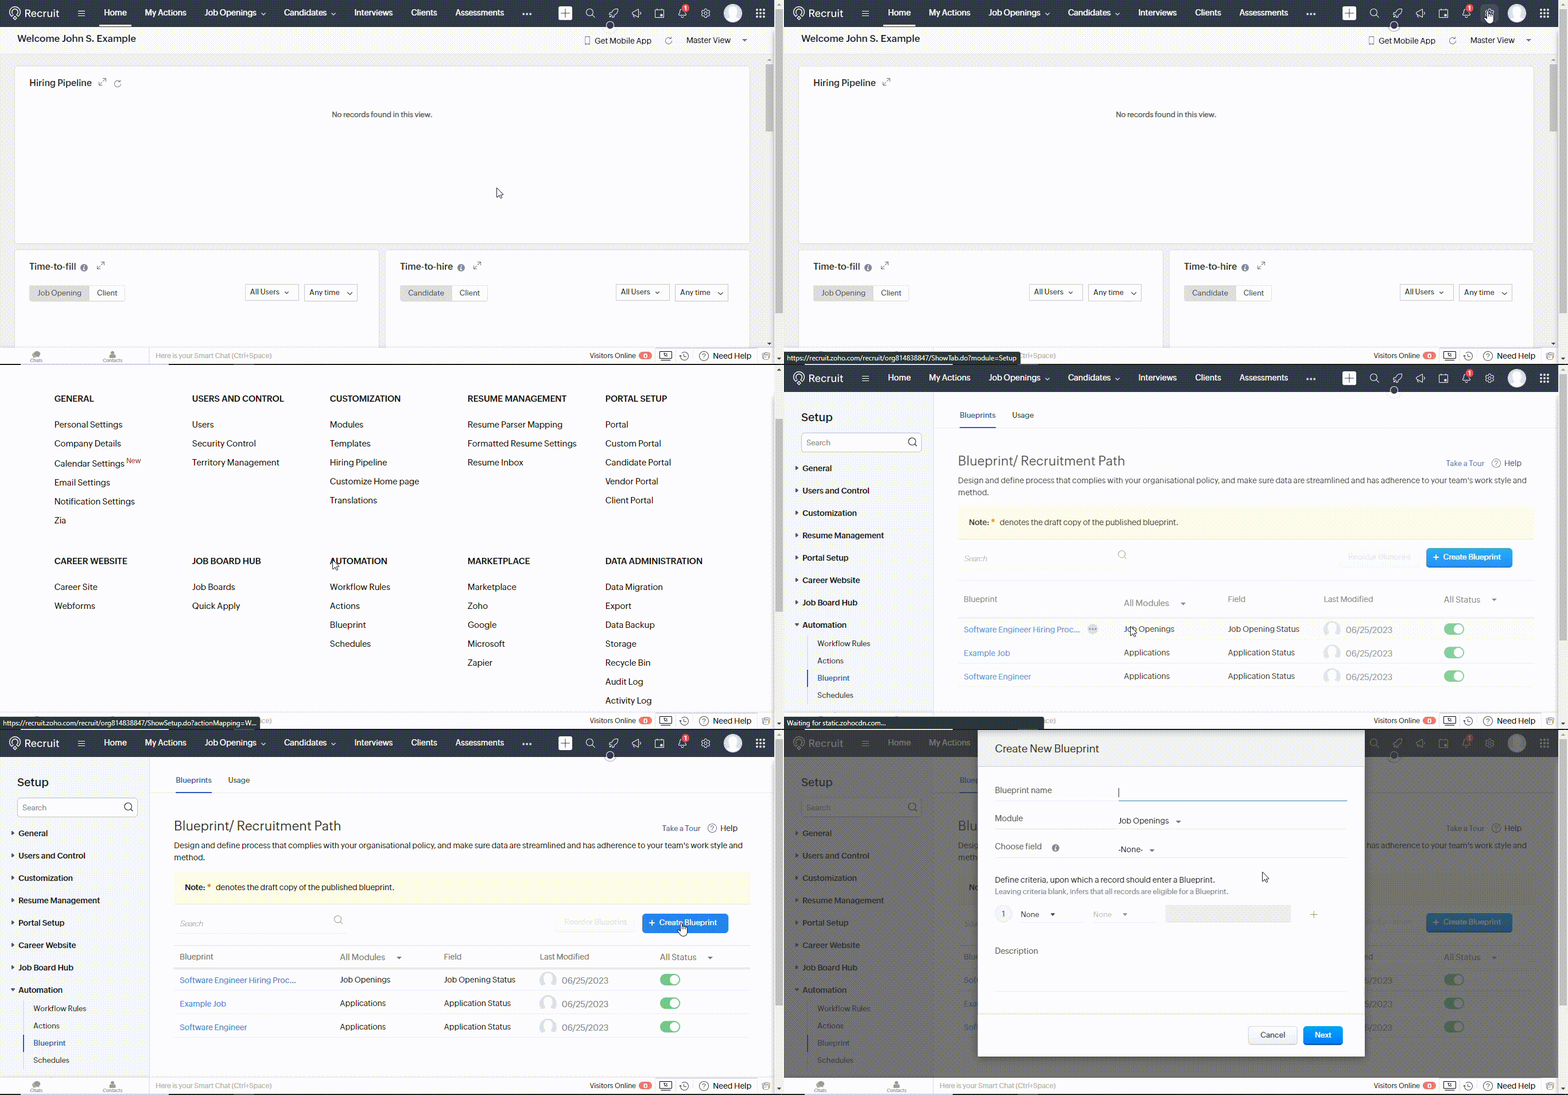
Enter the name of the blueprint, the module, the layout, the field, and the criteria. Let’s select the Job Opening module (we can select the Deals module, in case we are creating a blueprint for the deal follow-up process)
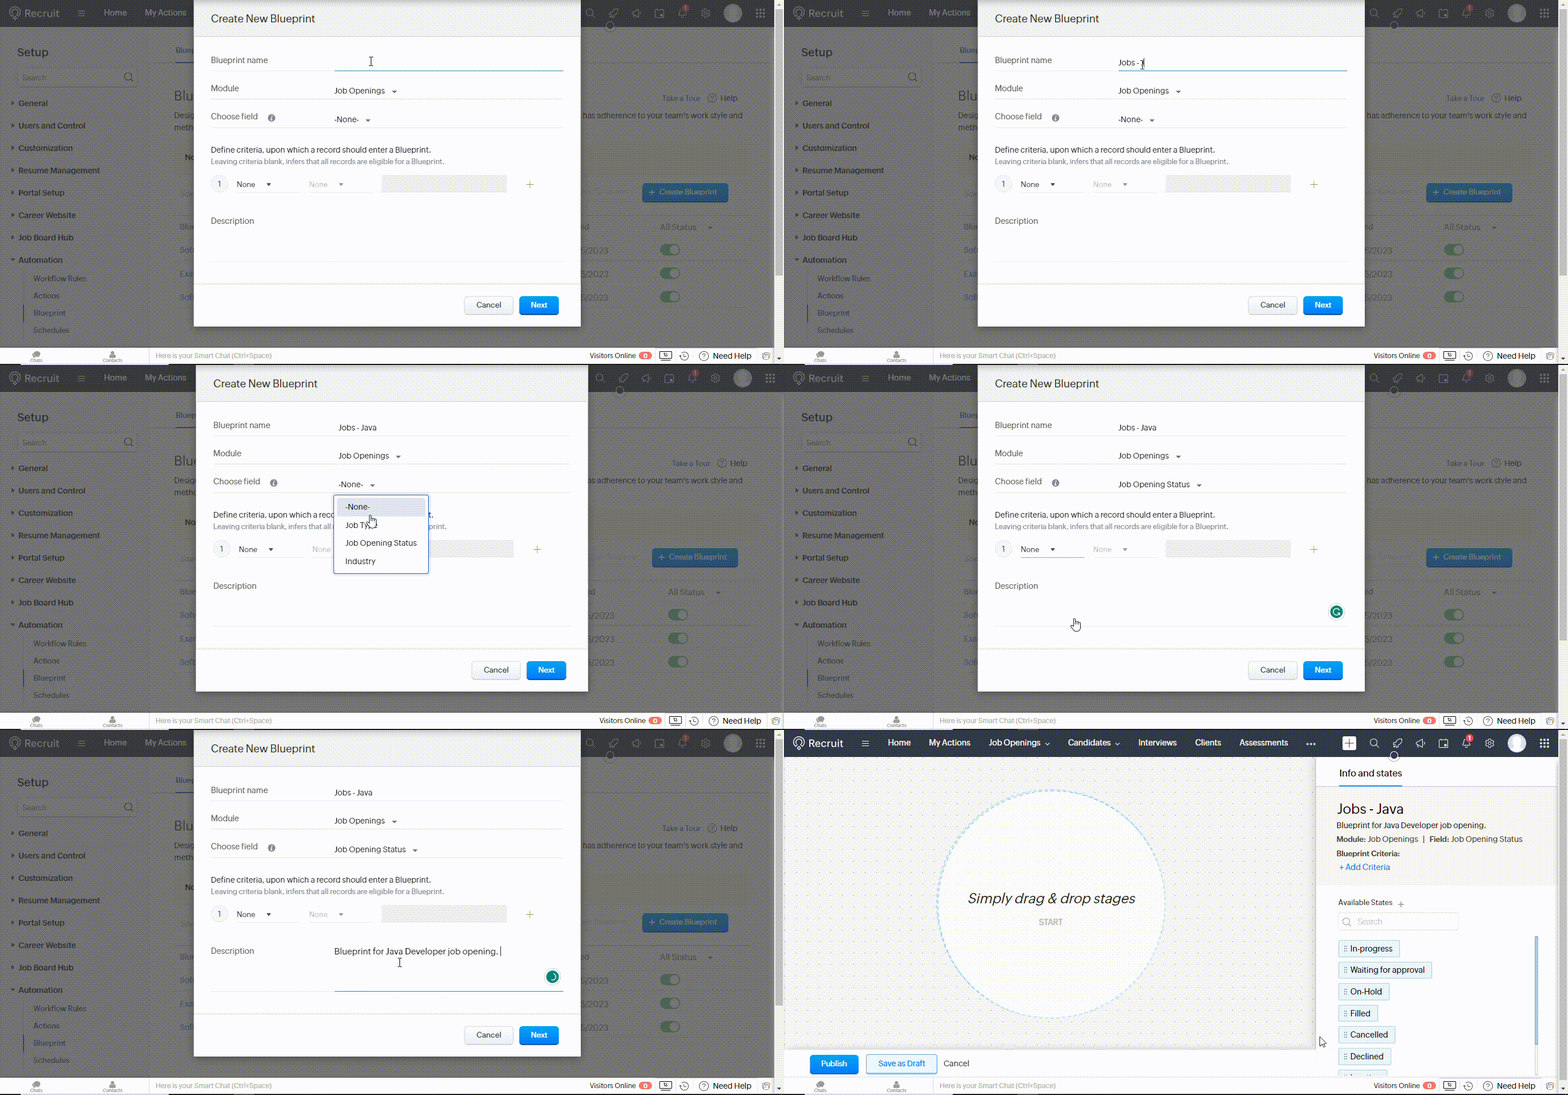
Afterward, you will enter a blueprint editor; remember the following points while creating a blueprint:
-
A blueprint is created using States and Transitions.
-
A State refers to each stage in your process.
The Transition defines the conditions to be met in order to move from one State to another. It forms a link between the two states.
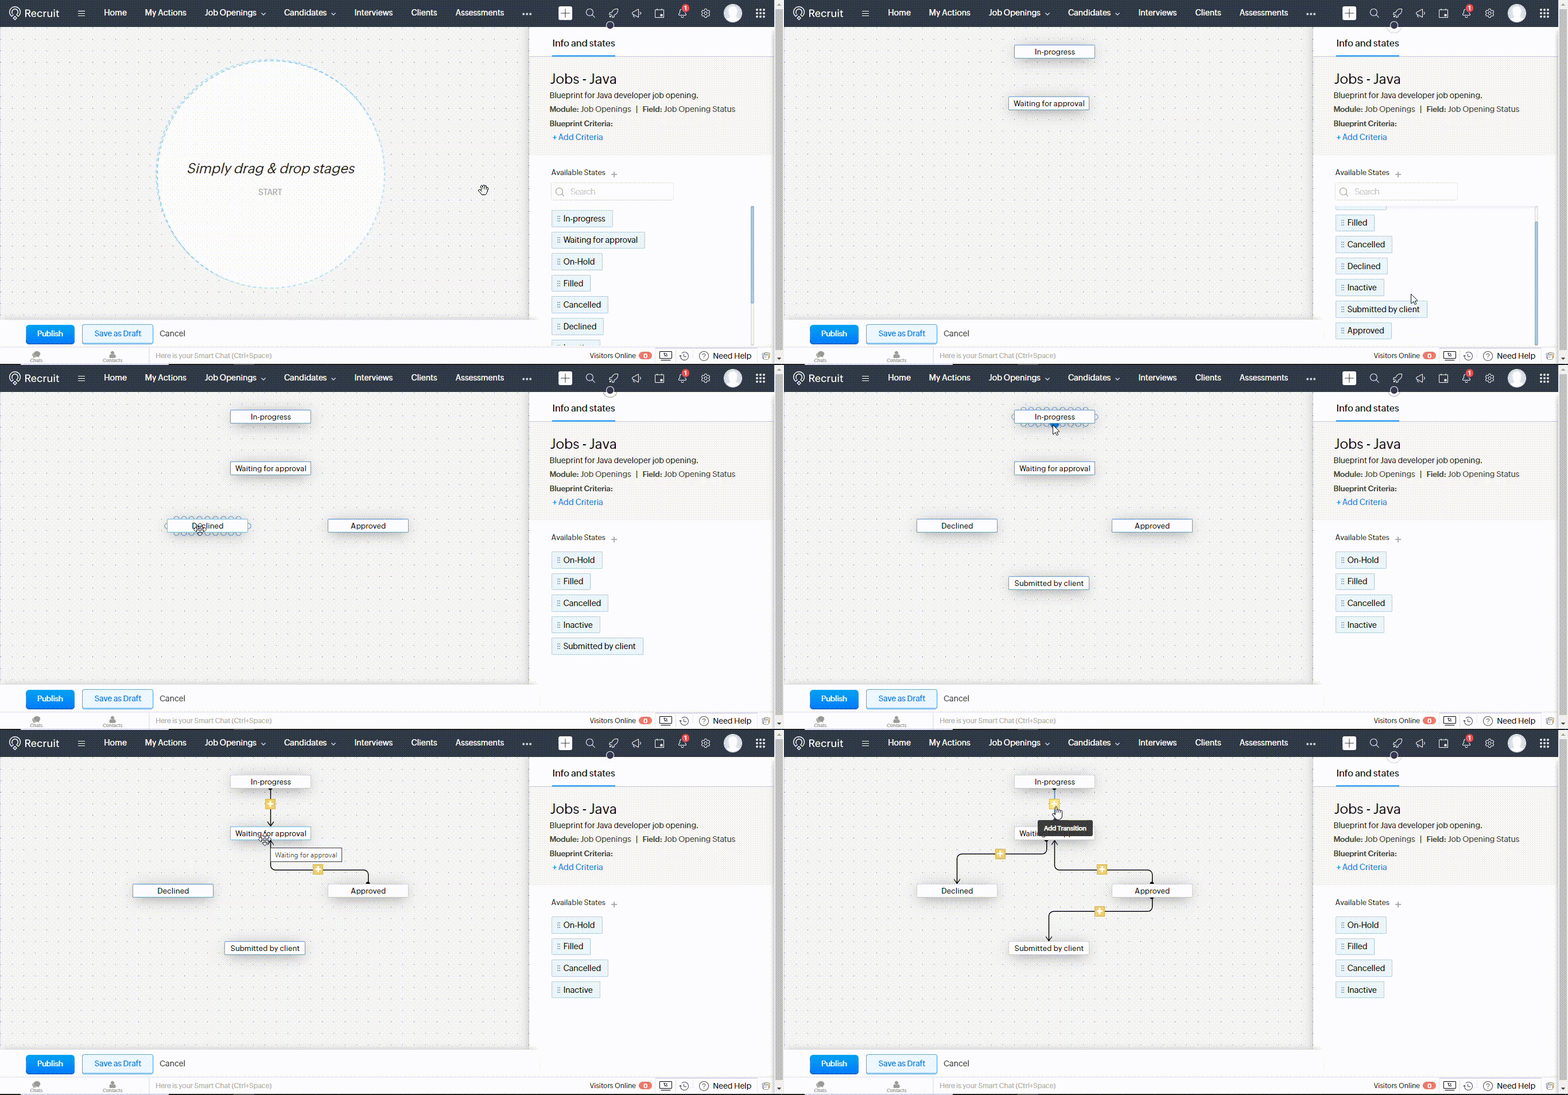
Select States from available states and connect the nodes between the states to define the process flow.
The “+” (plus) button is to Create a Transition. Transitions define the condition for a record to move from one state to another.
Each transition is divided into three sections.
-
Before Section: It defines who is responsible for executing this transition.
-
During Section: It’s the space where you guide your hiring employee on what is to be done at a particular stage and mandate the required information.
-
After Section: It’s the stage where you define the automated actions.
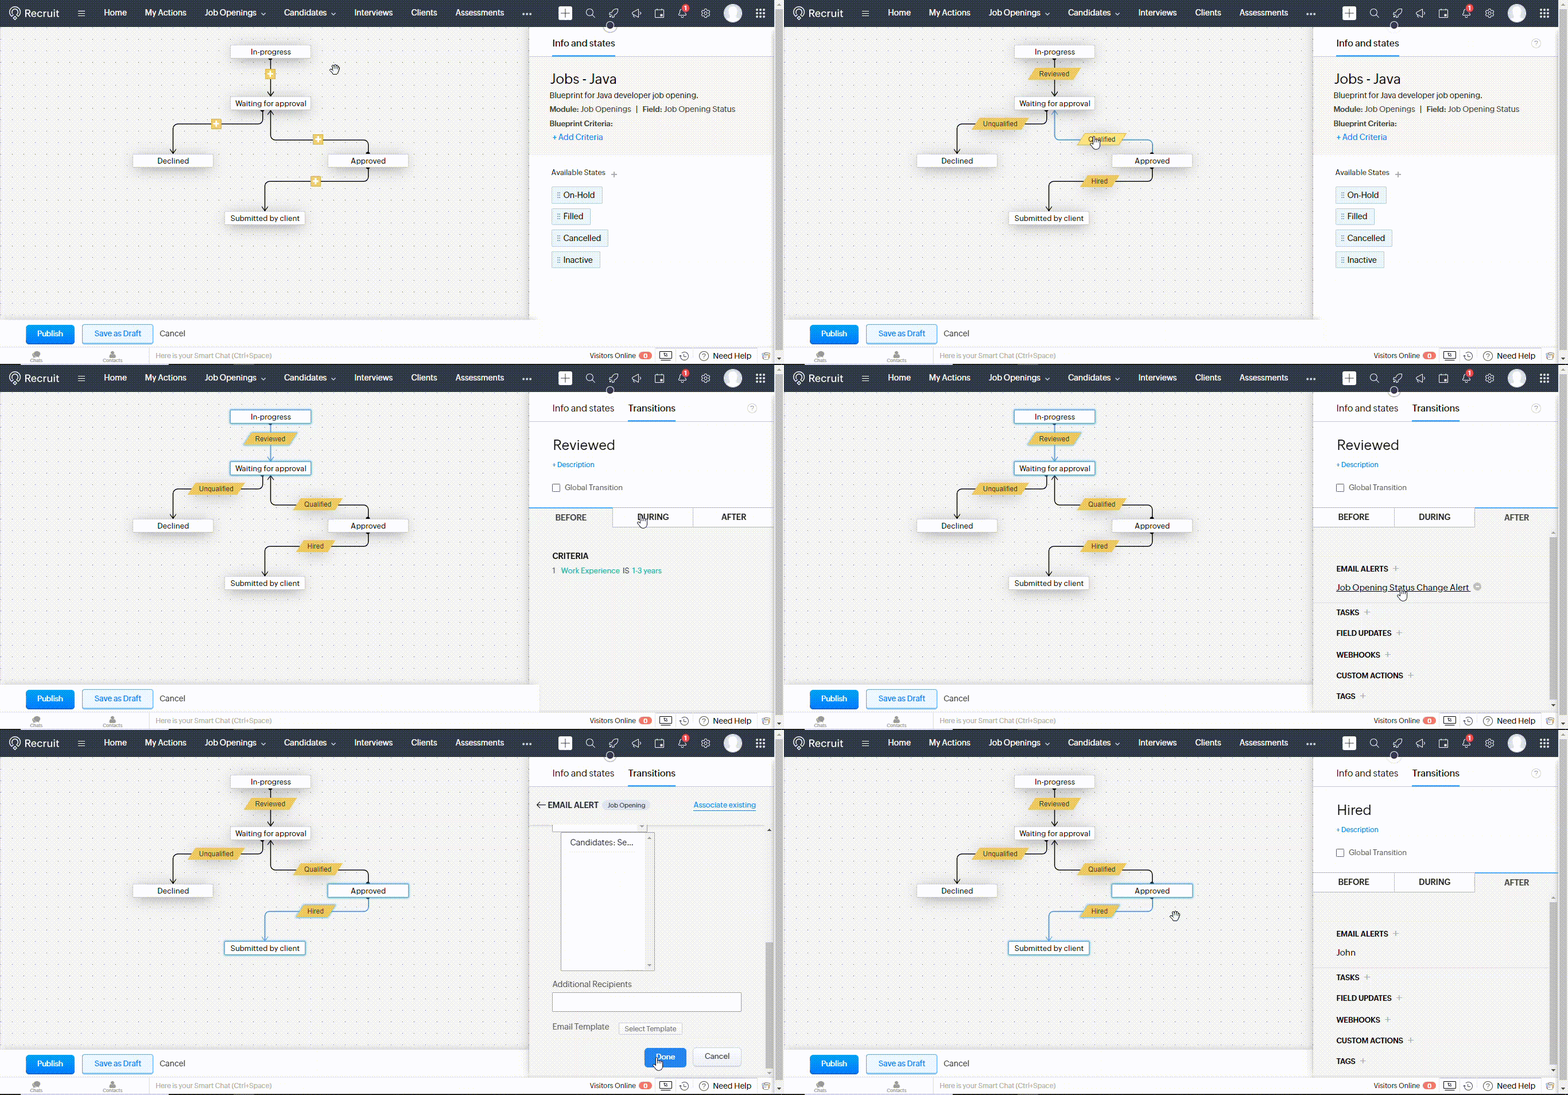
It’s important for your team to follow some tasks like Conditions, Validations, and Actions to move from one state to another.
If you look at the completed process, we have something like a break process if candidate qualification or any other criteria doesn’t meet. We want this transition at nearly every stage, as candidates can be eliminated at any stage.
For this purpose, we will make this transition a Common Transition. The transition will get linked to each stage by doing so, and it means the transition button will be available at all stages of the process.
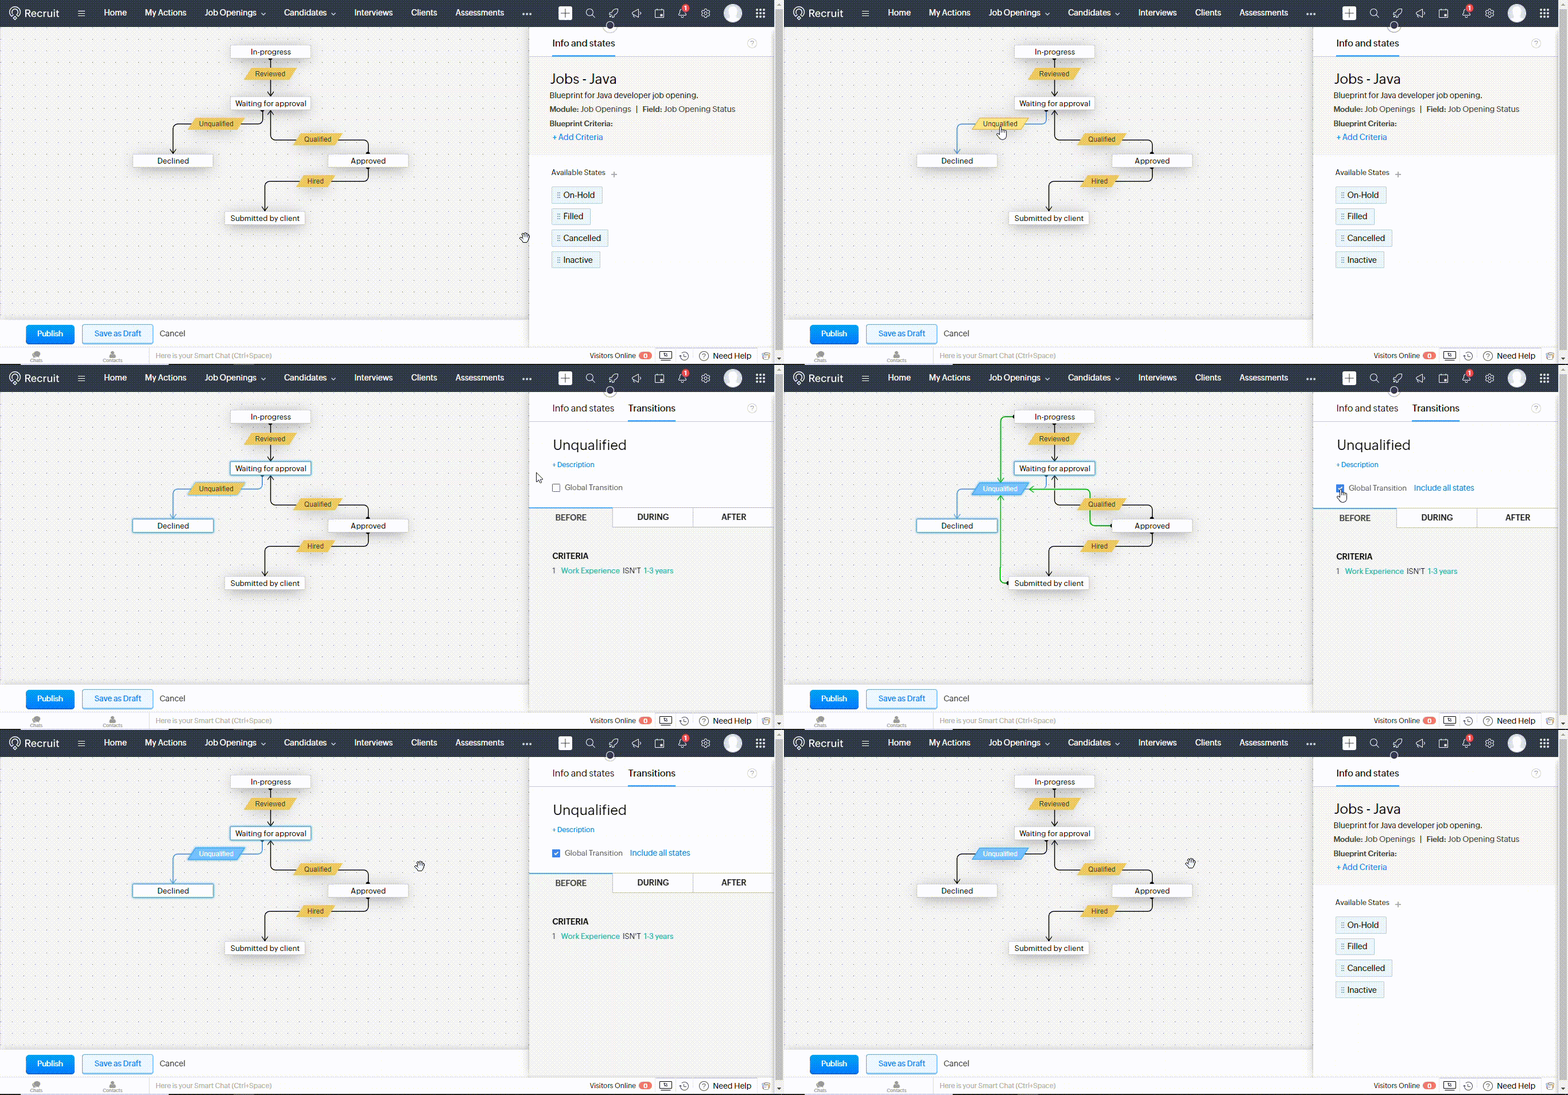
After successfully editing the blueprint, click the Save button to save the blueprint.
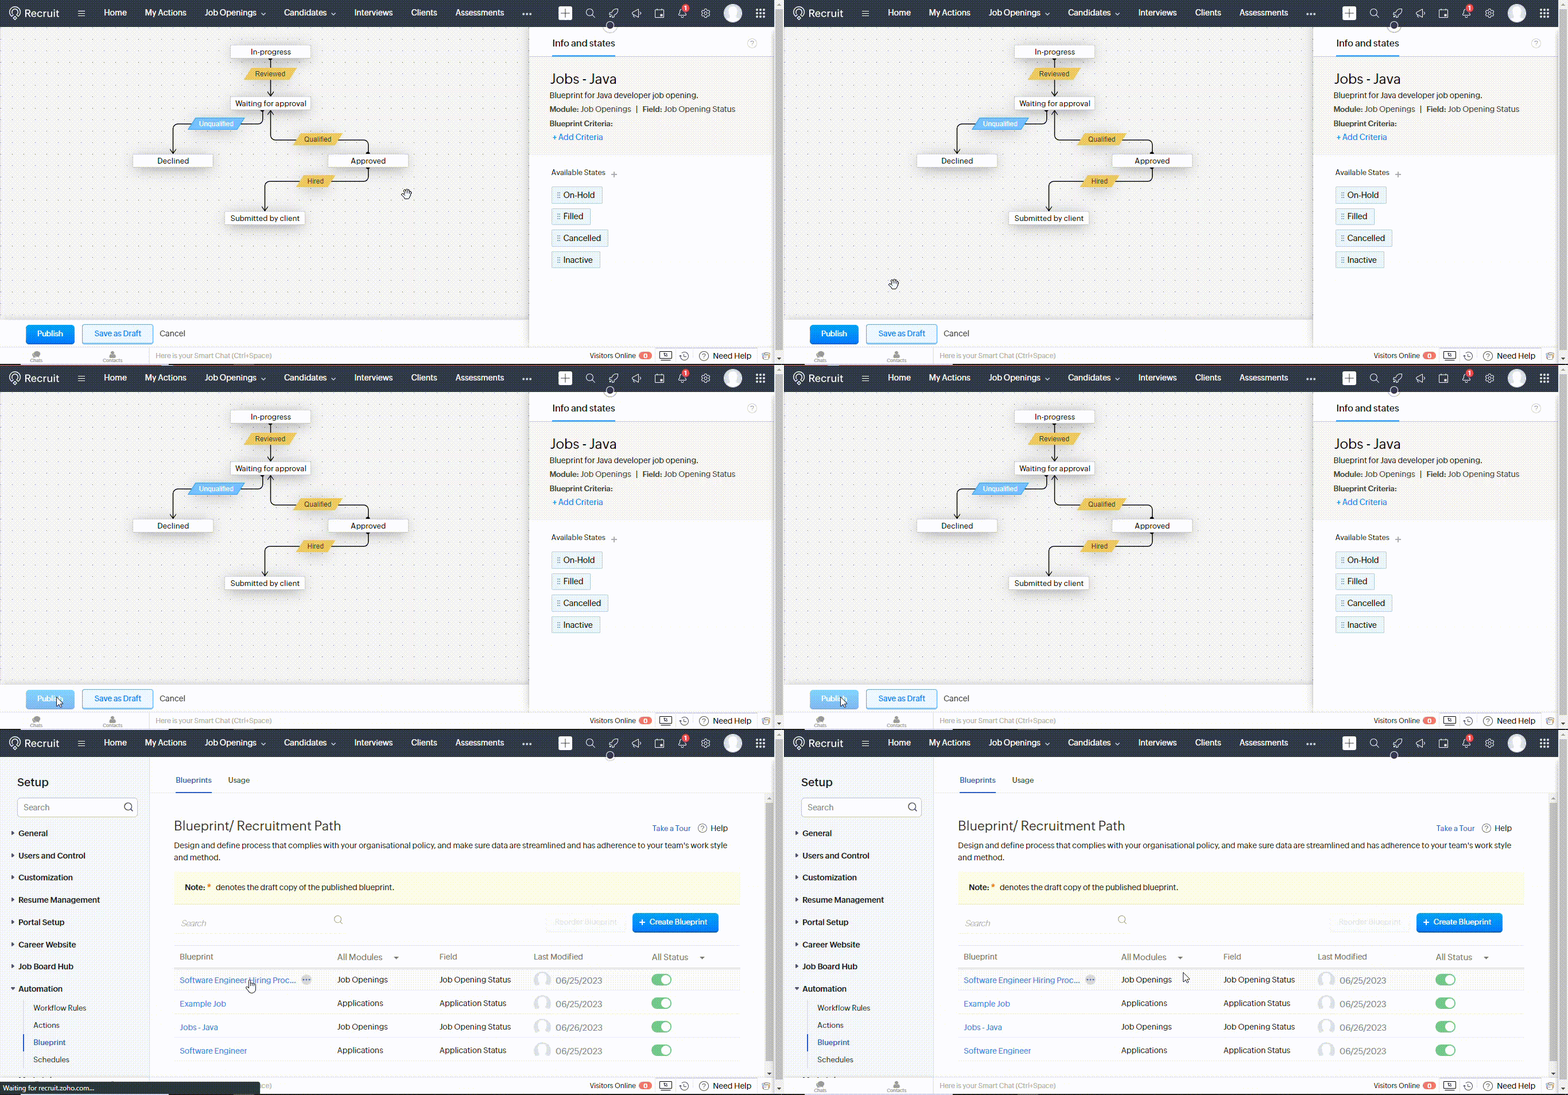
Adding a Candidate and Associating It to a Job Opening Using a Blueprint
Adding candidates manually in Zoho Recruit is a straightforward process. Here’s a step-by-step guide on how to manually add candidates to Zoho Recruit:
From the navigation menu, click on the Candidates tab and click on the Create Candidates button located at the top right corner of the page or click on the Import button to upload the candidate’s resume or information from a spreadsheet or any readable document.
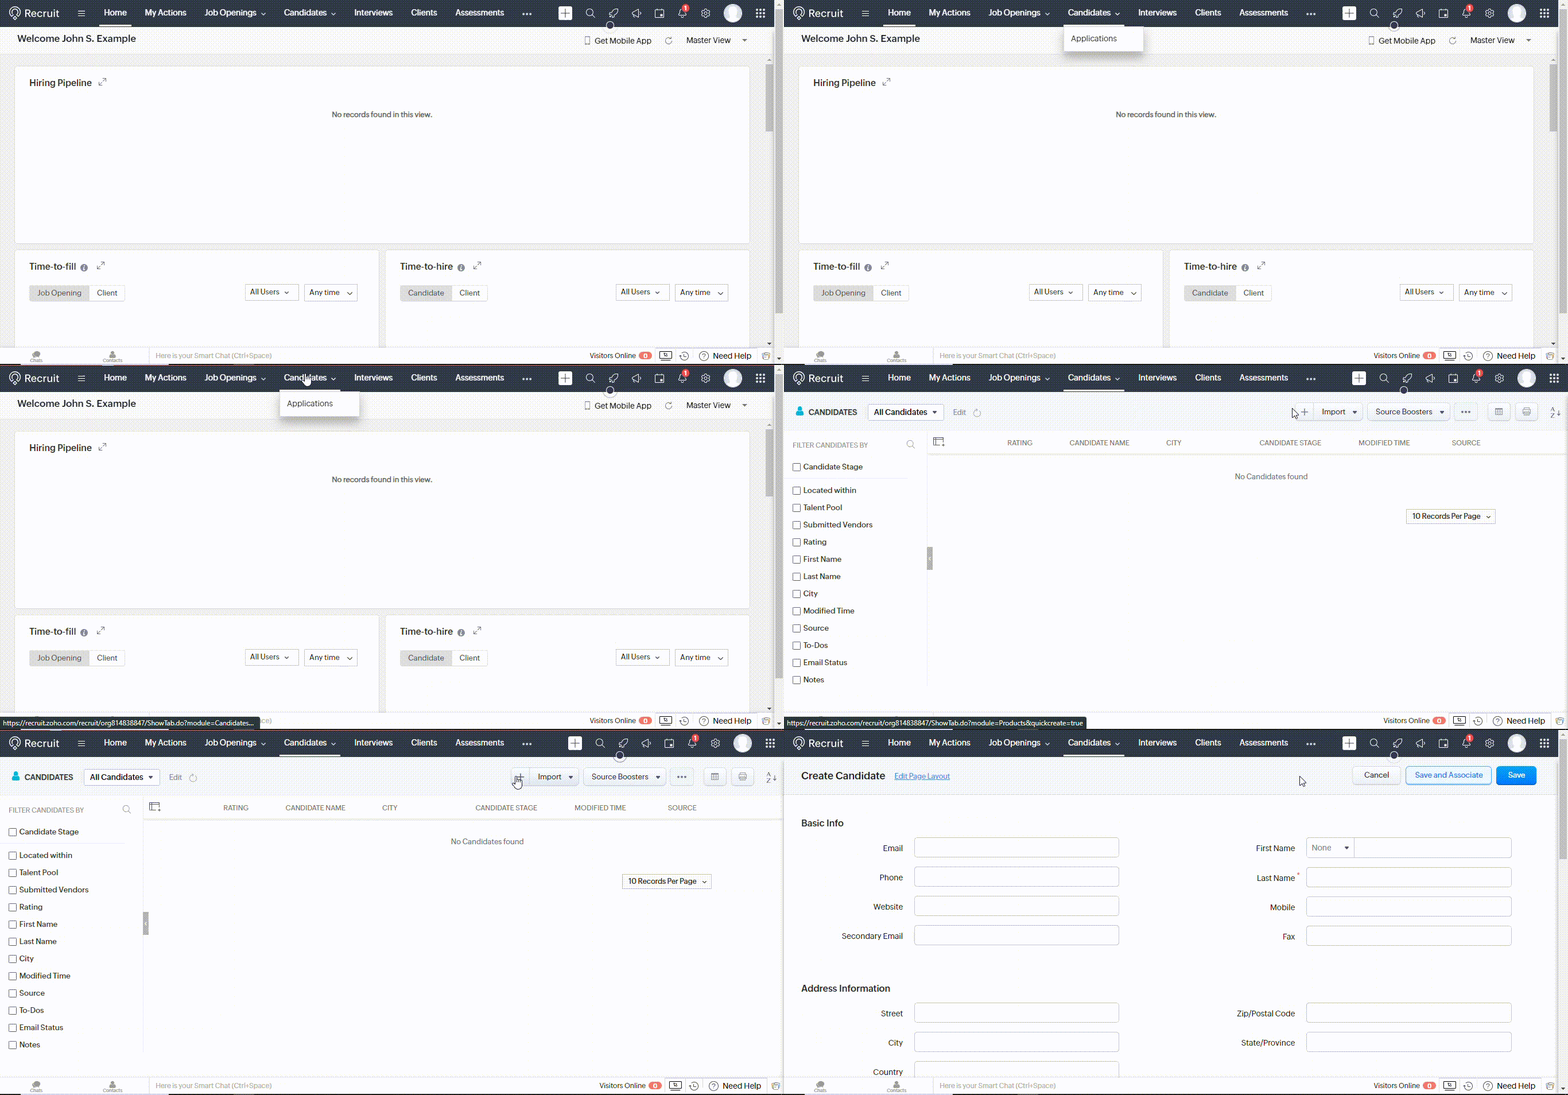
Fill in the candidate’s details in the provided fields. In addition to the required fields, you can provide more information about the candidate in the options fields. You can also assign the candidate to a specific job opening if applicable.
Under the Job Opening section, select the relevant job from the drop-down list. Once you have entered all the necessary information, click on the Save button to add the candidate to Zoho Recruit.
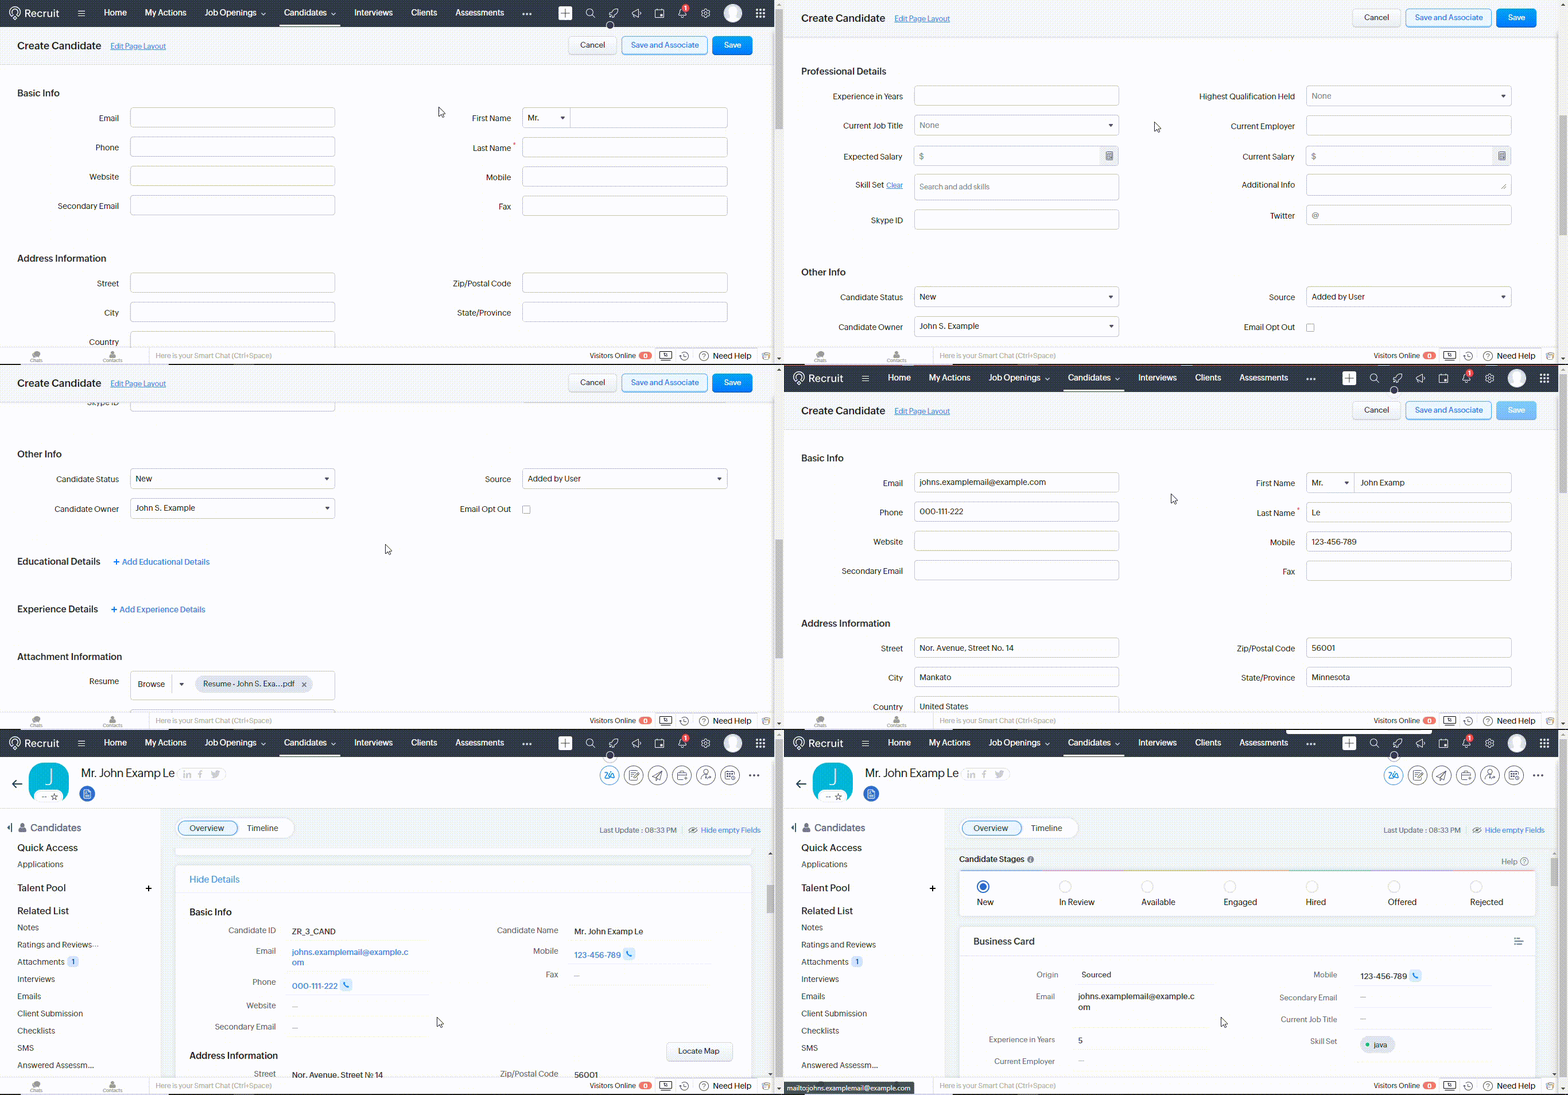
You can also click on Save and Associate button to associate the candidate with a job opening after successfully inserting all the information in the candidate form.
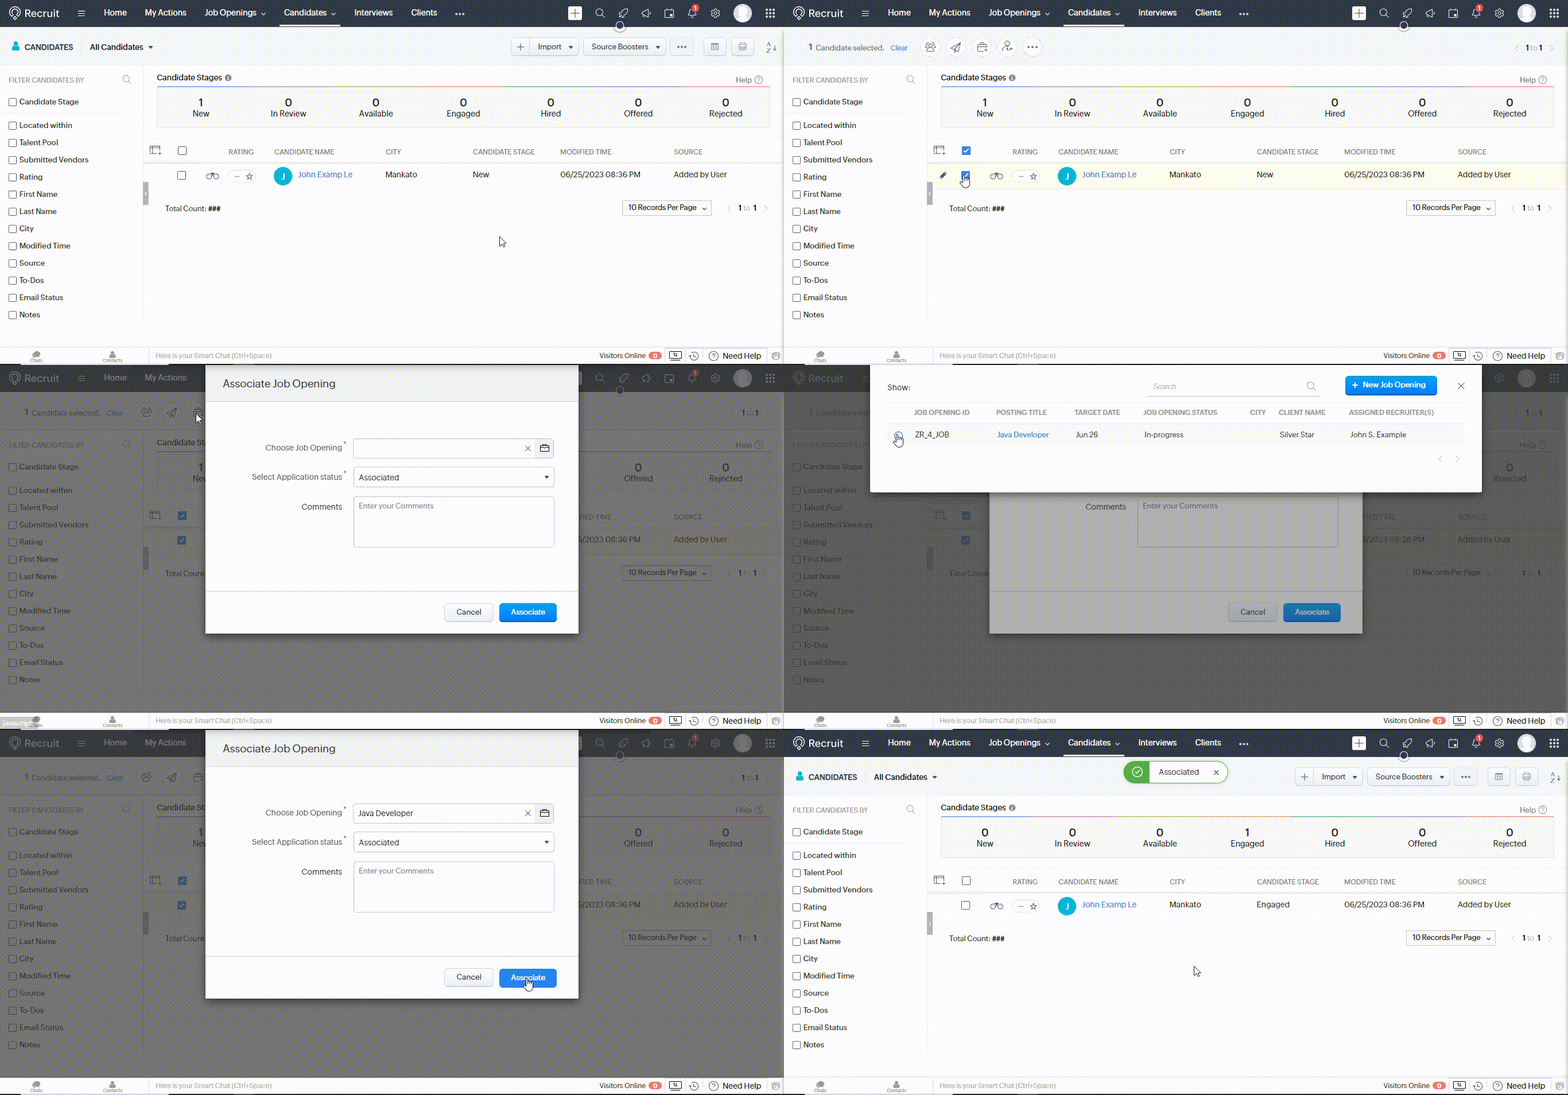
Remember, manually adding candidates is particularly useful when you have received resumes through channels other than the Zoho Recruit application form or when you want to enter candidate details obtained offline.
The following steps are necessary to associate a candidate with a job opening using a blueprint.
Blueprints in Zoho Recruit are predefined workflows that guide you through each stage of the recruitment process. They provide a structured framework to manage candidates and ensure that no step is missed during their evaluation and selection.
Blueprints can be customized to align with your organization’s hiring process and can be associated with job openings.
Navigate to the Candidates tab from the main menu, locate the candidate you want to associate with a job, and open their candidate profile.
Within the candidate profile, you will find the Stage field, which represents the candidate’s current stage in the recruitment process.
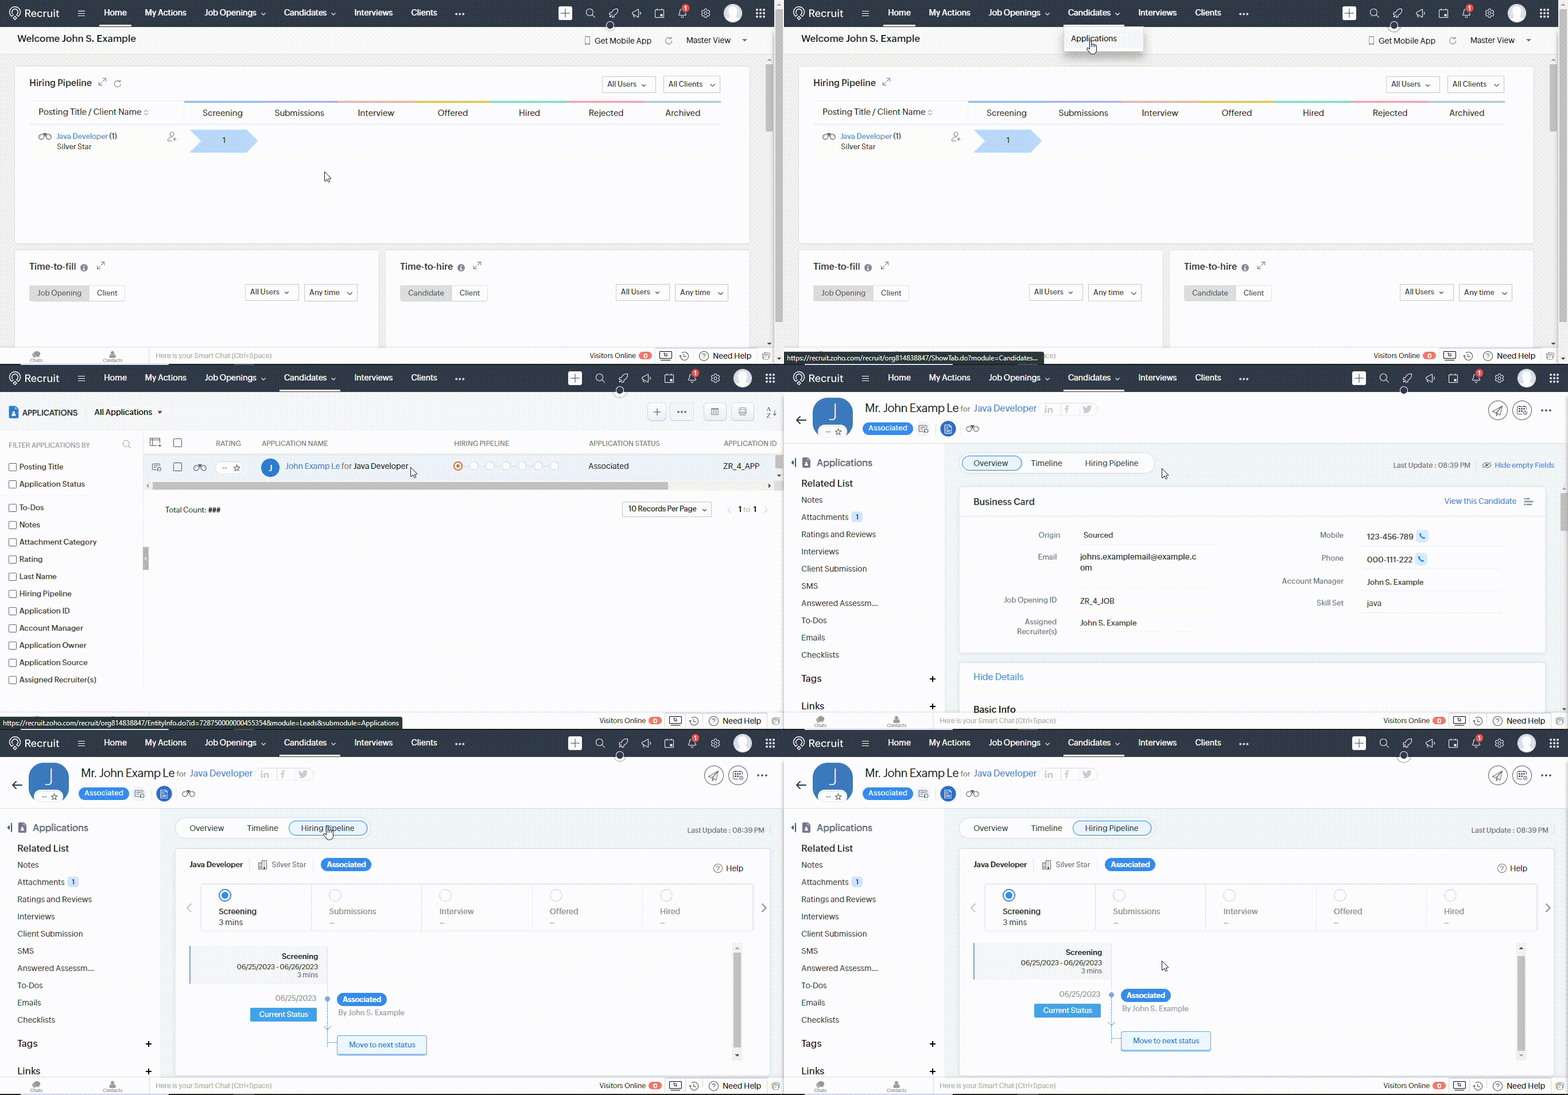
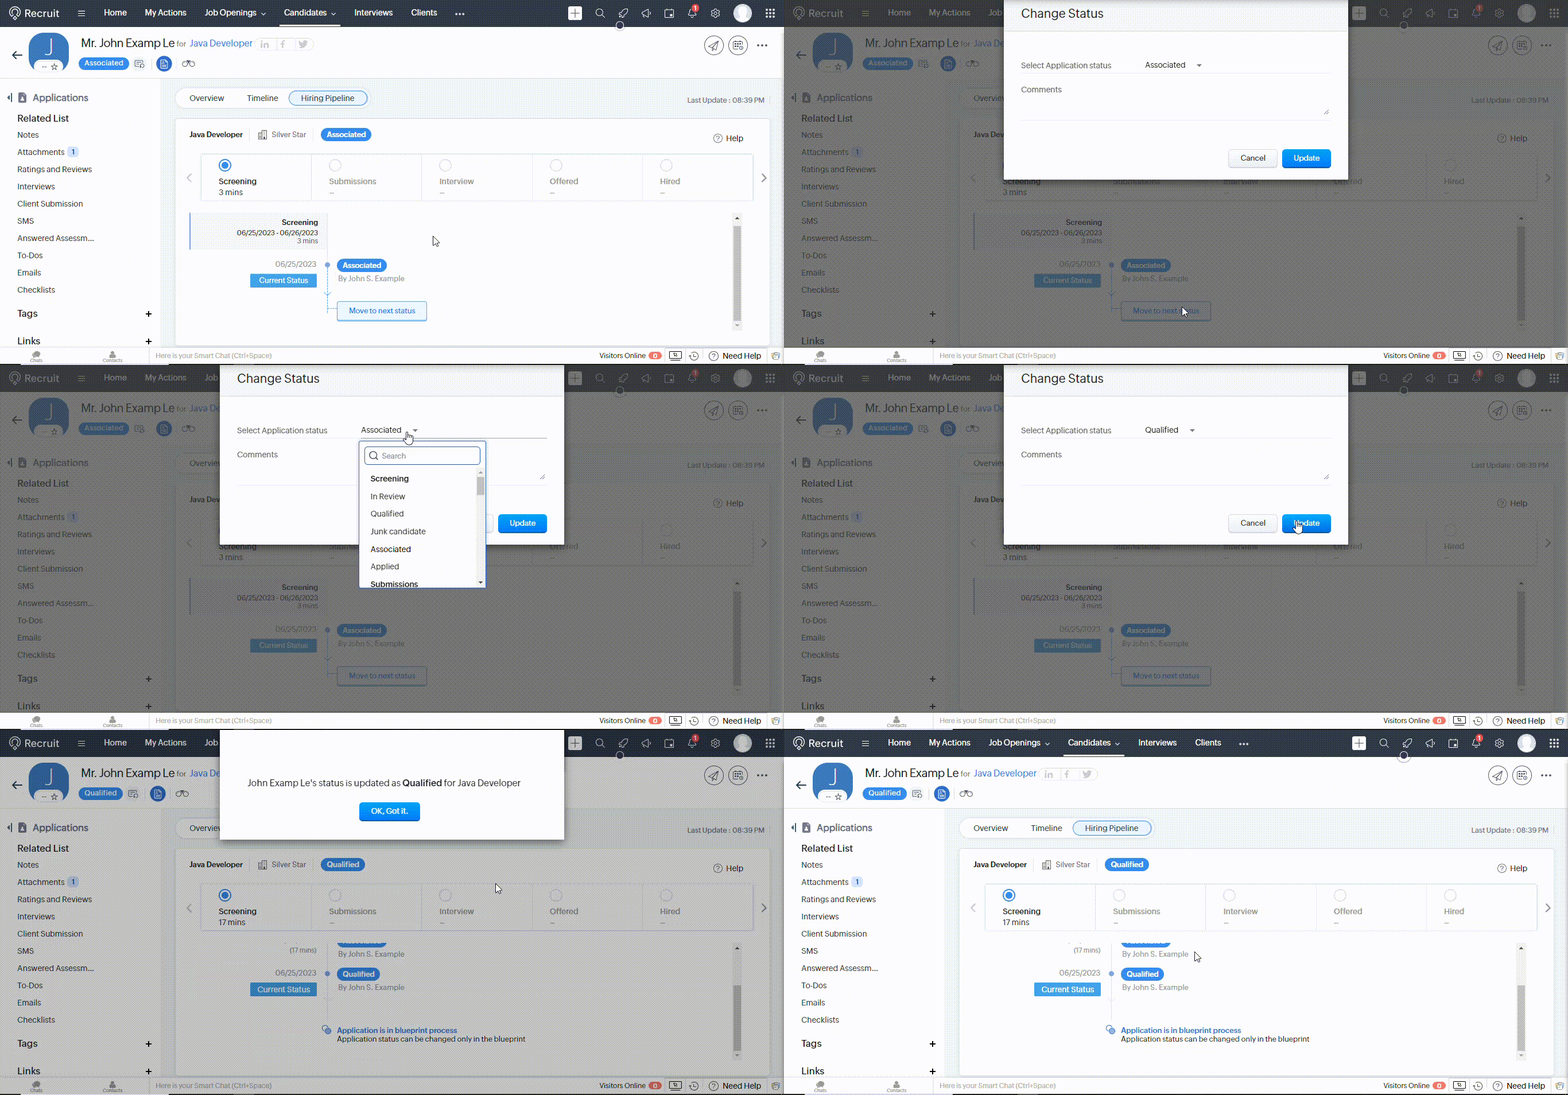
Click on the Stage field, and a drop-down menu will appear, displaying the various stages defined in your blueprint. Select the appropriate stage that corresponds to the candidate’s current progress in the hiring process.
For example, if the candidate has passed the initial screening and is scheduled for an interview, choose the relevant interview stage from the drop-down menu.
After selecting the appropriate stage, the candidate will be associated with the corresponding job and will progress through the workflow defined in the blueprint.
In case the candidate application is in the blueprint process, its status can be changed through the Job Openings under Blueprint Process.
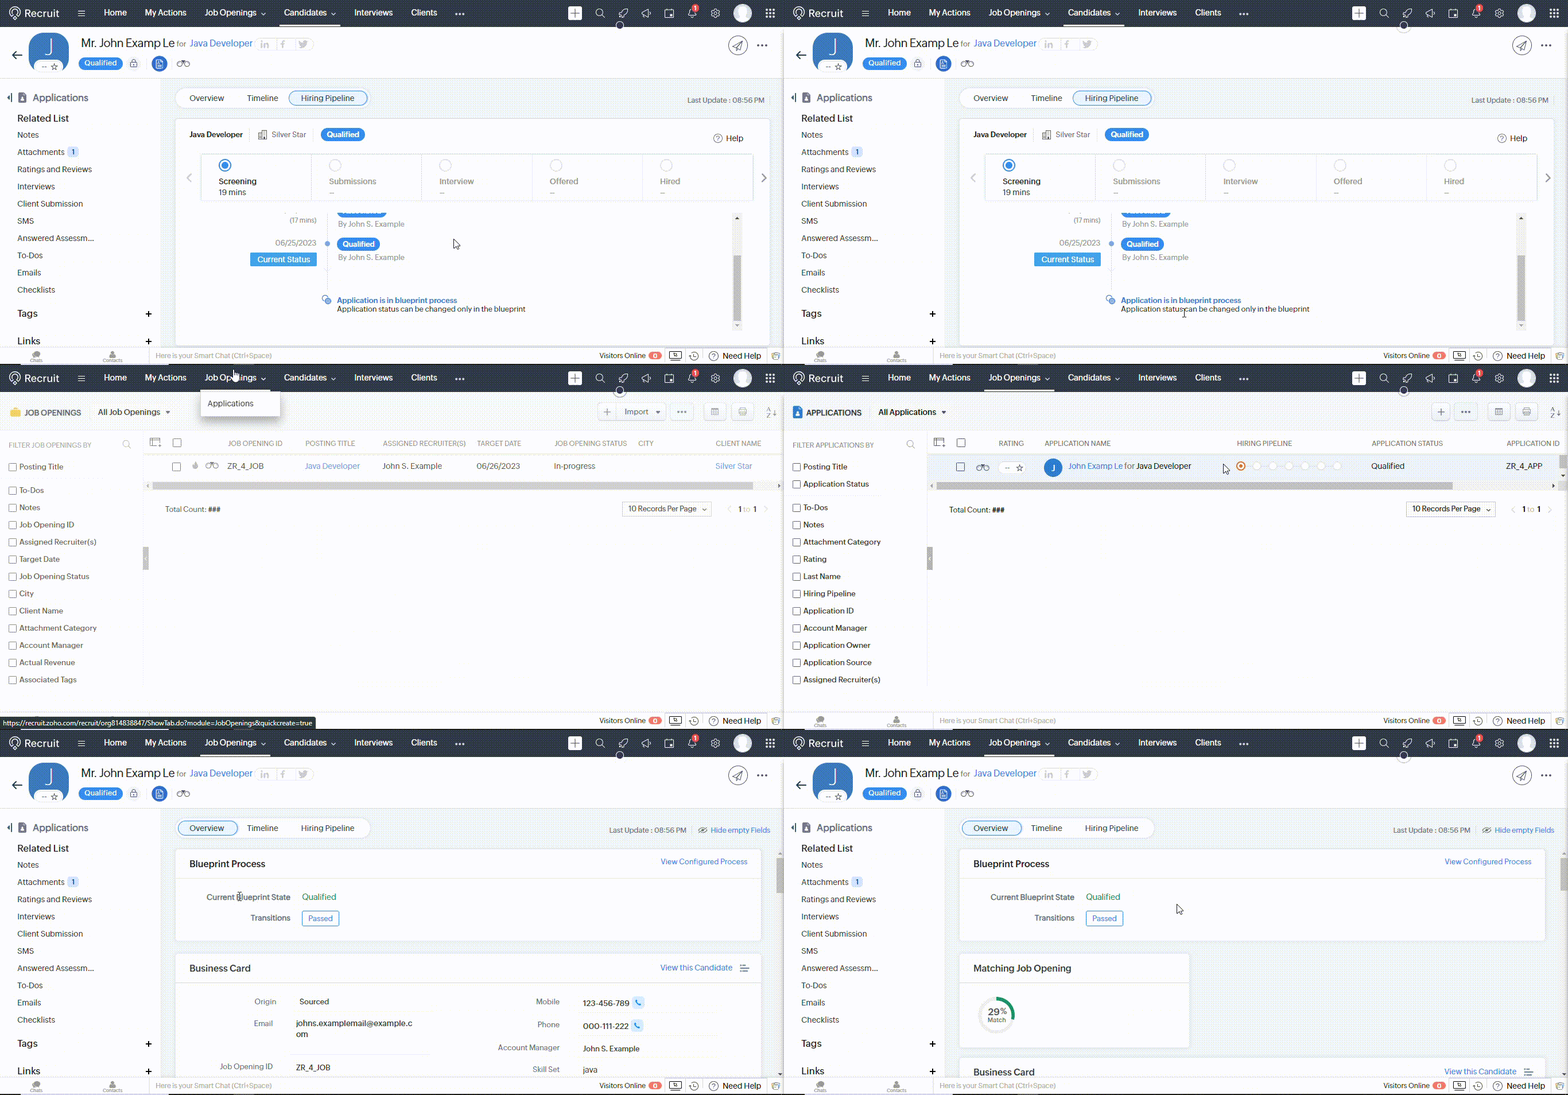
If desired, you can also add any additional notes or comments related to the candidate’s progress in the Comments field. Save the changes to update the candidate’s profile and their association with the job through the blueprint.
By associating candidates with jobs through blueprints, you can ensure consistent evaluation, track candidate progress accurately, and facilitate effective collaboration within the hiring team.
Inviting a Candidate to the Job Opening by Sending an Email Containing a Pre-screening Assessment
You now have valid candidates, jobs, pre-screening assessments, and a blueprint in place to commence recruiting for a job opening. Sending an email invitation to candidates, including the pre-screening assessment, is a straightforward task.
Go to the Candidates tab at the navigation bar and select a candidate. Once you have selected a candidate, there will be an icon for Send Email in the top left corner. Click the Send Email icon.
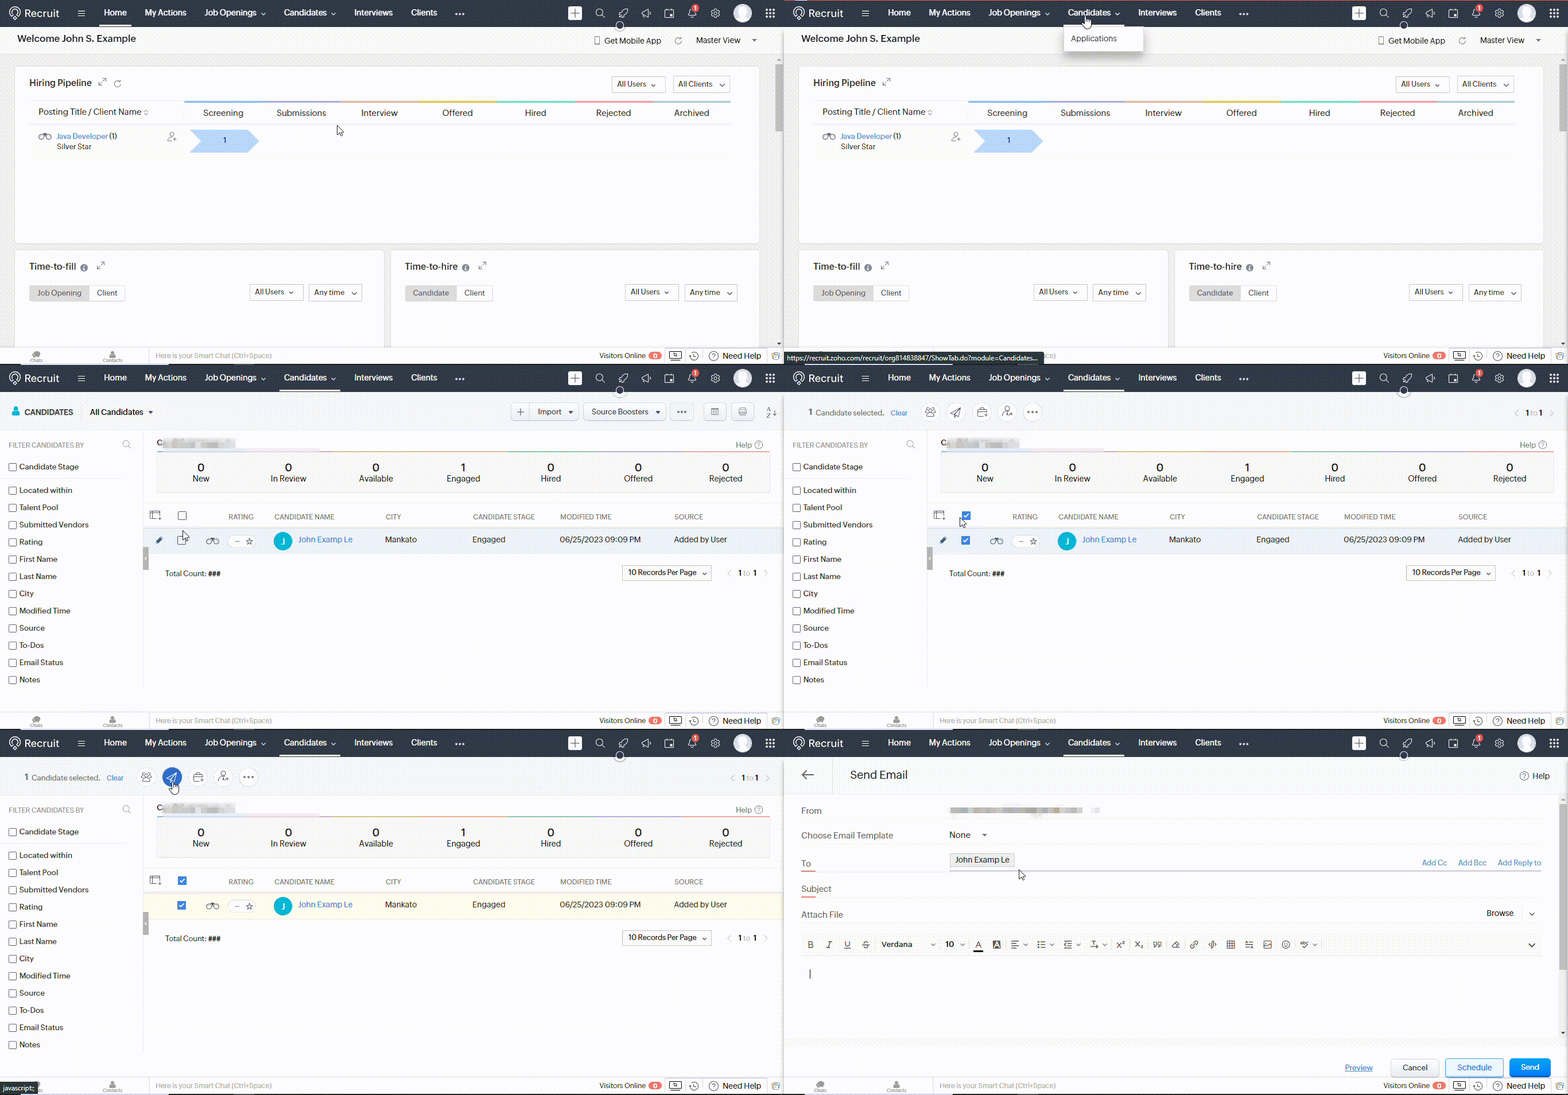
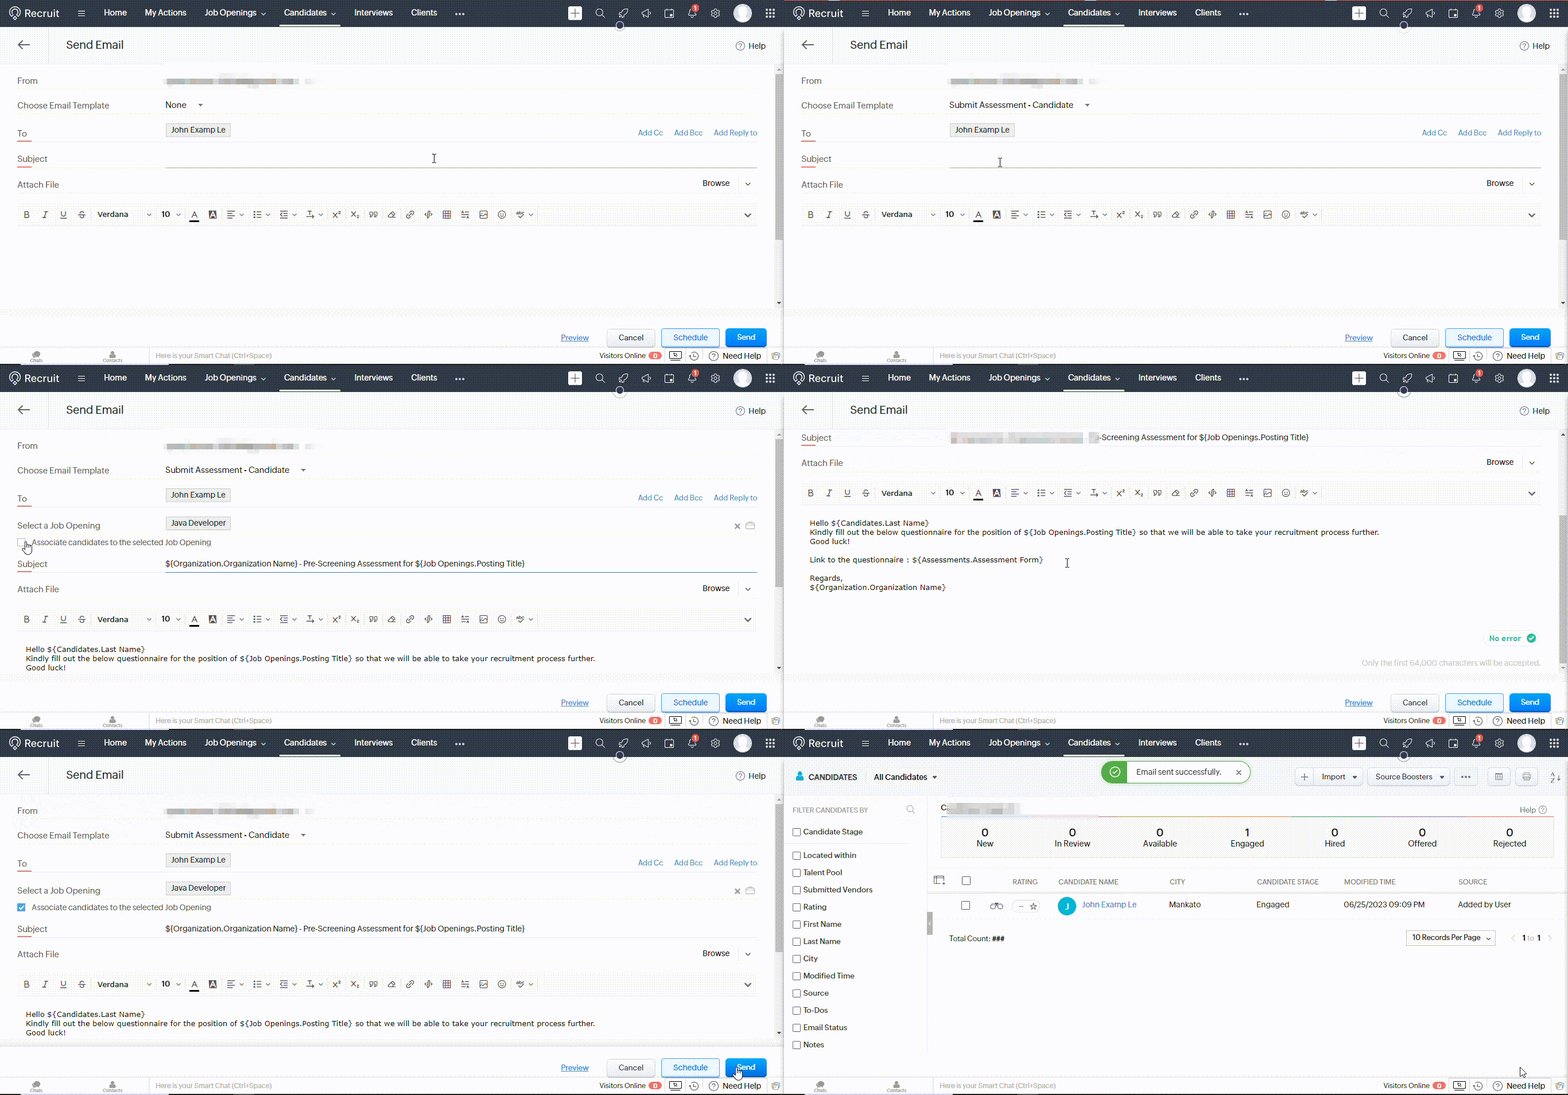
A new tab will open containing some critical information. Select Submit Assessment – Candidate from the drop-down list of Choose Email Template.
Select a job from the Select a Job Opening option. Edit the Subject and the Body of the email to personalize it, and click on the Send button.
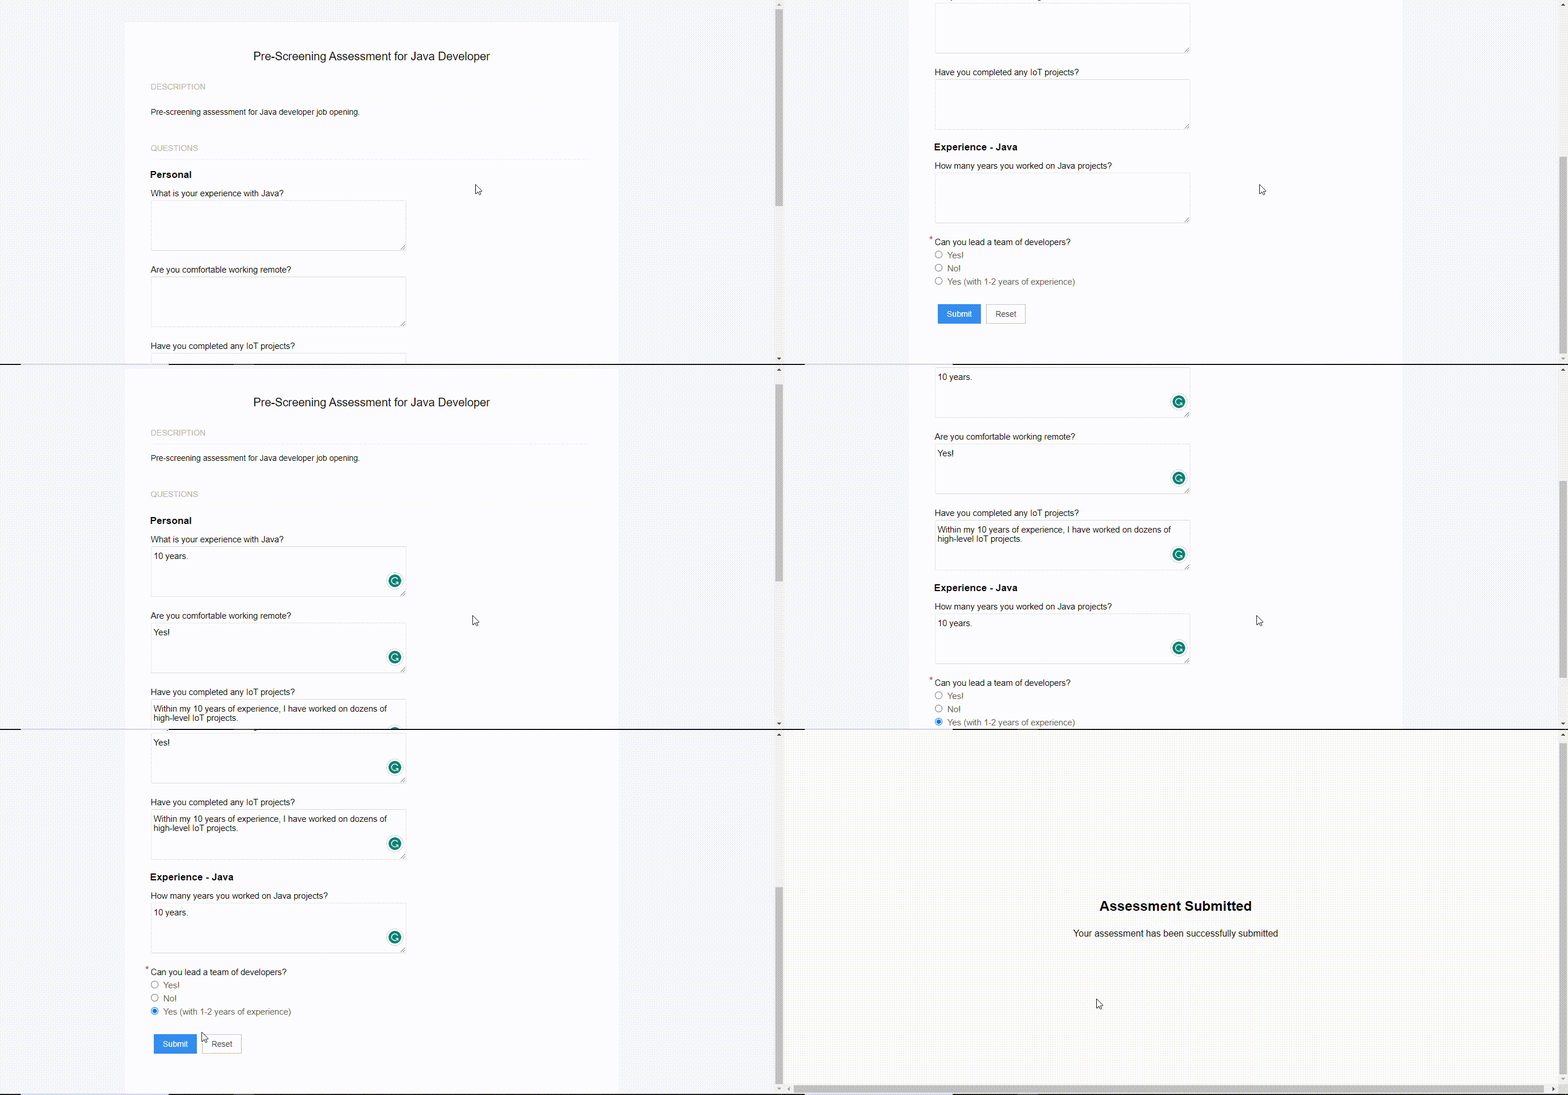
The candidate will read the mail, attempt the pre-screening assessment and submit the results.
The candidate score based on the attempted assessment will be shown in Applications under the Job Opening option.
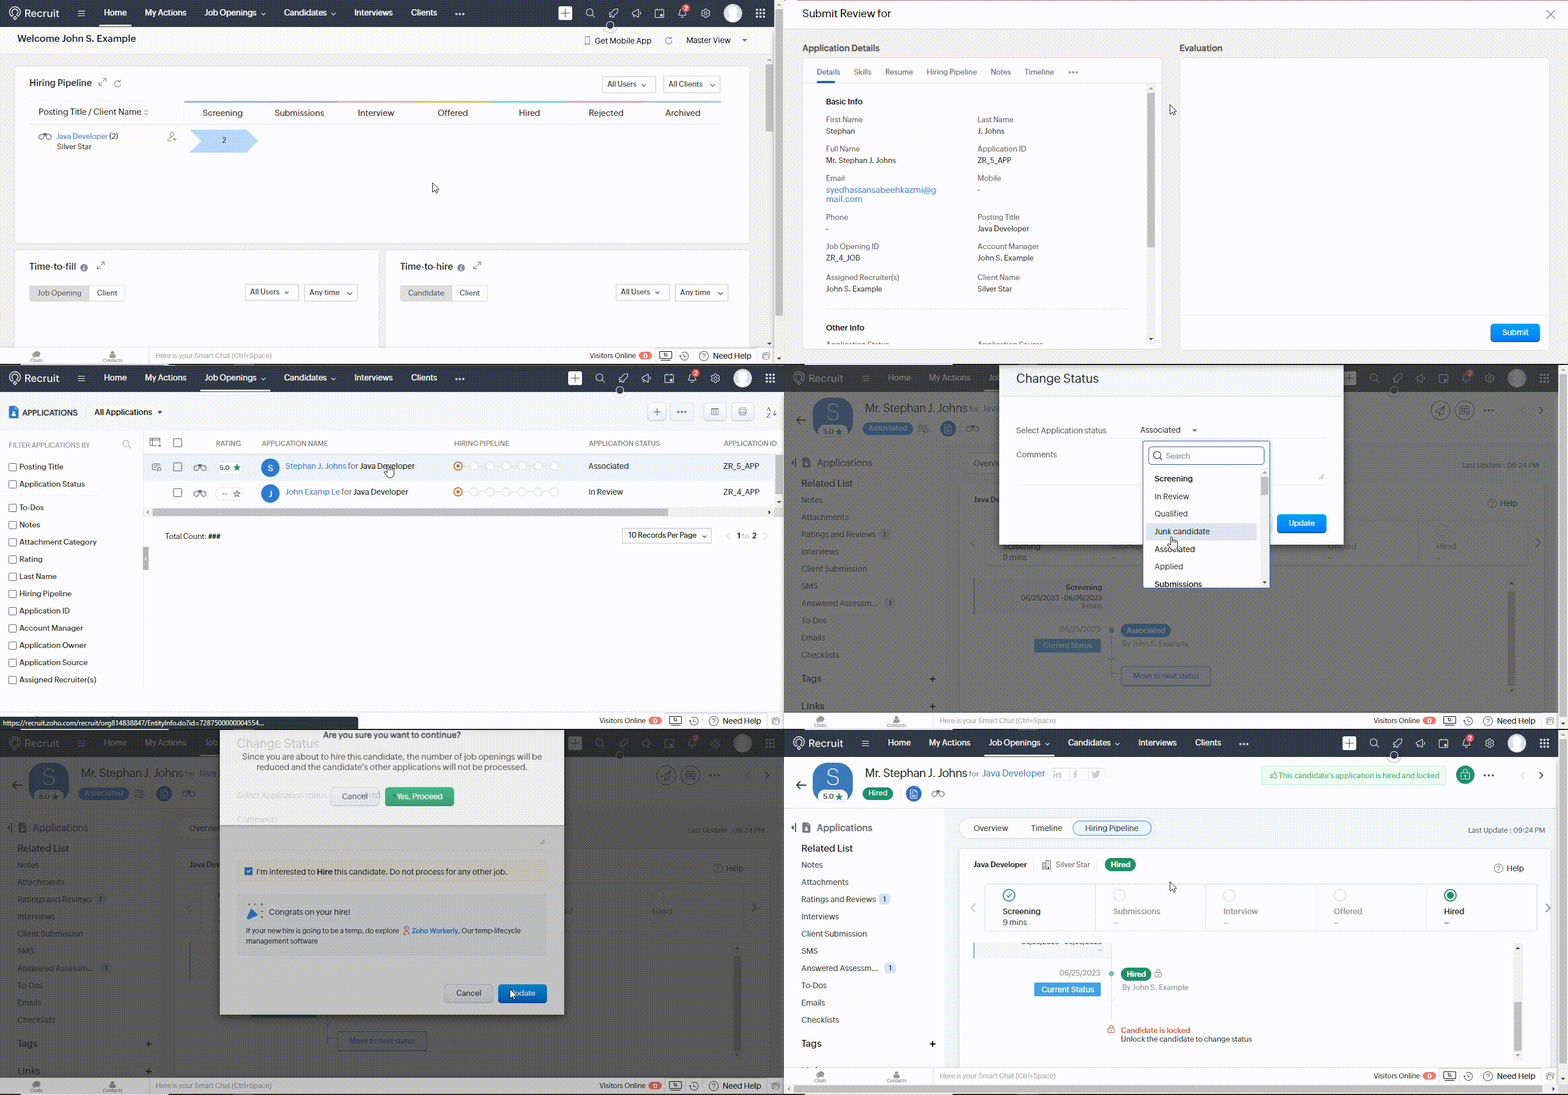
Click the candidate, go to Answered Assessments, click on an assessment, and click on Submit to accept the candidate’s attempted pre-screening assessment.
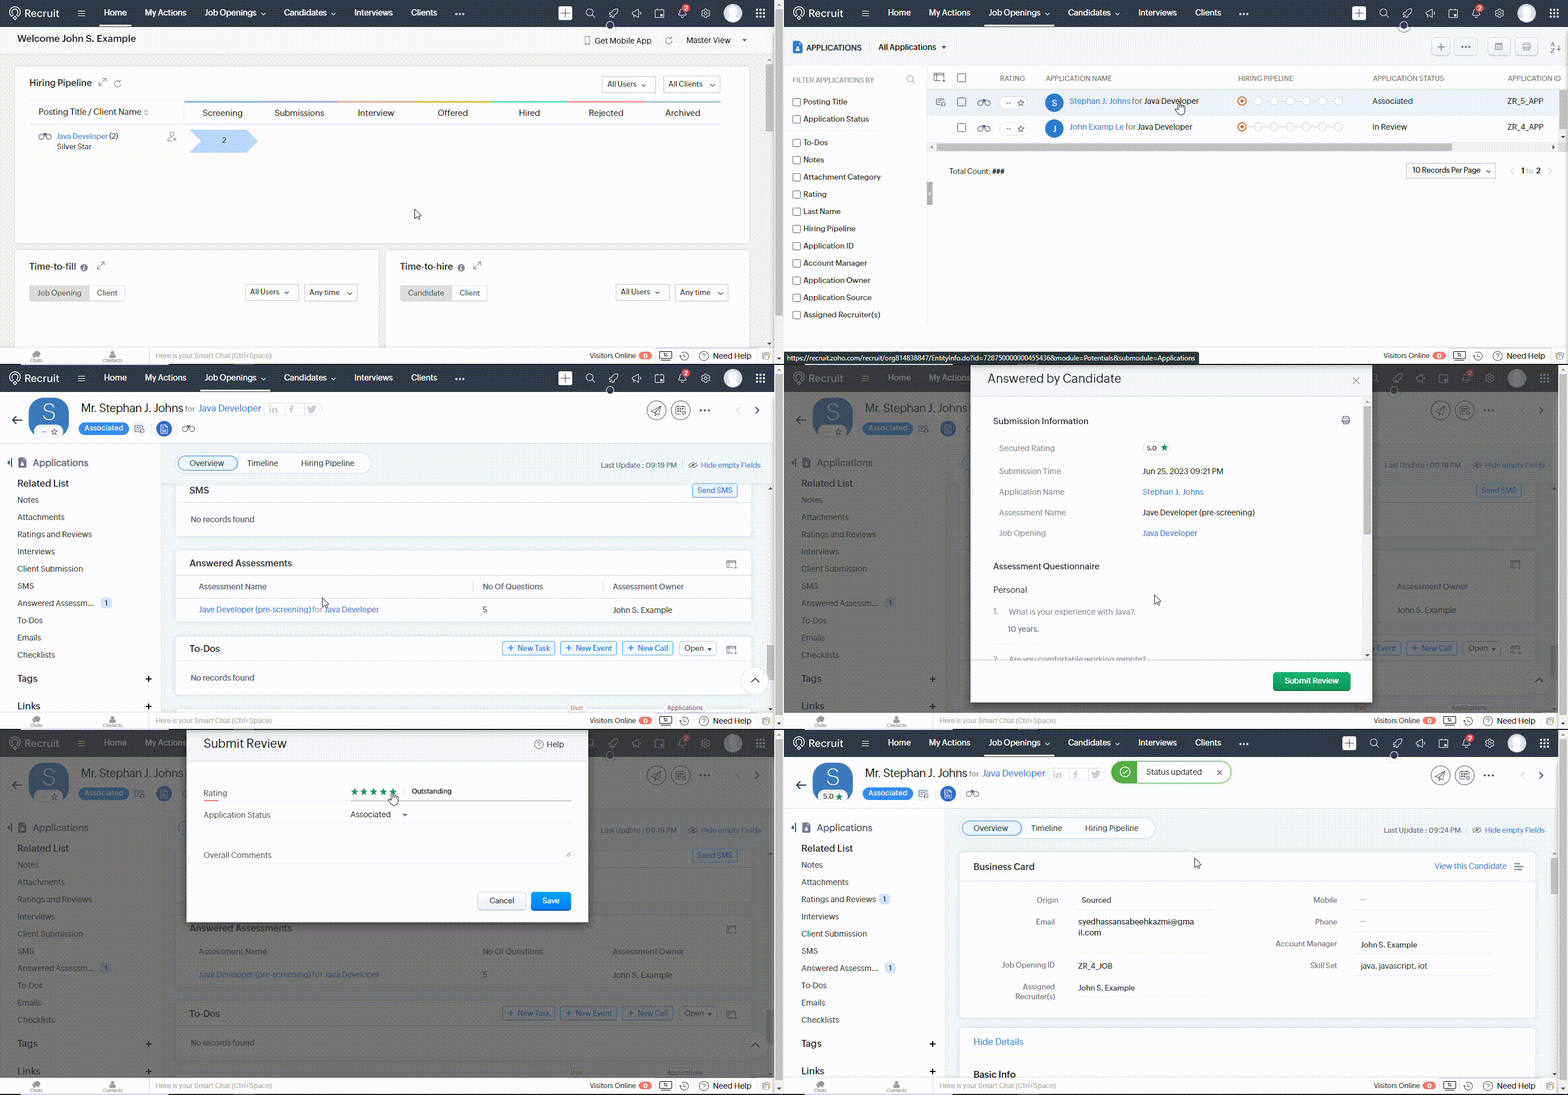
From there, you can go to the hiring pipeline and move the candidate to the next step of the blueprint by clicking on Move to Next Status.
You can see the updated rating of the candidate based on the pre-screen assessment he attempted through email against the candidate’s record.
Conclusion
This article has provided a comprehensive guide to building an automated sourcing pipeline within Zoho Recruit.
We covered essential steps such as creating a job opening integrated with a pre-screening assessment, developing a blueprint, adding candidates and associating them with job openings using the blueprint, and inviting candidates through email with the pre-screening assessment.
By following these strategies, recruiters can streamline their sourcing process, enhance efficiency, and make informed hiring decisions.


