Who is this feature for?
- HR Professionals
- Legal Professionals
- Real Estate Agents
What progress will you accomplish?
- Streamlined Document Management
- Faster Turnaround Time
- Improved Collaboration and Communication
Introduction
In today’s fast-paced digital world, streamlining HR processes is crucial for organizations to improve efficiency and reduce administrative burdens. One powerful tool that can help achieve this is Zoho Sign.
With its robust features, Zoho Sign allows HR professionals to automate the capture of HR information using templates and sign forms. Streamline your document management processes, reduce paperwork, and enhance efficiency in handling HR forms.
This article will explore how to leverage Zoho Sign templates and sign forms to revolutionize your HR documentation processes.
How to Create a Template in Zoho Sign
Creating templates in Zoho Sign is a simple and effective way to standardize your HR documents. Here’s how you can create a template:
Log in to your Zoho Sign account and click the Templates option in the left panel of the home page.

Creating a template
Click on the Create template button at the top-right corner and click on the Add document to upload the document from your desktop or import it from your cloud storage service.
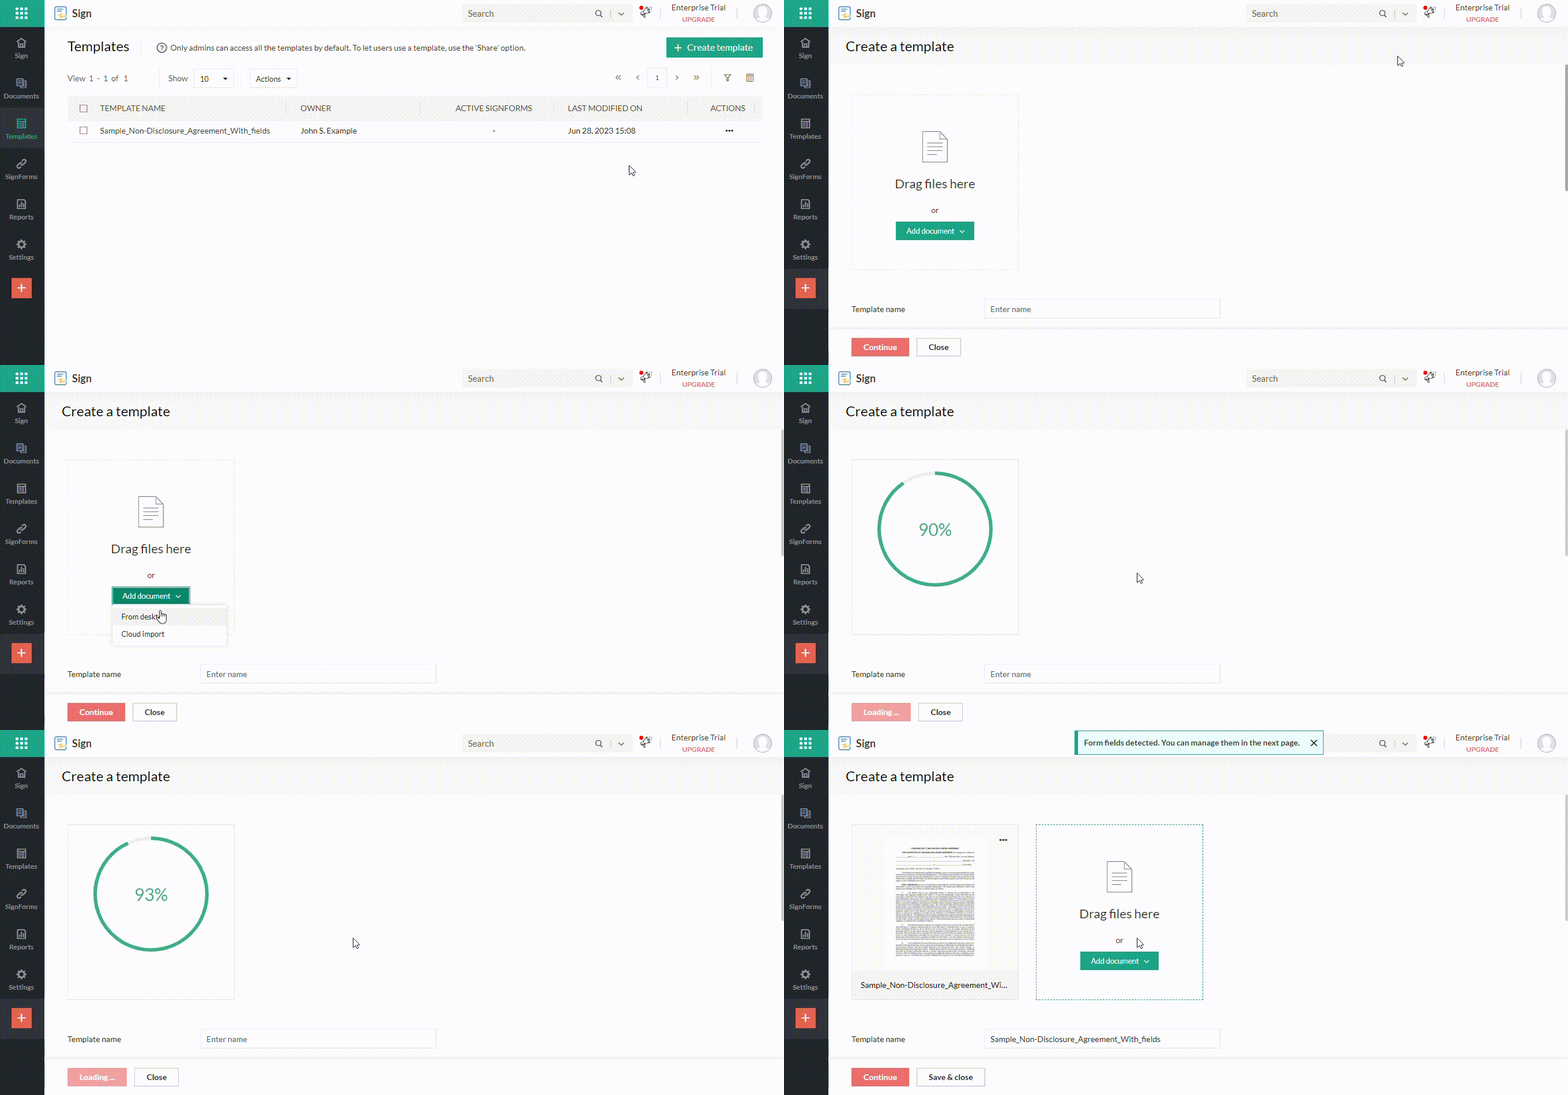
Adding a document
You can name the template, set the time by which the recipients must sign the document, and add the document type and description from here.
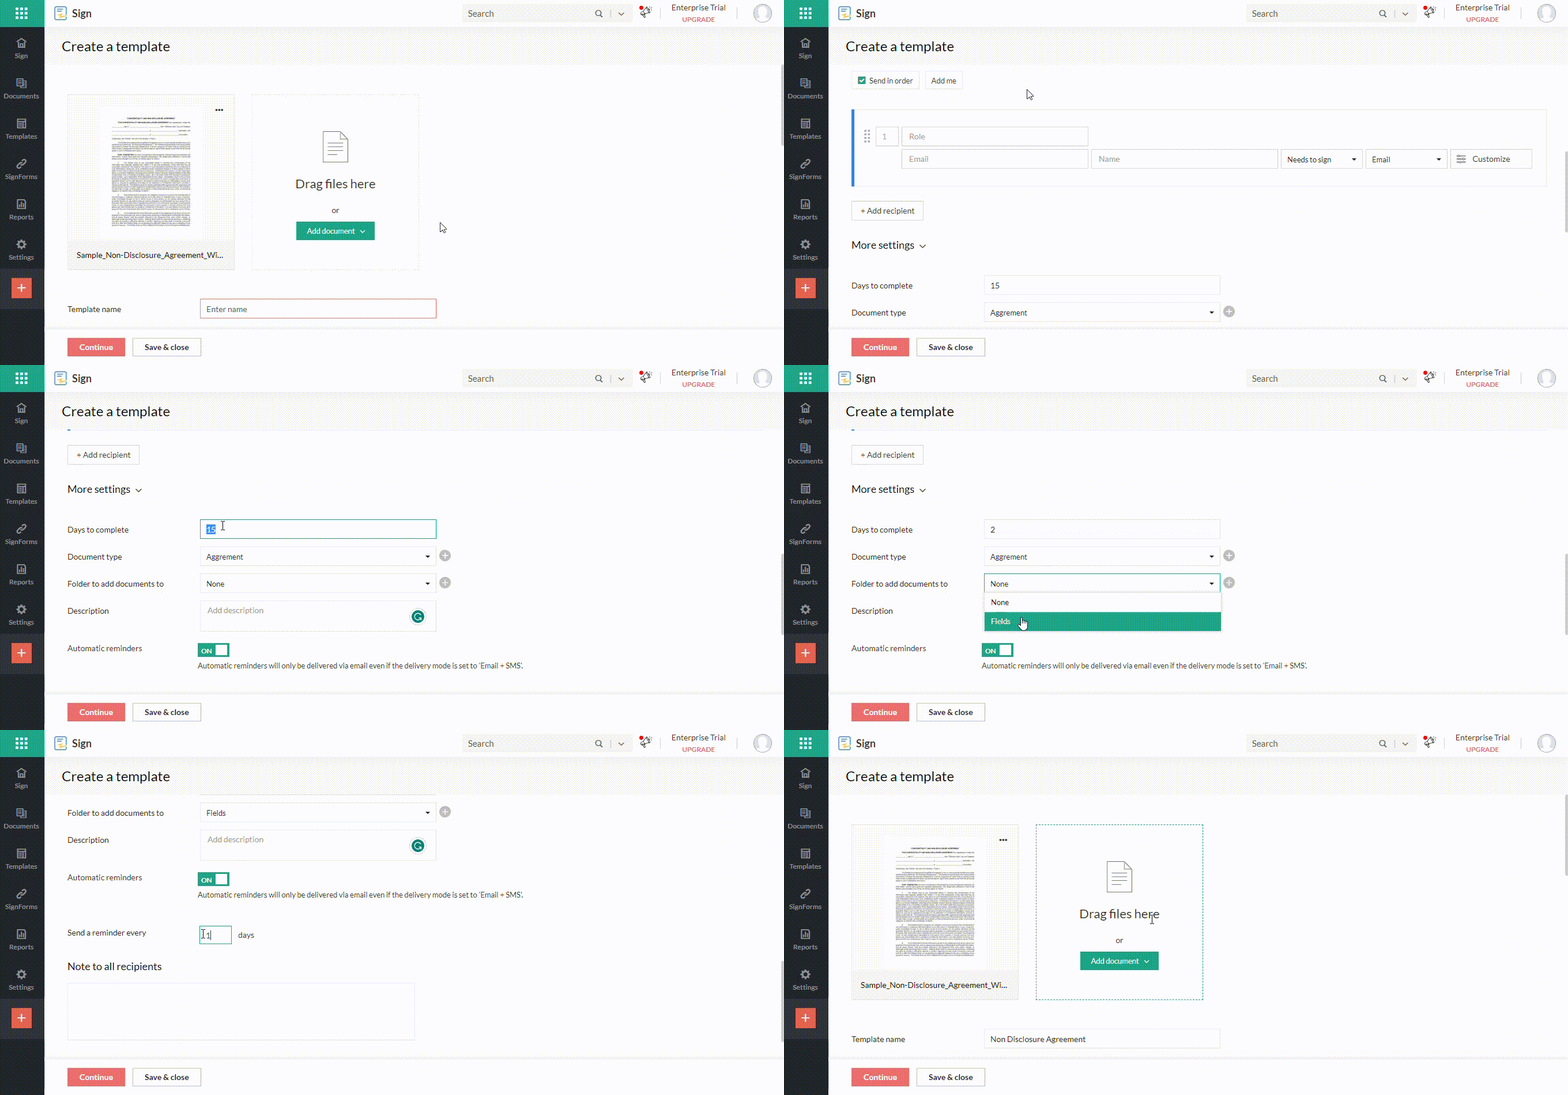
Filling in the “Create a template” form
Add recipients, set roles, set the signing order, and fill out other information, such as a private message, authentication code, and automatic reminders. After completing the template information, click the Continue button.
You can choose the recipient from the Recipients panel on the right and add form files for each recipient.
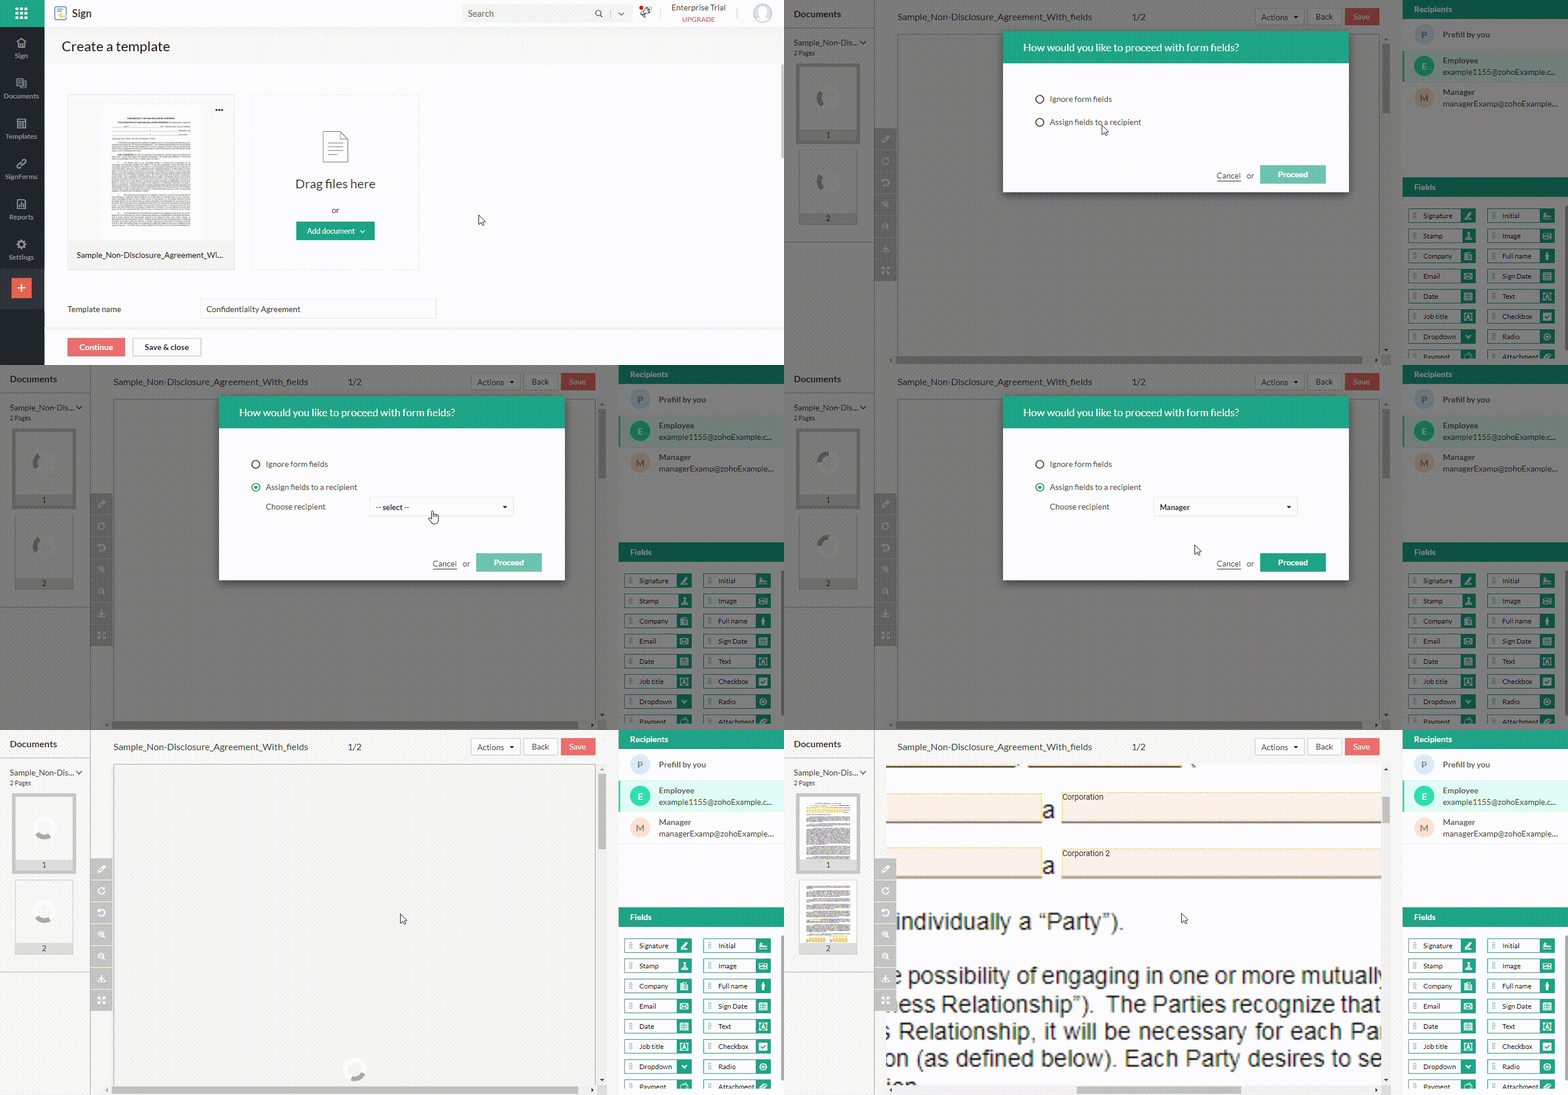
Editing the document – Assigning fields to recipients
You can either set the fields as pre-filled by the owner or filled by the candidate. Choose the preferred option and click Save.
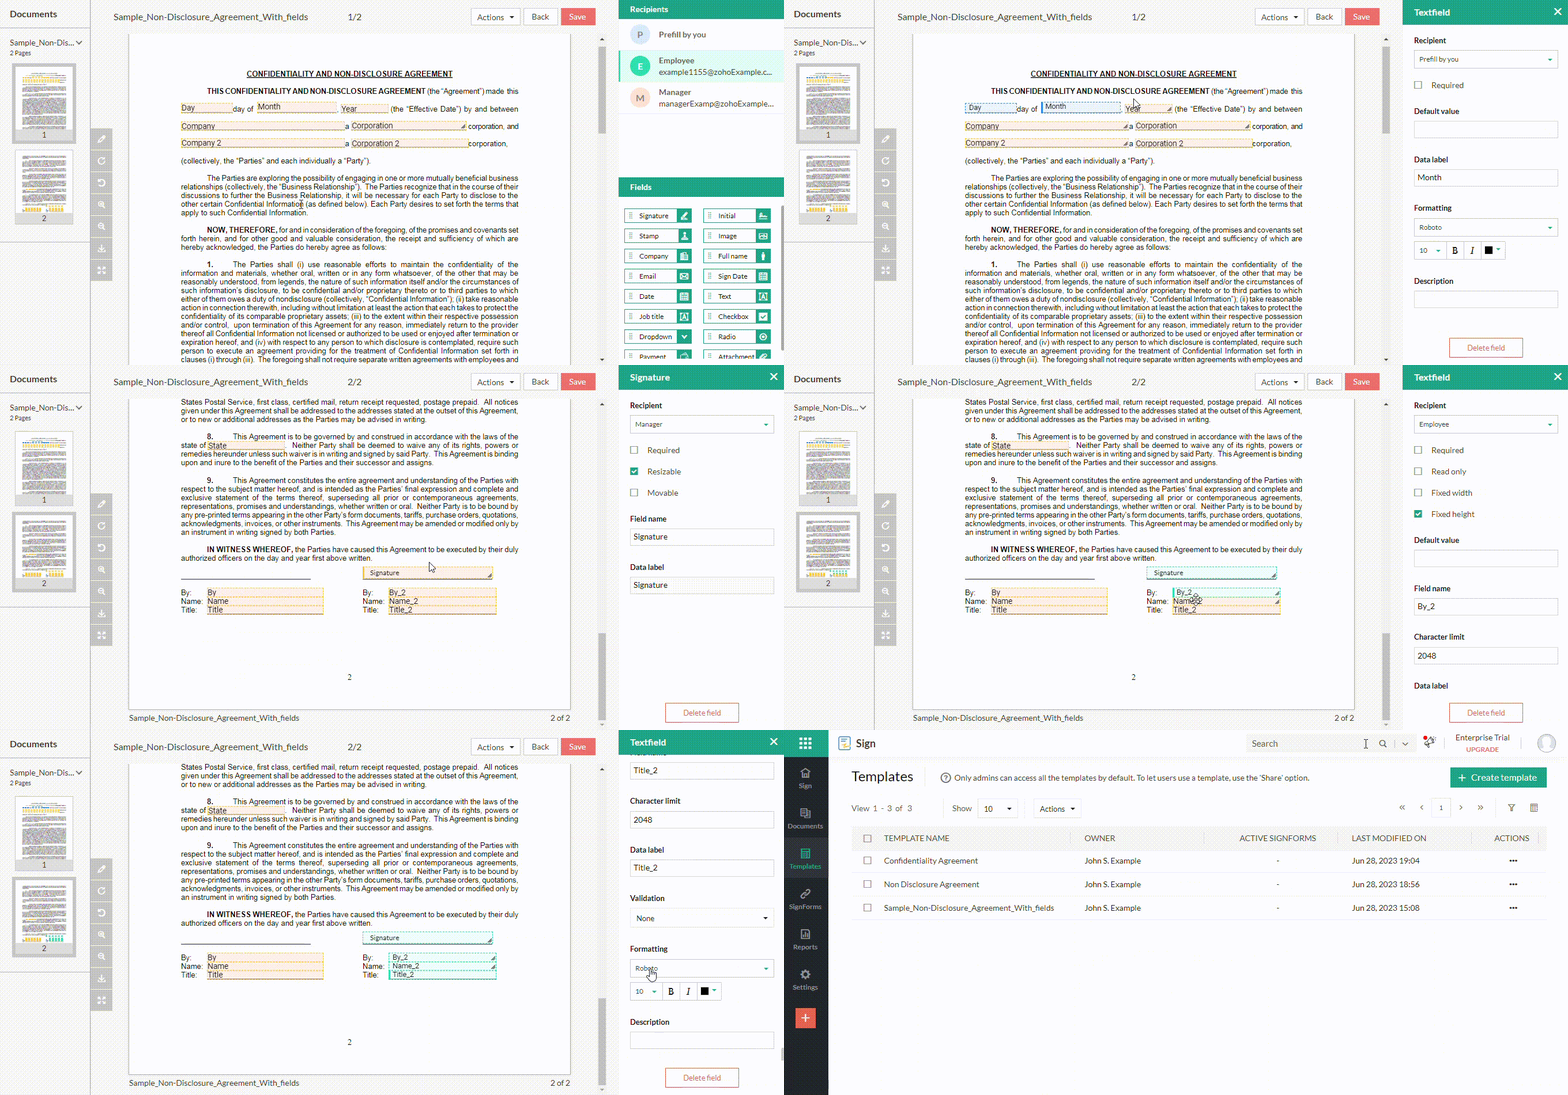
Saving the created template
Creating templates eliminates the repetitive task of recreating HR documents from scratch, saving time and ensuring consistency across all your forms.
Sending documents for signature
Once you have your template ready, it’s time to send the documents for signature. Here’s the process:
On your dashboard, click Send for signatures icon. The first step is to upload the document. Click on Add document and choose a way to upload your document from three available choices.
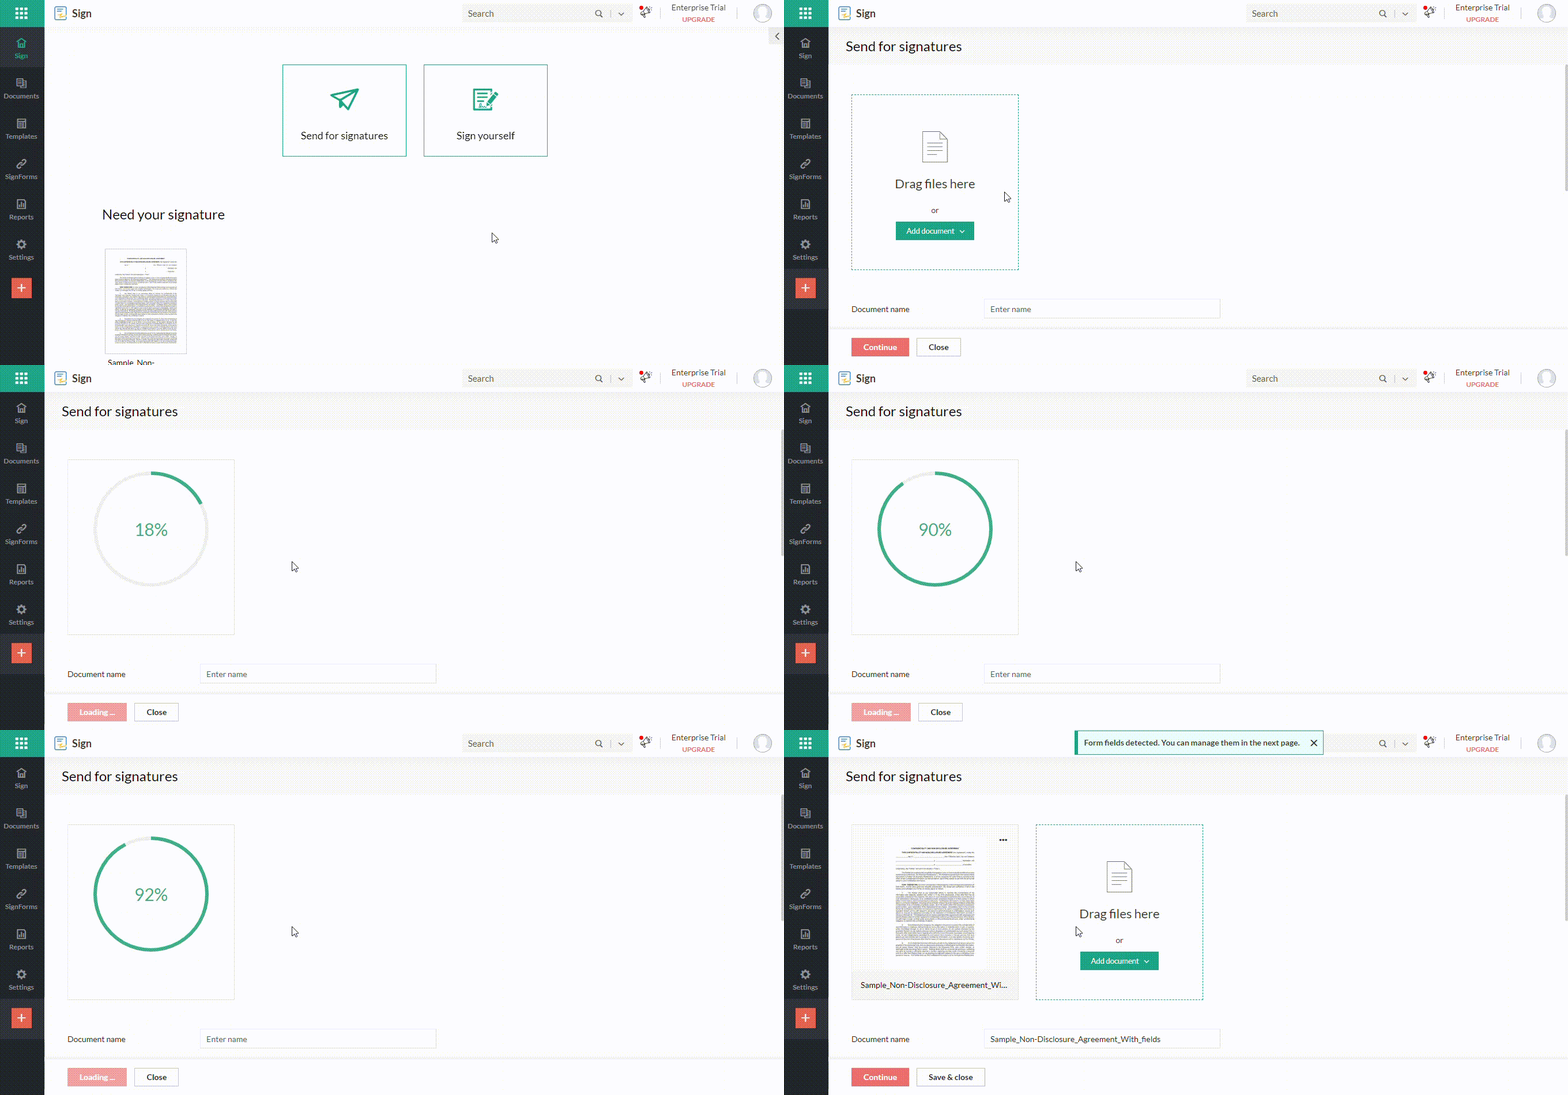
Sending a document for signatures
In Add recipients section, you can add recipients by clicking on the + Add recipient button. Enter the details of each recipient as its email, name, action, and how to send the document, and can click on Customize to add a private note, set the authentication type, and many other options like setting the language.
After adding the recipients, you can select to send the document for signature in an order, add yourself to the recipients, or add bulk recipients.
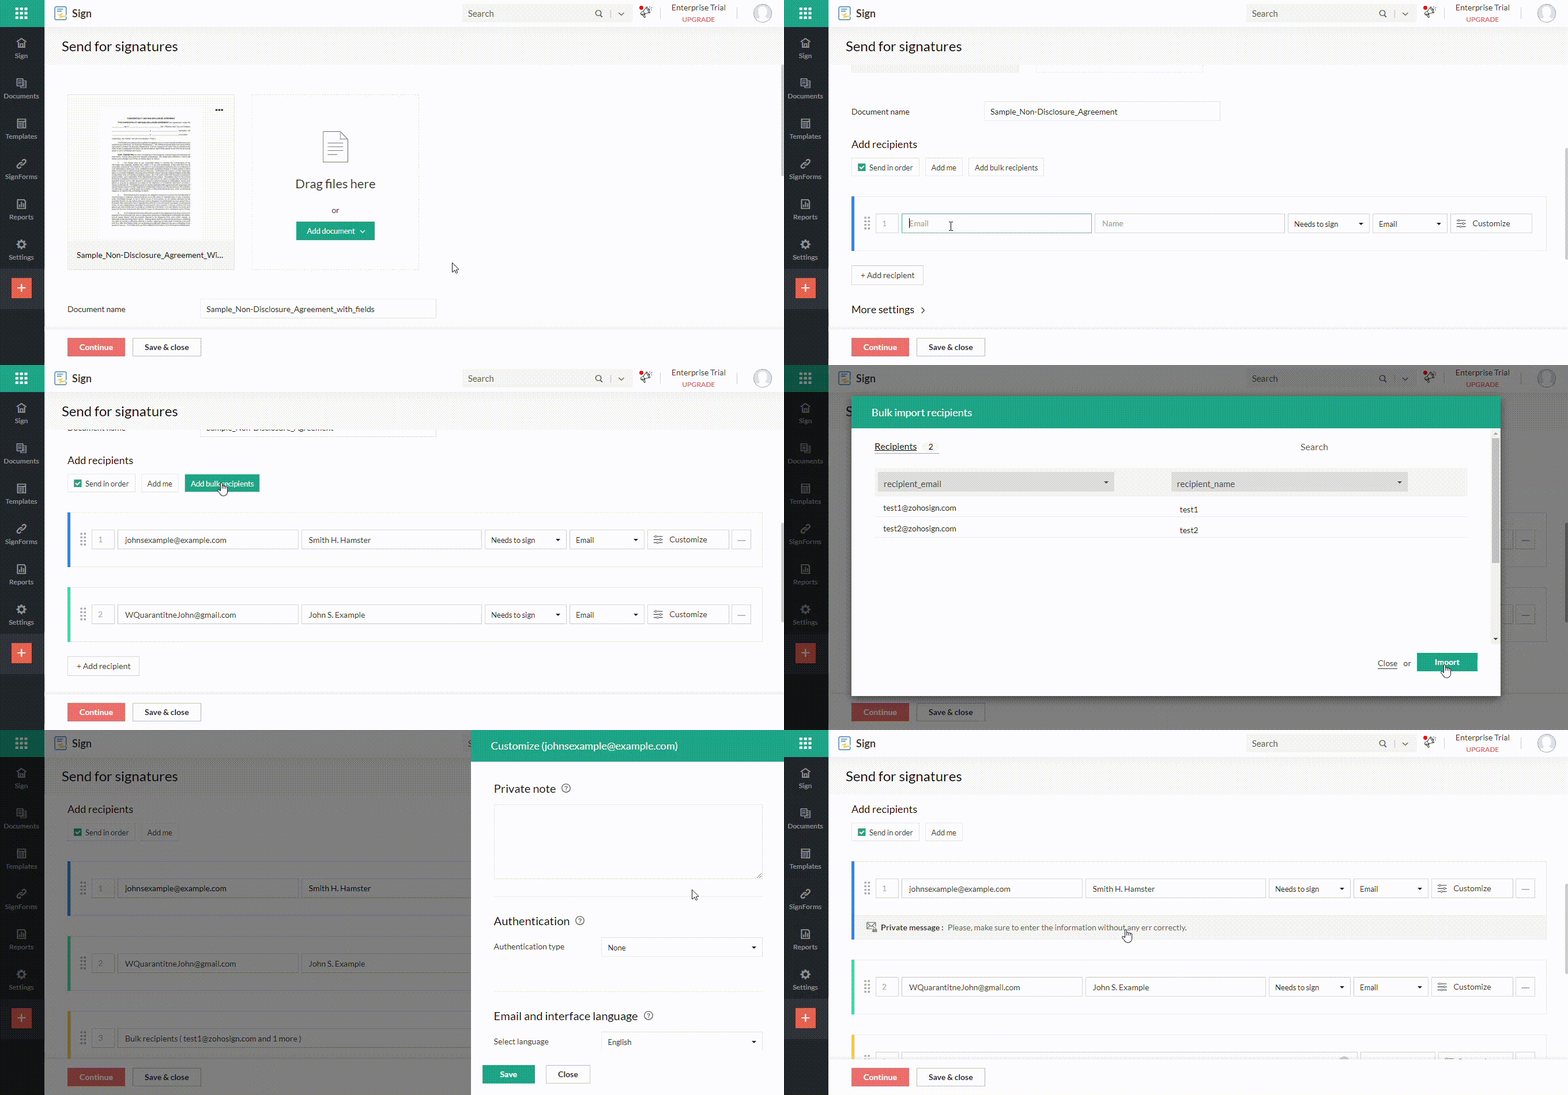
Adding the recipients
Click on More settings to add further critical details. You can select the Days to complete the document signing process by setting a date and many other details.
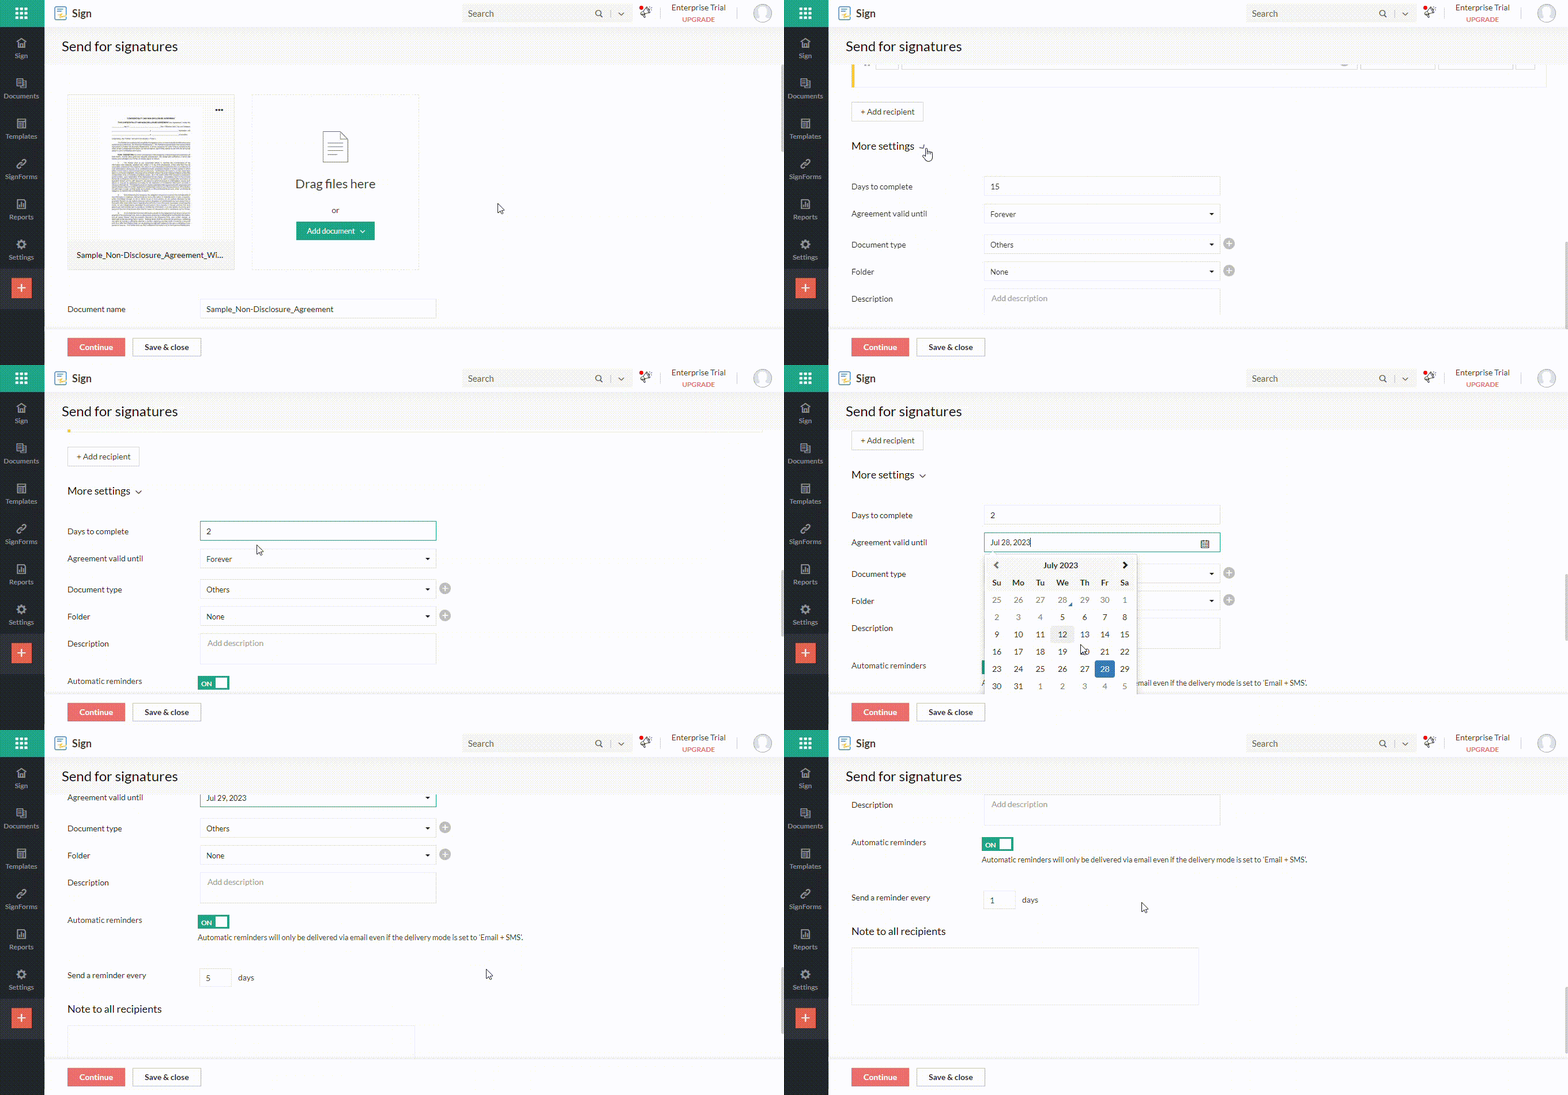
Configuring the document before sending
Create folders or document types to easily group and manage your documents. You can choose an existing folder to add the uploaded documents or create a new one. To do so, click the plus icon next to the dropdown field and enter the name of the folder in the field.
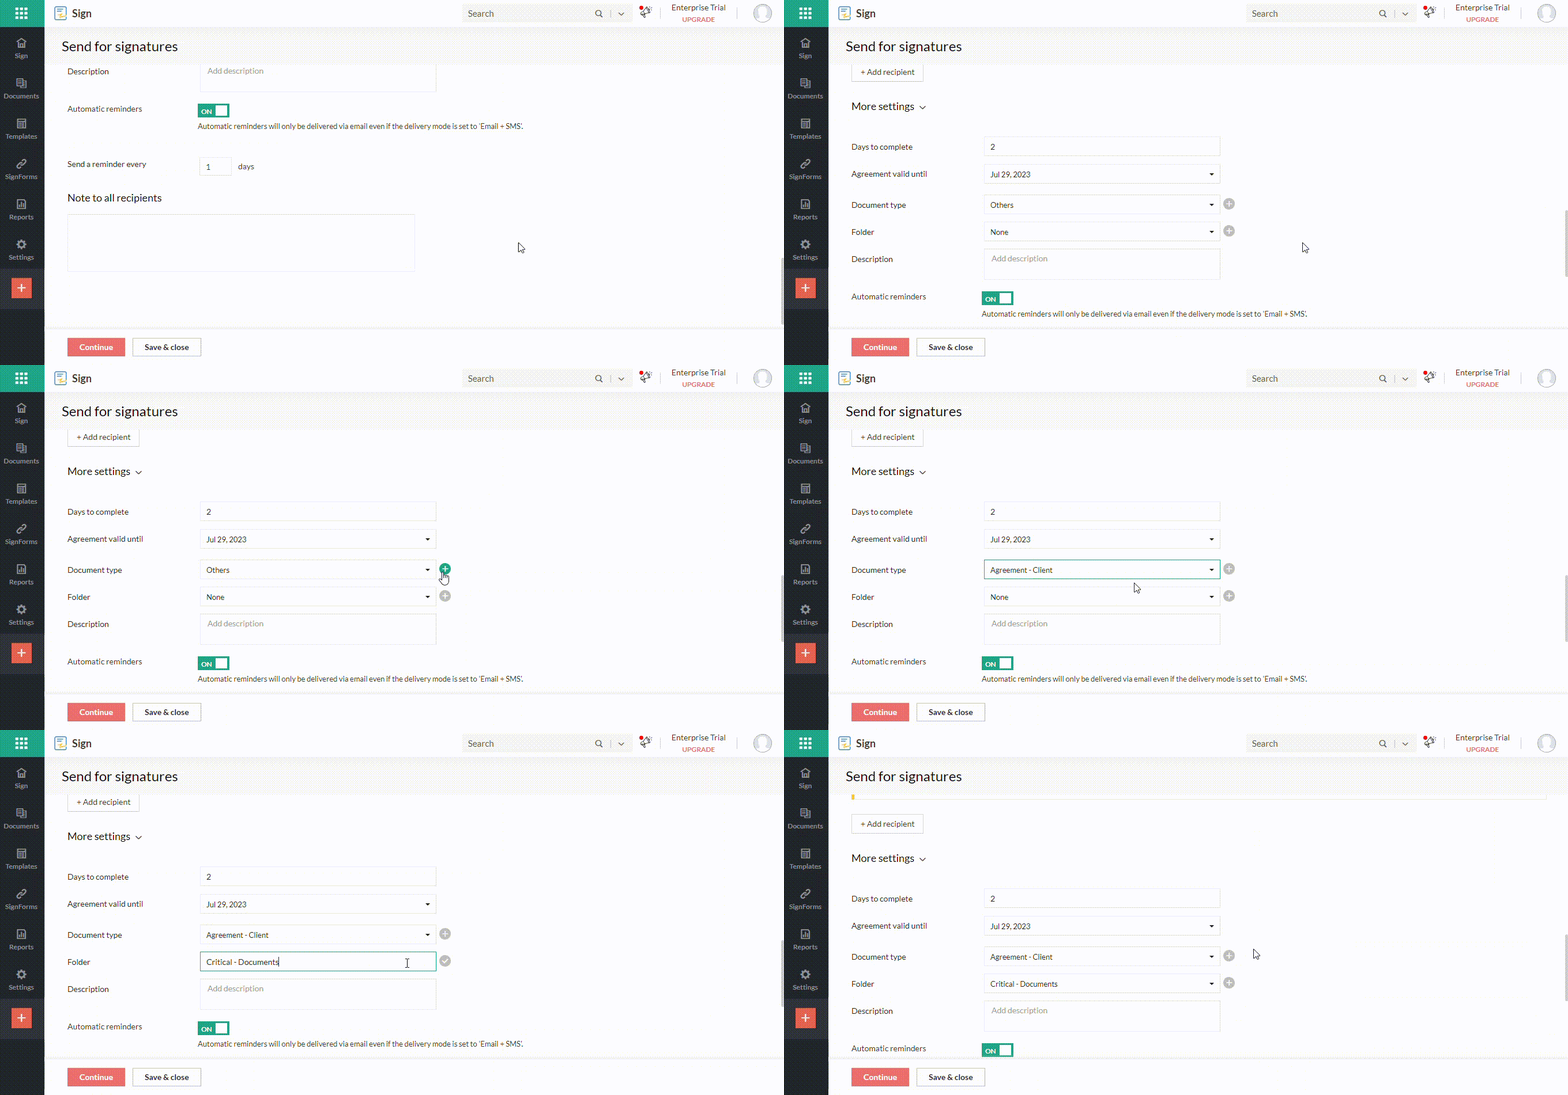
Setting the document type and folder for easy document management
You can set the recipient action using the dropdown menu. When the recipient action is set to:
- Needs to sign – Recipient has to fill form fields and attach their signature to the documents.
- Receives a copy – The recipient receives a signed copy of the documents.
- In-person signer – You need to assign a host from your organization who will get the documents signed in person by the signatory.
- Approver – The recipient has to approve the contents of the document as opposed to signing it or simply viewing it.
Click on Continue to edit the template fields or set the authority on who can edit the fields.
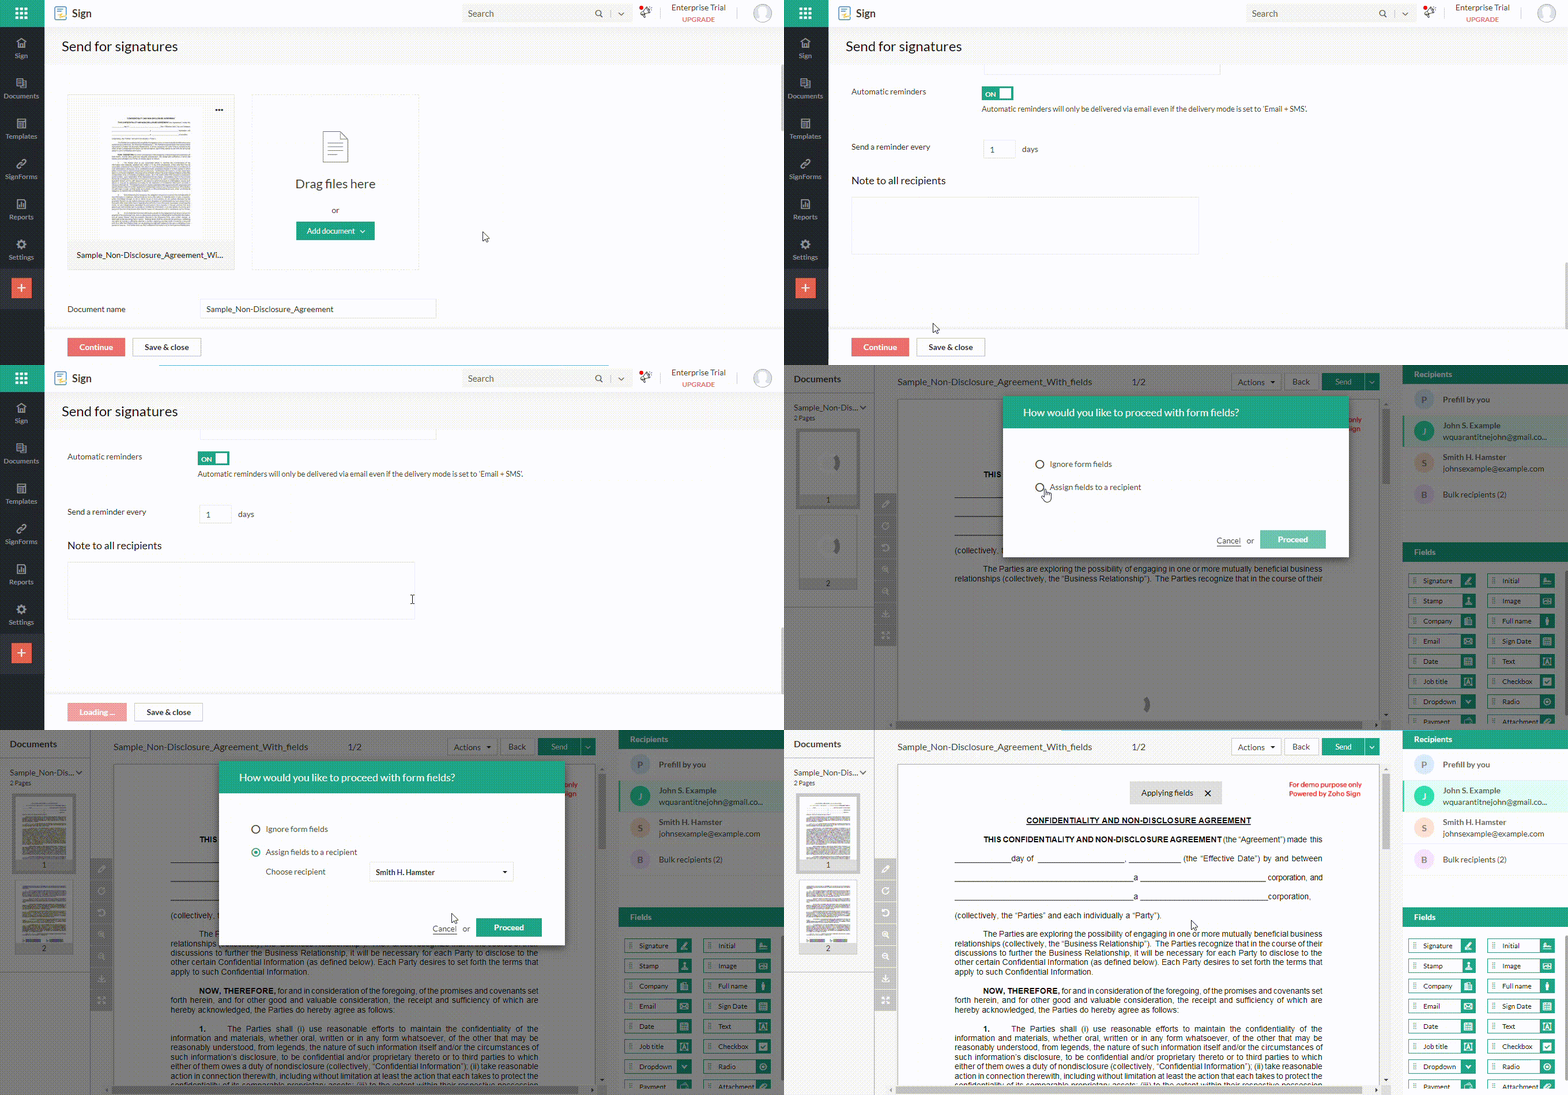
Assigning the form fields to a recipient
Signing Order
Enable a signing order for the documents by checking the Send in order option. This sends the documents to the recipients one-after-the-other to be acted upon. For example, if there are two signatories, the documents would be sent to the second signer only after the first signer has signed the document.
To set the signing order, arrange the recipient list by dragging the rows using the slider icon or entering each recipient’s intended position in the numeric field next to the slider icon. Do this until the desired order is achieved, and then proceed.
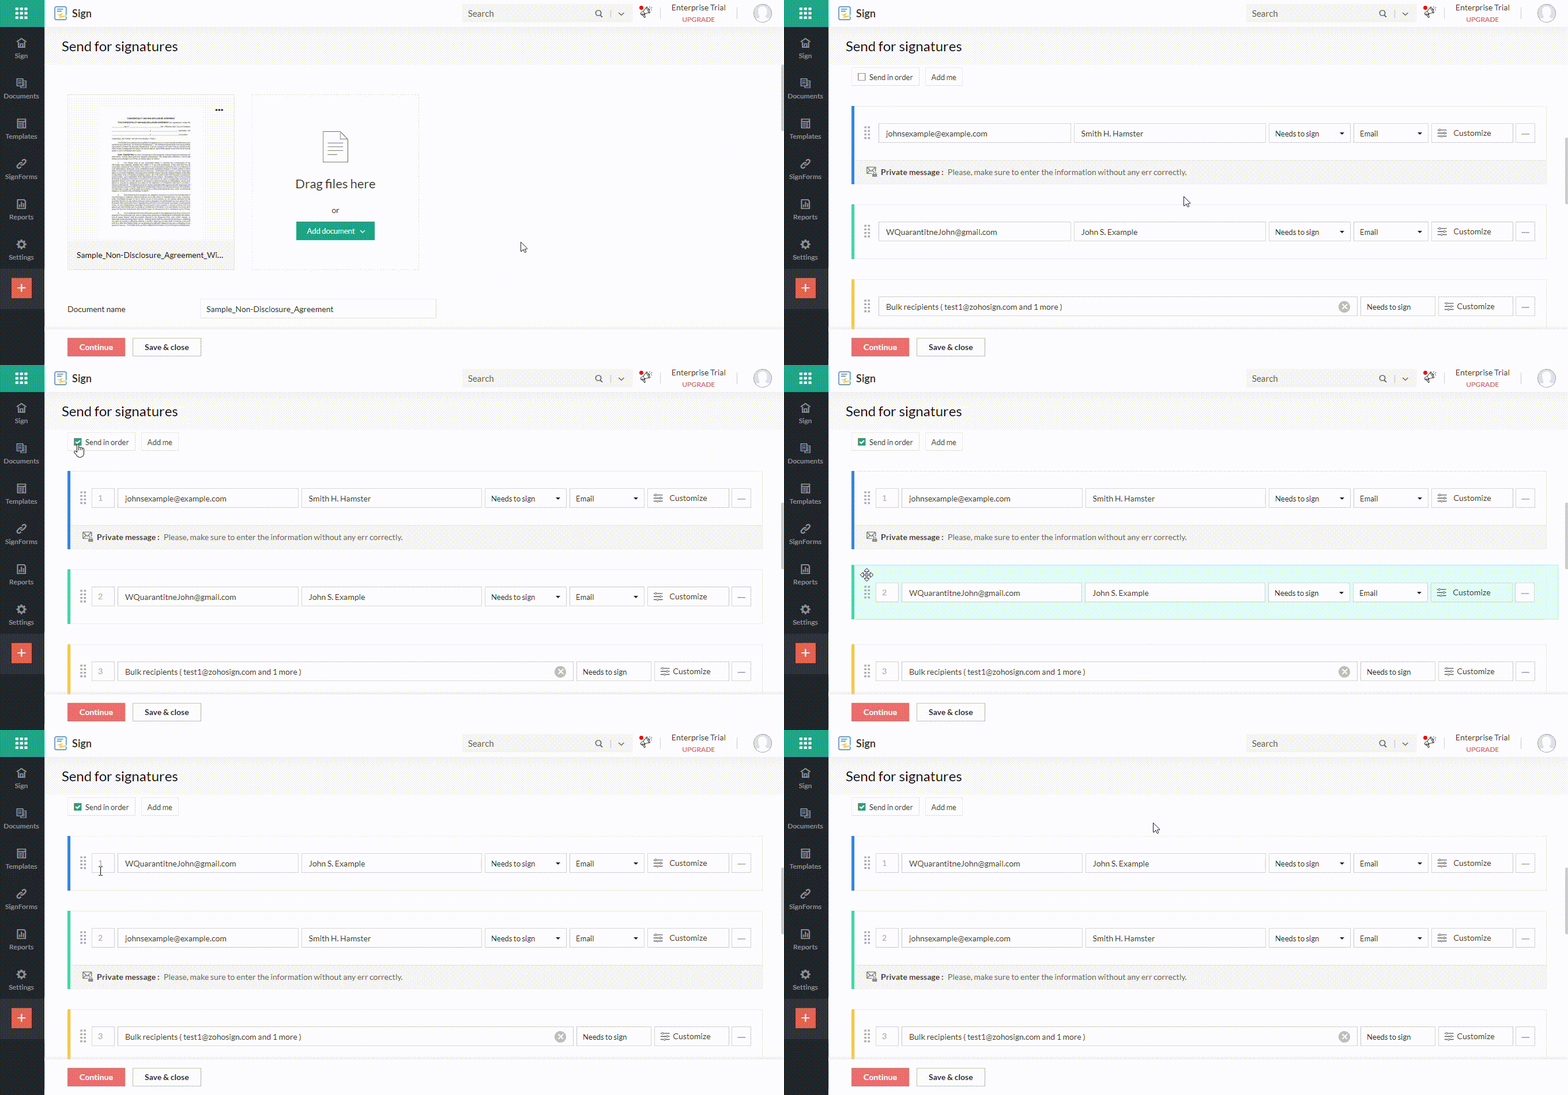
Setting the order in which the document will be signed or filled
Sending documents in bulk
The Bulk Send option enables you to send copies of one or more documents for signing to a large list of recipients in one go.
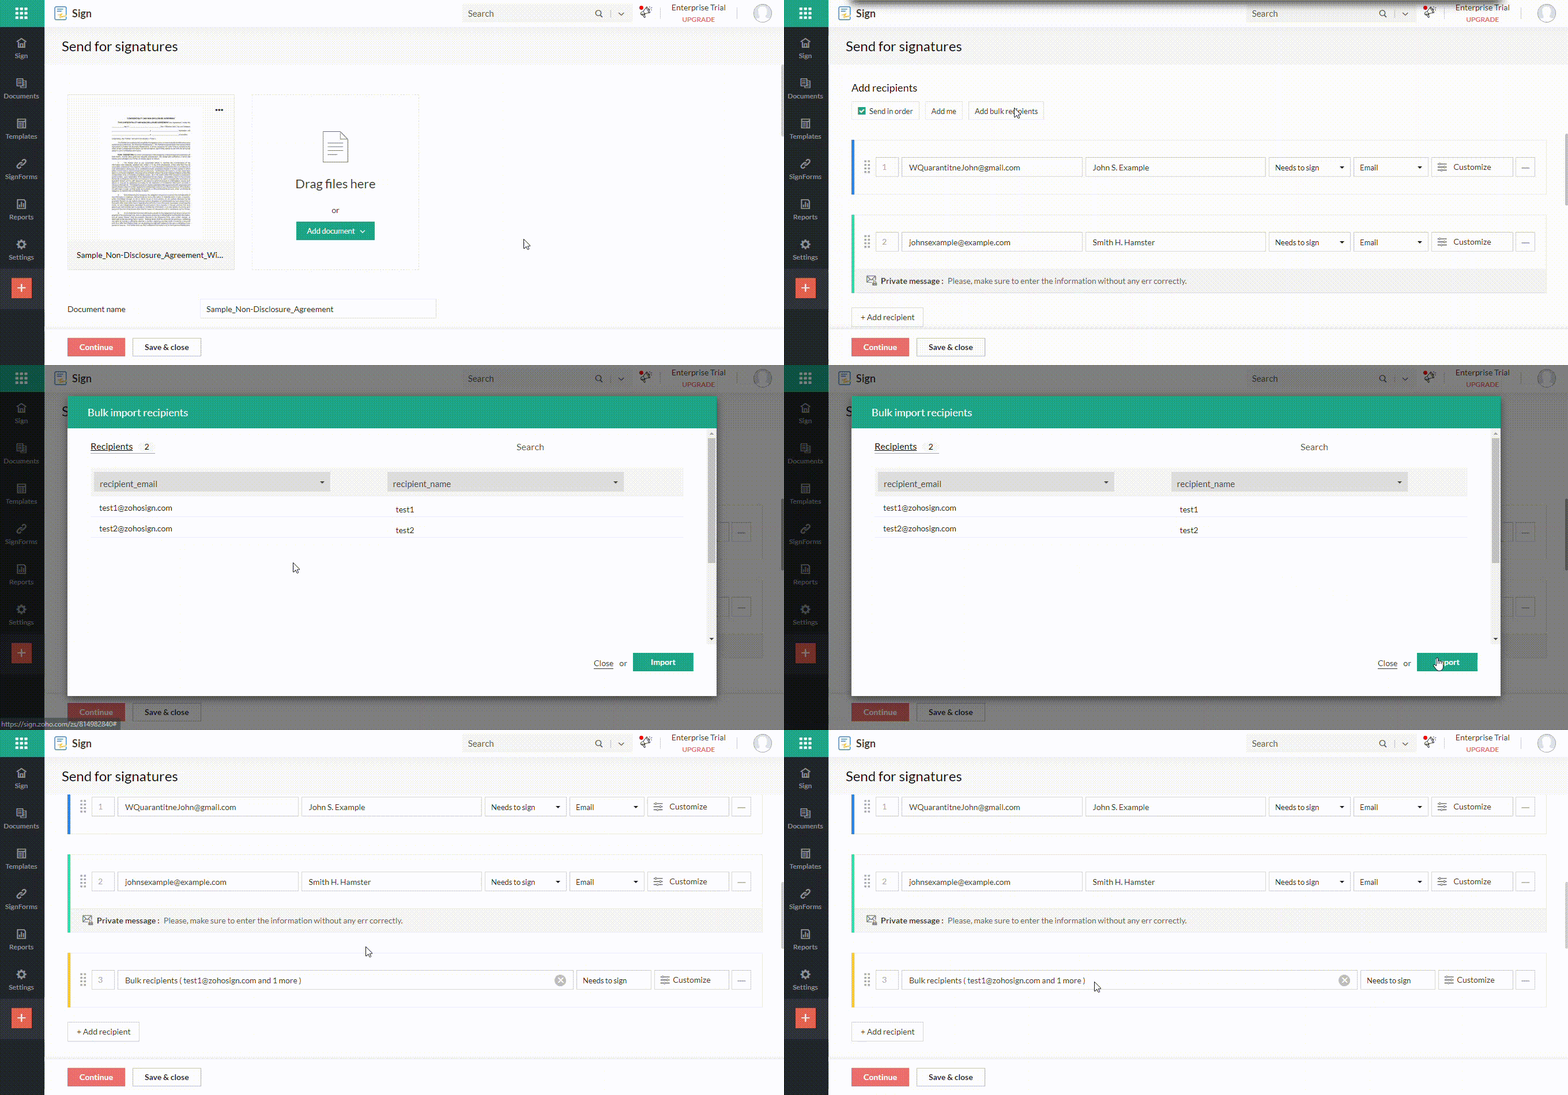
Sending a document to bulk recipients
Document fields in Zoho Sign
When you upload a document in Zoho Sign, you can add a wide range of fields, such as name, email, signature, payment, and much more, to collect information from the signer.
This document will give you an overview of all the available fields, their formatting options, and other available configurations.
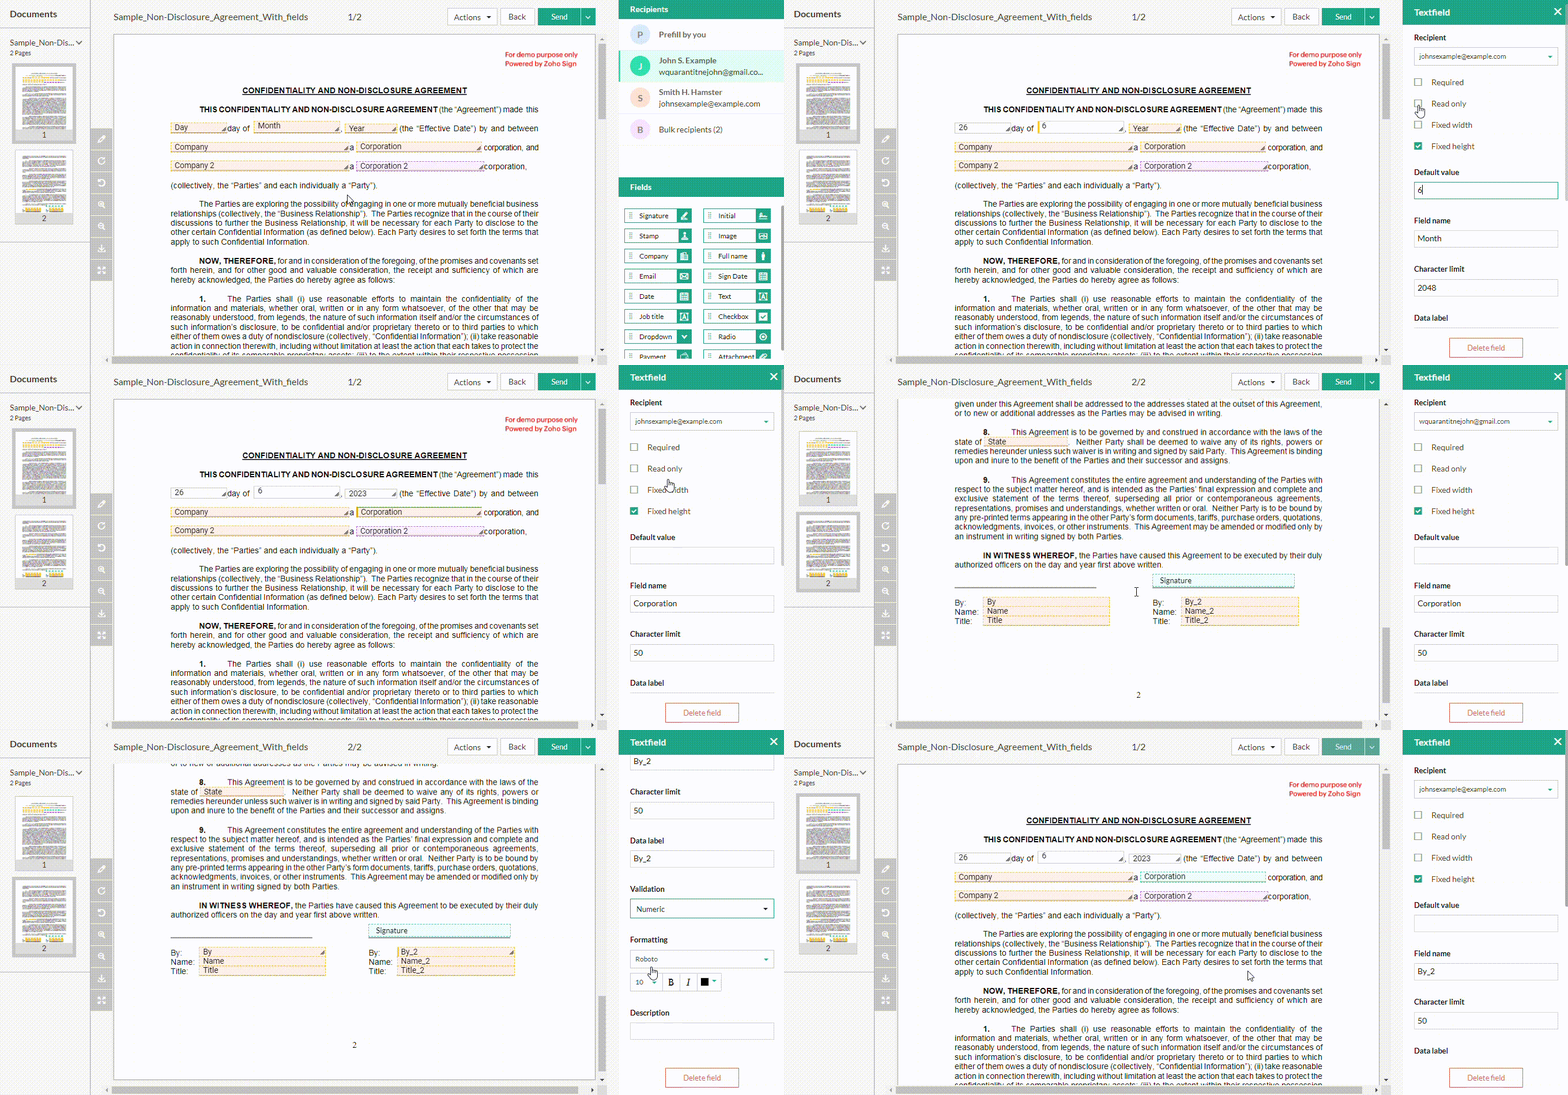
Configuring the document fields and assigning them to different recipients
Sending a document for signature | final part
After the document fields have been set for each recipient, click Send to open the confirmation dialog box, then click Confirm to send the documents.
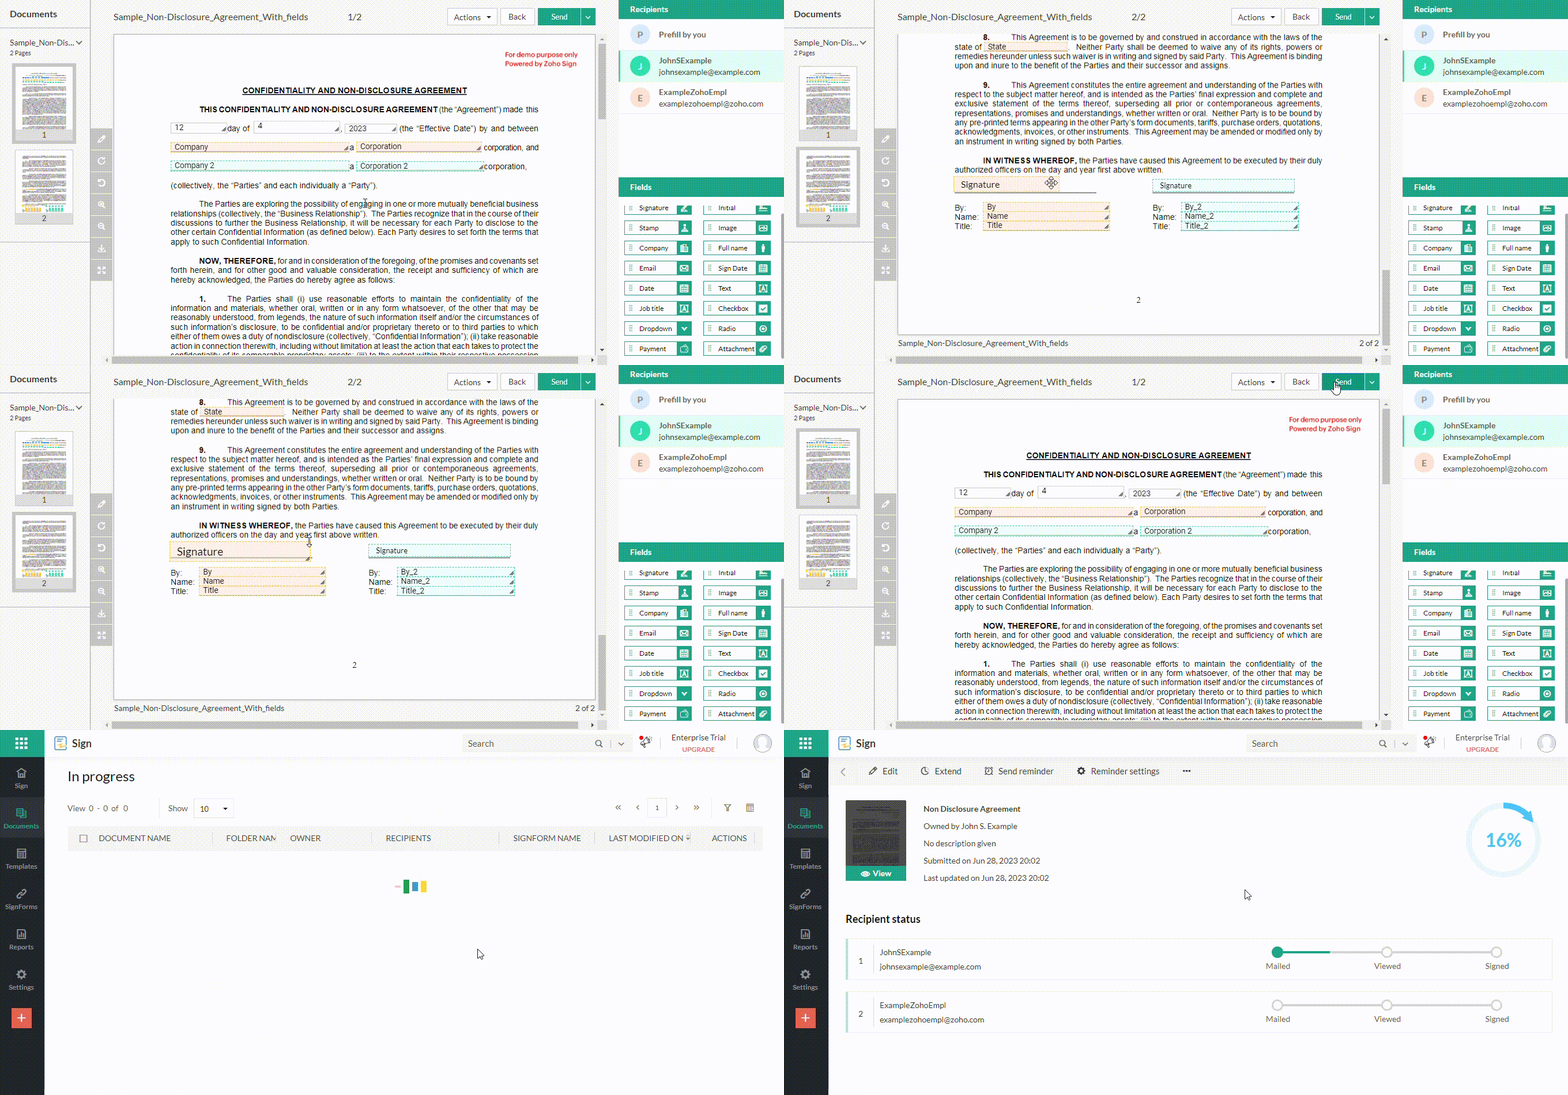
Sending the finalized document for signatures
If the document is sent from a trial account, a watermark, as shown in the screenshot below, will be present in your document.
Zoho Sign will notify the recipient via email, allowing them to review and sign the document electronically, eliminating the need for printing and manual signatures.
Signing the Documents
Signing documents in Zoho Sign offers a seamless and efficient process for obtaining legally binding electronic signatures.
With Zoho Sign, you can transform the traditional paper-based signing process into a digital workflow, saving time, reducing paperwork, and improving overall efficiency.
Setup your signature
An electronic signature (or e-signature) is the most fundamental component of digital signing. It’s essentially your signature stored in digital format. Zoho Sign allows you to set up your e-signature in three ways:
- Type
- Draw
- Upload
To set up your signature: On the left side of your dashboard, find the Settings menu and navigate to your Profile.
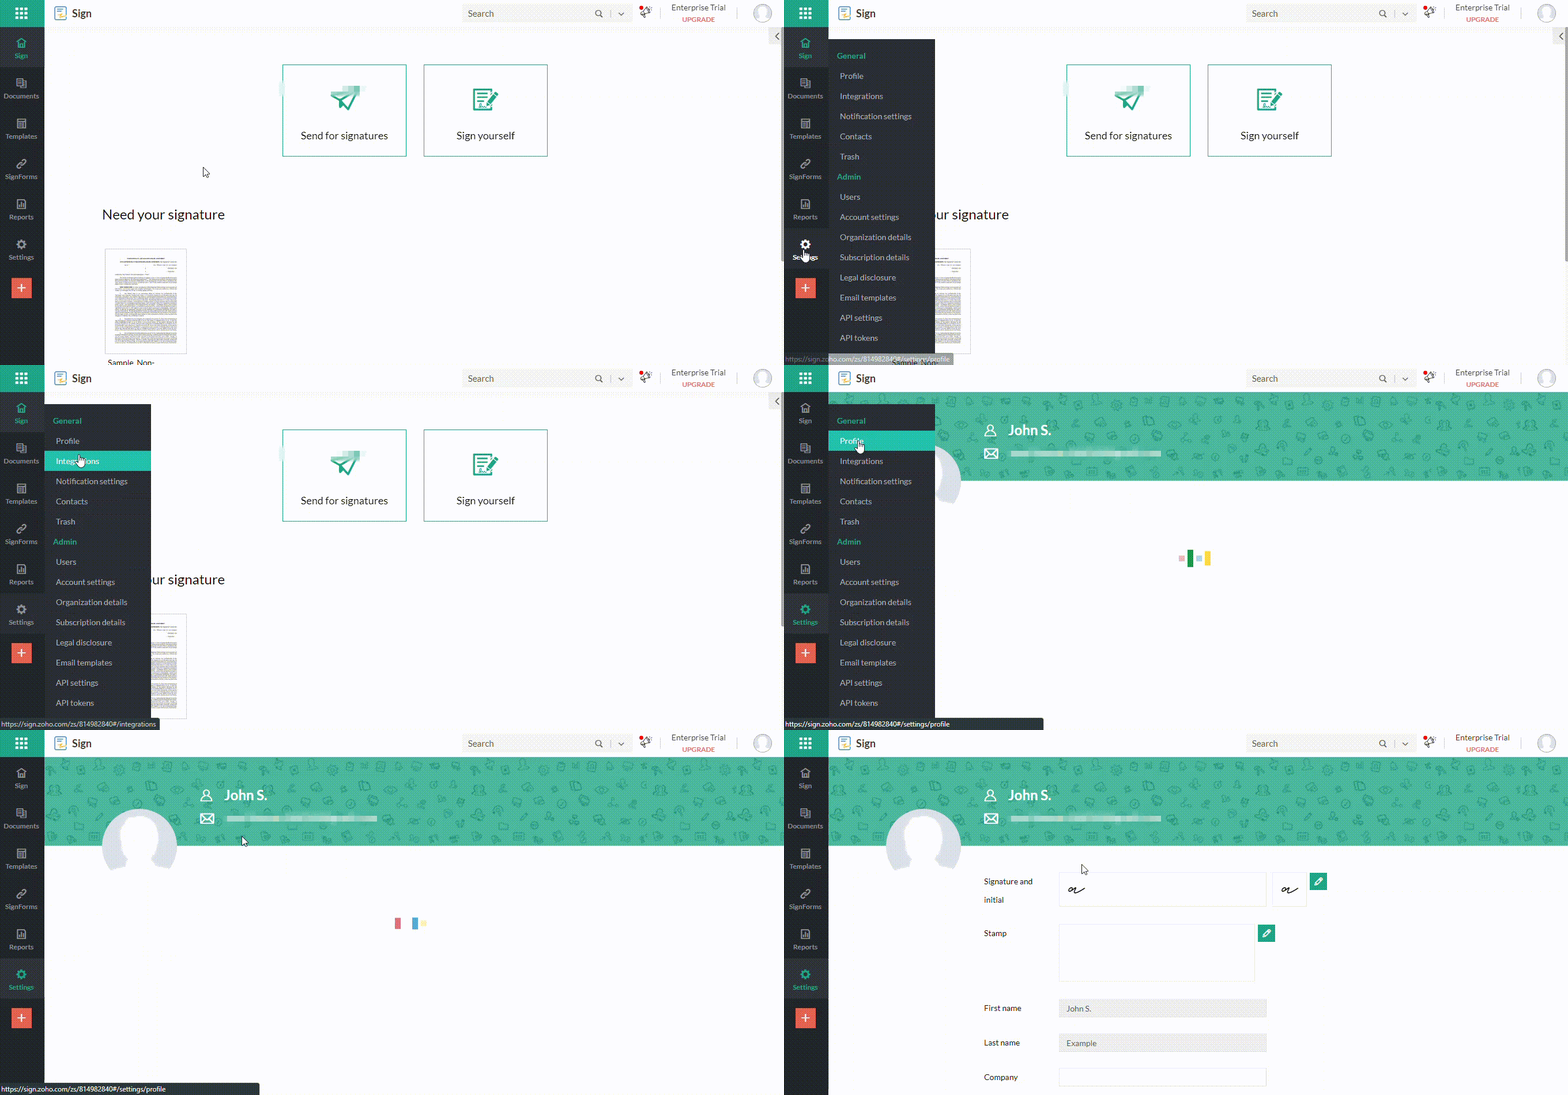
Setting up the signature
Click on the pencil icon next to the Signature and initial fields to open the signature wizard.
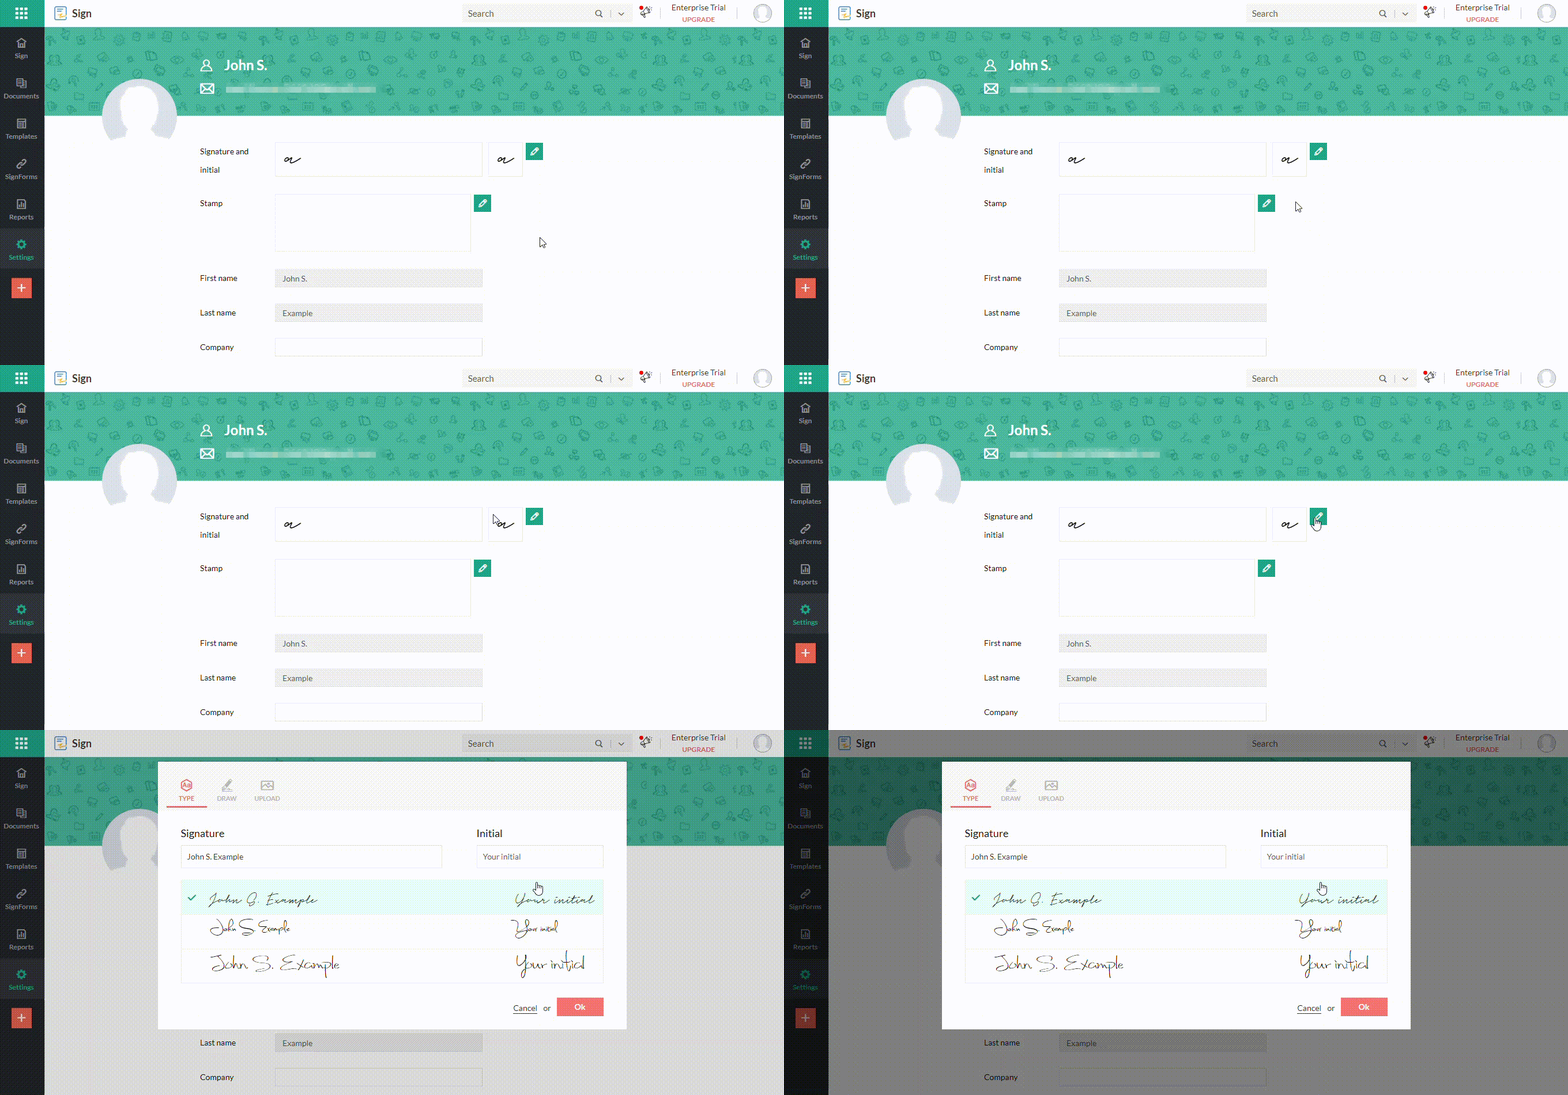
Selecting a signature by either typing, drawing, or importing
If you want to type your signature, click Type at the top. If you want to draw your signature, click Draw, and if you want to upload the document containing your signature, click Upload at the top and click OK.
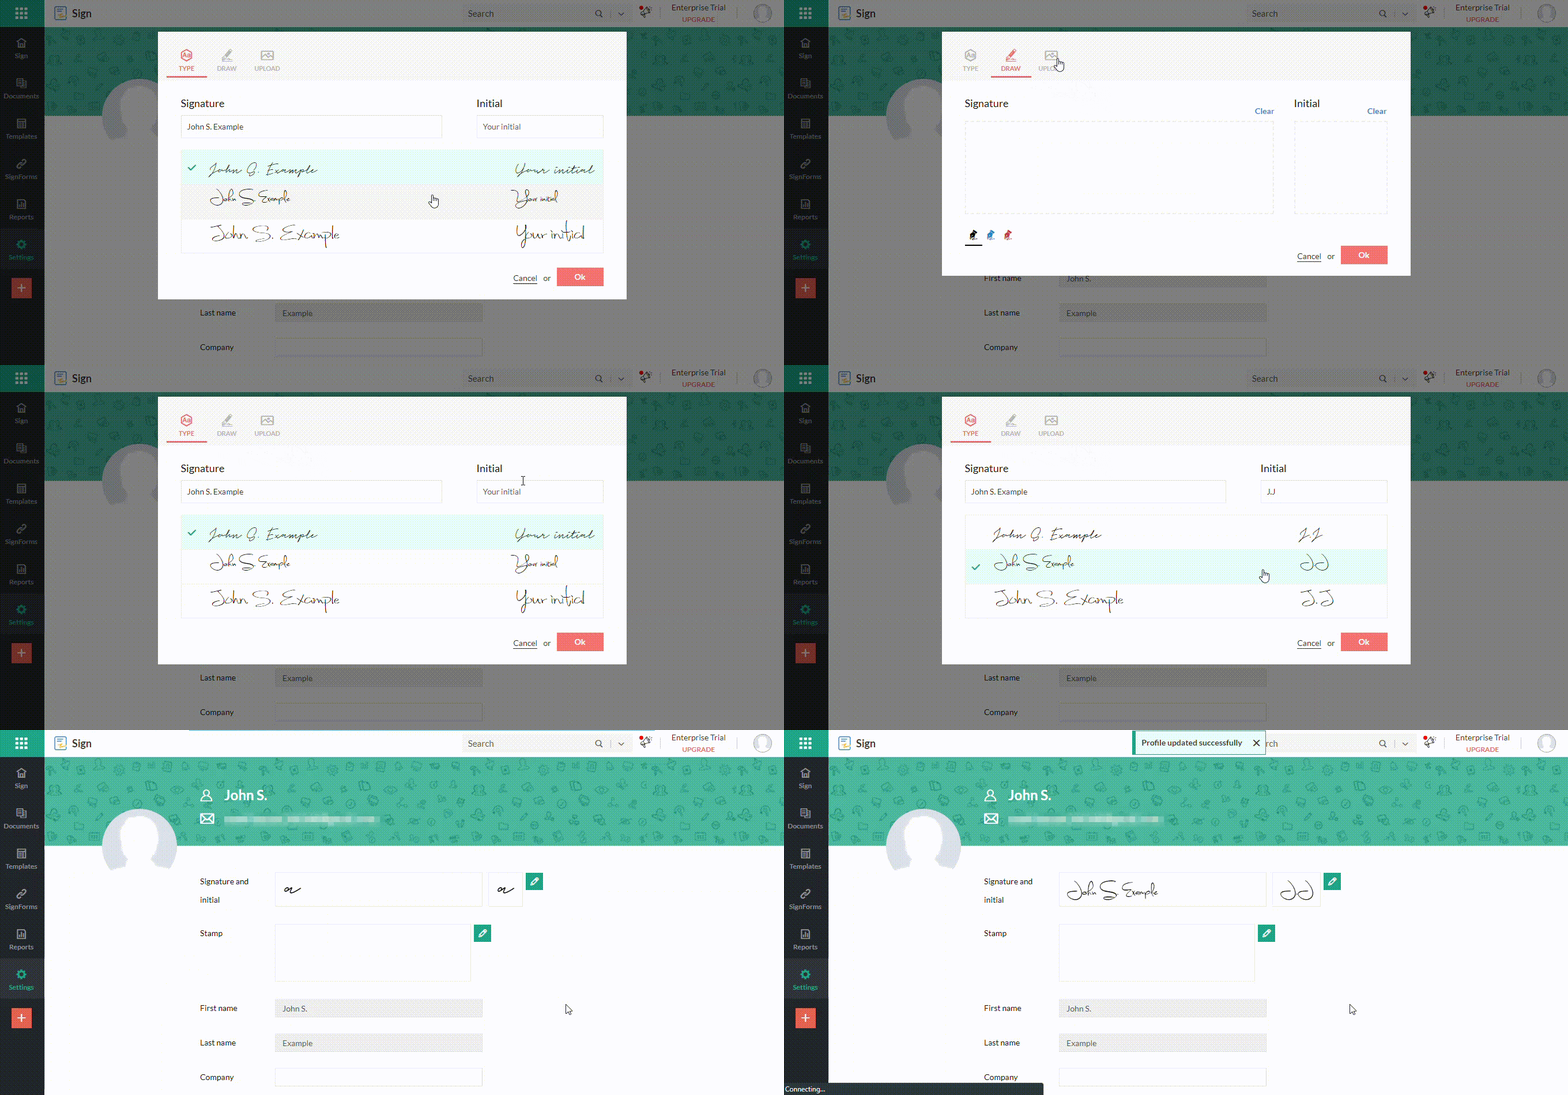
Saving the finalized signature
Signing the documents from the Zoho Sign dashboard
If you are an existing Zoho Sign user, you can sign the documents received from the Zoho Sign dashboard.
To sign documents directly from your Zoho Sign dashboard:
Select the document that you want to sign from the documents listed under the Need your signature category.
Fill in all the input fields on the document viewer page and click the Finish option to complete the signing process.
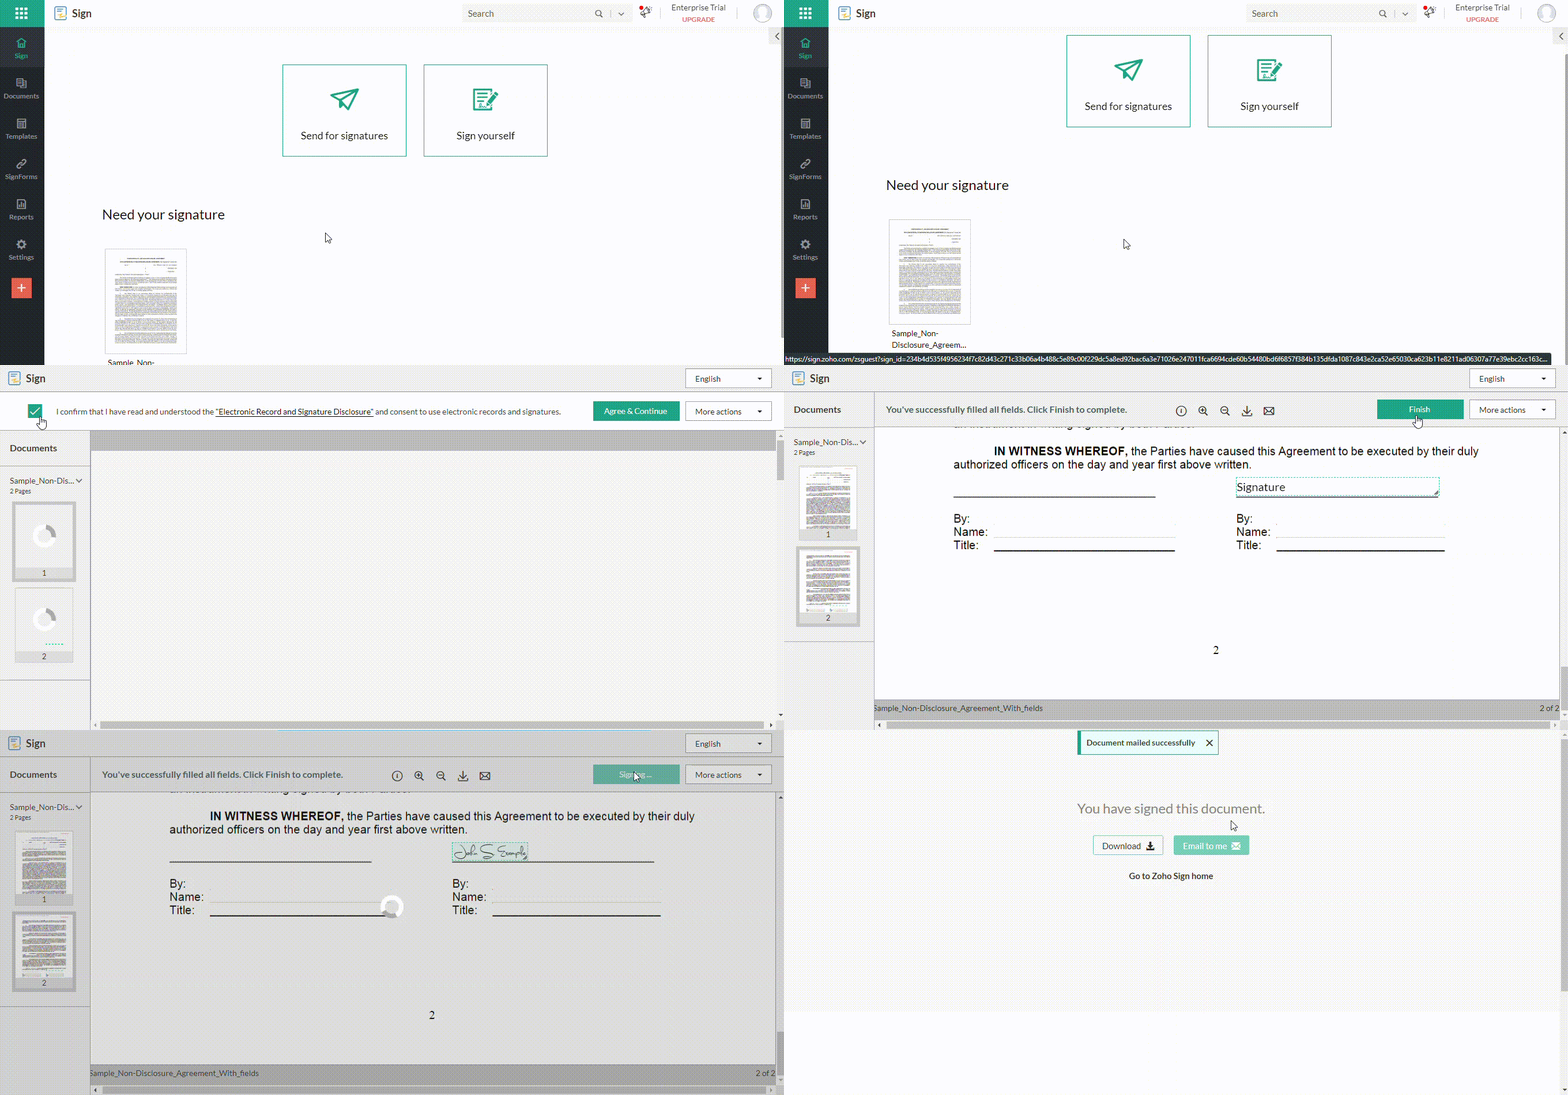
Signing documents directly from the Zoho Sign dashboard
To sign documents yourself: Click Sign Yourself on your dashboard. Alternatively, click the plus icon on the left navigation panel and select Sign yourself from the dropdown menu.
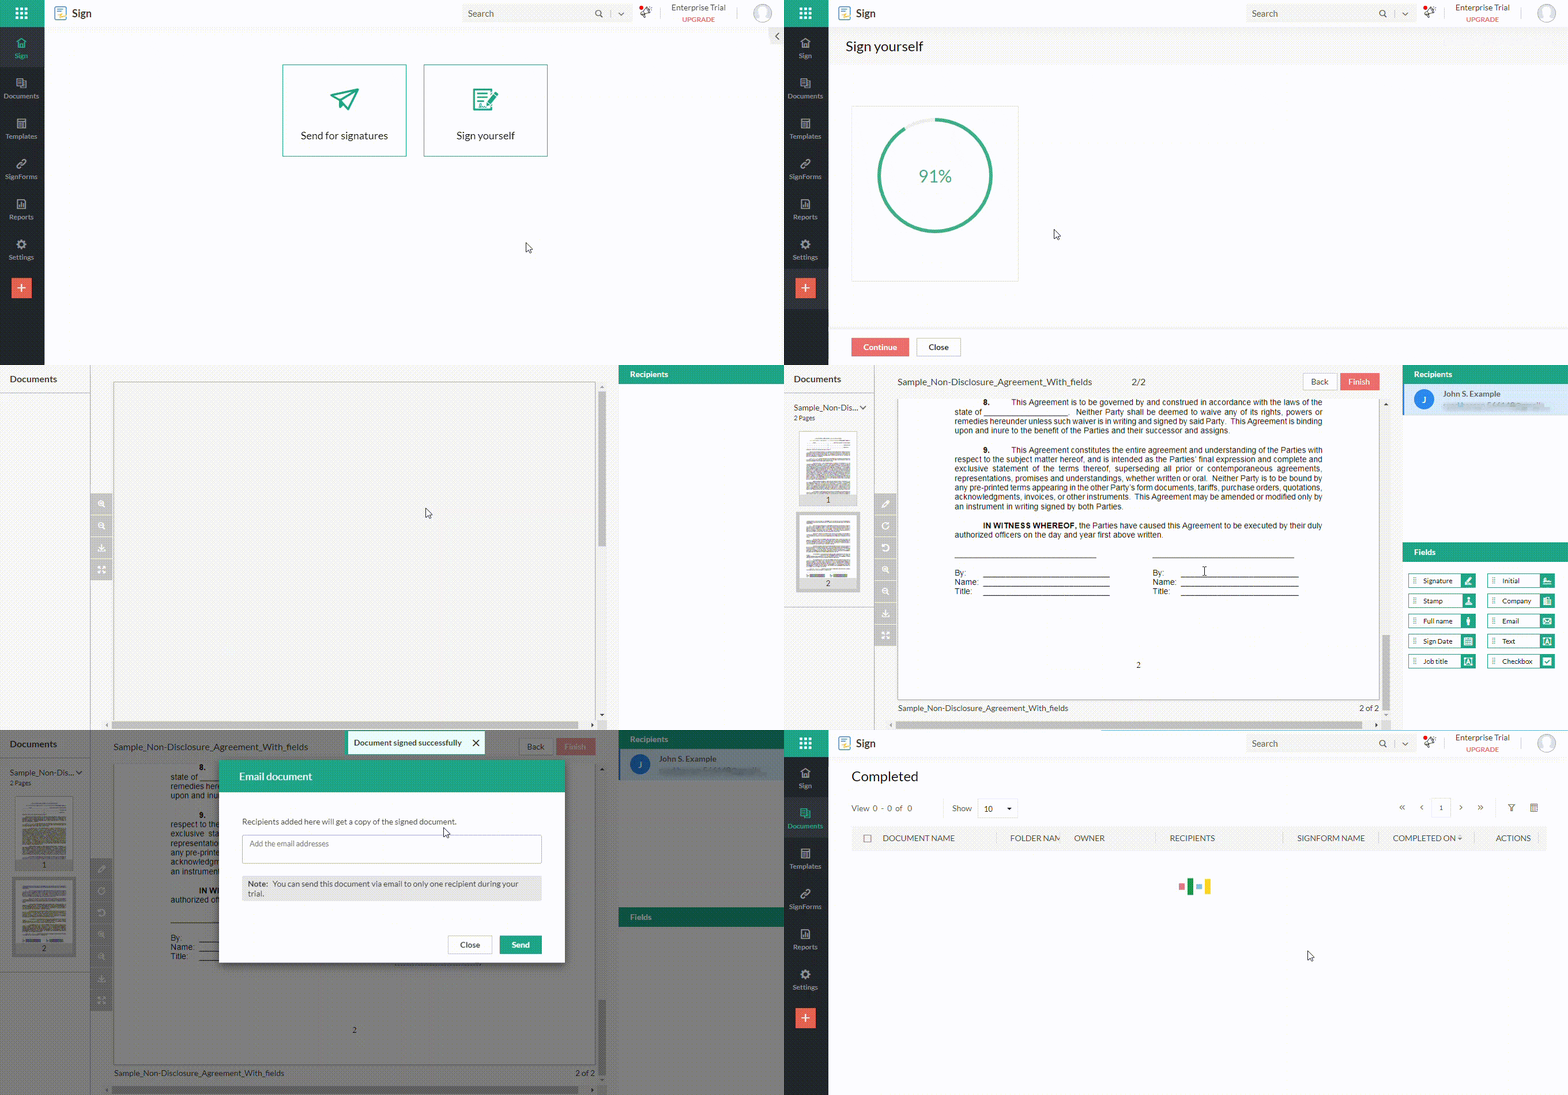
Signing documents yourself
Signing the documents from email
When the recipient receives the email notification, they can easily sign the document using Zoho Sign’s intuitive interface. Here’s how they can sign:
There are three steps to sign documents directly from your email inbox.
- Access the documents via a secure link in the email
- Confirm identity
- Fill in the form fields and send the signed documents

Signing the documents from an email
Zoho Sign ensures the integrity and security of the signed documents, providing a legally binding electronic signature.
Downloading the completion certificate for signed documents
Once all parties have signed the document, keeping a record of the completed and signed HR forms is essential. Zoho Sign allows you to download a completion certificate for each signed document.
Zoho Sign provides the option to download the certificate of completion. This certificate contains a complete audit trail of the signed document.
It can be used for legal documentation if it is tampered with or if any other legal questions arise.
To download the certificate of completion:
From the left navigation pane, hover the mouse over Documents and click Completed. Select the document from the list by clicking on the document’s name.
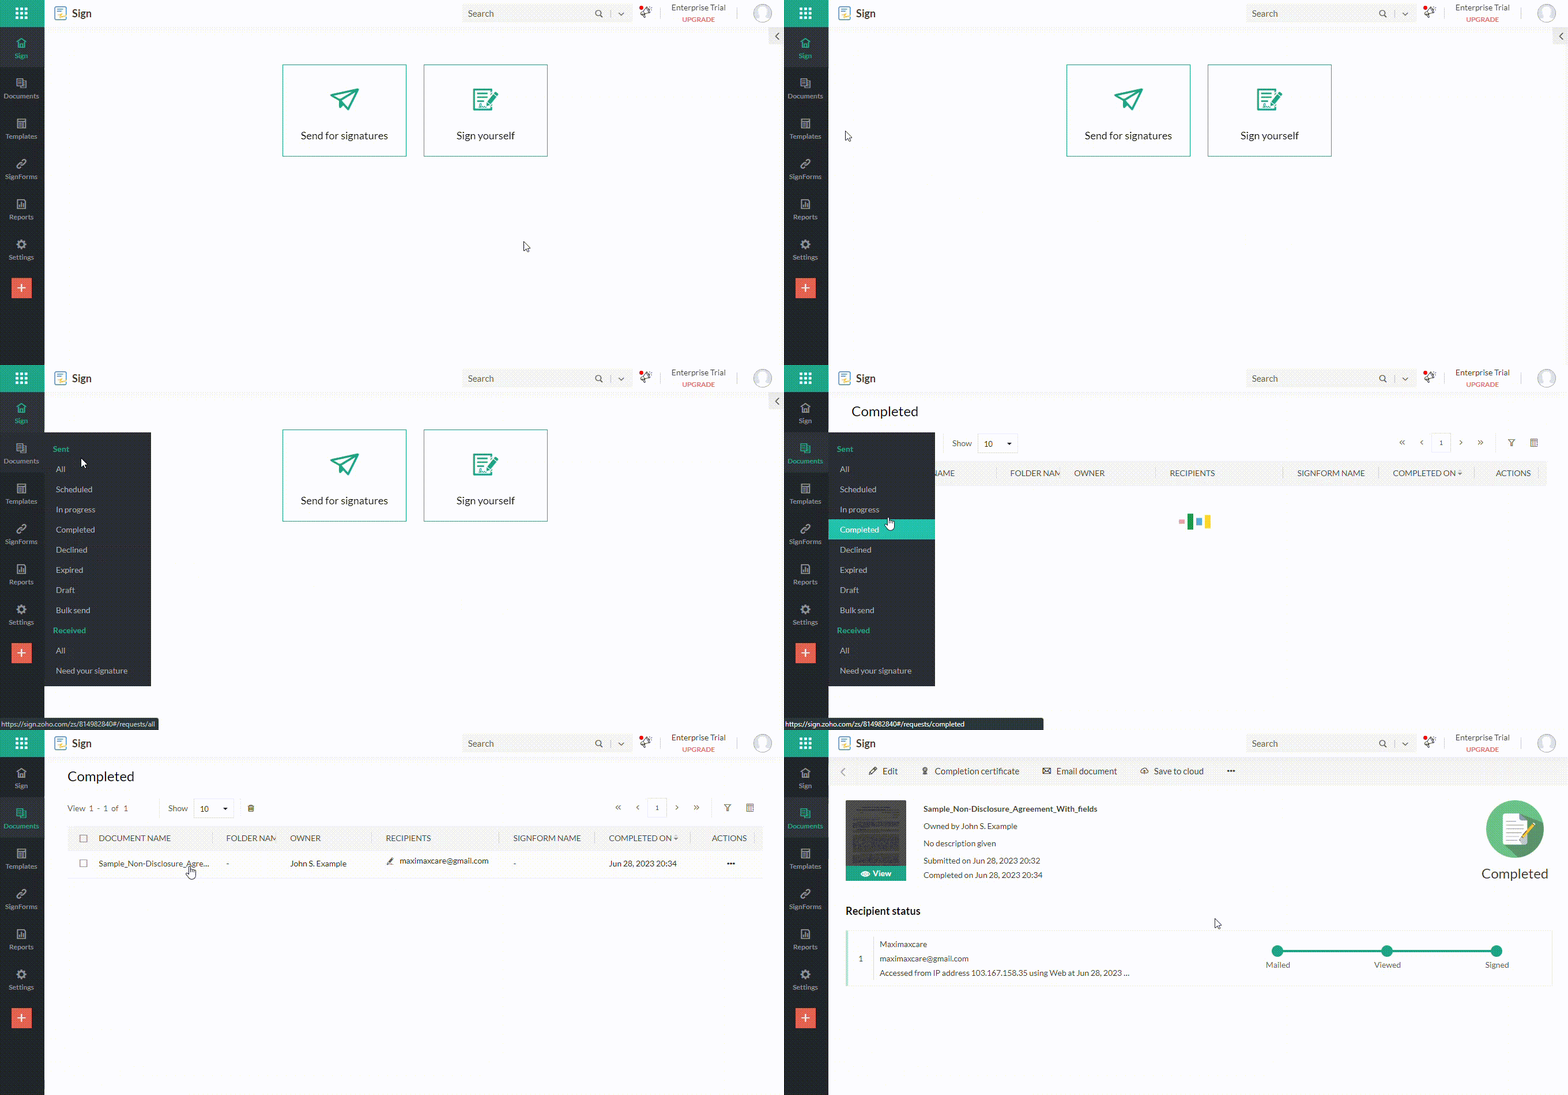
Tracking the completion certificate
Click the Completion certificate at the top of the detailed view screen. The download will begin automatically.
Click on the three dots from the document’s detail view screen to view more download options and select Download. Select the desired option and click Download.
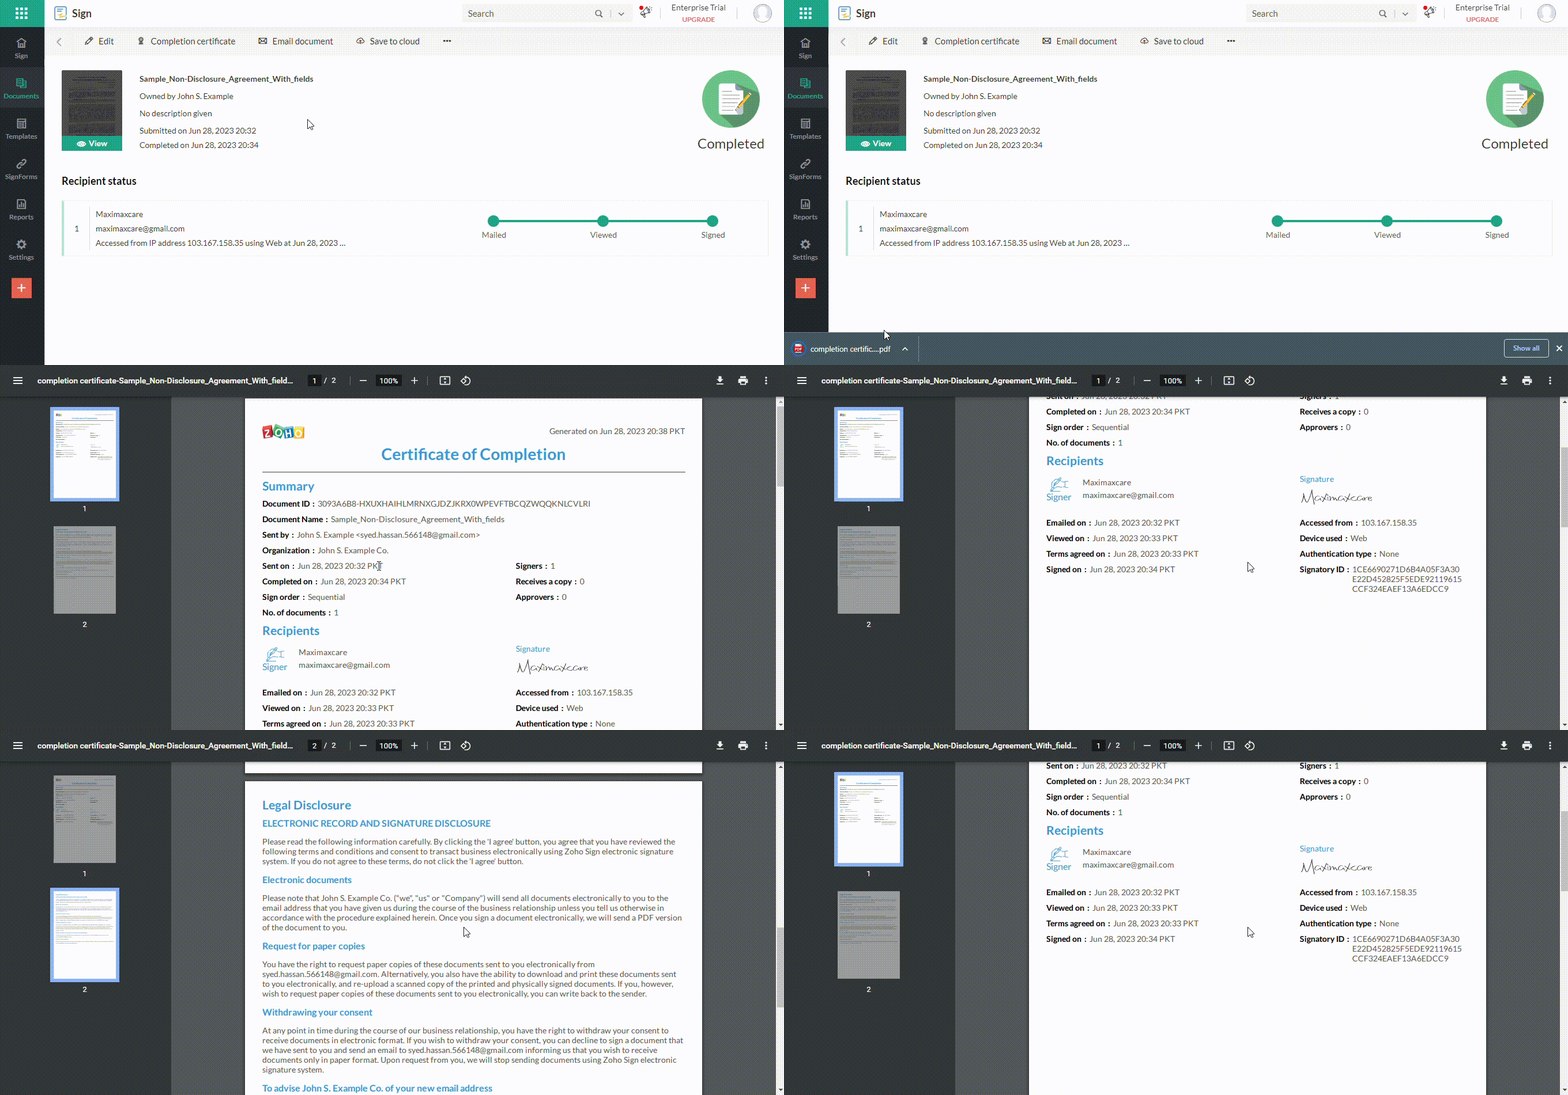
Downloading the Certificate of Completion
The completion certificate serves as proof of completion and can be used for auditing, compliance, or legal purposes.
Conclusion
By leveraging Zoho Sign templates and sign forms, HR professionals can automate the capture of HR information, streamline workflows, and reduce the administrative burdens associated with manual paperwork.
Creating templates, sending documents for signature, signing electronically, and downloading completion certificates have become seamless processes with the power of Zoho Sign.
Embrace this digital transformation to enhance efficiency, improve accuracy, and elevate your HR operations to new heights. Say goodbye to paper-based HR documentation and embrace the convenience of Zoho Sign.

