Zoho Projects Permissions | Configuring Global Timers and Tab Access
Unlocking the full potential of a project management platform often hinges on the fine-tuned control of user access and privileges. In Zoho Projects, this control is achieved through a sophisticated system of permissions that govern what users can see and do within the portal.
Published on March 1, 2024

Who is this feature for?
- Project Managers & System Administrators
- Team Leaders & Team Members
- Clients & New Users
What progress will you accomplish?
- Efficient collaboration and improved task management
- Enhanced data security and faster task completion
- Effective project oversight and improved communication
Introduction
Unlocking the full potential of a project management platform often hinges on the fine-tuned control of user access and privileges. In Zoho Projects, this control is achieved through a sophisticated system of permissions that govern what users can see and do within the portal.
In this comprehensive guide, we will delve into two critical aspects of permissions management within Zoho Projects: Global Timer Permissions and Tab Access Permissions.
These two key features empower administrators and project managers to not only track time efficiently but also customize the workspace by organizing tabs to enhance collaboration.
Global Timer in Zoho Projects
Global Timers in Zoho Projects represent a powerful time-tracking and management tool designed to enhance efficiency and productivity in project management workflows.
This feature empowers users to precisely monitor and log the time spent on individual tasks and issues, ensuring accurate project tracking and billing.
Global Timers provide flexibility by allowing users to initiate timers from various views, such as task details and board view, streamlining the process of tracking work hours.
With the ability to categorize timers, pause and resume tracking, and access comprehensive timer views, Zoho Projects’ Global Timers facilitate seamless time management.
Additionally, administrators can gain a holistic view of timers logged by all team members across projects, fostering enhanced project oversight.
How to Manage All Running Timers (Global Timer) in Zoho Projects?
It allows users to efficiently track and manage time spent on tasks and issues within their projects.
To access all running timers, log in to your Zoho Projects account. Once logged in, you can access them from virtually any page within Zoho Projects by simply clicking the Global Timer Widget (stopwatch icon).
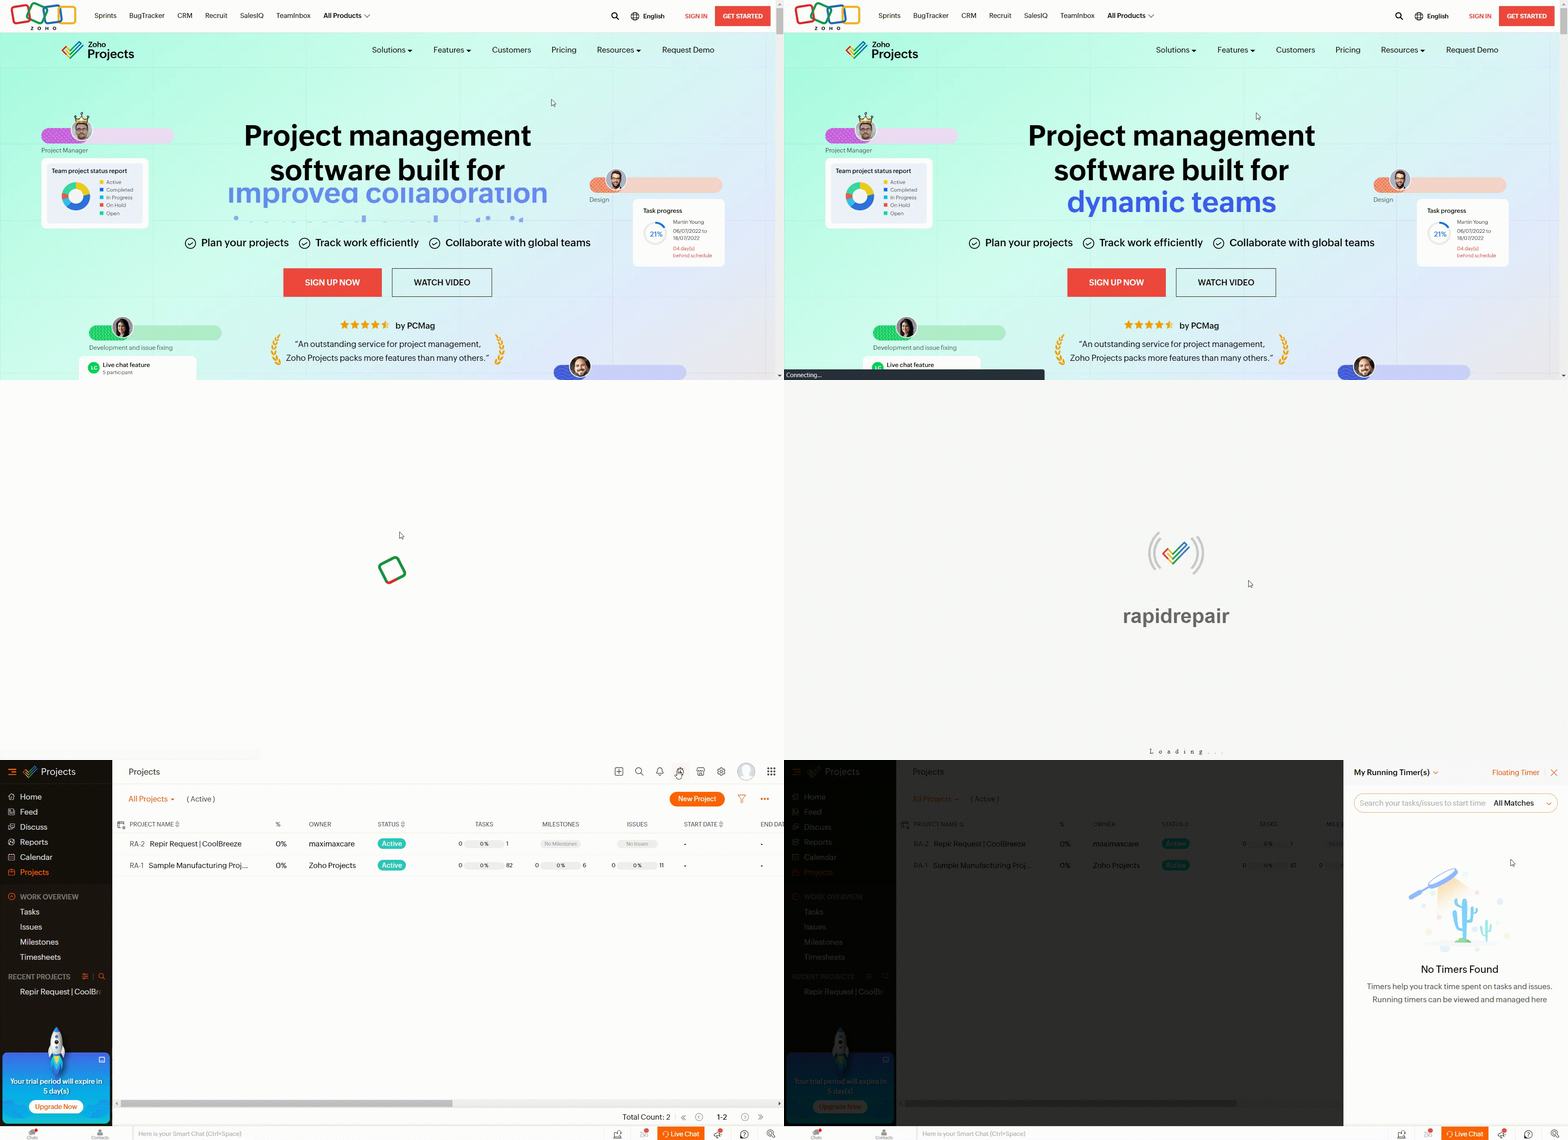
In the search box within the widget, type the work item’s ID or name for which you want to track time. Then, select the Start button located next to the work item name to track time for a specific task.
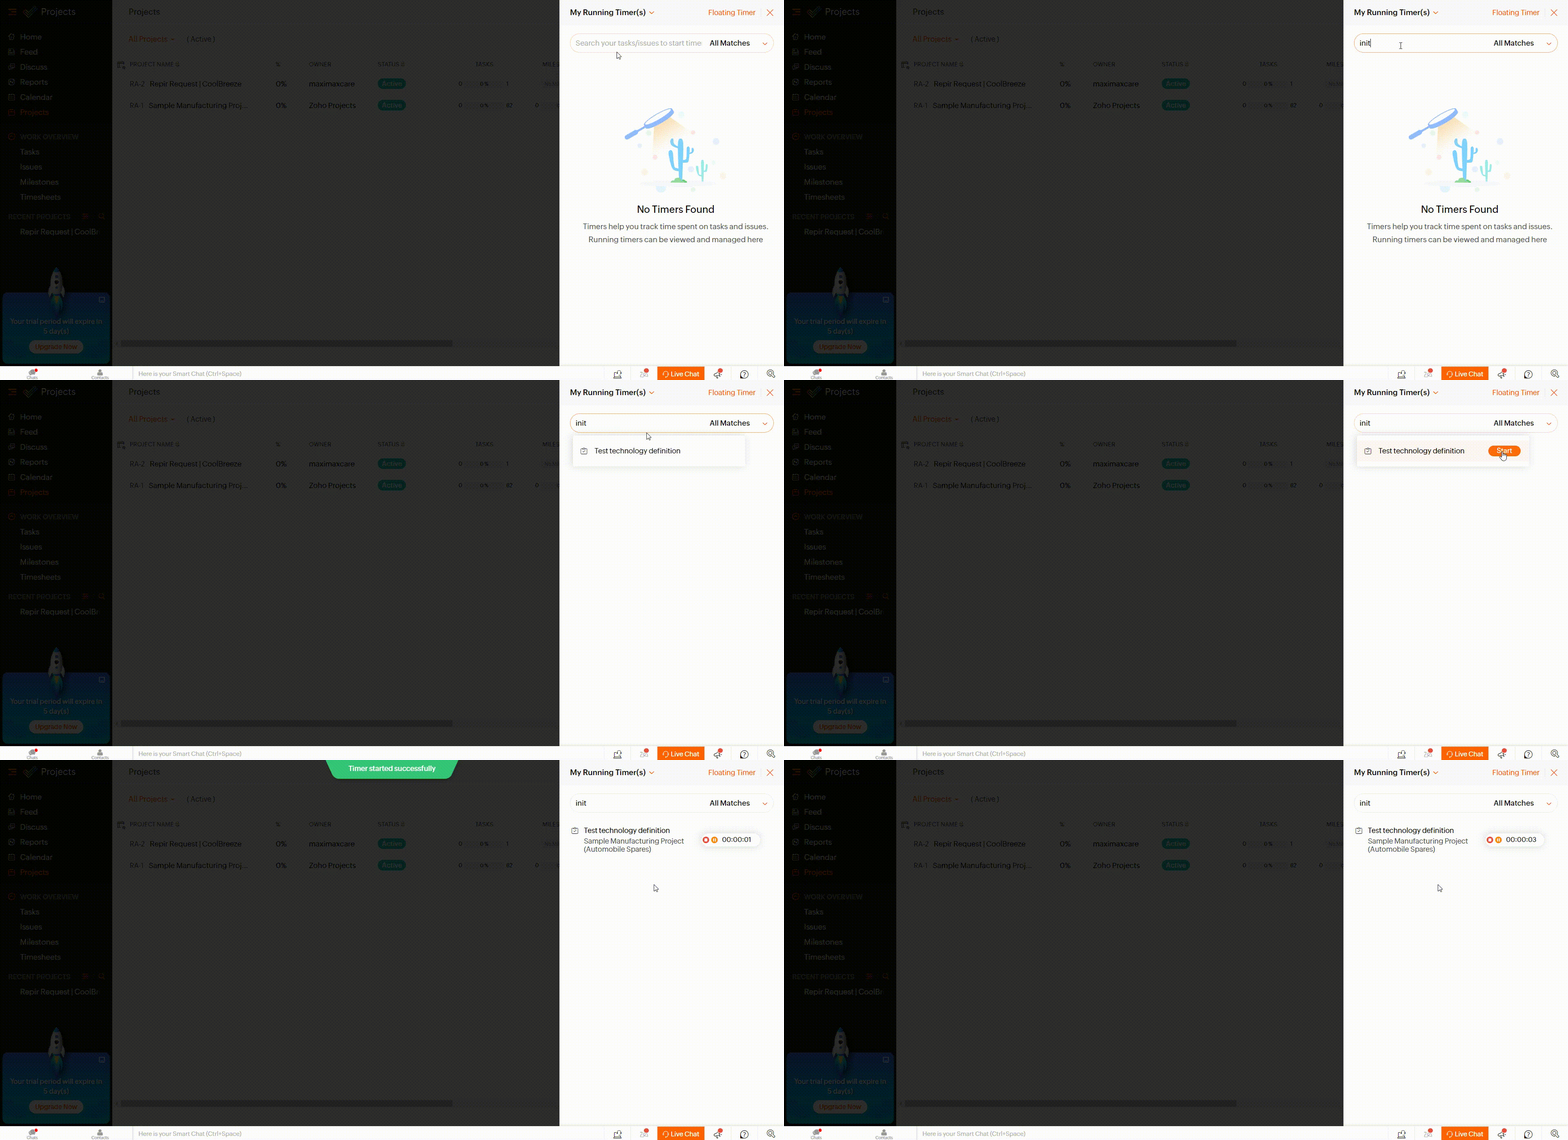
The moment has come to handle your active timers. To oversee them, simply click on the Global Timer Widget, where you’ll find a comprehensive list of all active timers.
From this central location, you can start, stop, pause, or resume timers without the need to navigate to individual task or issue views.
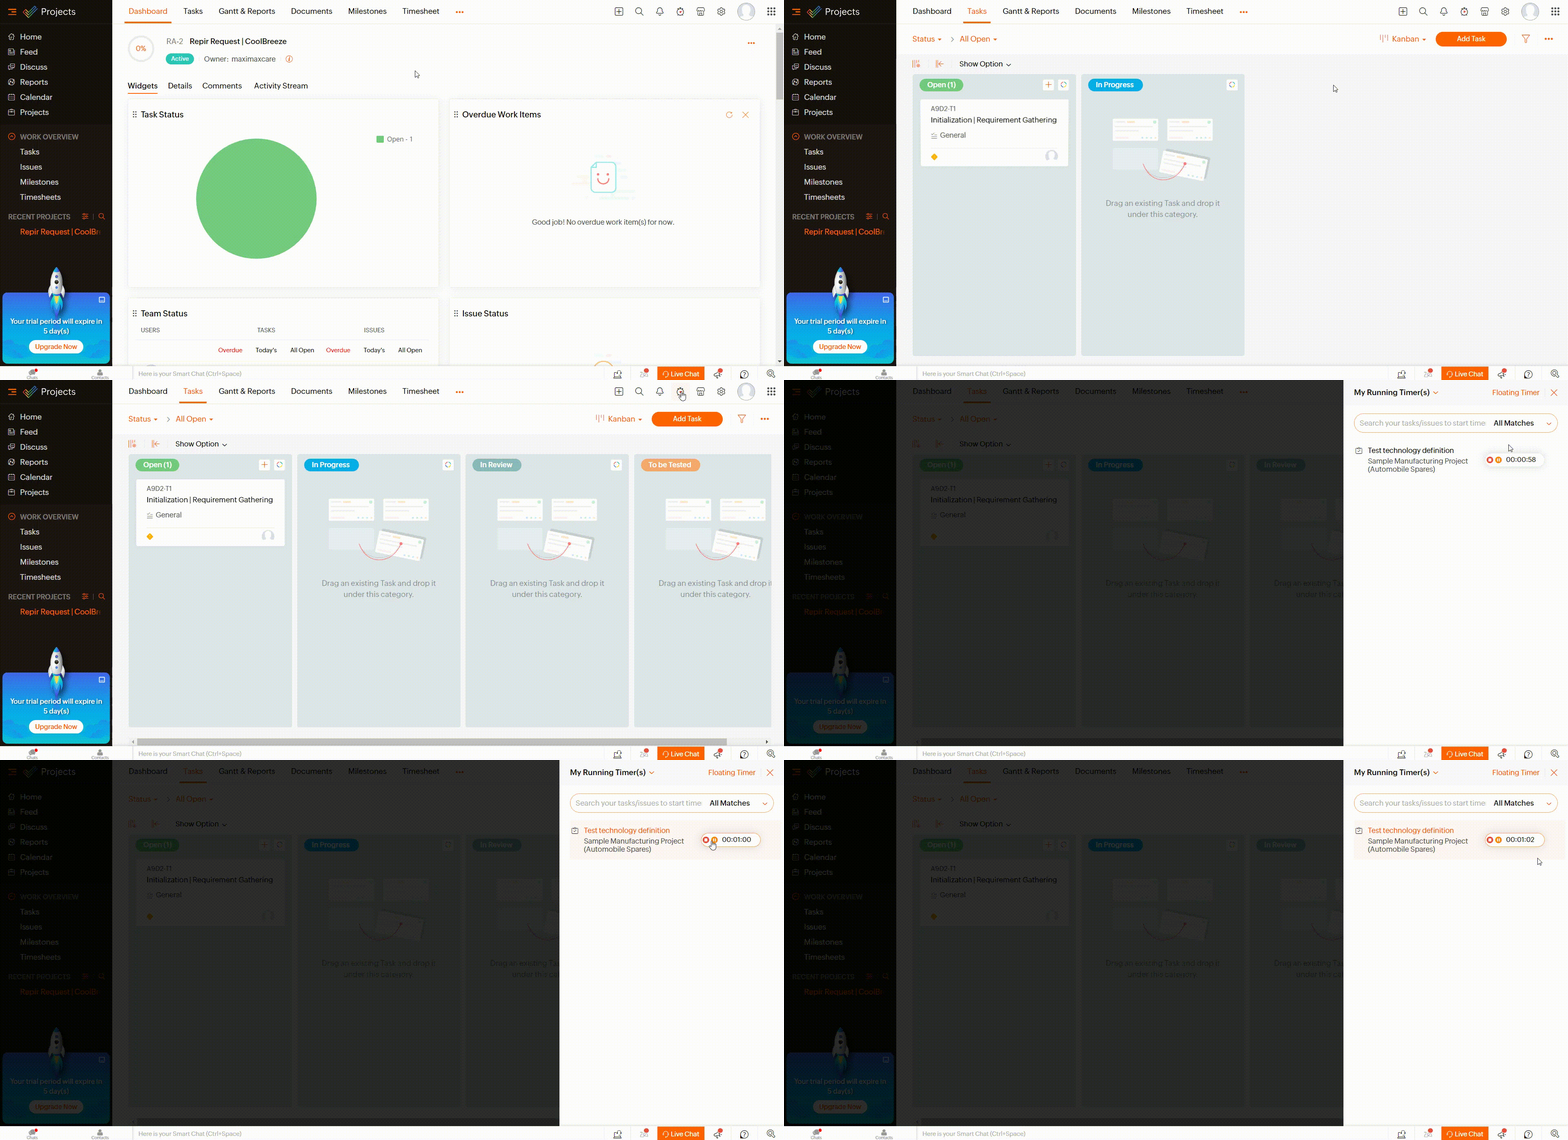
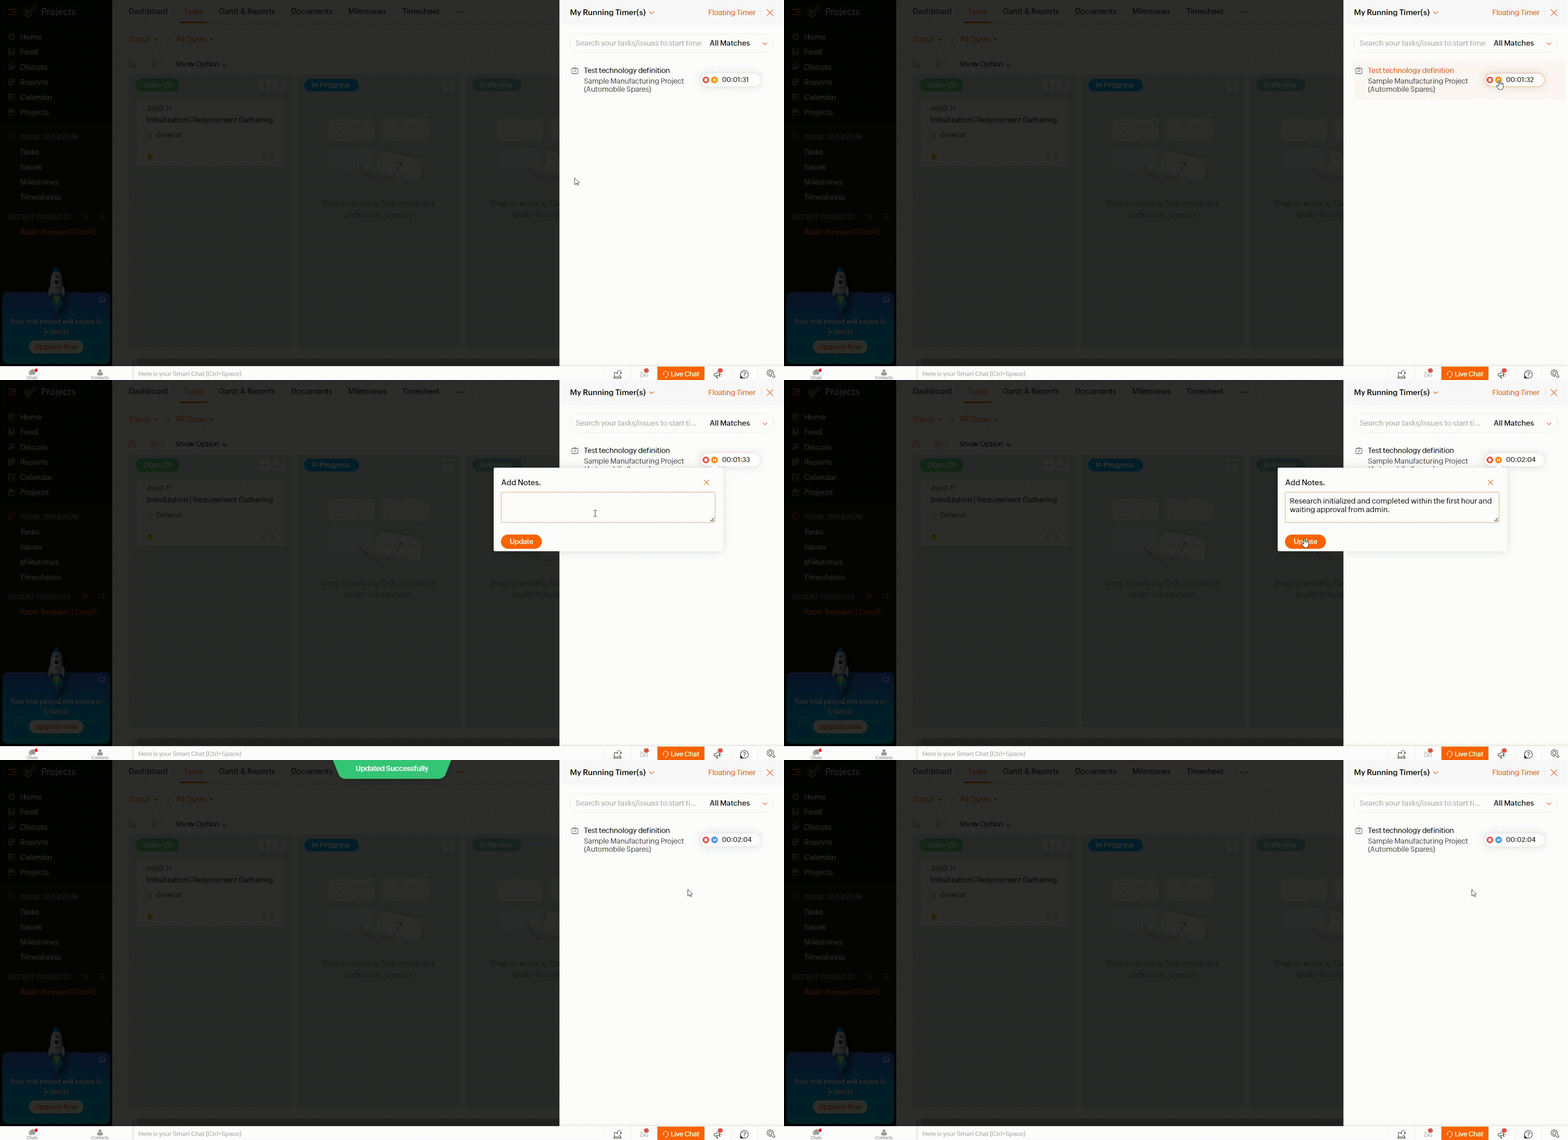
If you pause the timer, you have the option to add notes to it. These notes can be viewed later when the timer is stopped.
To pause a timer, click on the Pause icon within the Global Timer Widget. To stop a timer, click on the Stop icon.
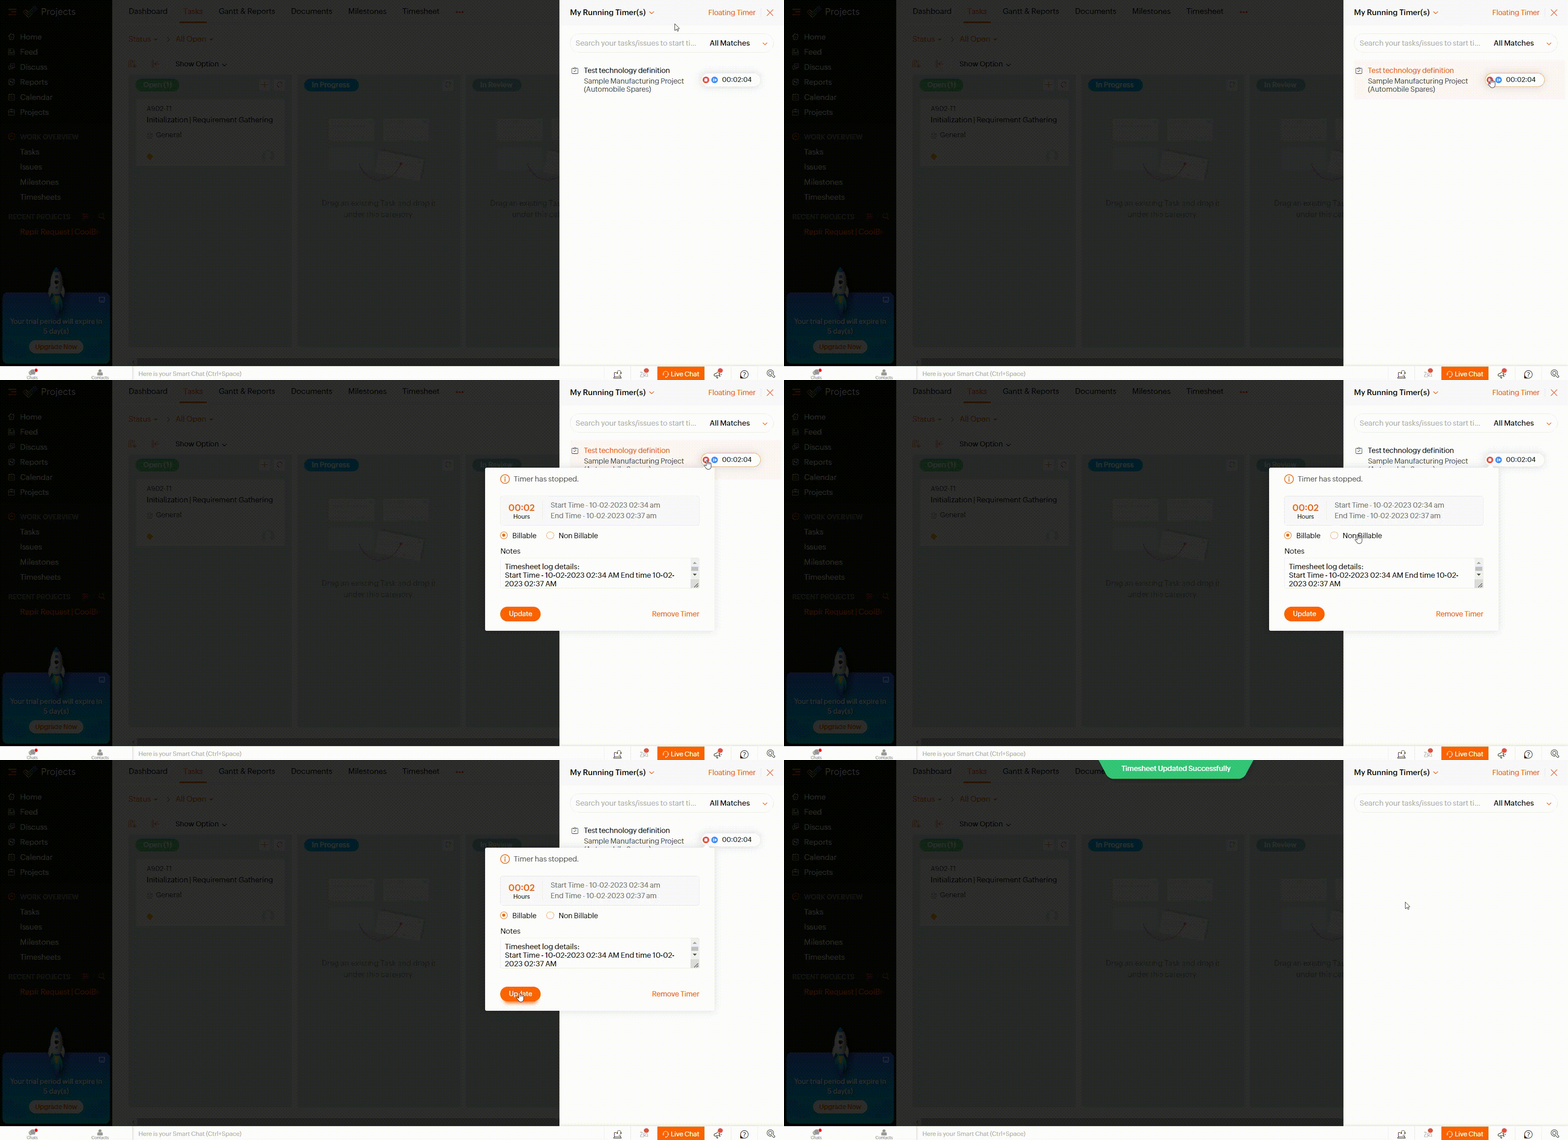
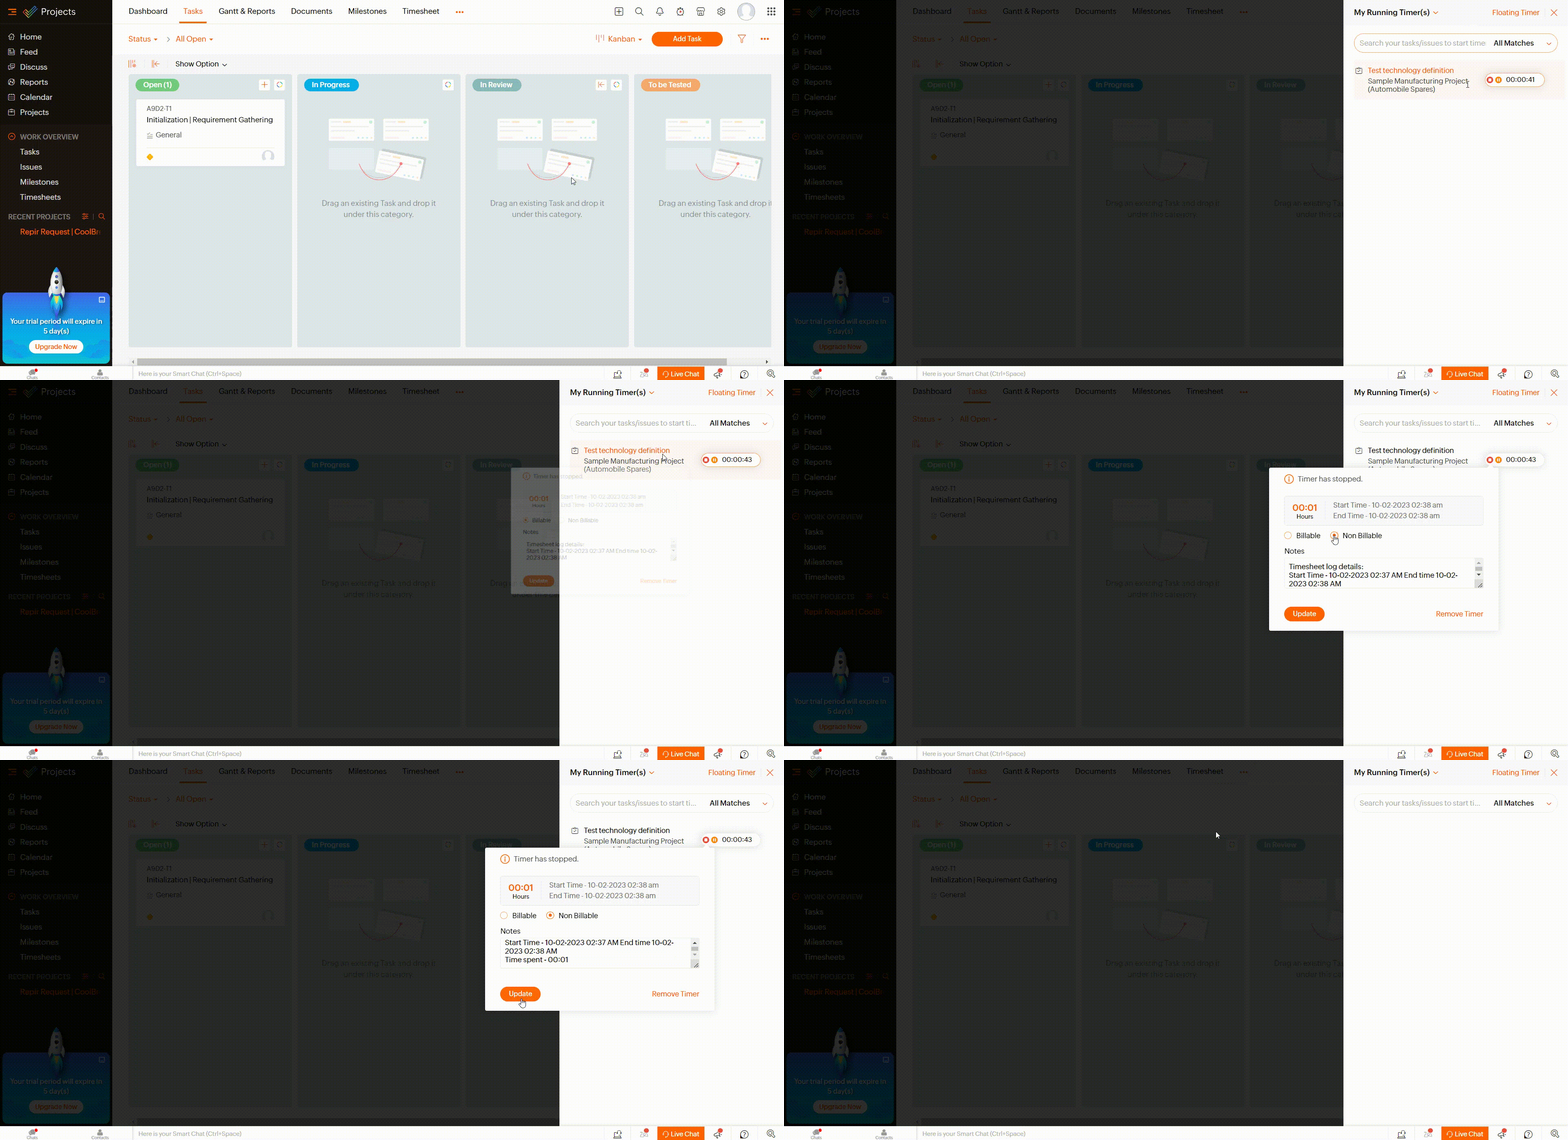
When you stop a timer, you can enter additional details, such as notes and whether the time log is billable or non-billable. Then, click Update to save the log.
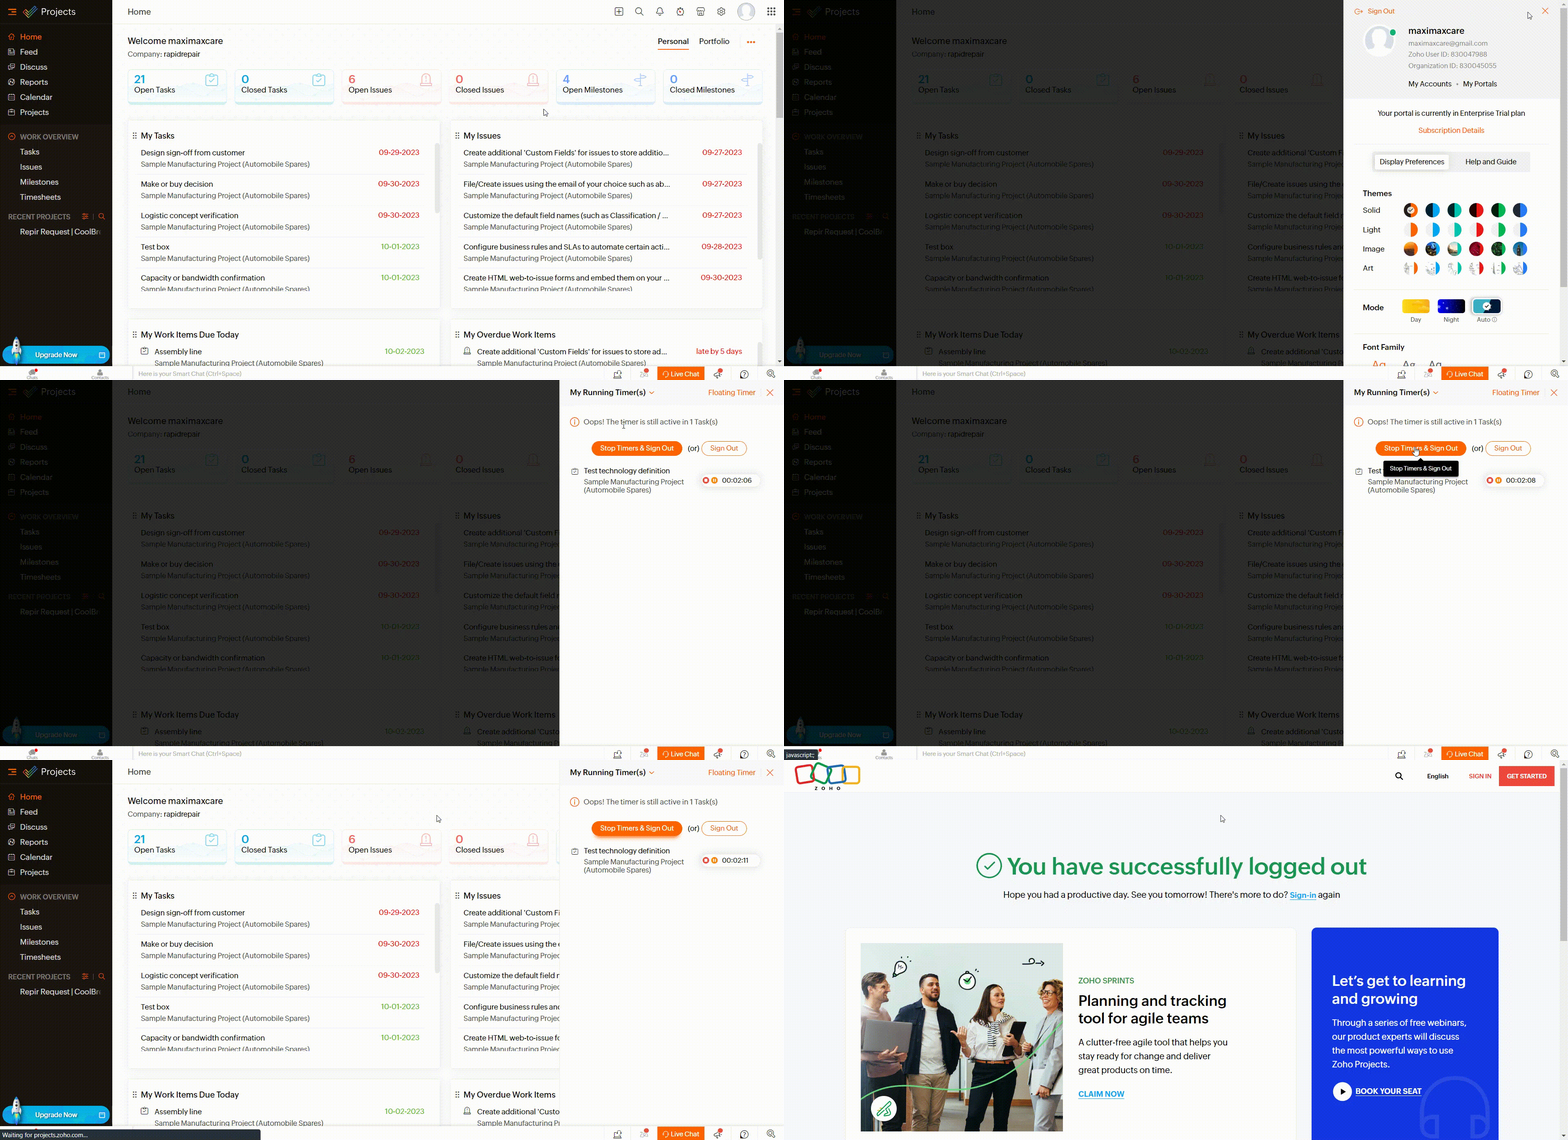
When you are ready to sign out of Zoho Projects, you will receive a reminder about any active timers. You can choose to stop all timers, pause them, or simply sign out.
You can further configure your search by selecting either Tasks or Issues and looking for your own or all running timers.
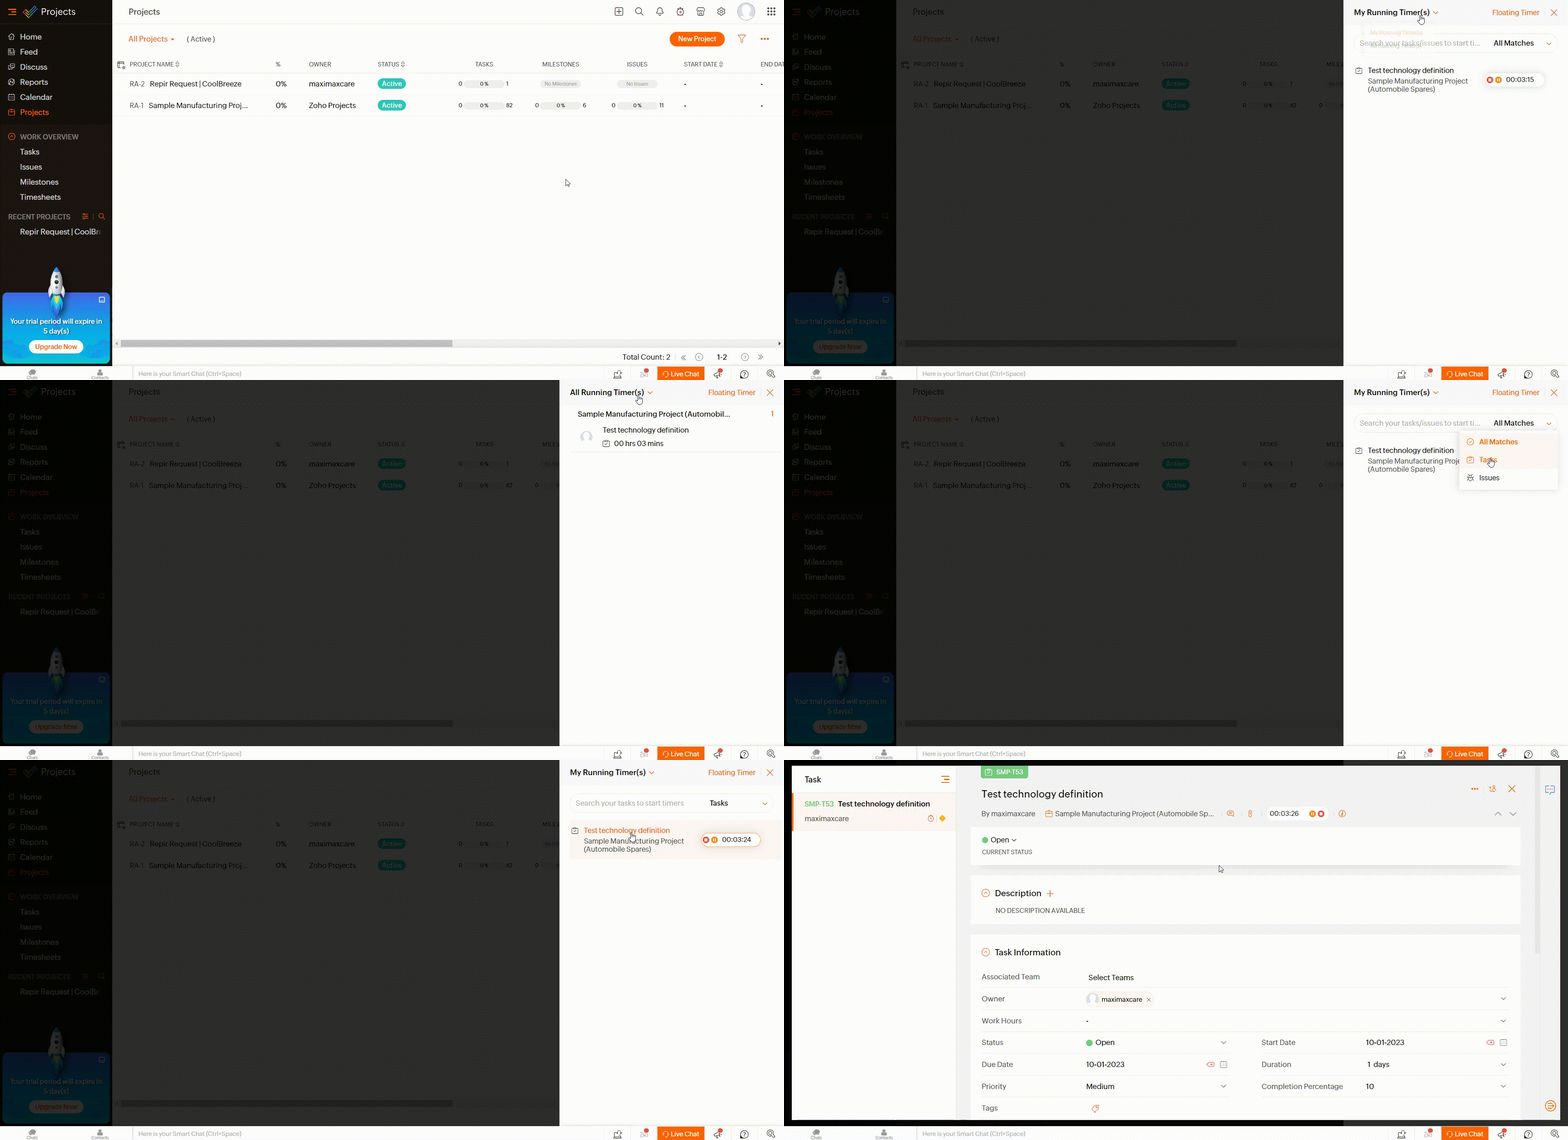
Additionally, you can start a task and click on the Floating Timer to make the Global Timer easily accessible while also keeping an eye on the progress.
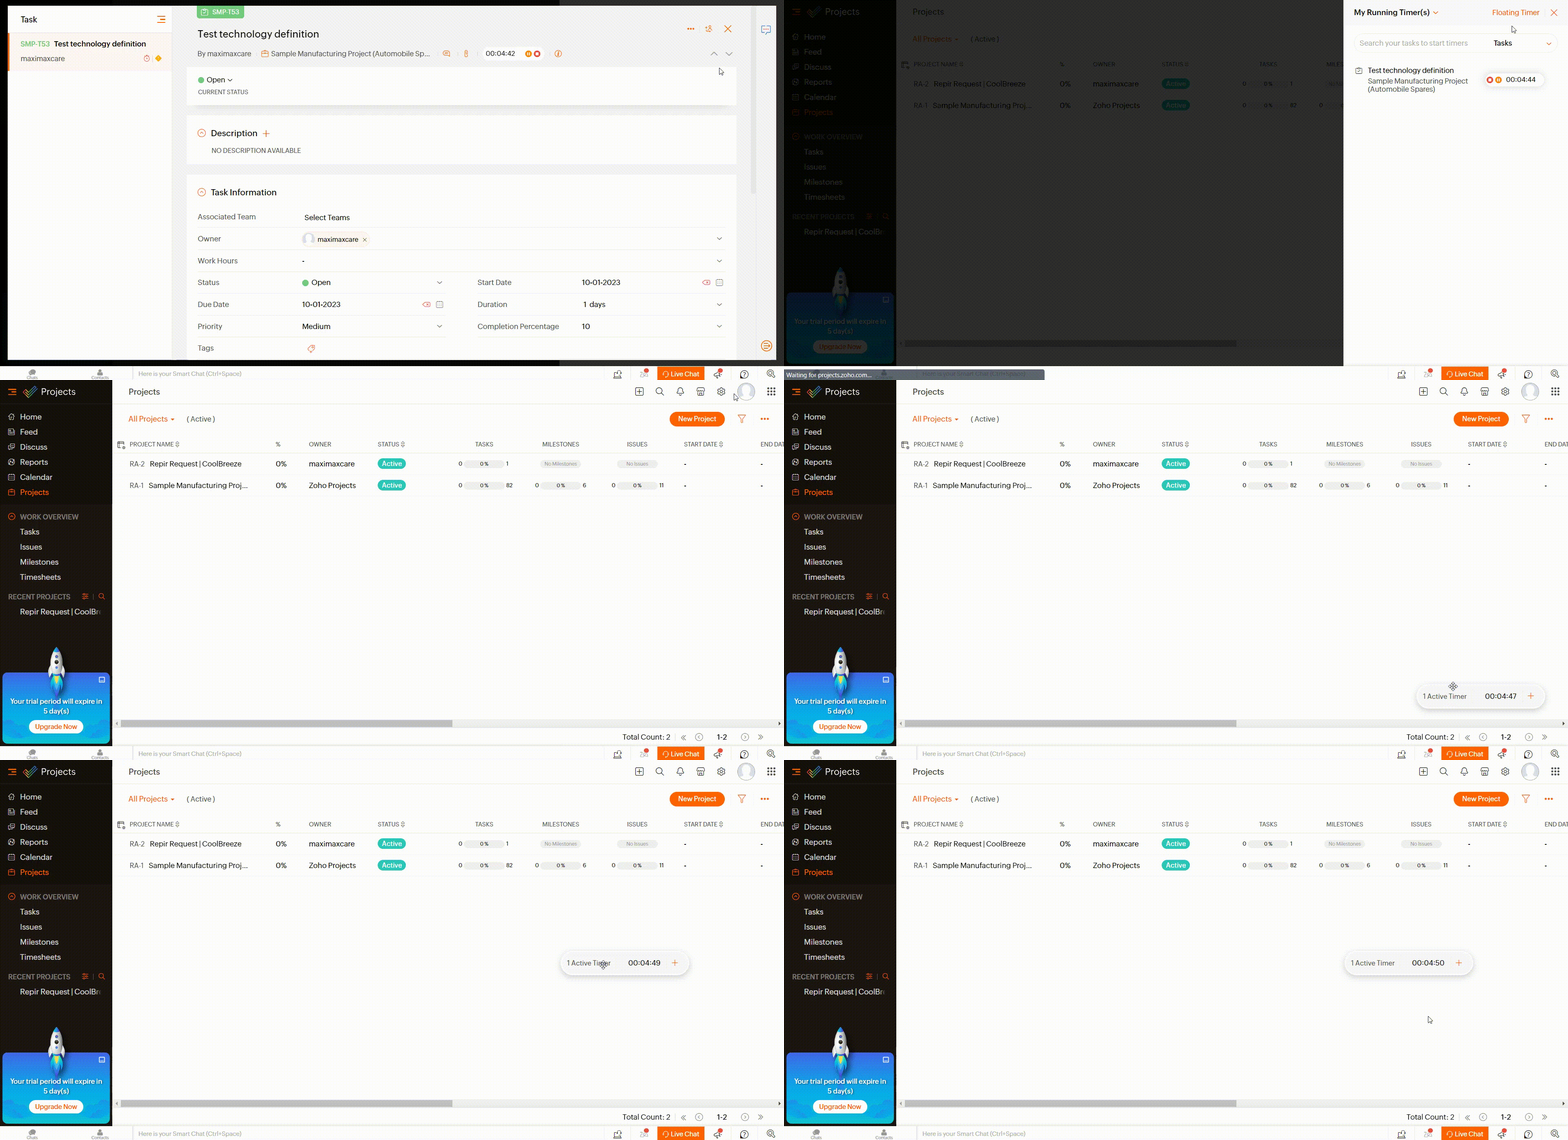
All Running Timers in Zoho Projects simplify the process of tracking time for tasks and issues, offering flexibility and convenience.
For a better understanding of the Global Timer permissions that administrators, managers, and other project members have, refer to the table below.
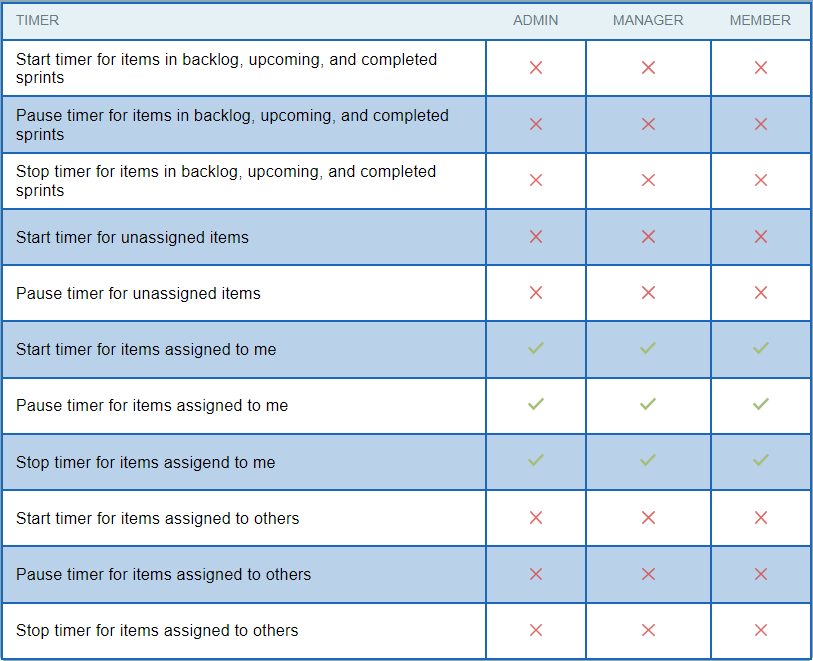
By following this guide, you can easily set up and utilize this feature to enhance your project management, maintain accurate time logs, and improve overall productivity within your projects.
Tab Access in Zoho Projects
Tab Access in Zoho Projects is a robust feature designed to empower users with greater control over their project workspace. This feature enables users to strategically organize and customize project tabs, optimizing the accessibility and visibility of modules for both project and client users.
By configuring Tab Access, project managers can ensure that relevant information is readily available to the right stakeholders, enhancing collaboration and productivity.
Additionally, Web Tabs extend the functionality by allowing users to seamlessly integrate web applications into their project environment, providing a comprehensive and tailored project management experience.
How to Organize Tabs or Manage Tab Access in Zoho Projects?
Organizing tabs and managing tab access in Zoho Projects is an essential aspect of tailoring your project workspace to meet specific user needs. We will walk you through the steps to efficiently organize tabs and control tab access, optimizing your project management experience.
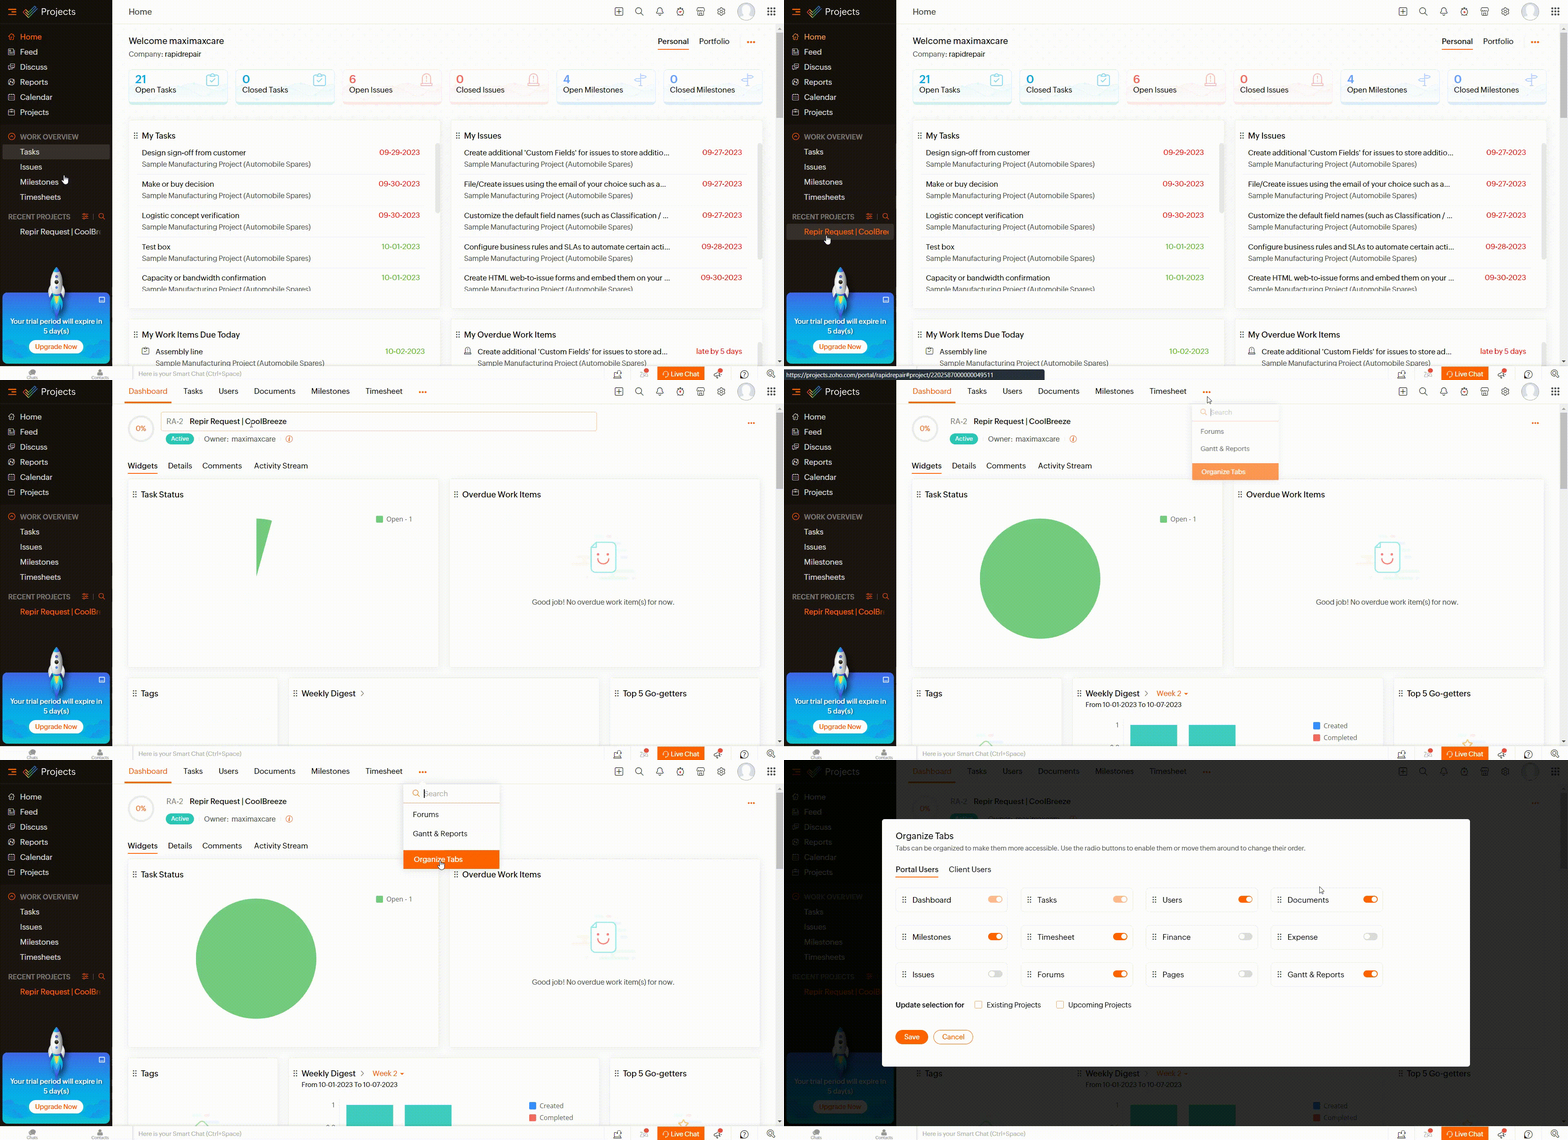
To access tab organization settings, log in to your Zoho Projects account and navigate to the project for which you want to organize tabs or manage tab access.
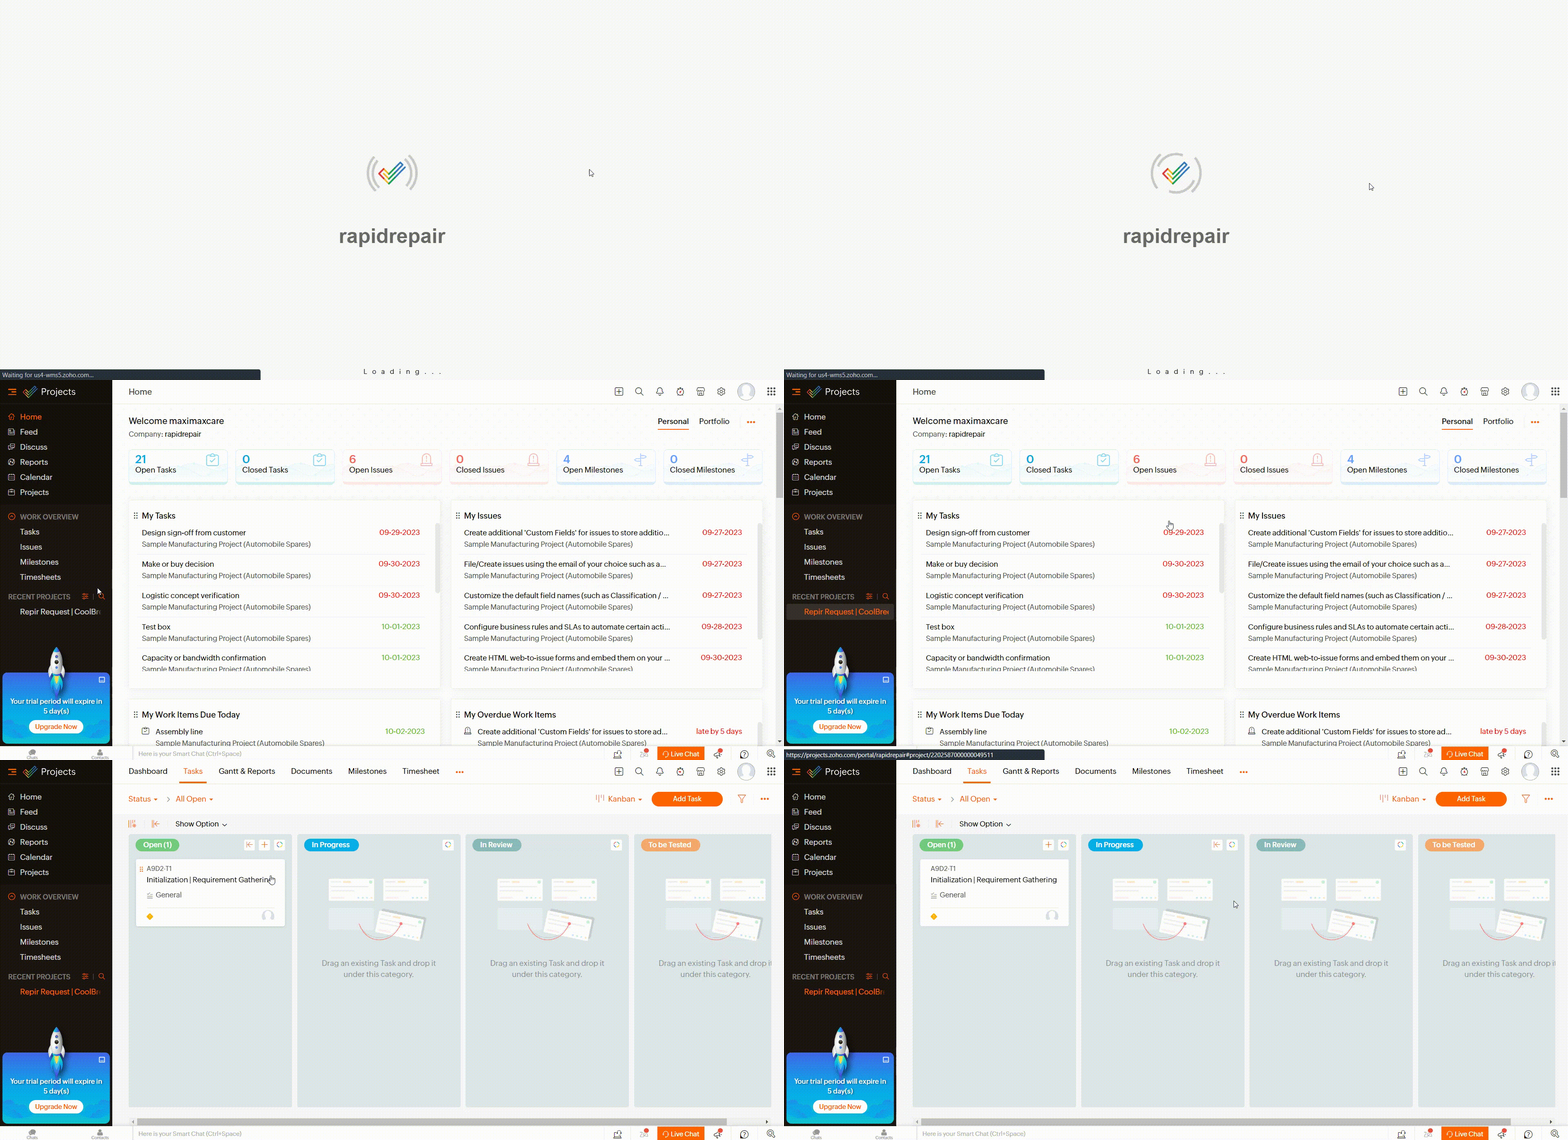
Click on the Projects option in the left navigation panel. In the top navigation bar, click on the More Options icon, and then select Organize Tabs from the menu.
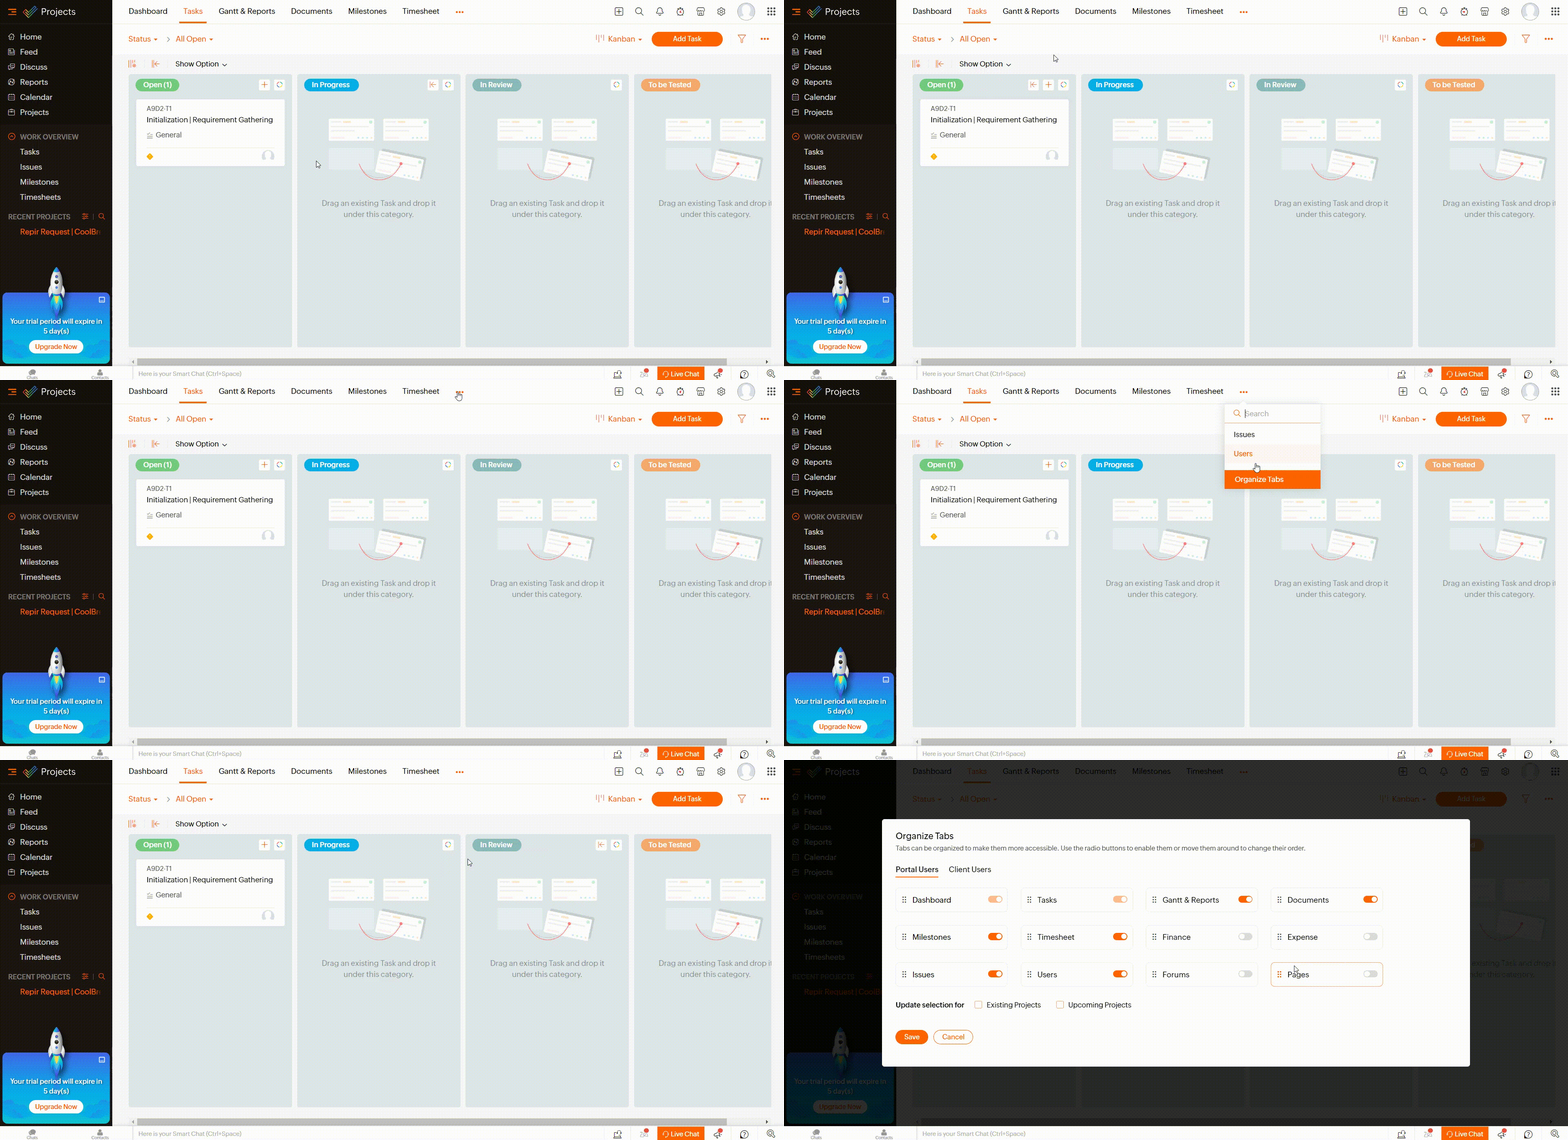
From here you can easily organize the tab or manage tab access in Zoho Projects.
To show or hide tabs, within the Organize Tabs selection, choose the specific project you want to configure. Toggle the switch next to each tab to make it visible or hidden. Hidden tabs will not be accessible by project users.
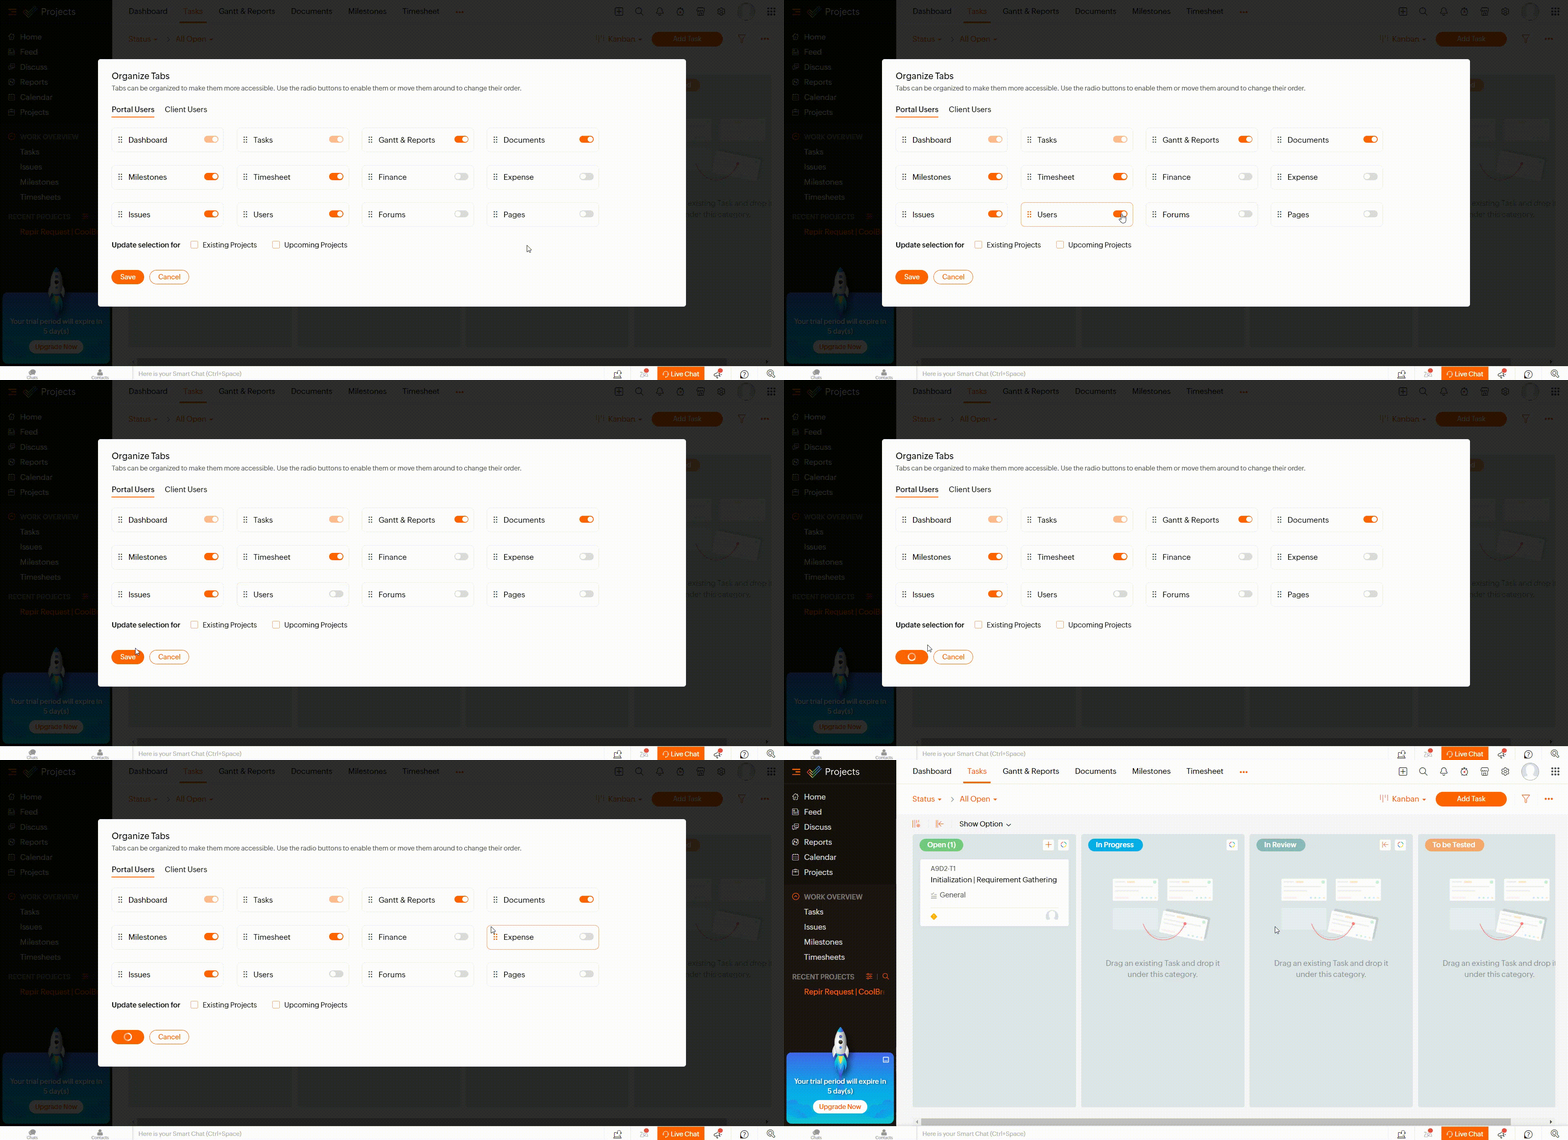
To reorder tabs, simply drag and drop them into the desired order. This allows you to prioritize the most frequently used tabs.
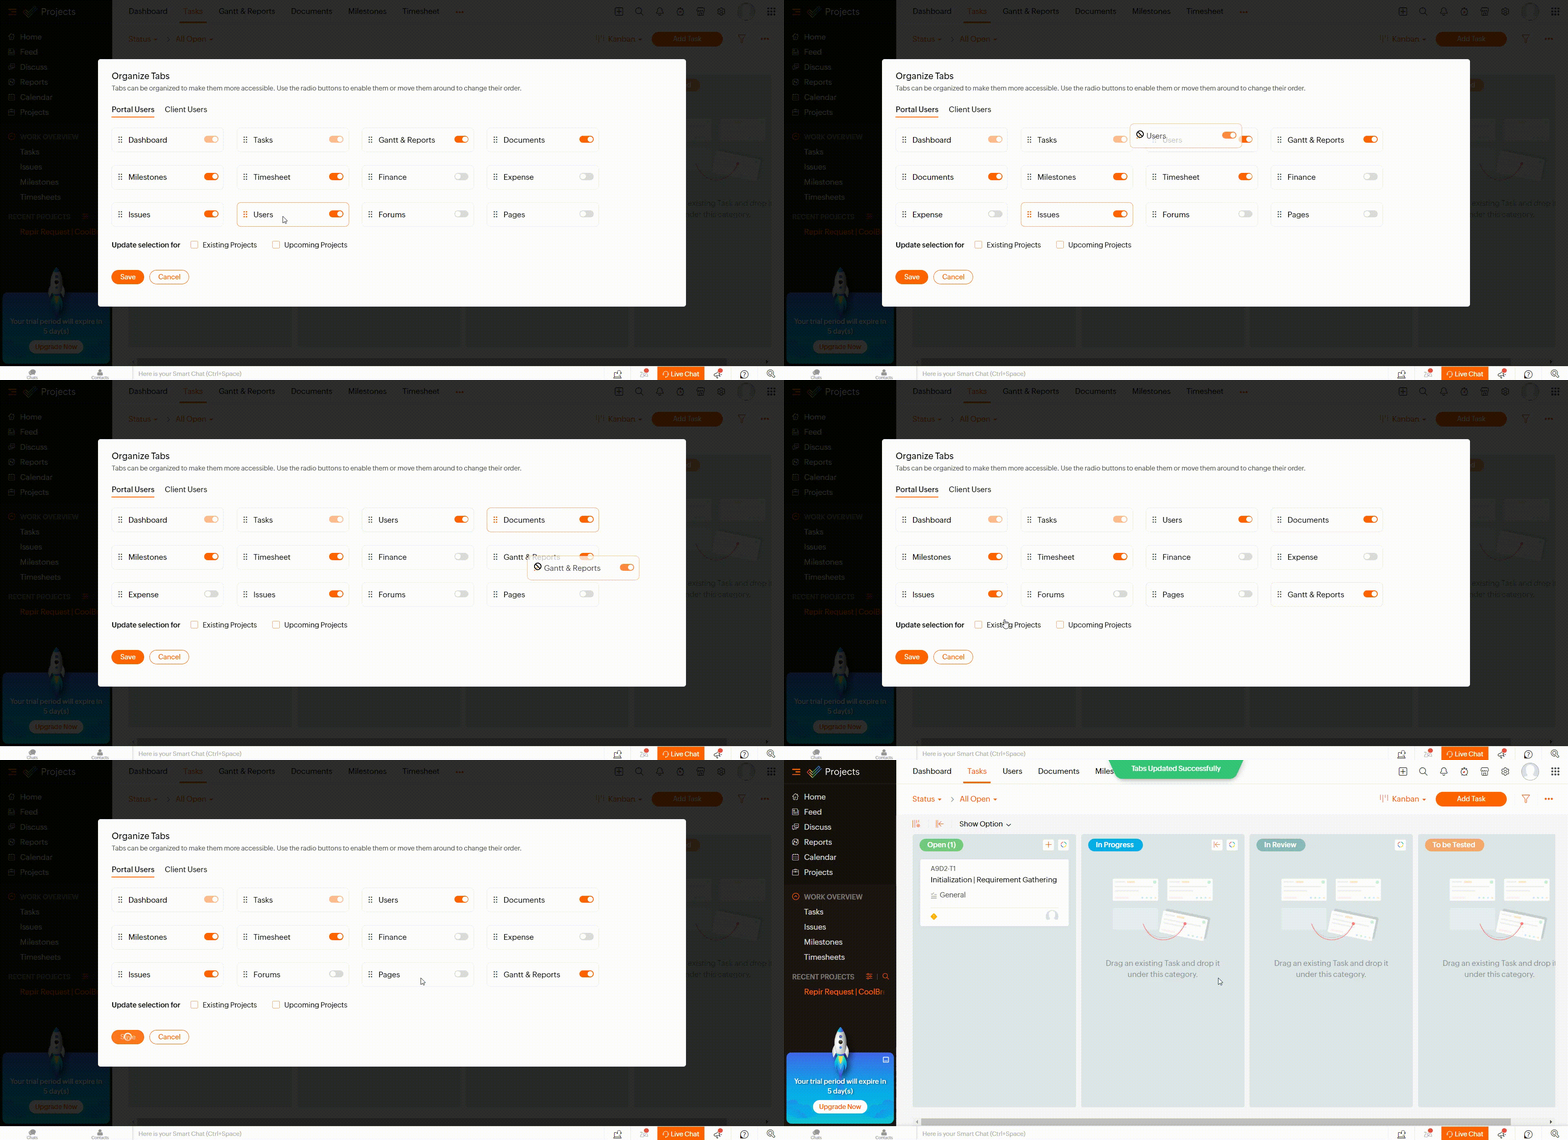
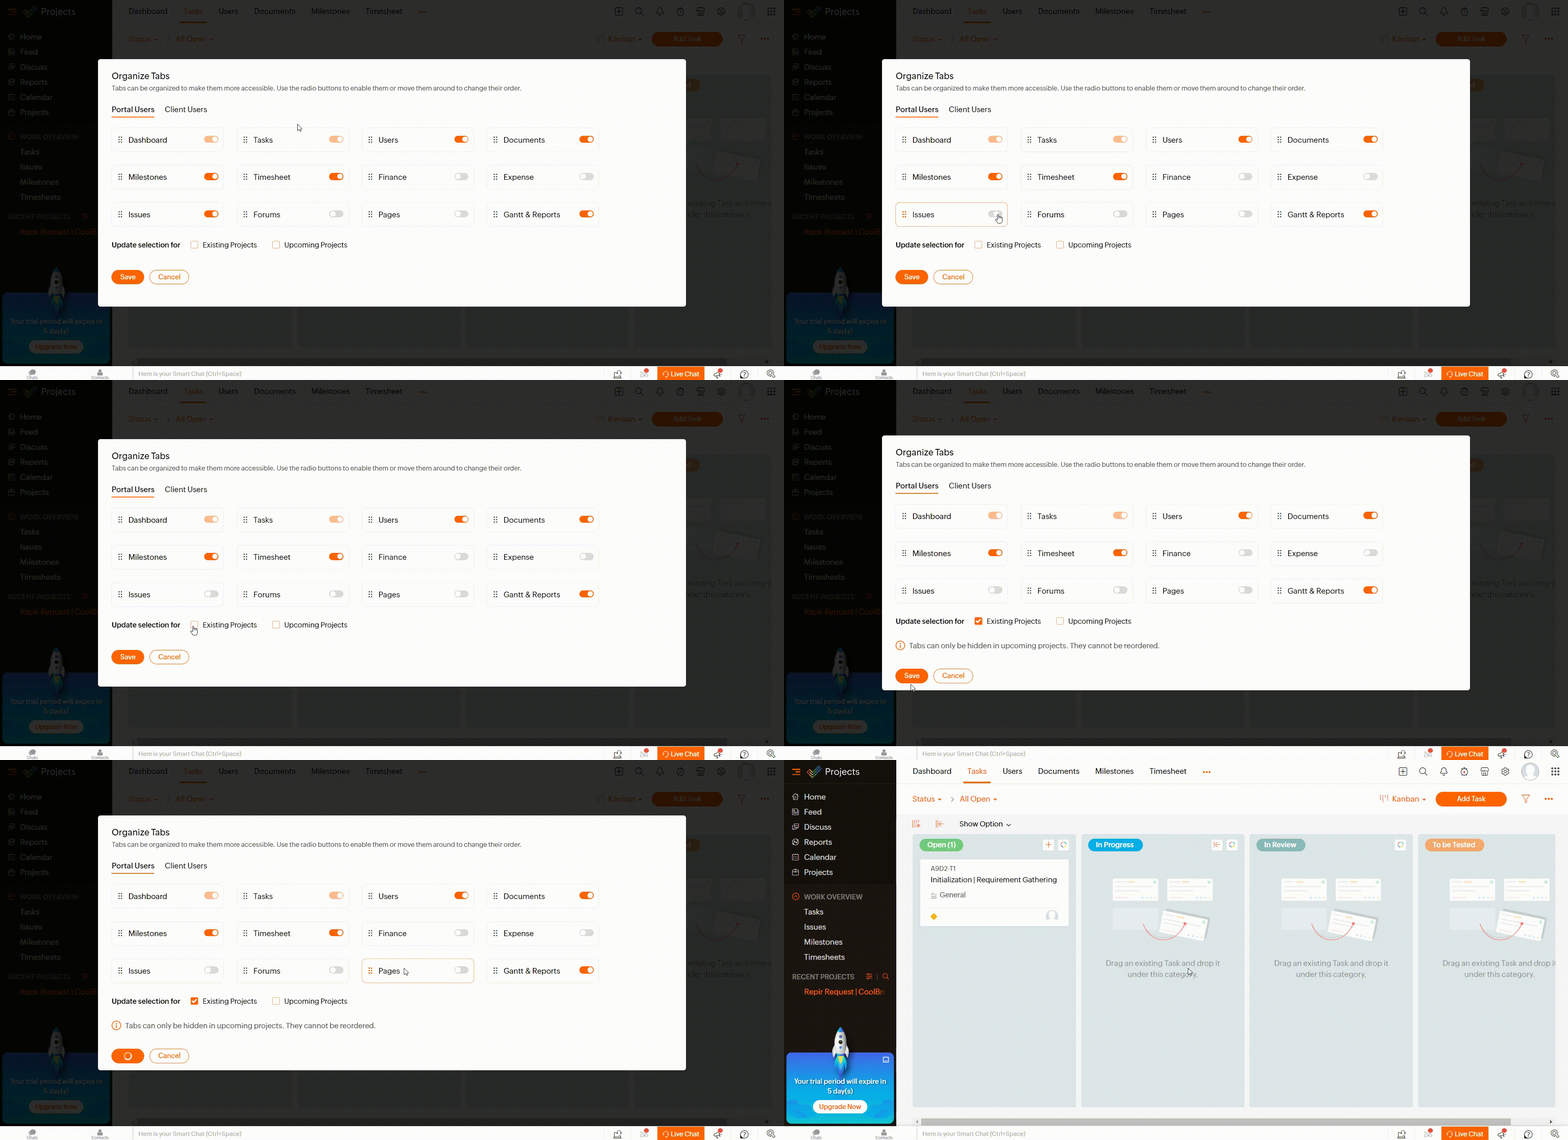
If you want the changes in tab visibility to apply to existing and upcoming projects, select the checkbox labeled “Update the changes in existing/upcoming projects“ and then click the Save button to save your tab organization settings.
Tab Access for Client Users
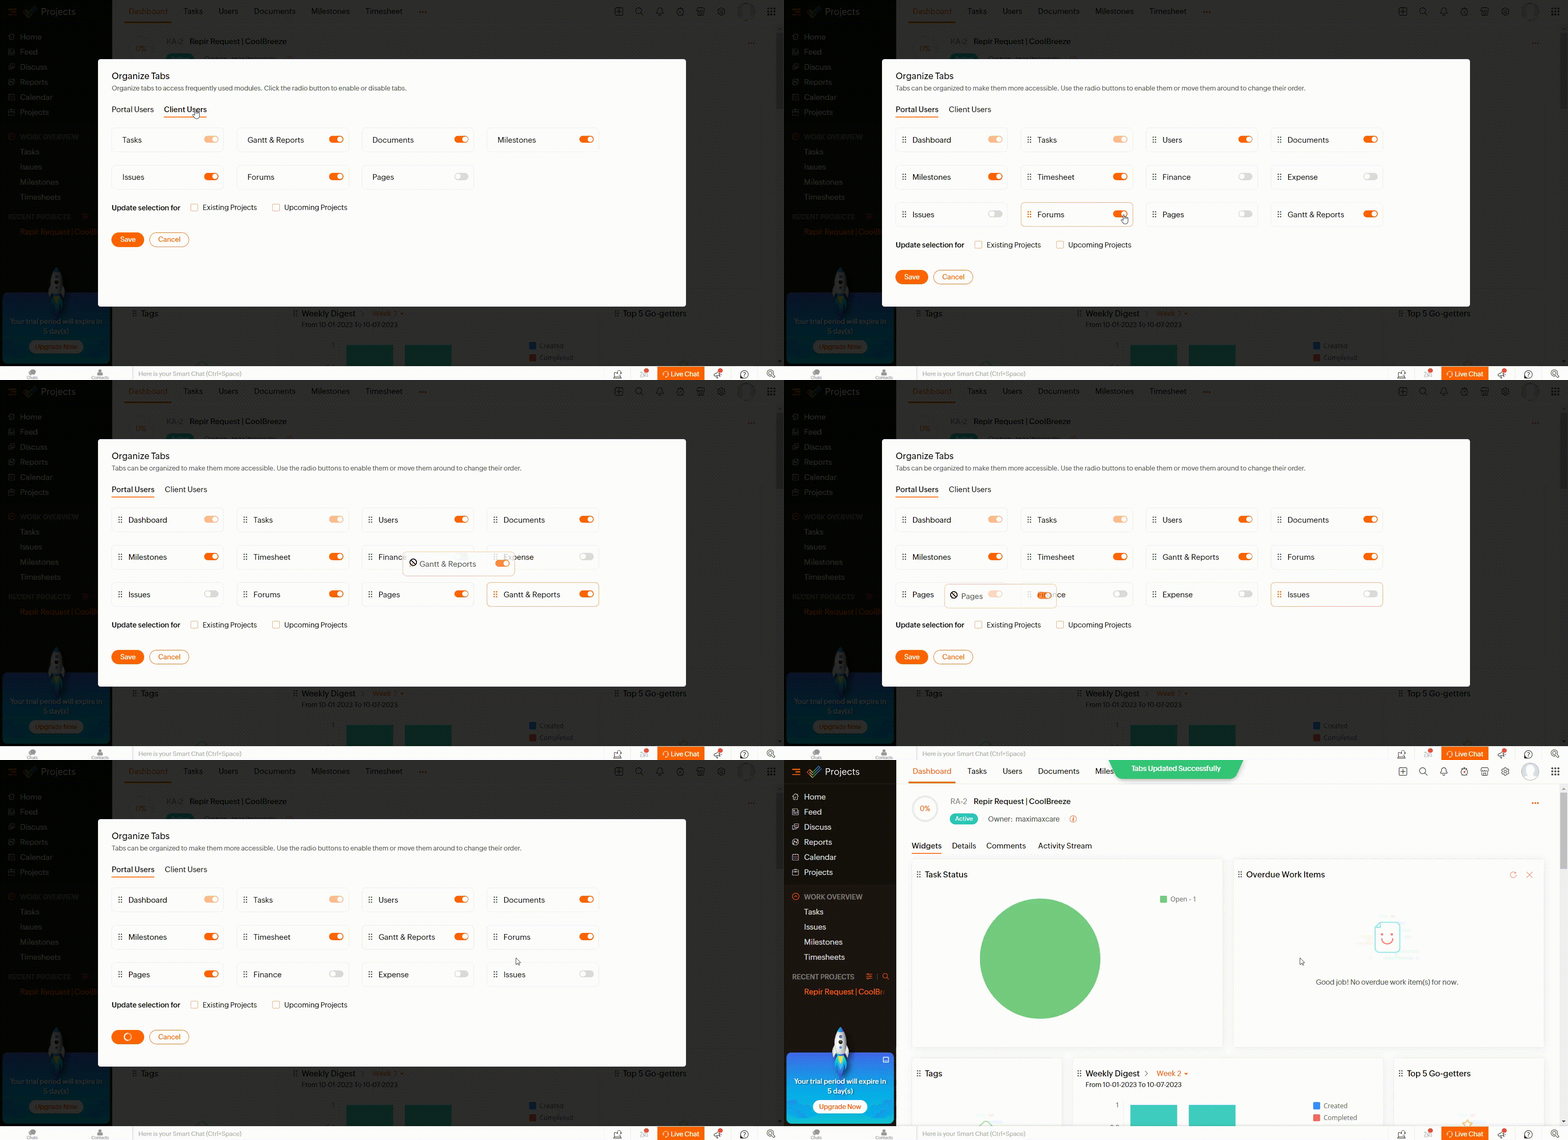
In the Client Users section, you can configure which tabs you’d like to share with clients. This way, clients can view information only from the tabs that have been enabled for them. Make sure to save the new order as needed.
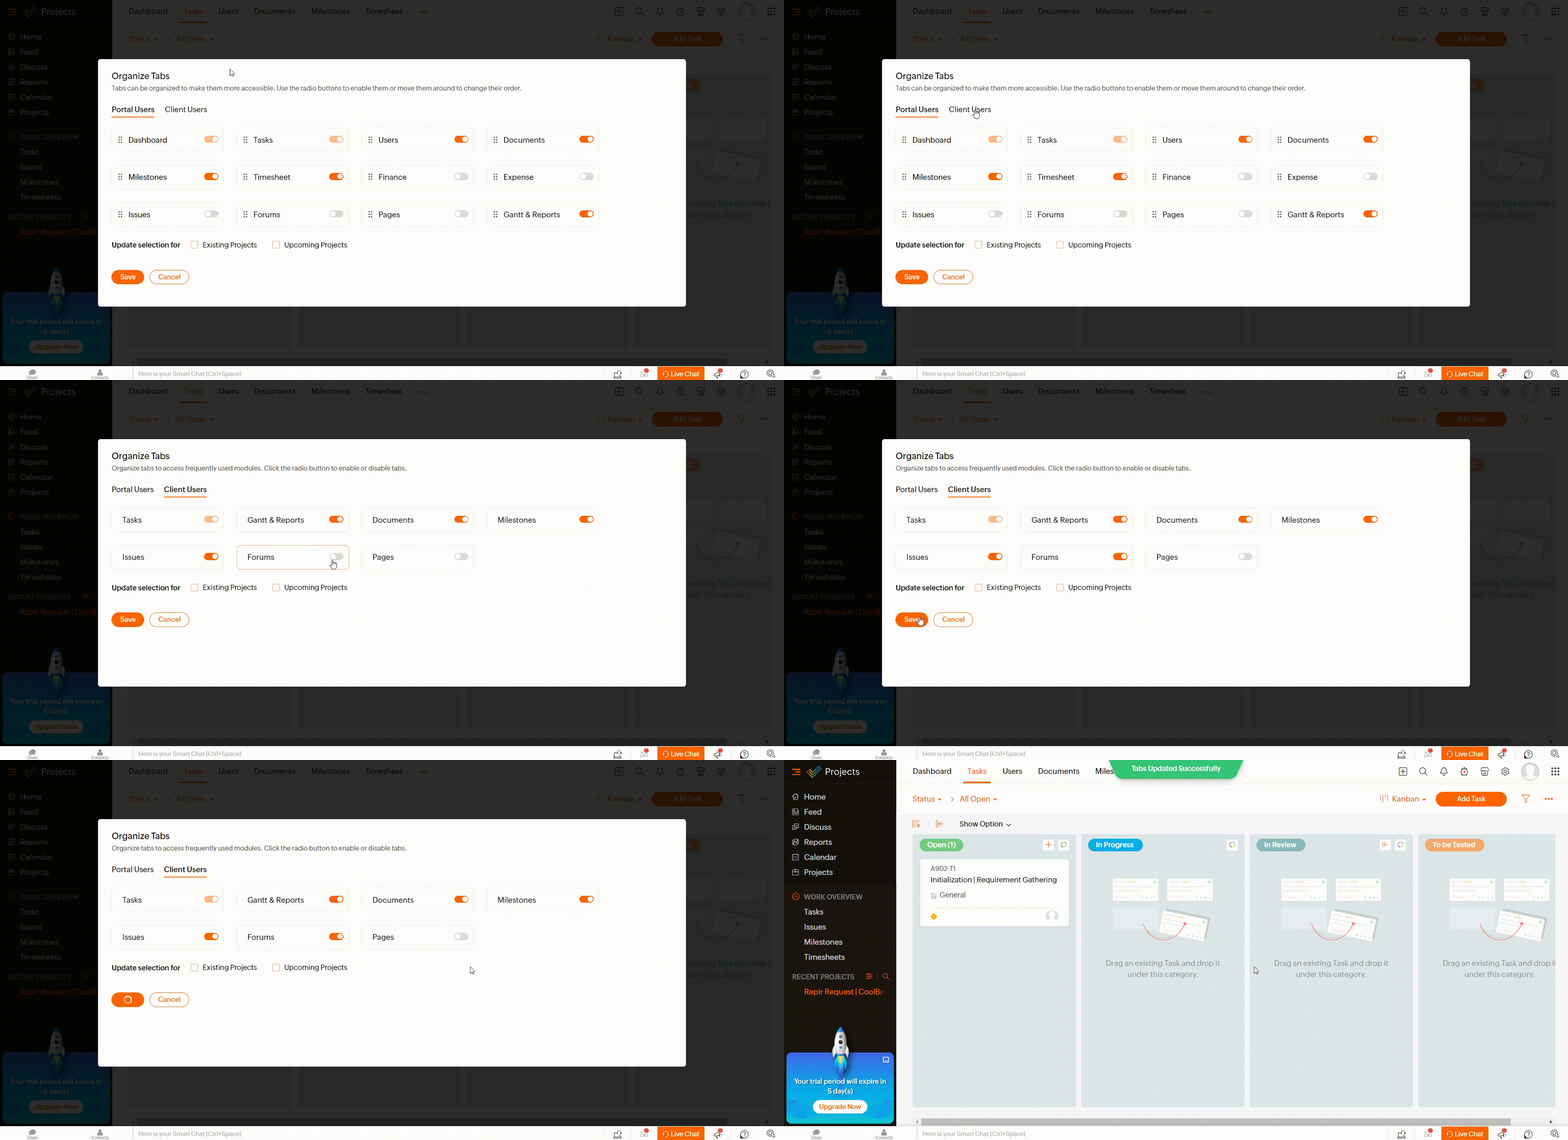
Keep in mind that when you switch off an enabled tab, it becomes inaccessible to anyone in the project. Default tabs cannot be disabled or reordered.
Tab Access for Portal Users
To enable project tabs for portal users, select a project and click on Organize Tabs from the menu.
From here, select Portal Users, enable the required tabs, and click on Save to update the tab access of portal users for a specific project.
Web Tab Integration
If you’re using the Enterprise plan, you can integrate web applications within Zoho Projects using Web Tabs.
To create a Web Tab, click on the Setup and navigate to Web Tab under Customizations.
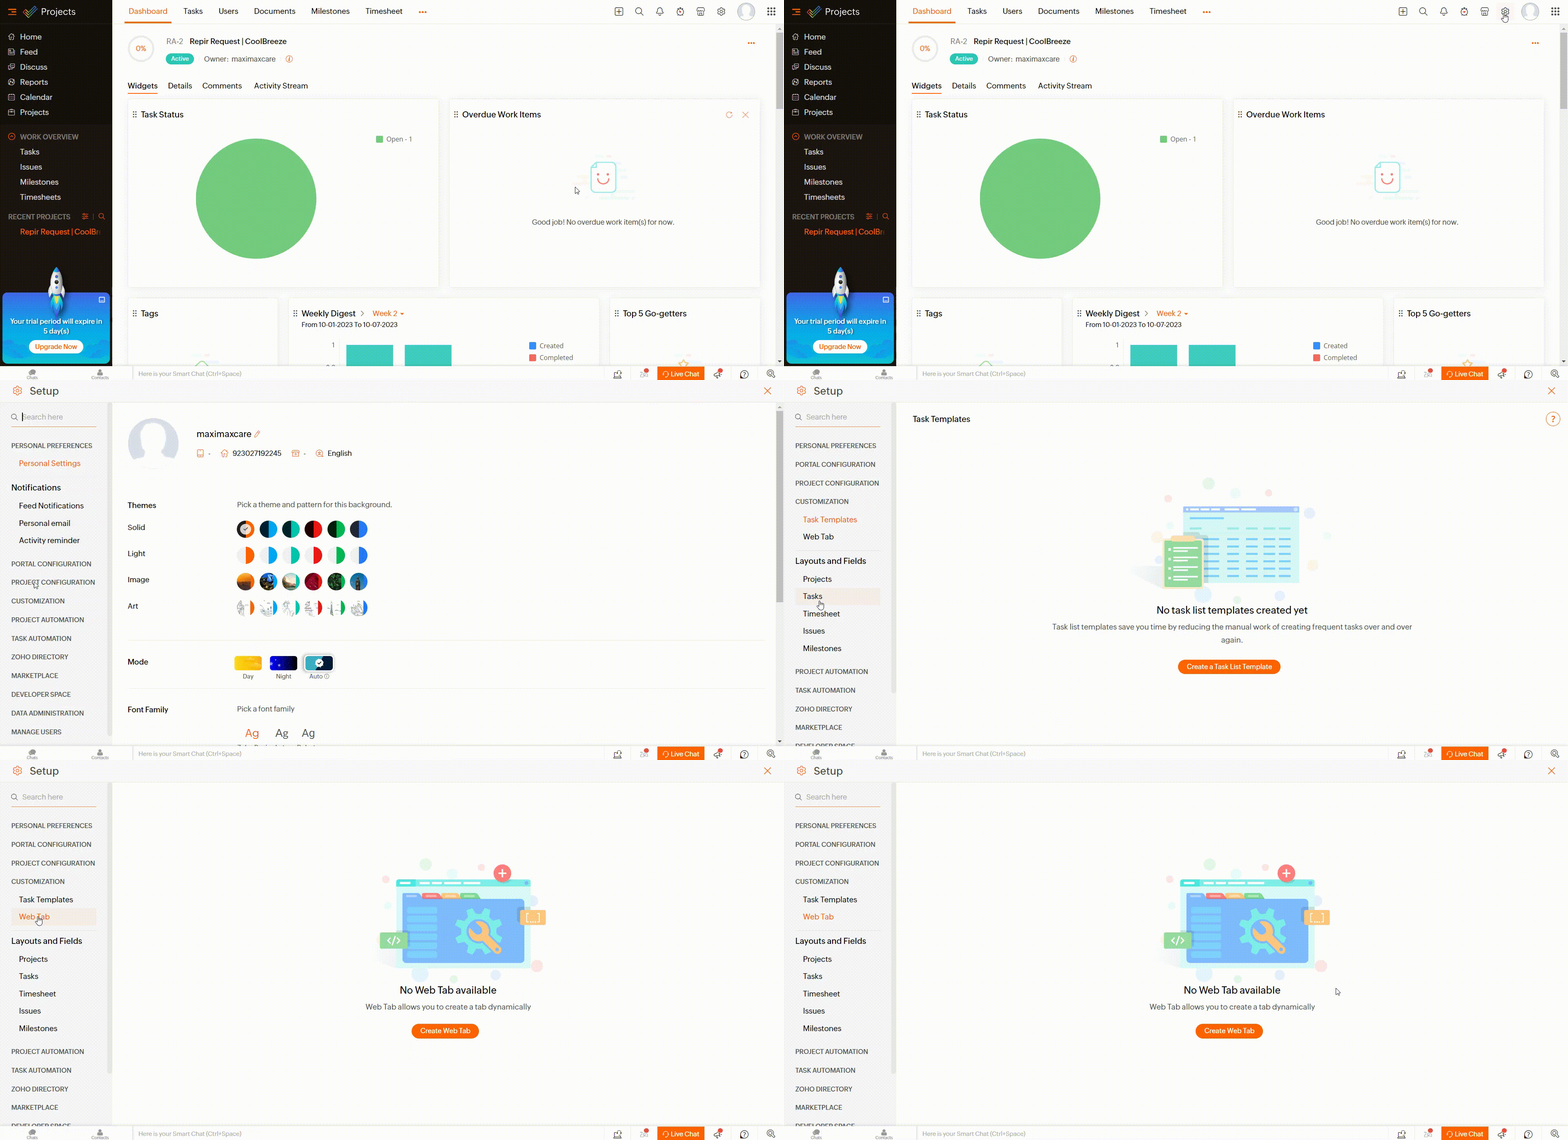
Click on Create Web Tab and add the necessary details, including the Module Name and Web Tab URL.
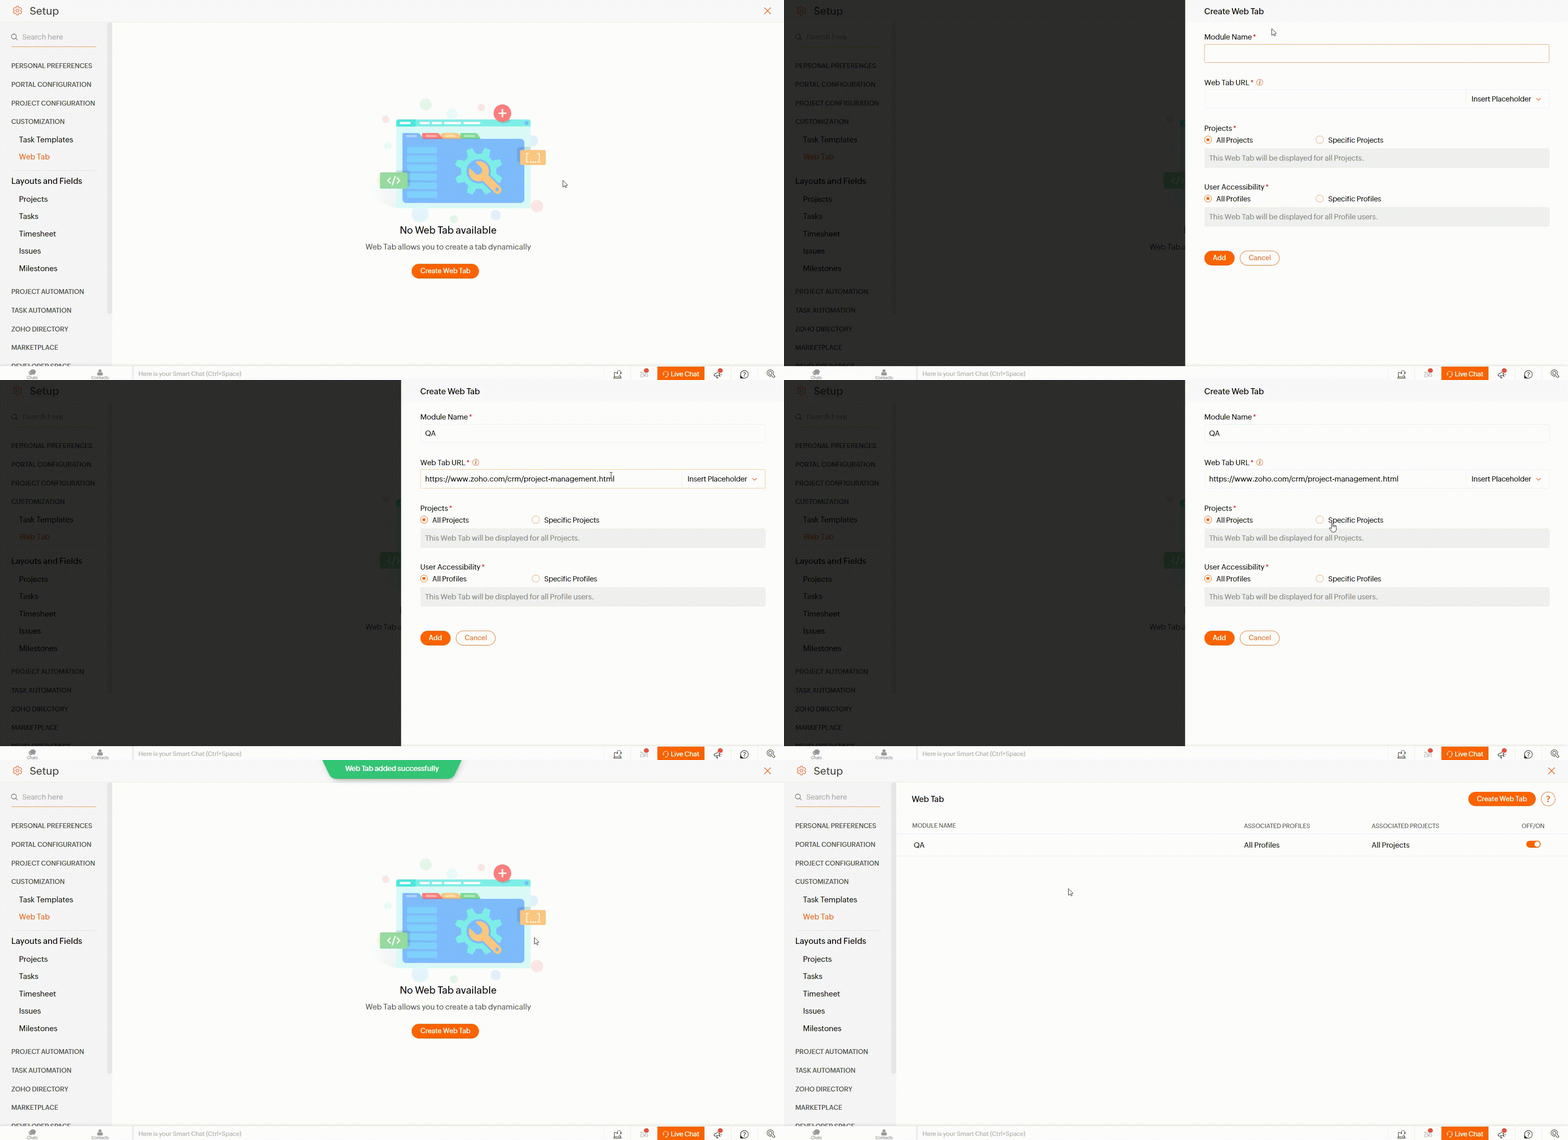
To view and manage Web Tabs, click Projects in the left navigation panel, go to the Organize Tabs section, and review all the modules, including Web Tabs.
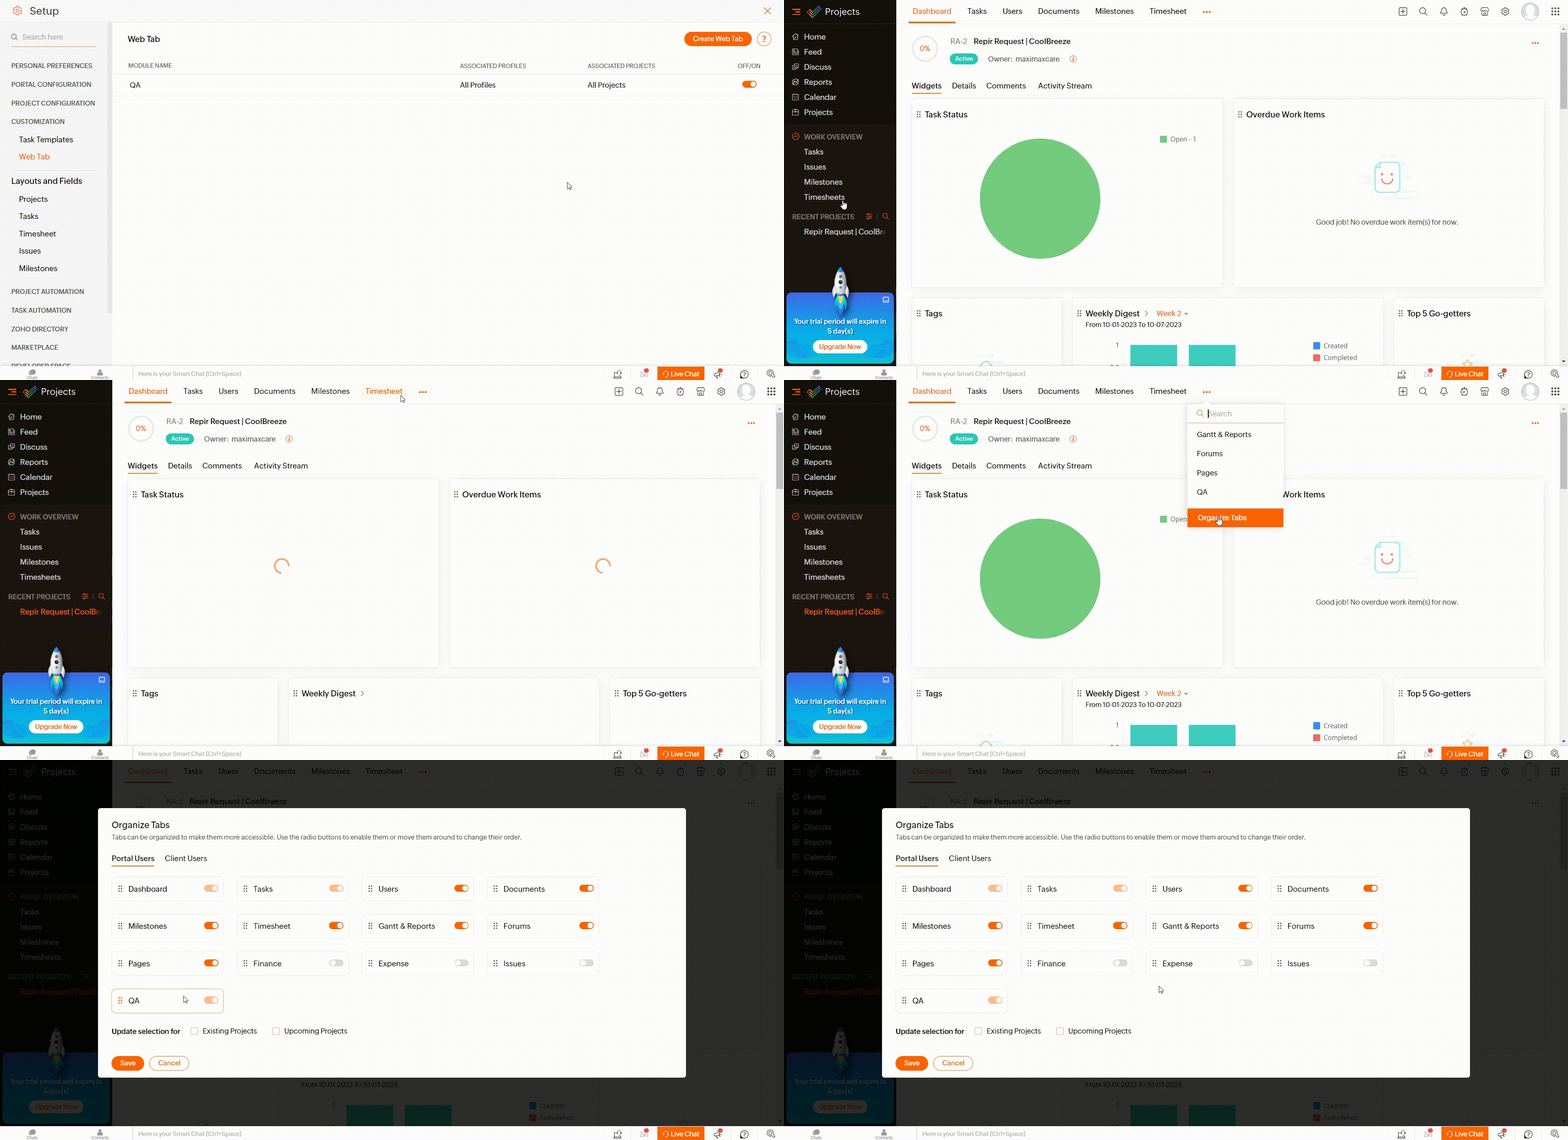
To edit or delete a Web Tab, go to Customization > Web Tab, select the Web Tab you want to modify or remove and follow the respective options for editing or deleting.
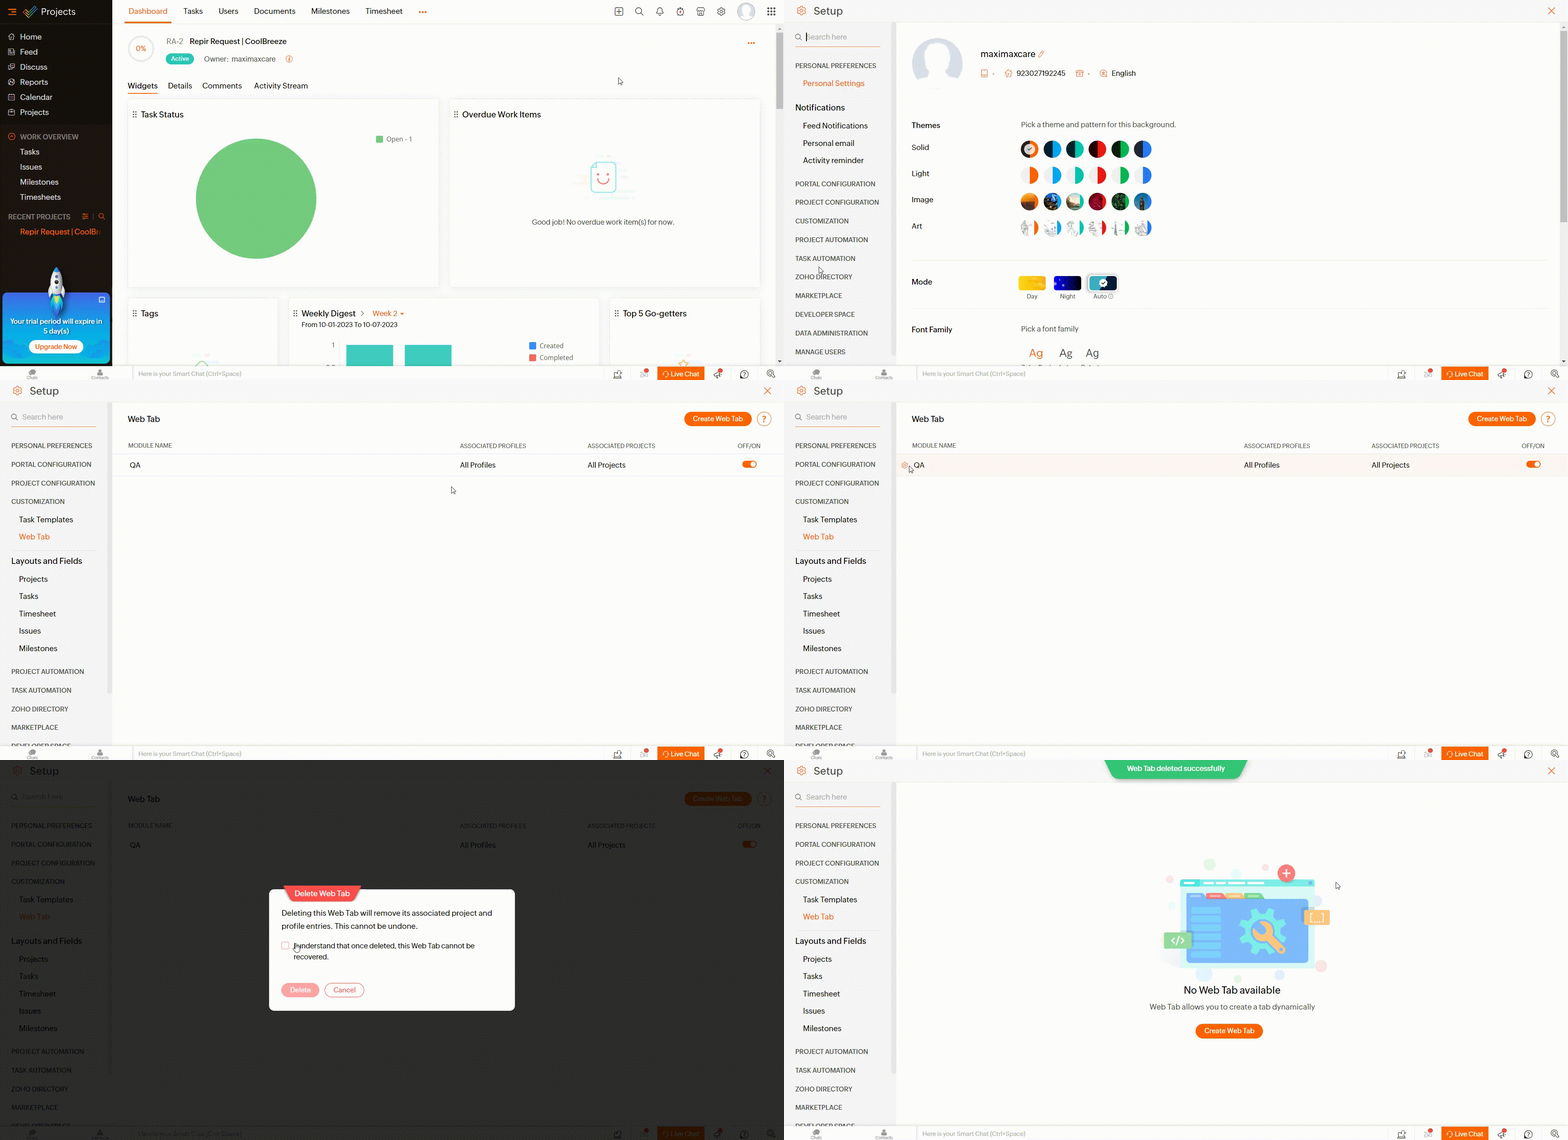
Effectively organizing tabs and managing tab access in Zoho Projects can significantly enhance project collaboration and productivity.
By following these steps, you can tailor your project workspace to match your specific requirements and optimize the user experience for both project team members and clients.
Permissions in Zoho Projects
Permissions are the backbone of user access control in Zoho Projects, providing project managers and administrators with the ability to define and regulate user privileges within the platform. These permissions are essential for maintaining the security, integrity, and efficiency of project management.
In Zoho Projects, permissions are categorized into three main levels: Portal Level, Project Level, and Module Level, each with its own set of actions permitted or restricted. Let’s explore these different permissions in detail:
1. Portal Level Permissions:
- Global Reports: Users can view Milestone Gantt, Resource Utilization Chart, and Project Timeline Gantt from Global Reports.
- Manage Users & Clients: Control over portal and client user management, including adding, editing, and deleting users. Import users from external sources.
- Profiles & Roles: Ability to view, add, edit, and delete user profiles and roles.
- New Project: Permission to create new projects, import project files, and manage archived and trashed projects.
- Project Groups, Templates, Layouts, and Fields: Managing project groups, templates, layouts, and custom fields.
- Task Templates: Ability to view, add, edit, and delete task templates.
- Task Automation, Layouts & Fields: Control over task automation, layouts, and fields, both public and private.
- Project Budget: Enabling Project Budget settings.
- Teams: Creating and associating teams with projects, including team leadership.
- Issue Layouts & Fields: Creating, editing, and deleting issue layouts and custom fields.
- Timesheet Layouts & Fields: Managing timesheet layouts and custom fields.
- Milestone Layouts & Fields: Creating, editing, and deleting milestone layouts and custom fields.
- Tags: Control over creating, updating, and deleting tags.
- Web Tabs & Resources: Creating, editing, and deleting web tabs and resources.
2. Project Level Permissions:
- Forums: Ability to view, add, edit, and comment on forums.
- Chat: Control over viewing, creating, and editing chats.
- Pages: Permission to view, create, edit, and comment on pages.
- Events: Managing events, including viewing, adding, editing, and commenting.
- Project Settings & Issue Tracker: Editing project settings and Issue Tracker settings.
- Associate Users / Clients: Adding existing portal or client users to projects.
- Project Field Level Permissions: Customizing field-level permissions for projects, including default and custom fields.
3. Module Level Permissions:
- Milestones: Permission to view, add, edit, and delete milestones at a granular level.
- Task List: Control over viewing, adding, editing, deleting, and reordering task lists.
- Task: Managing task permissions, including viewing, adding, editing, deleting, and reordering tasks.
- Issues: Permissions related to issue management, encompassing viewing, adding, editing, deleting, and adding followers.
- Timesheet: Control over viewing, adding, editing, and deleting timesheets.
- Finance: Permissions for invoicing time logs (excluding client users).
- Documents: Management of documents, including viewing, adding, editing, and deleting them.
- More Permissions: Customizing permissions for editing or deleting comments within modules.
Understanding and effectively configuring these different permissions in Zoho Projects is crucial for project managers and administrators to create a secure and collaborative project management environment.
By carefully assigning and managing permissions, organizations can ensure that the right users have the right access, leading to improved project outcomes and enhanced team productivity.
This overview provides a glimpse into the multifaceted world of permissions in Zoho Projects. Depending on your specific project and organizational needs, you can fine-tune these permissions to create a tailored access control strategy that optimizes your project management experience.
Conclusion
By harnessing the power of Zoho Projects’ permissions system, you elevate your project management capabilities, ensuring that tasks are executed seamlessly, data is protected, and collaboration thrives.
These tools are not just features; they are your keys to project management success.


