Maximize Sales Insights by Building Custom Commission Reports in Zoho Books
Discover how leveraging custom commission reports in Zoho Books can streamline sales tracking, optimize performance, and empower businesses with data-driven insights for effective decision-making.
Published on February 23, 2024
Who is this feature for?
-
Finance and Accounting Professionals
-
Sales Representatives
-
Management Teams and Sales Managers
What progress will you accomplish?
-
Enhanced commission tracking and performance evaluation
-
Informed decision-making and financial analysis
-
Sales performance evaluation and streamlined reporting
Introduction
Revolutionize your commission reporting process and unlock invaluable sales insights using custom reports in Zoho Books. This article delves into the intricacies of optimizing commission management, streamlining reporting procedures, and driving sales performance through data-driven decision-making.
With step-by-step instructions on creating automated commission reports using custom functions in Zoho Books, you’ll gain the tools and knowledge to propel your sales potential to unprecedented heights.
Discover how harnessing the power of Zoho Books can transform how you analyze, track, and maximize commissions, ultimately fostering growth and success within your organization.
Creating a Custom Function for Commission Report
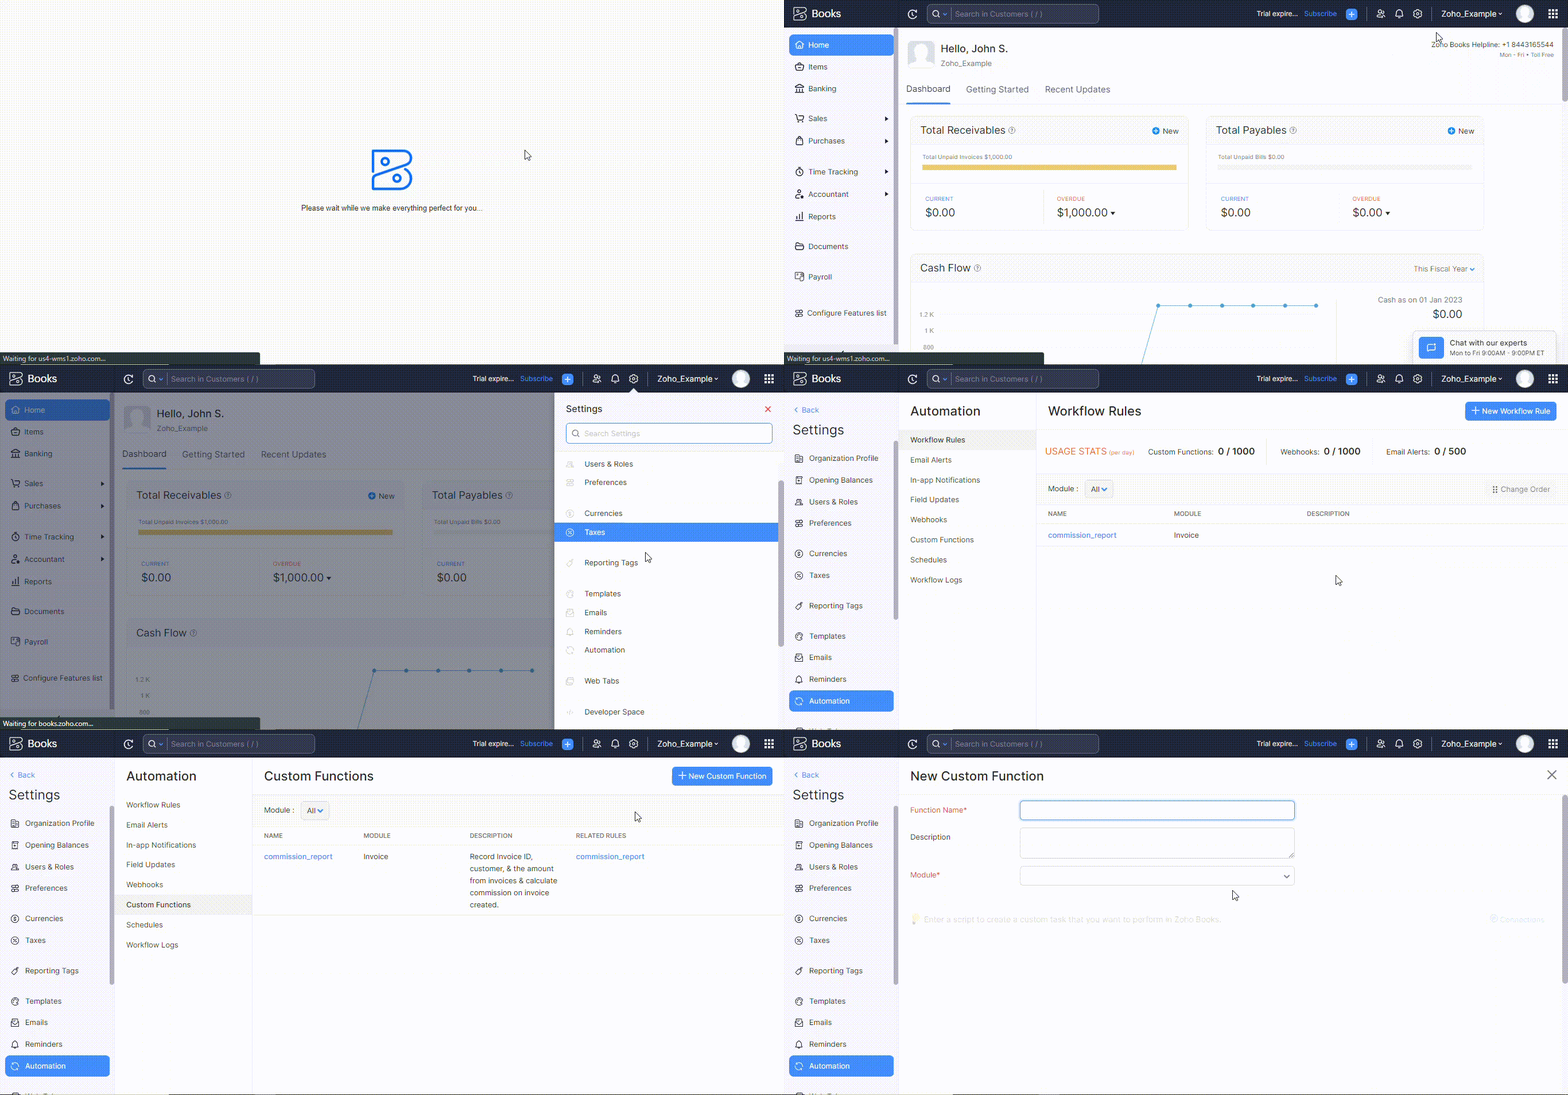
To create a custom function in Zoho Books, simply log in to your account, navigate to the Settings section, click on Automation, go to Custom Functions, and then select the option to create a New Custom Function.
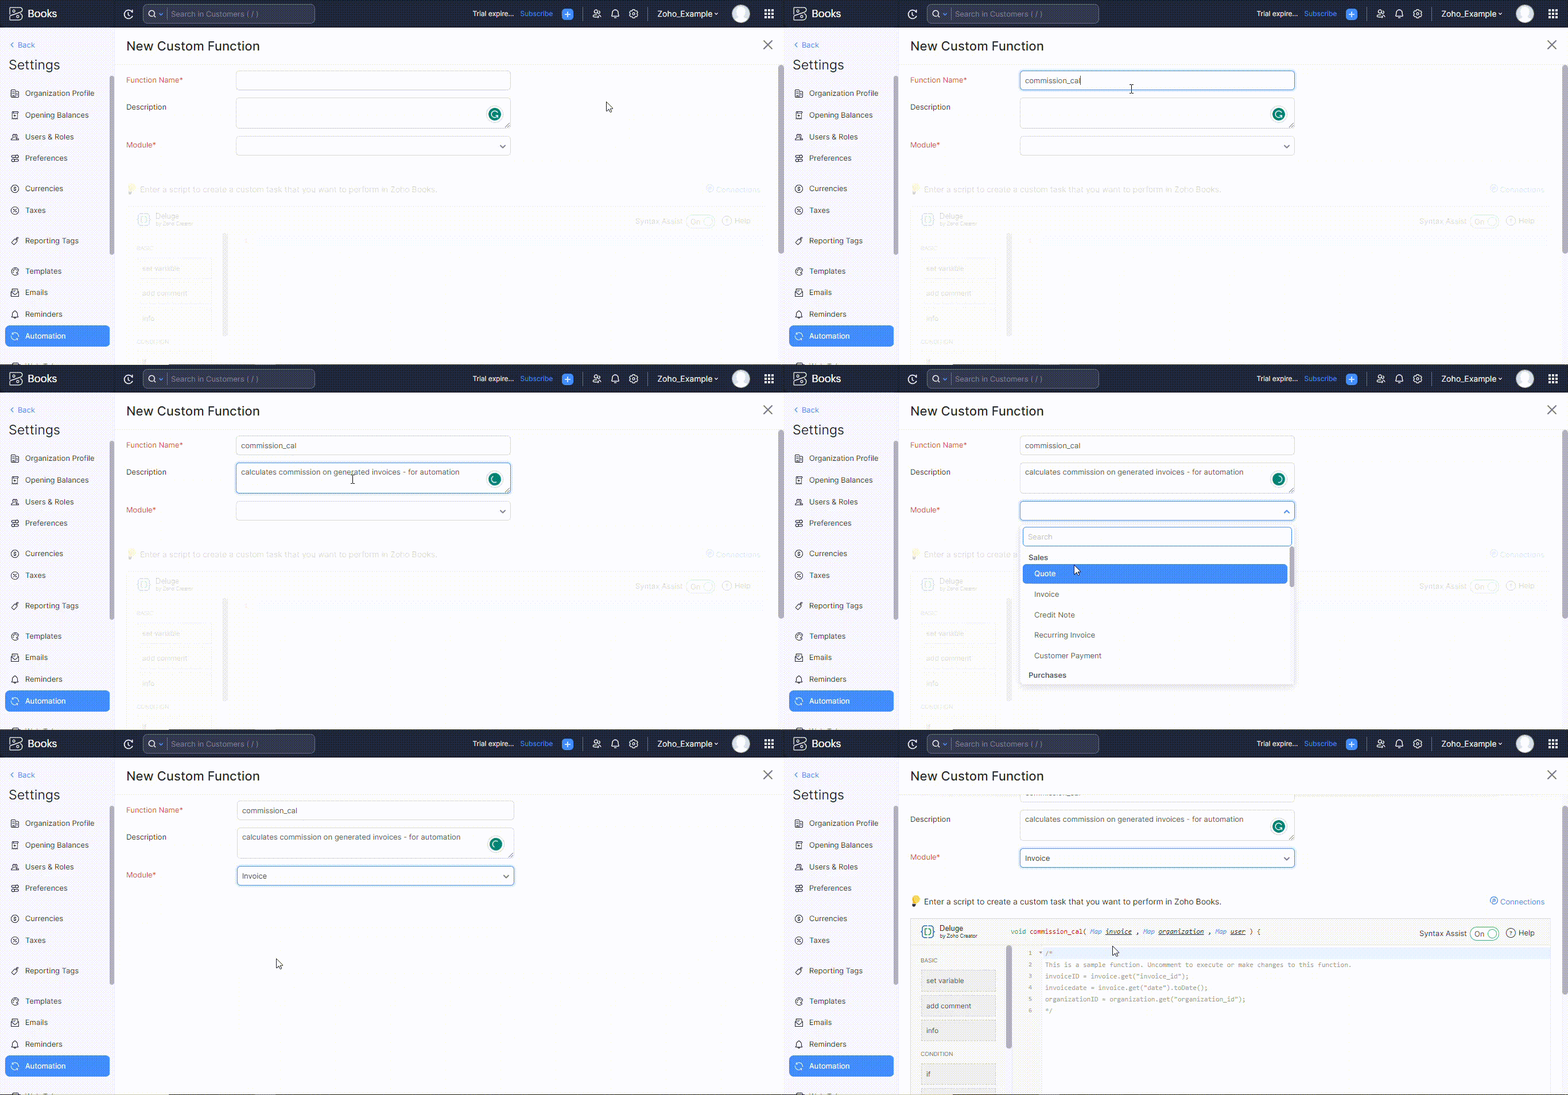
Enter a name, briefly describe your custom function, and select the desired module for which you want to create the custom function.
Write your code using Deluge to create a custom function that calculates a (3%) commission on every invoice paid. After writing the code, click the Save button.
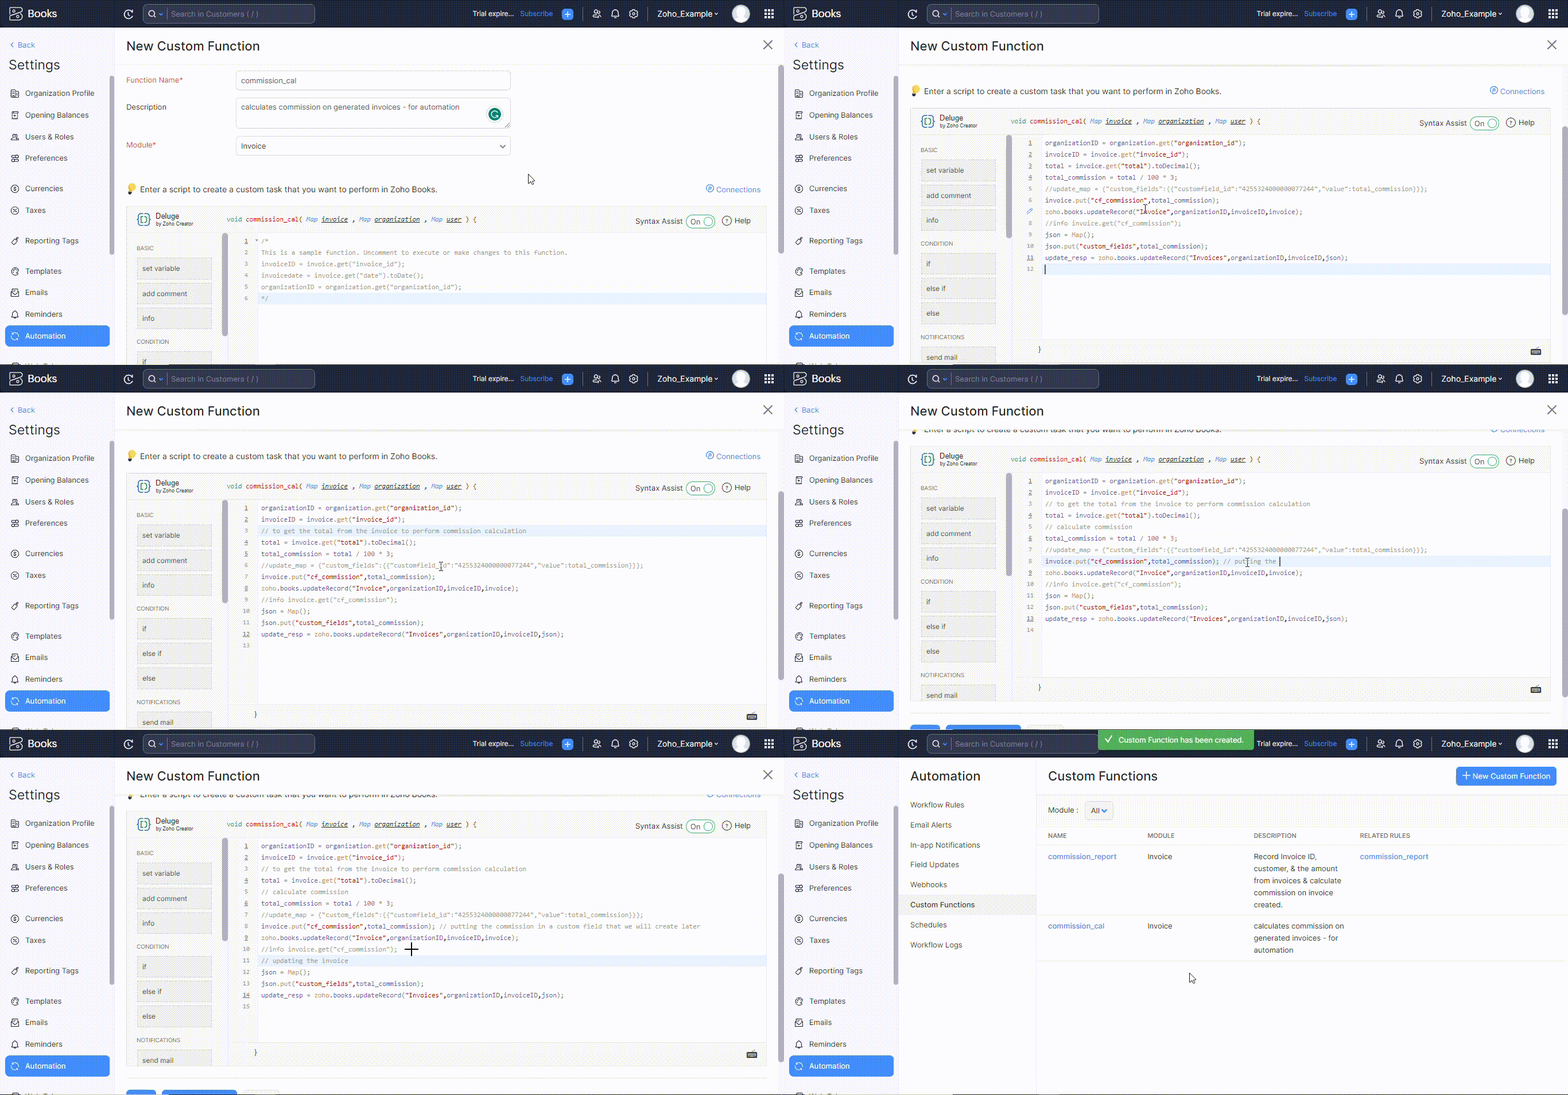
You can use the following code:
organizationID = organization.get(“organization_id”);

invoiceID = invoice.get(“invoice_id”);

total = invoice.get(“total”).toDecimal();

total_commission = total / 100 * 3;

//update_map = {“custom_fields”:{{“customfield_id”:”4255324000000077244″,”value”:total_commission}}};

invoice.put(“cf_commission”,total_commission);

zoho.books.updateRecord(“Invoice”,organizationID,invoiceID,invoice);

//info invoice.get(“cf_commission”);

json = Map();

json.put(“custom_fields”,total_commission);

update_resp = zoho.books.updateRecord(“Invoices”,organizationID,invoiceID,json);
Or alternatively, you can use the following code for creating a custom function using your Zoho Books connection link:
invoiceID = invoice.get(“invoice_id”);

organizationID = organization.get(“organization_id”);

total_price = invoice.get(“total”);

invoice.put(“cf_commission”,total_price);

imap = Map();

imap.put(“api_name”,”cf_commission”);

imap.put(“value”,total_price);

ilist = List();

ilist.add(imap);

json = Map();

json.put(“custom_fields”,ilist);

res = zoho.books.updateRecord(“Invoice”,organizationID,invoiceID,json,”zoho_connect_link”);

info res;

info json;
Furthermore, you can describe the link to the custom field you created for your invoice and alter the code slightly.
You can use the following code where “4255324000000077244” is the link to your custom field, and the commission will be updated to this field on your invoice.
|
update_map = {“custom_fields”:{{“customfield_id”:”4255324000000077244″,”value”:total_commission}}}; |
You can click the Execute button to see if the code is running without errors. After clicking Execute, you can select an invoice you have created already and can run the custom function.
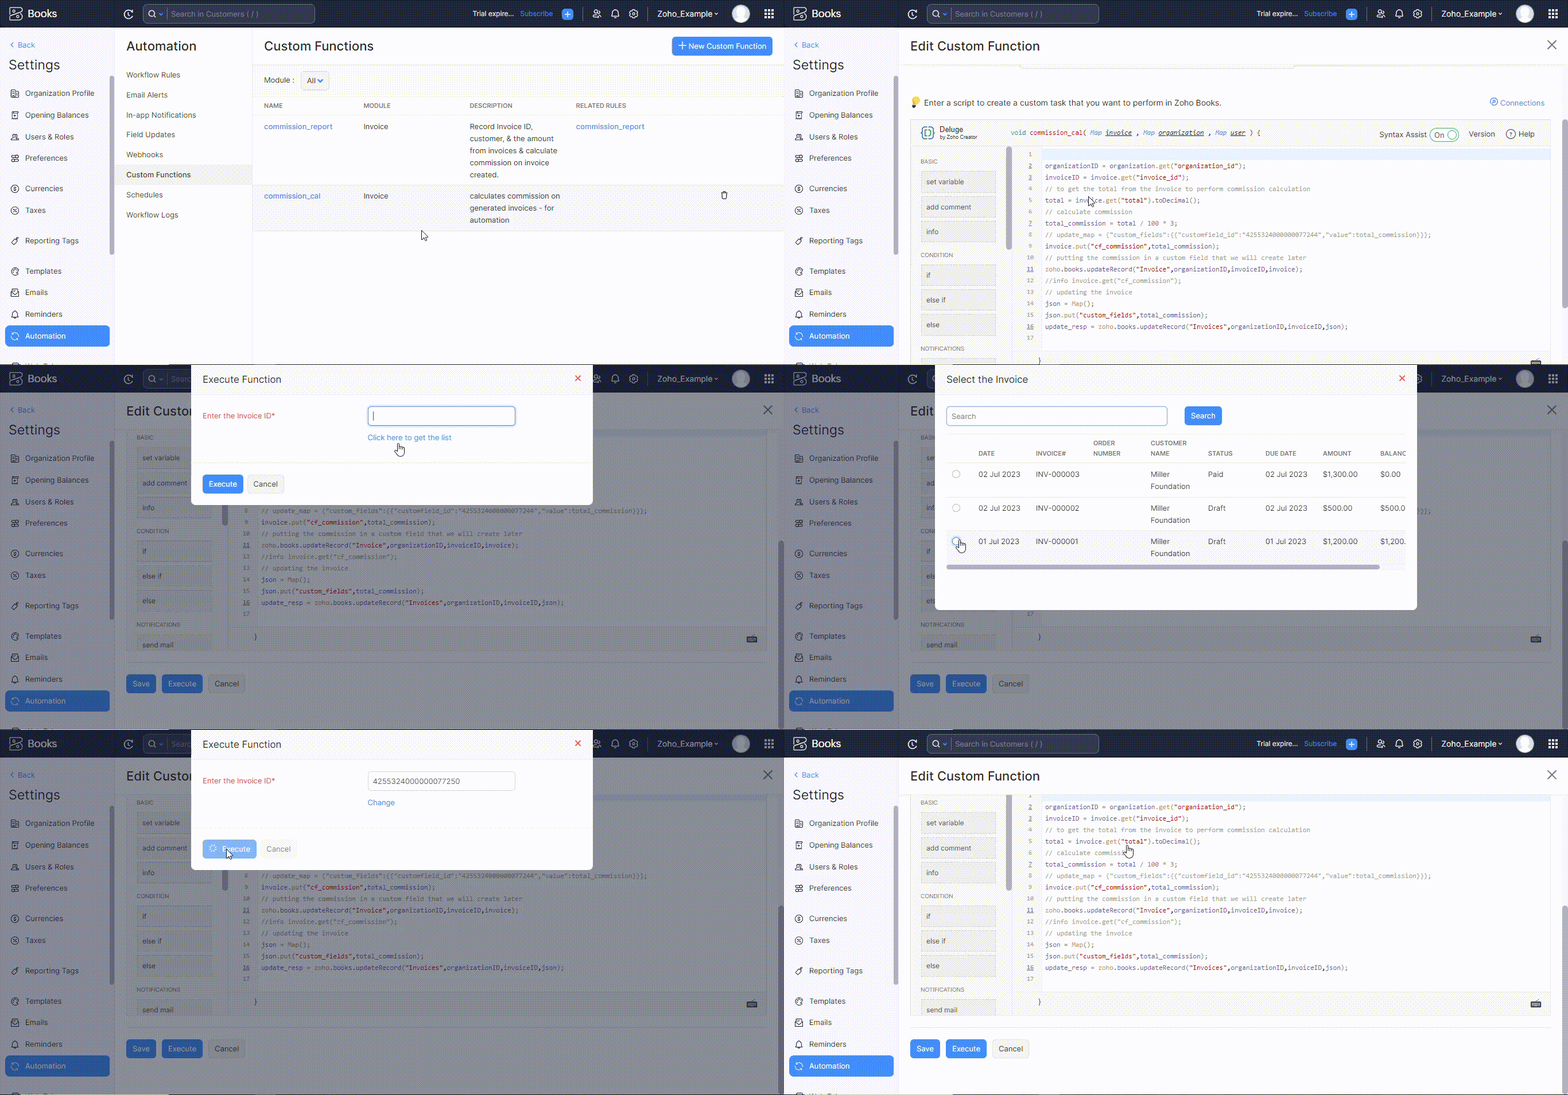
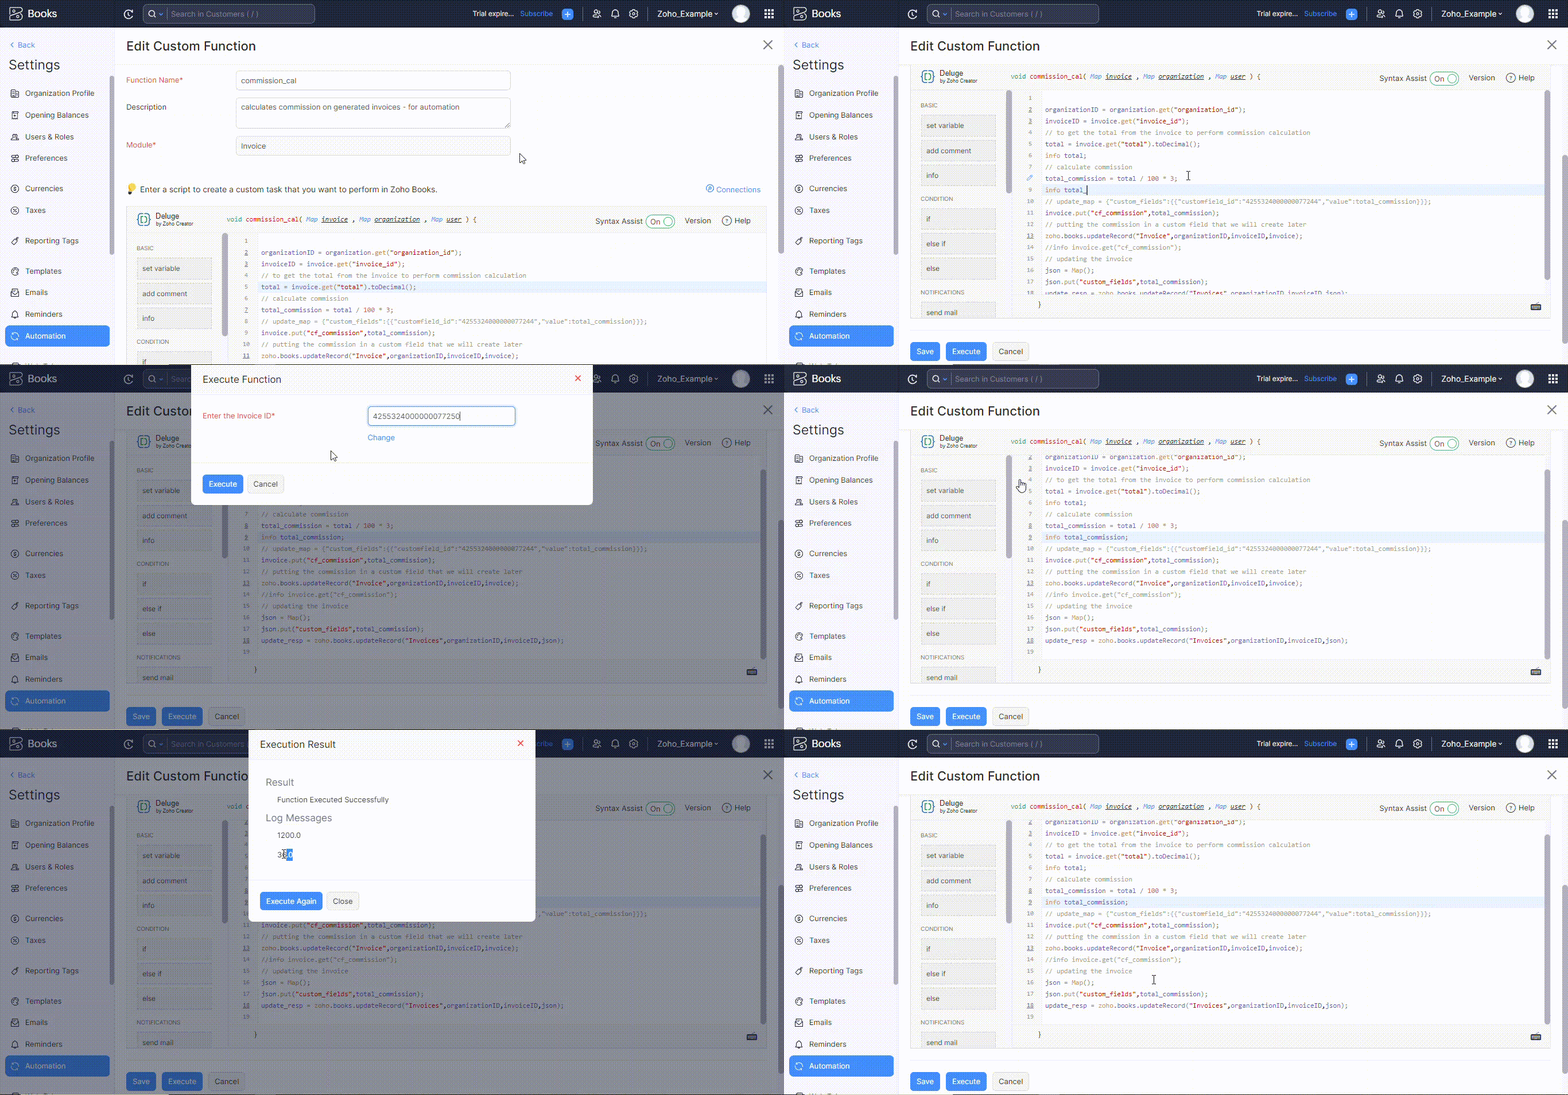
Use the “info” keyword to also see a specific line of code output during the code execution.
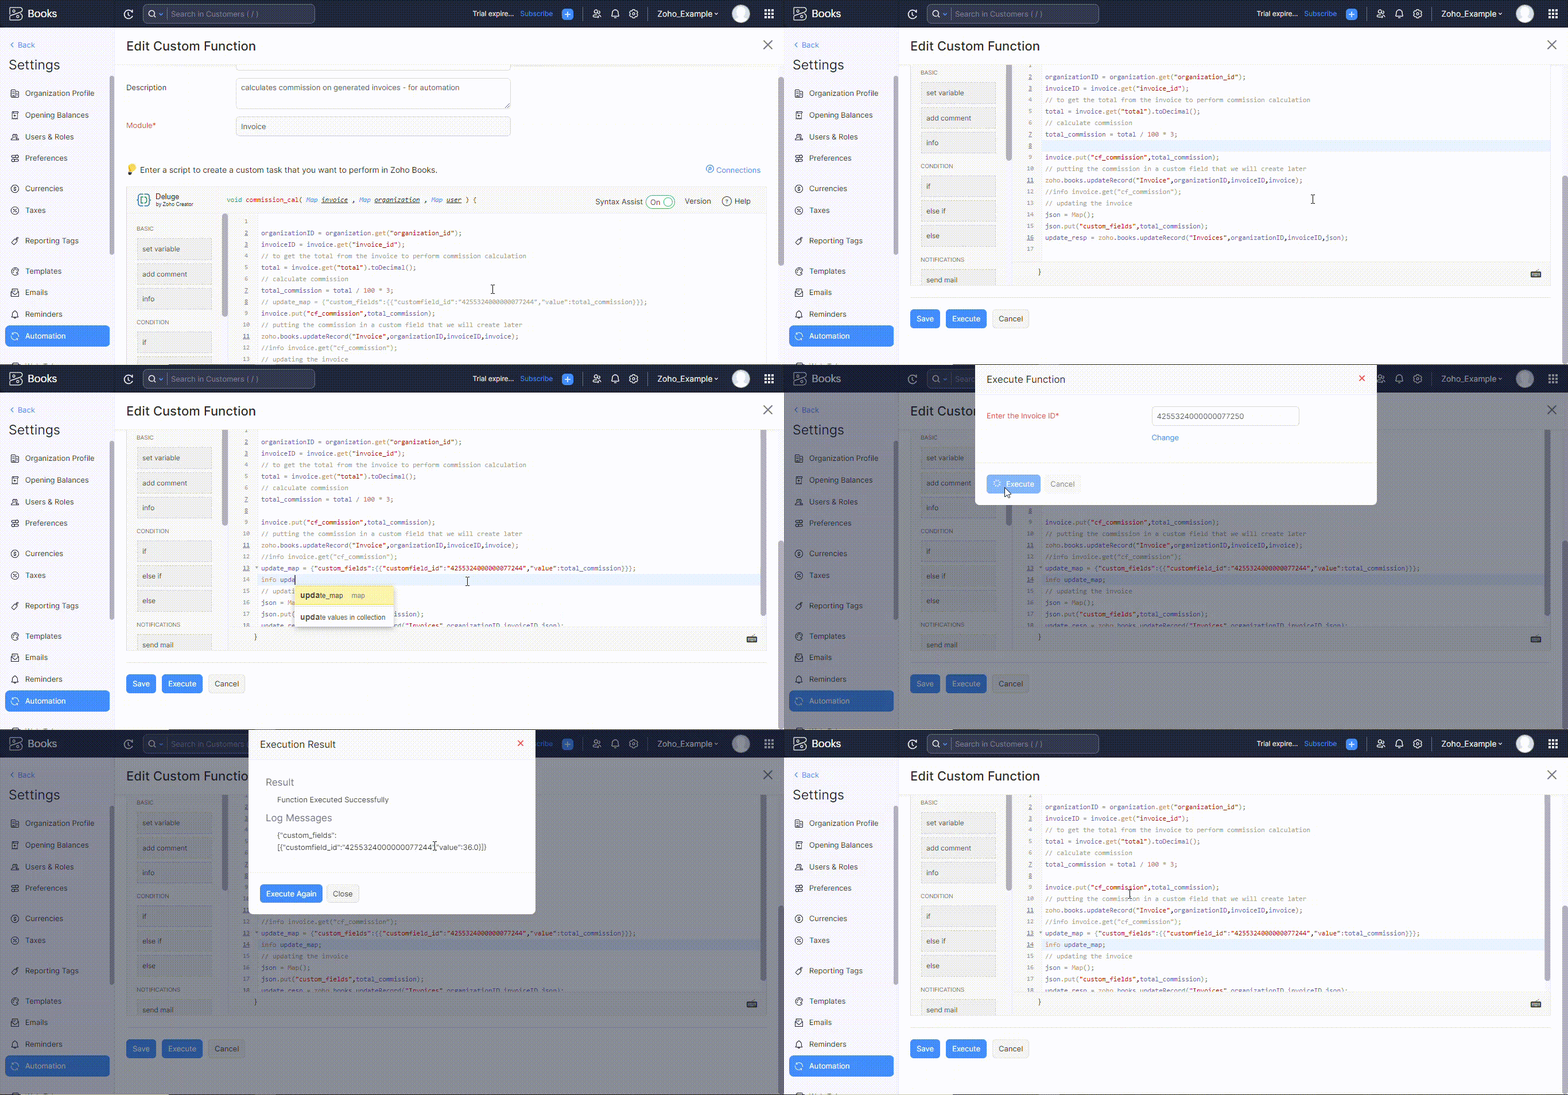
To confirm if the value is saved accurately in the custom field on your invoice, use the “info <name>” for your line of code that performs this action.
After writing the custom function successfully, click the Save button. Remember, creating a custom field for your invoice first is important, so let’s create one.
Adding a Custom Field for Invoices
To create a custom invoice field in Zoho Books, access the Sales section, open the Invoices page, click New to create a new invoice, navigate to Settings, and select Manage Custom Fields.
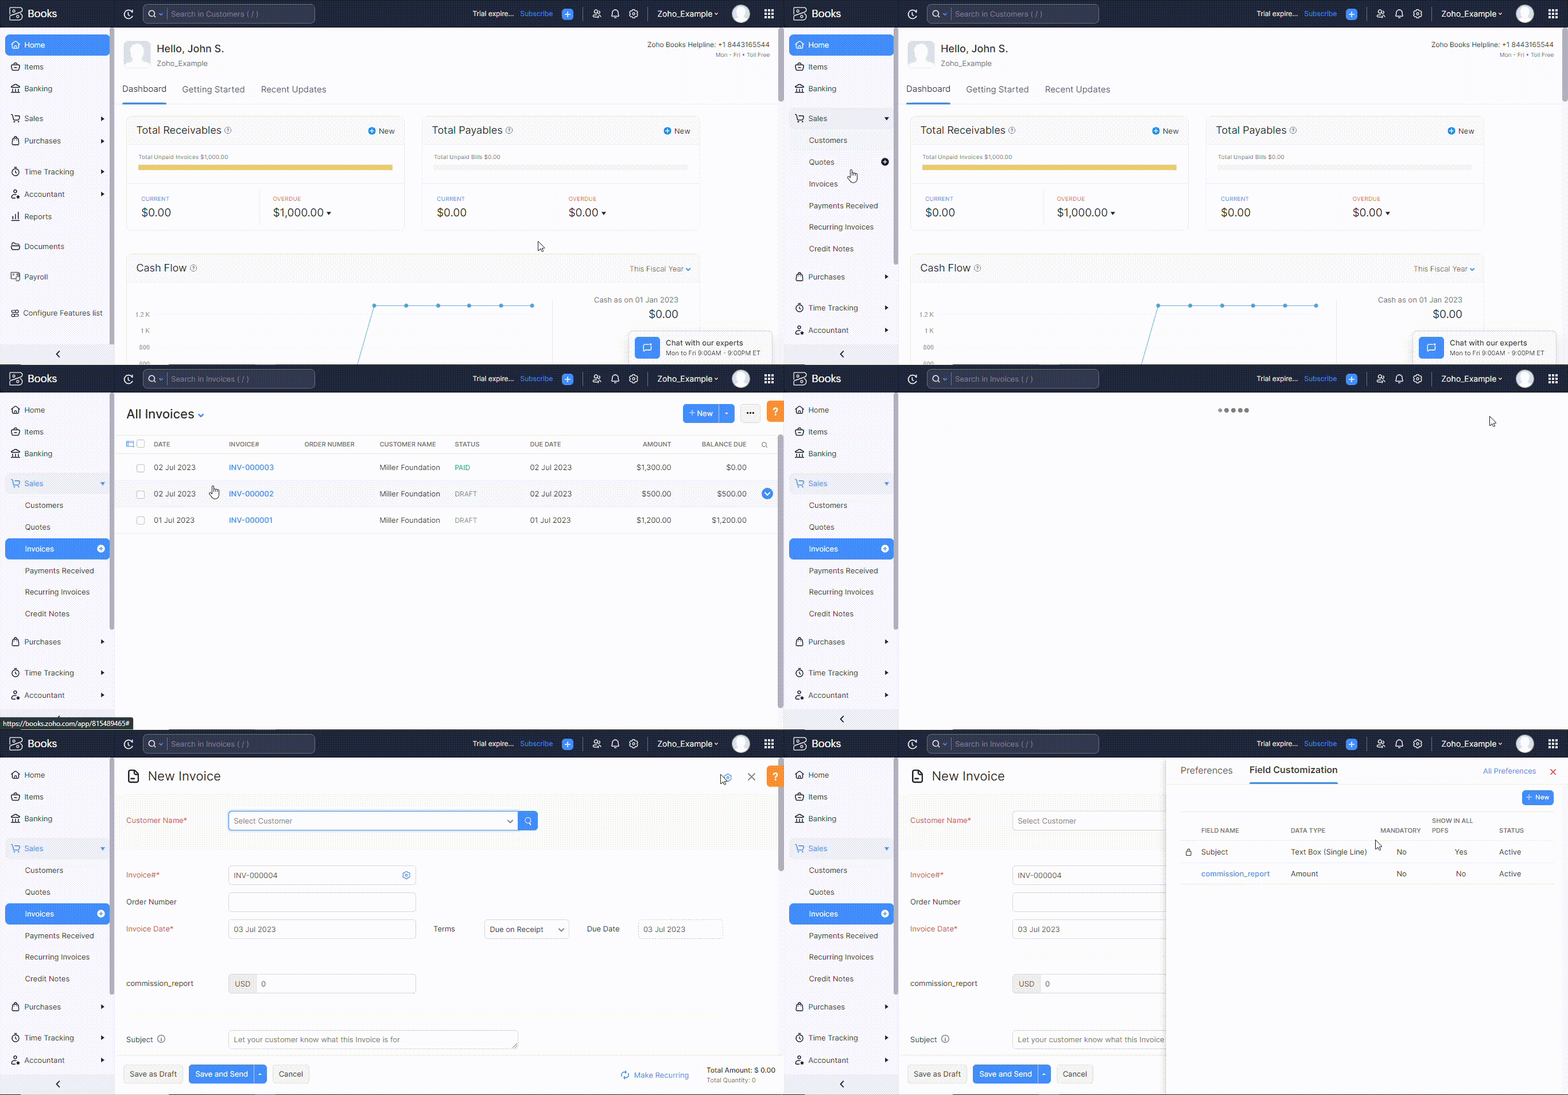
Click New and enter the Label Name for your custom field and its Data Type. Then, click Save to create the custom field successfully.
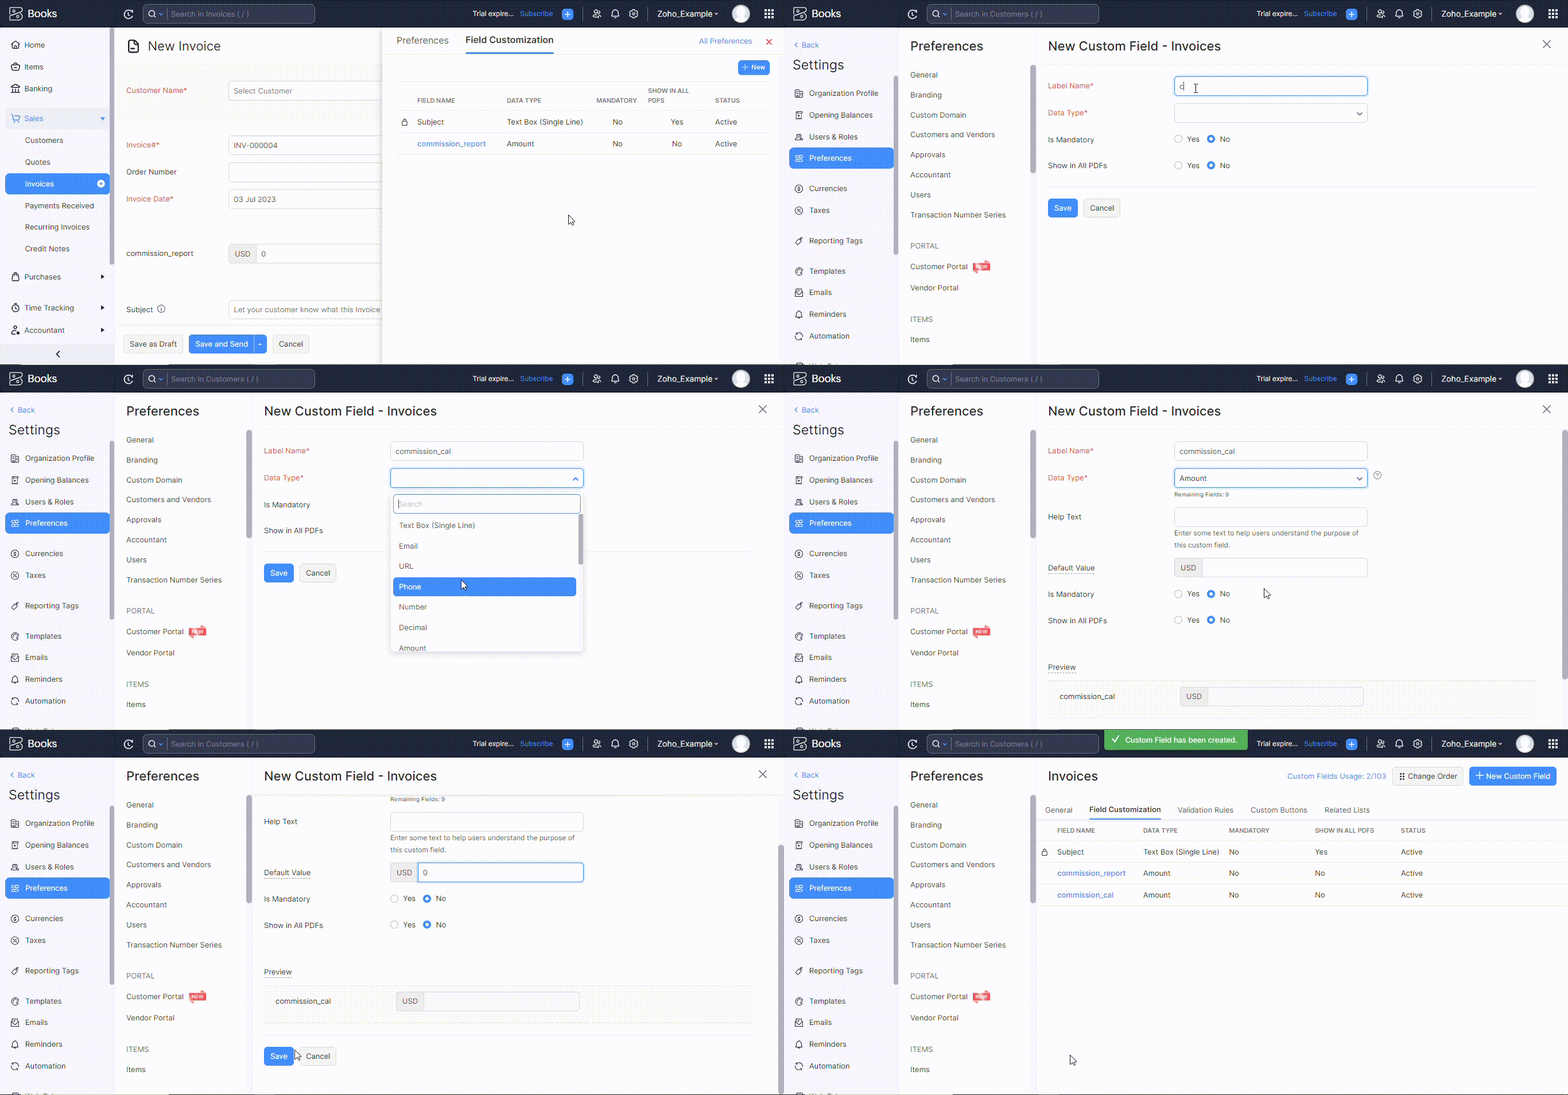
When creating custom fields, you can get “customfield_id” from the custom field’s URL. You can click on the custom field you created and copy its URL address and API Field Name from there.
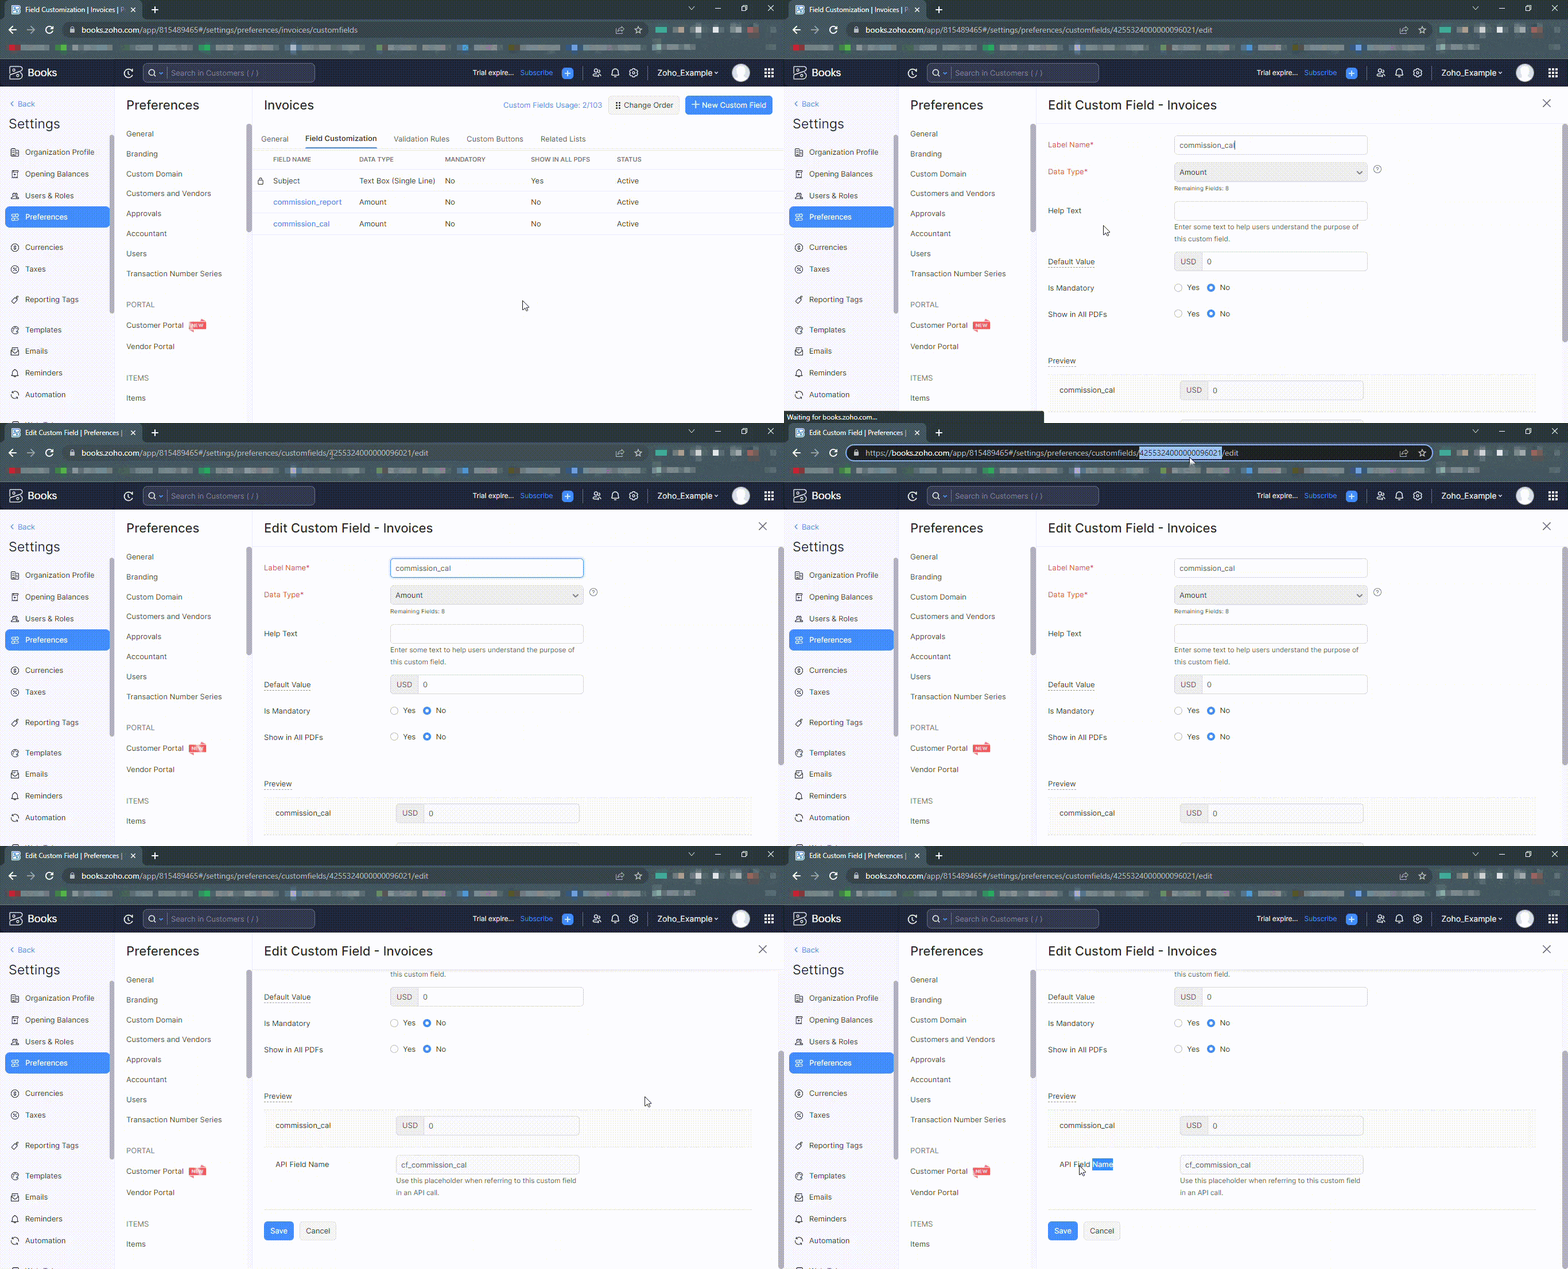
In our case, its: Custom Field URL is 4255324000000096021, and its API Field Name is cf_commission_cal
After creating a custom field and a custom function, now is the time to create a new workflow rule to perform successful automation. It will automate the custom function whenever an invoice is paid.
Creating New Workflow Rule
To automate the custom function, you need to create a Workflow Rule for it so that whenever an invoice is paid, it calculates the commission.
Click on Settings and navigate to Workflow Rules. From there, select the option to create a New Workflow Rule.
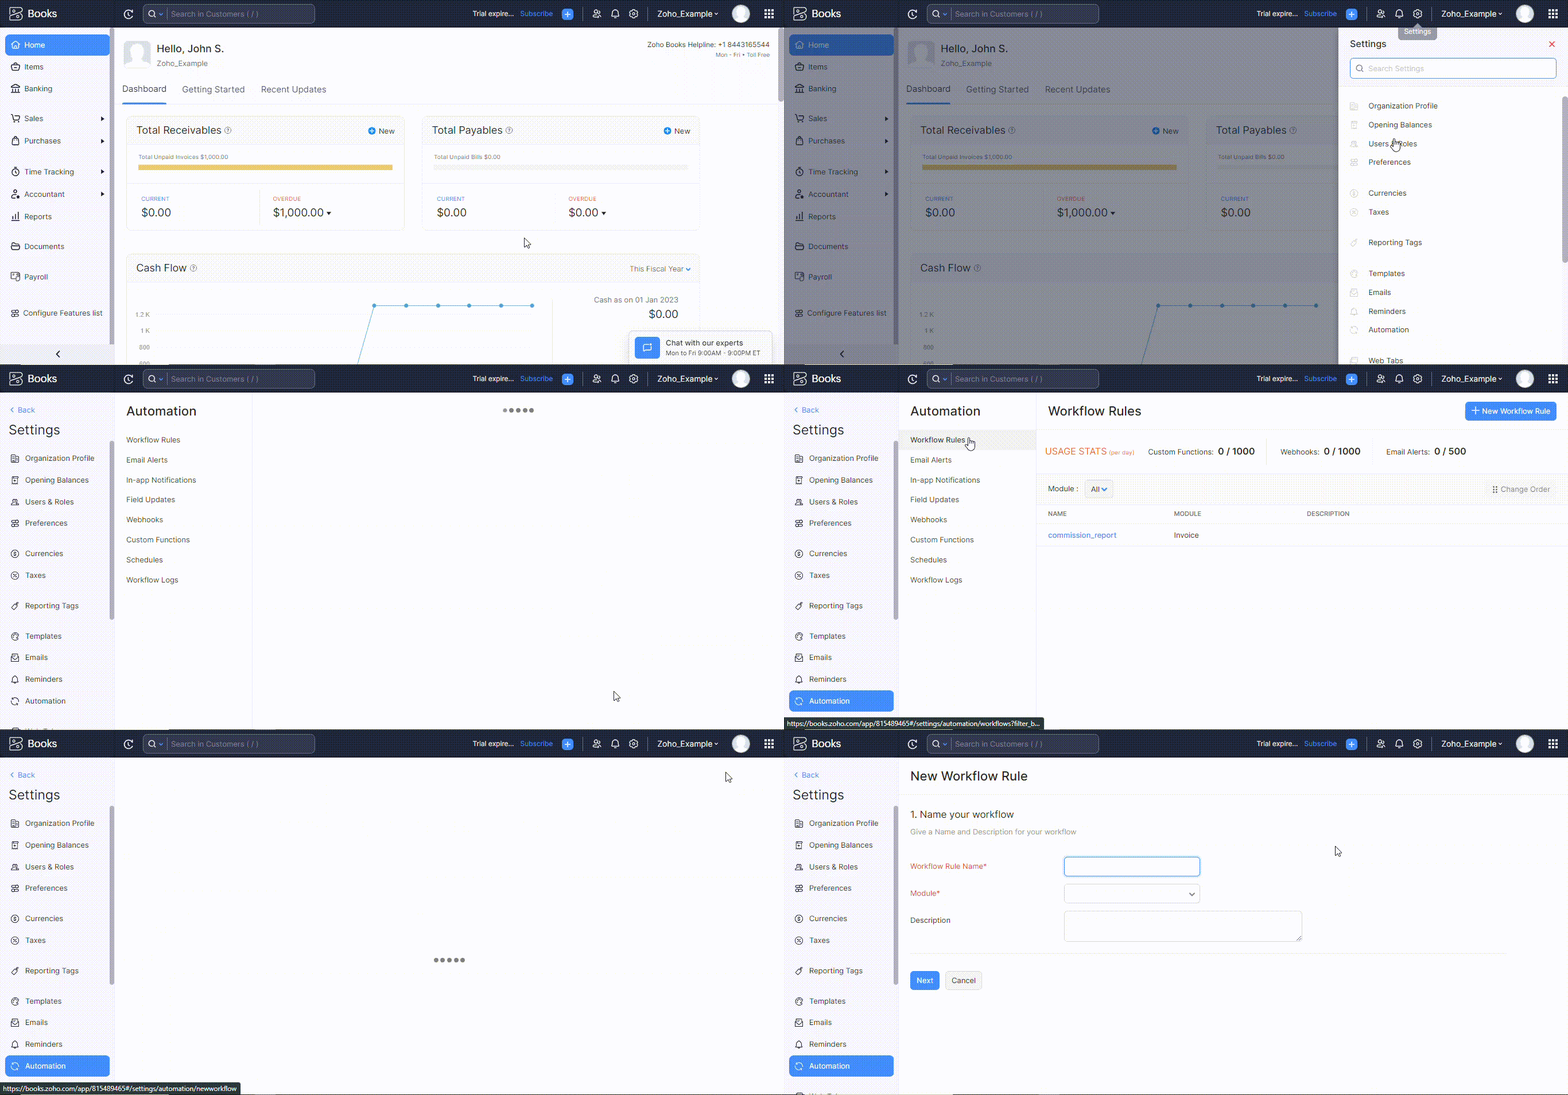
Provide a name for your Workflow Rule and indicate the specific Module it serves. After entering this information, click on the Next button to proceed.
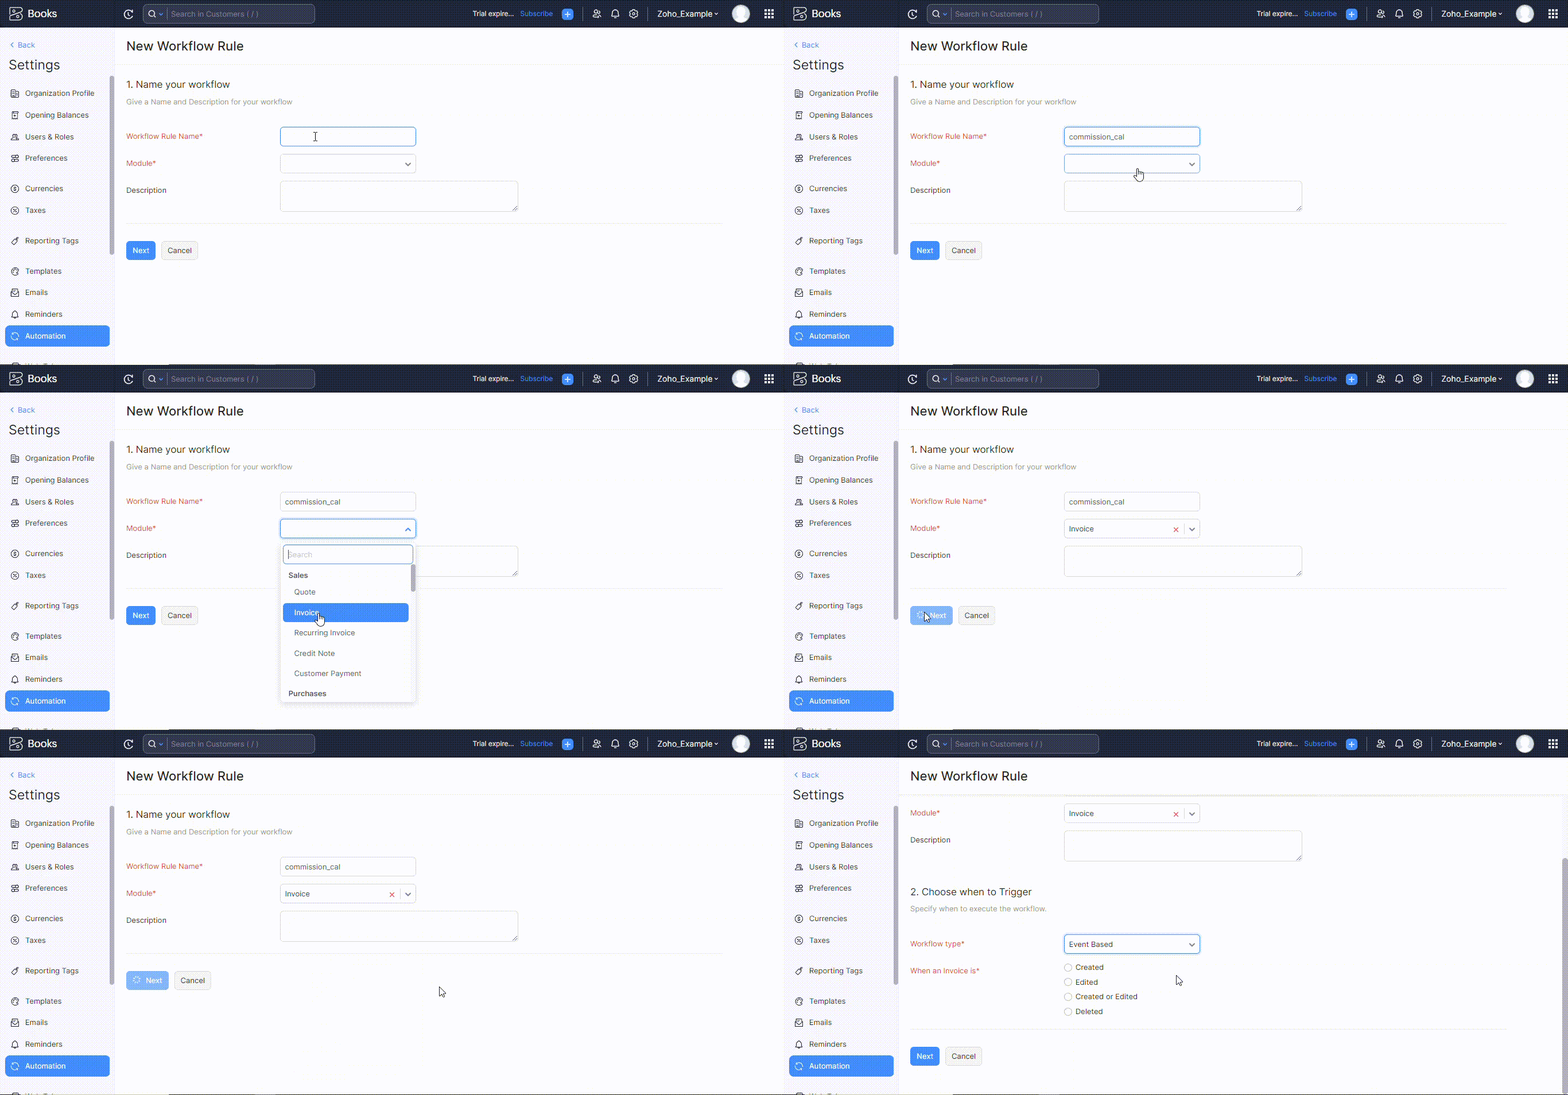
It’s time to choose when your custom function will be triggered. We will choose the Event Based and When an Invoice is Created or Edited options.
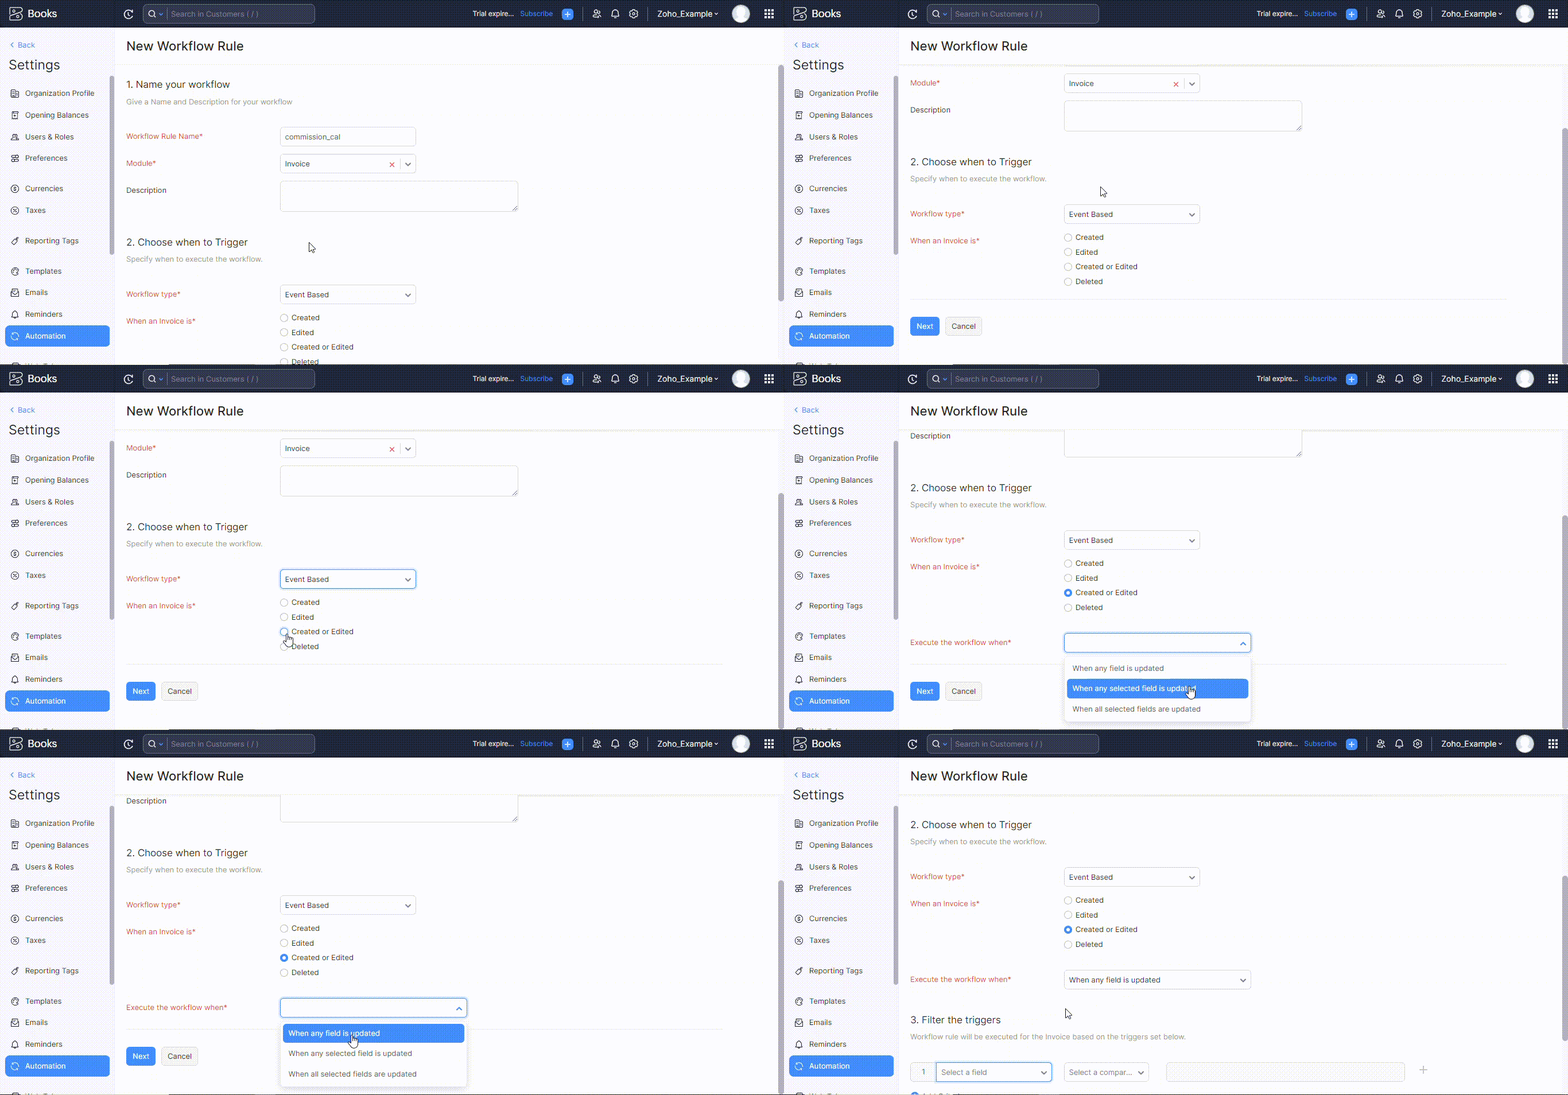
You can further filter the trigger for making the workflow rule in-depth. For example, if you want your commission to be calculated every time an Invoice is paid, you can filter the triggers by applying the following criteria:
Status is Paid – Every time
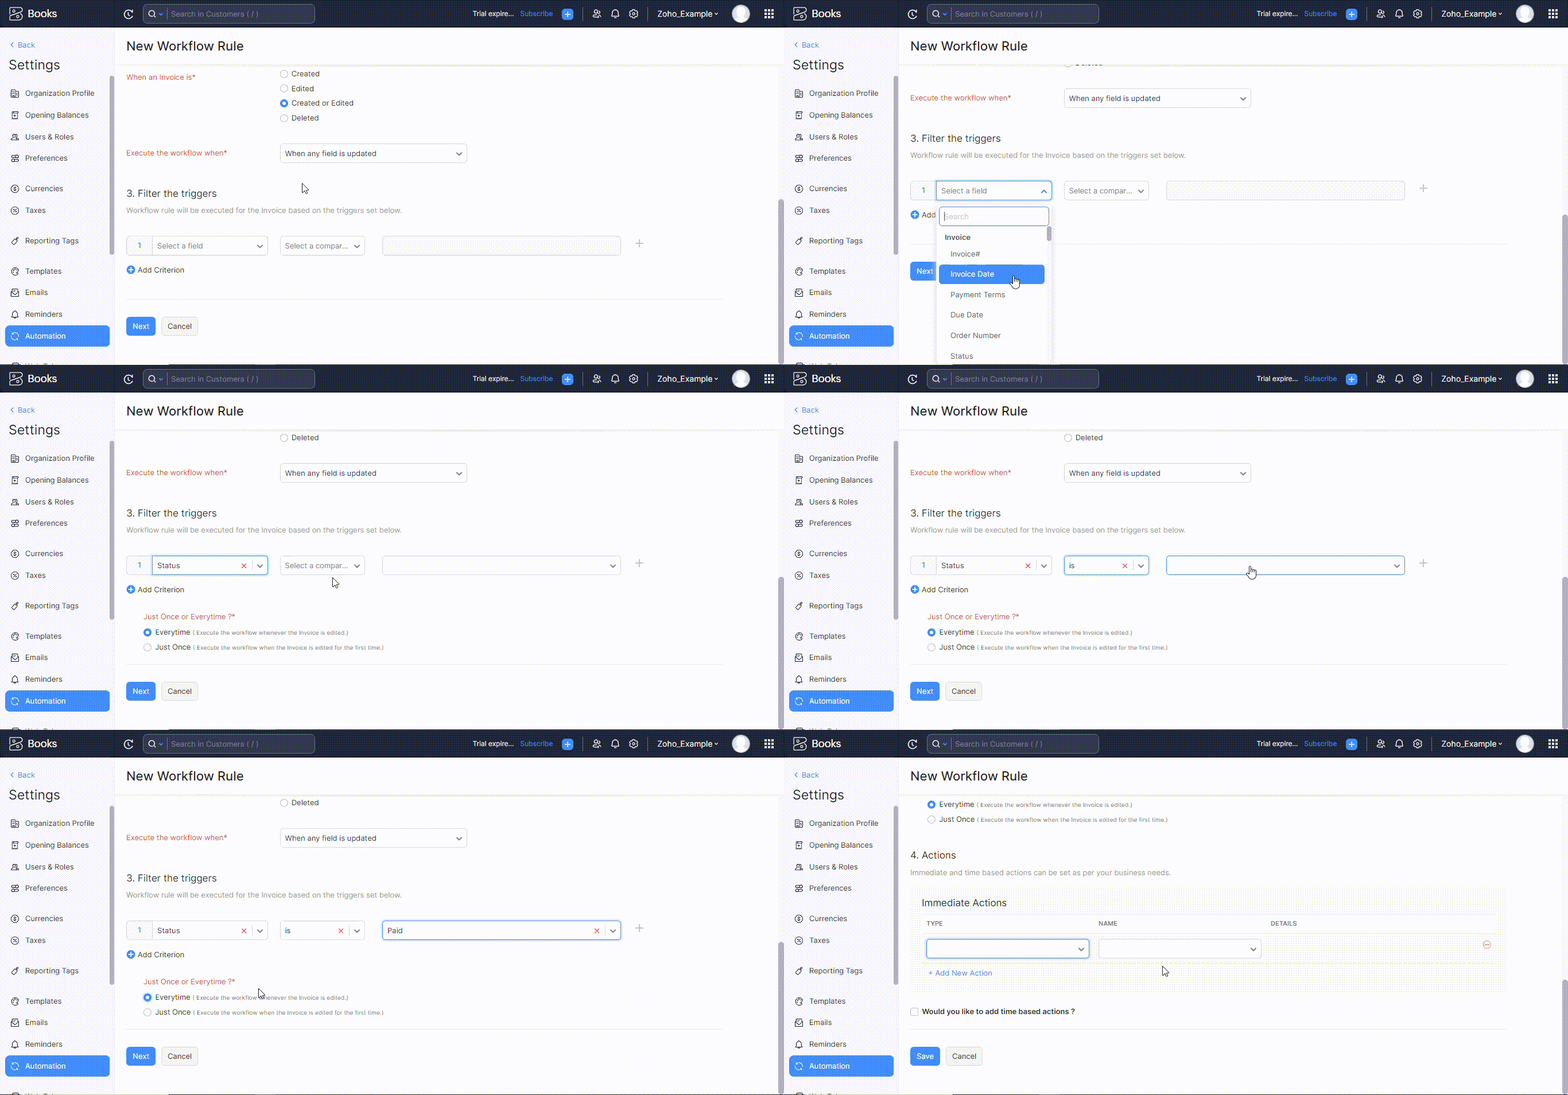
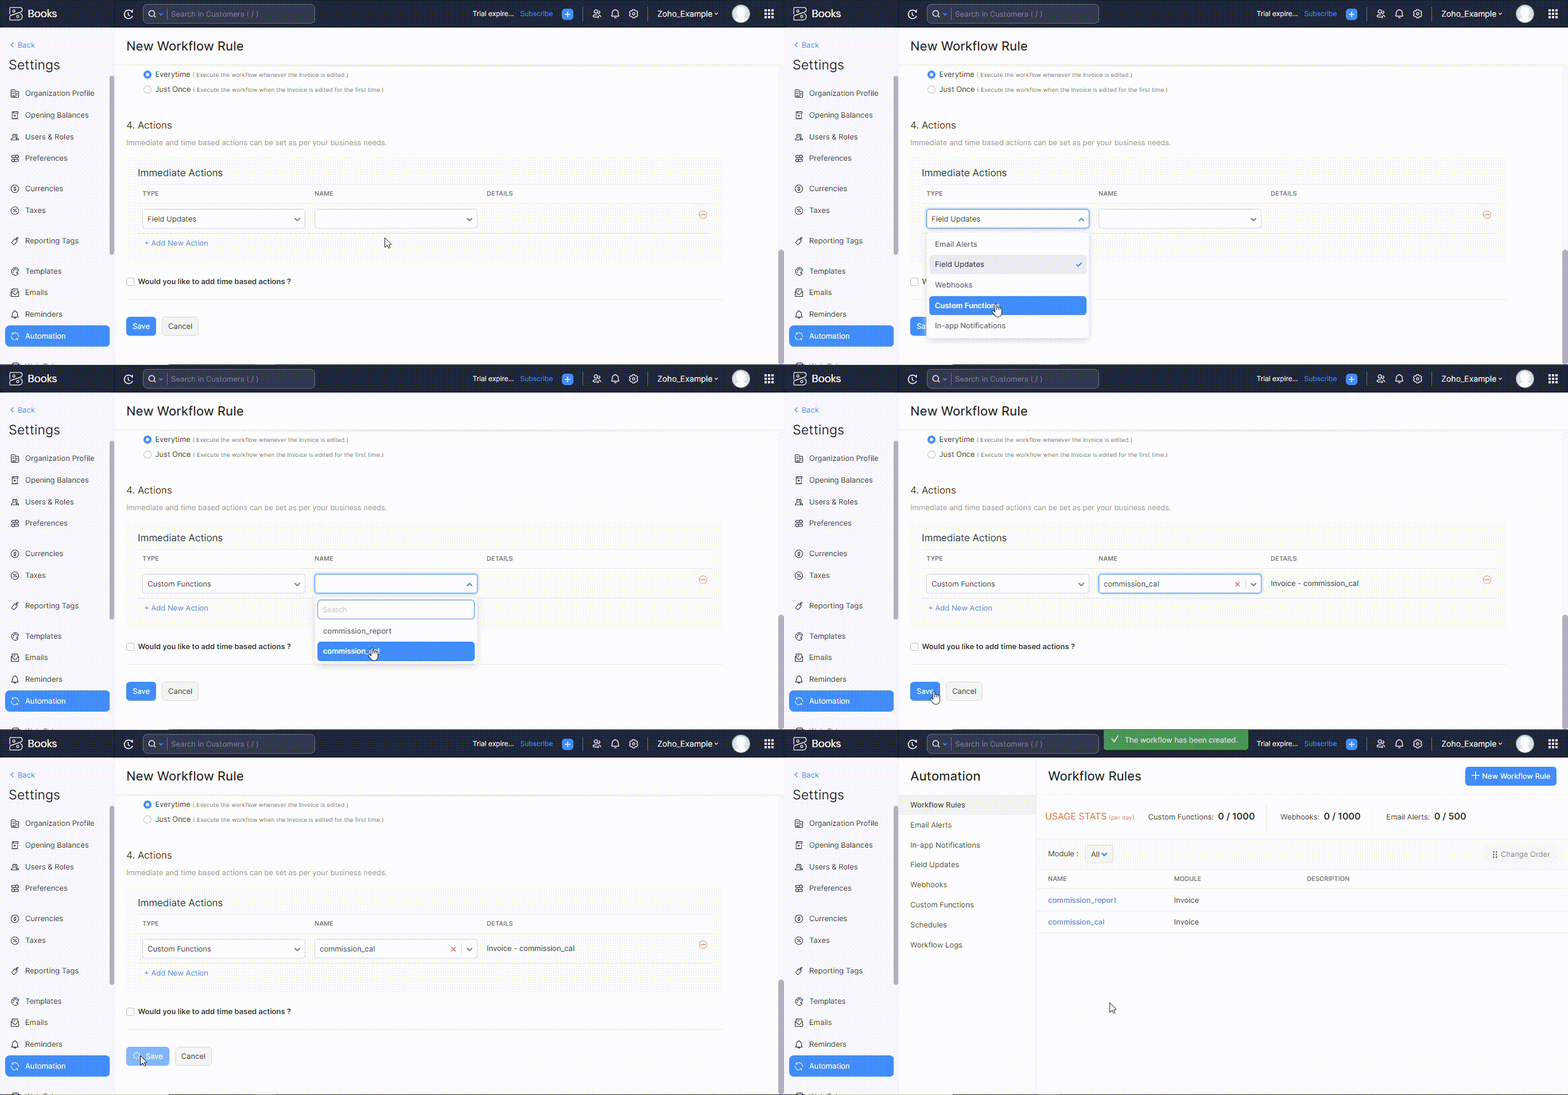
Now, the final option is to select the Action. You can select the custom function you want to be executed, and its according custom fields will be updated.
Putting it all together
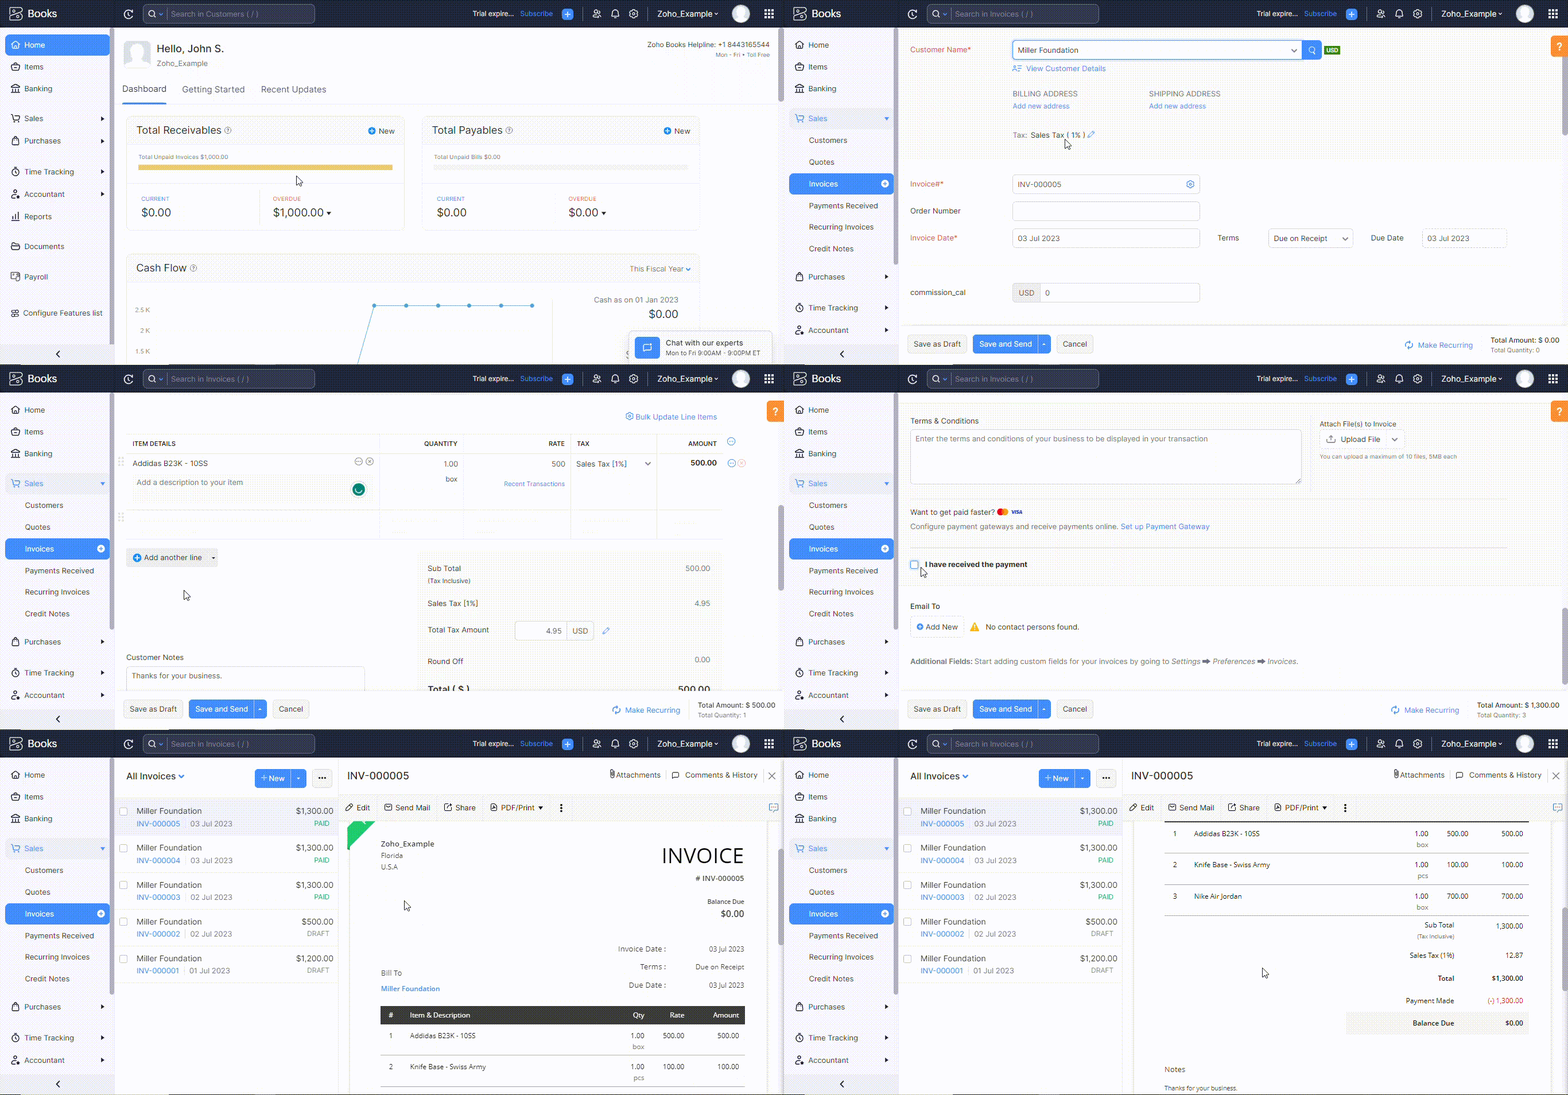
Now we have a custom field for commission on Invoices, a custom function to calculate commission based on the total amount on Invoices, and a workflow rule to trigger this custom function whenever an Invoice is paid.
Let’s create an Invoice and set its status to Paid to see how our custom function automatically calculates the commission for each invoice paid.
Integrating Invoices with Zoho Analytics
To integrate your Invoice details with Zoho Analytics, access the Settings menu, click on Integrations, then navigate to Zoho Analytics Integration and select Configure.
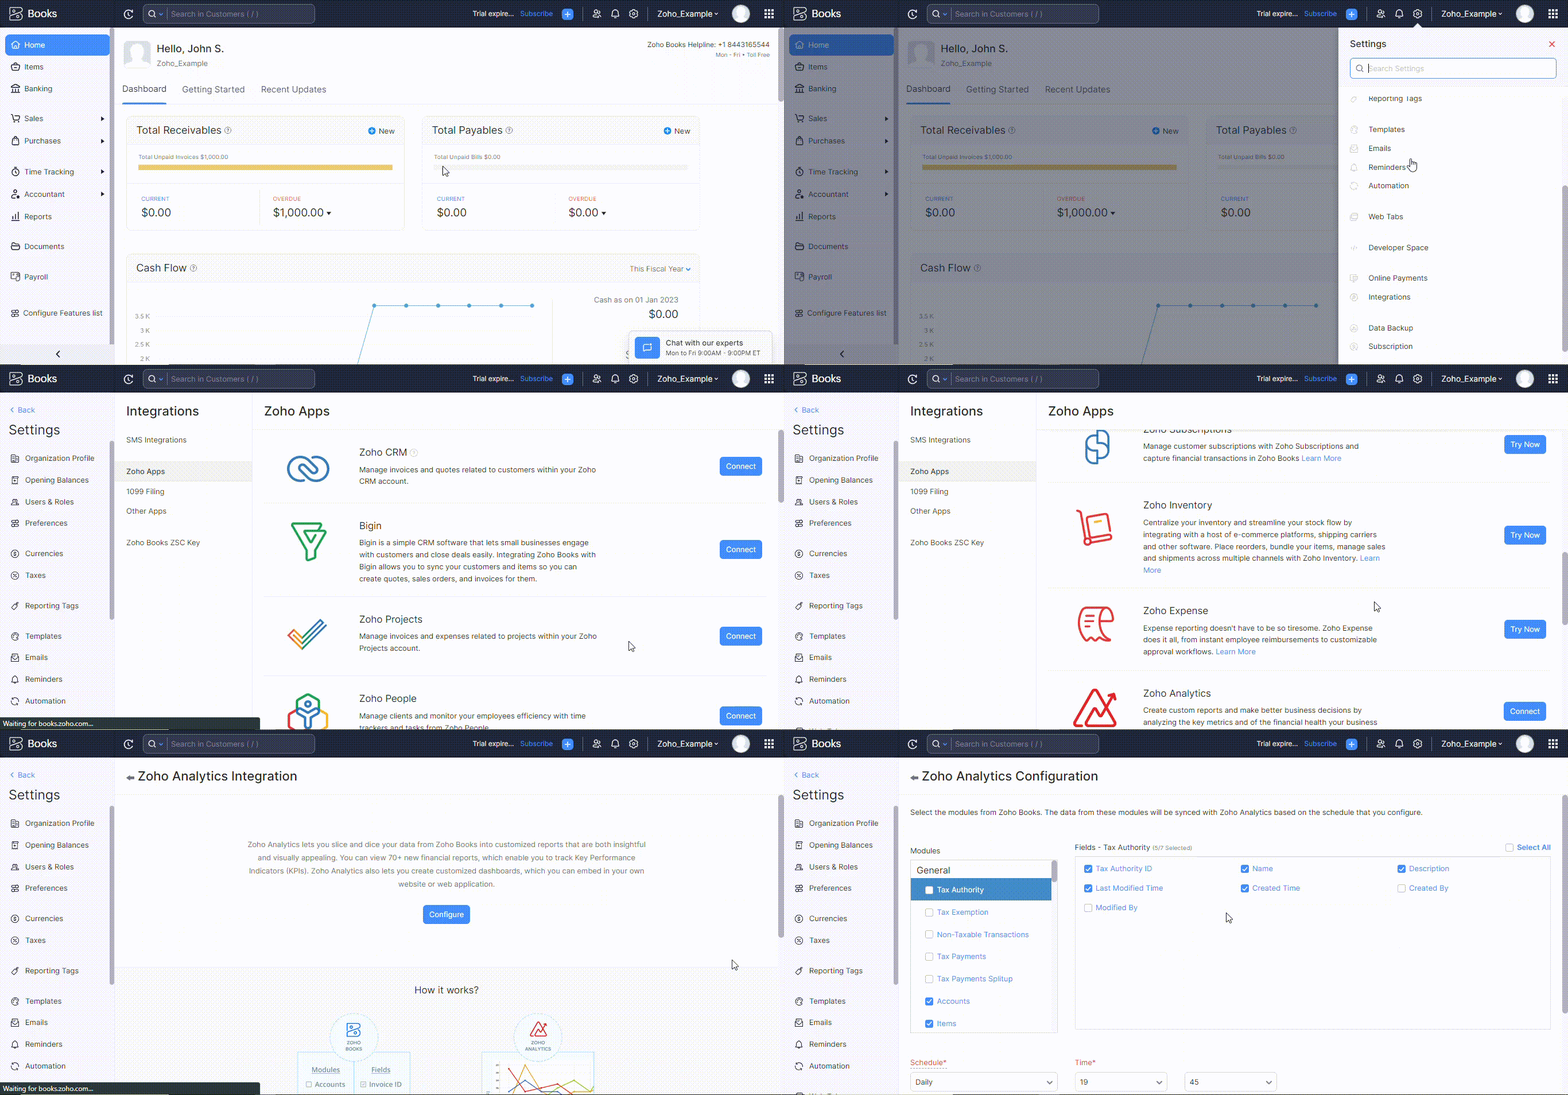
Here, you can choose the Zoho Books modules that need integration and schedule the data synchronization with Zoho Analytics.
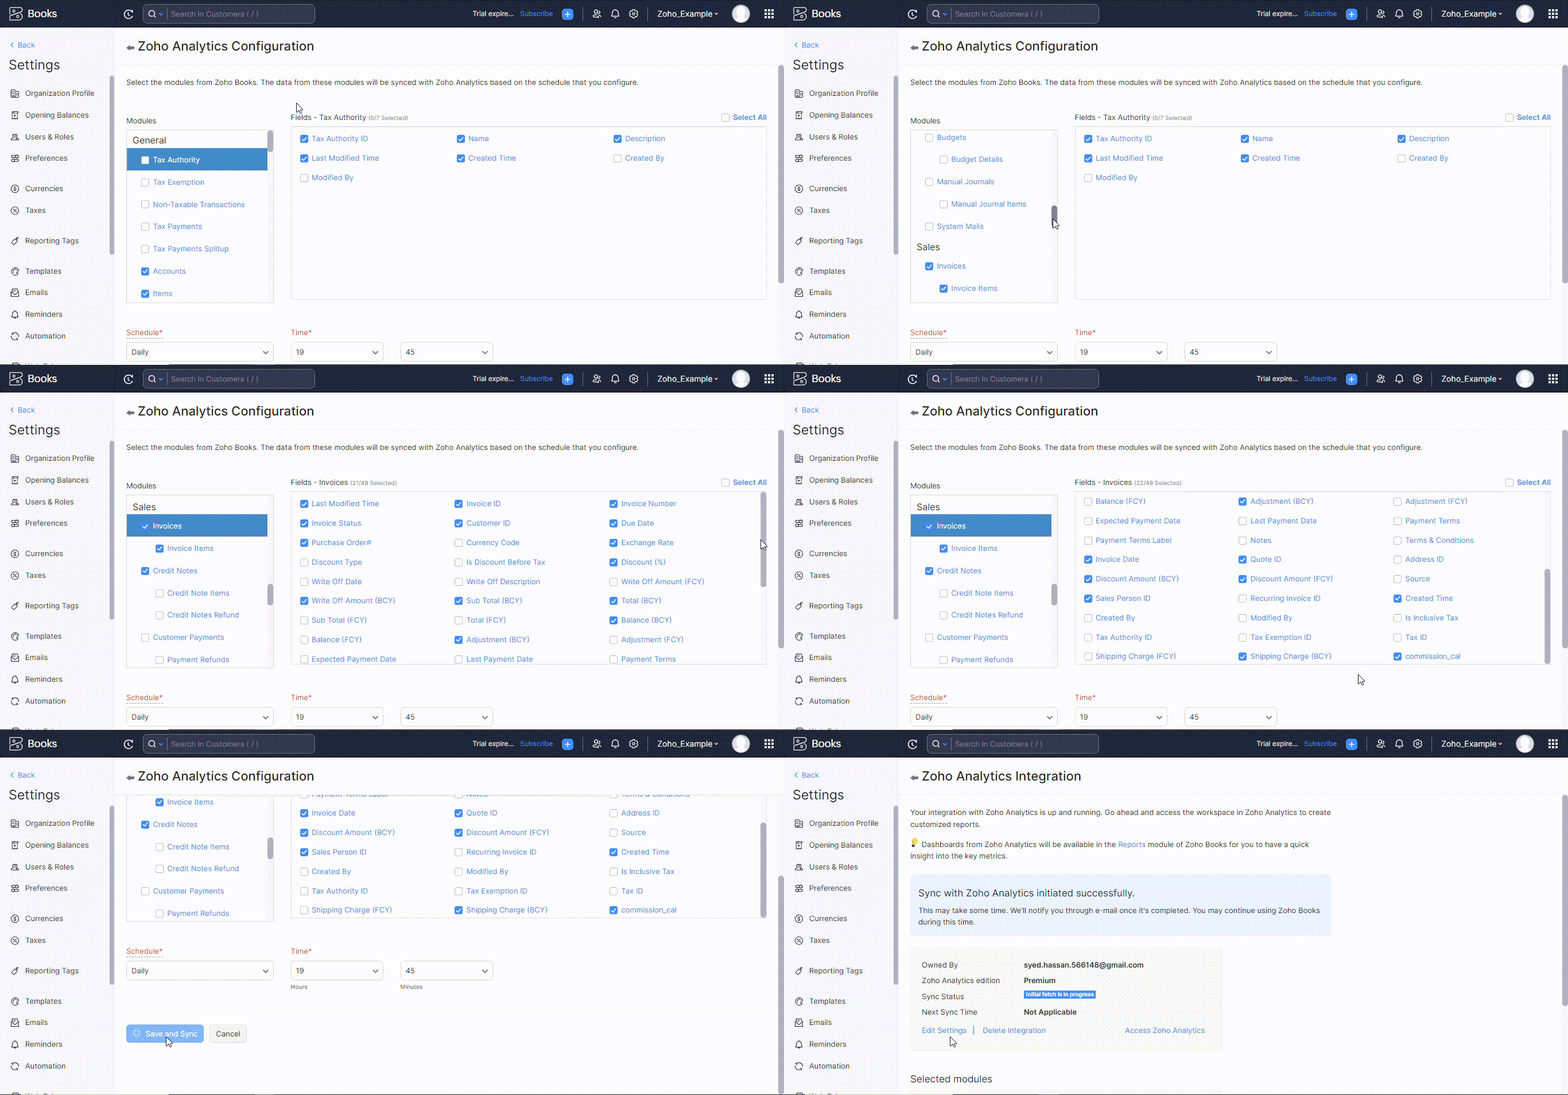
Don’t forget to select the custom field that we created to store commission for every invoice paid. To access reports from Zoho Analytics, follow these steps:
Go to Settings and click on Integrations. Then, select See Details on Zoho Analytics Integration and click on Access Zoho Analytics.
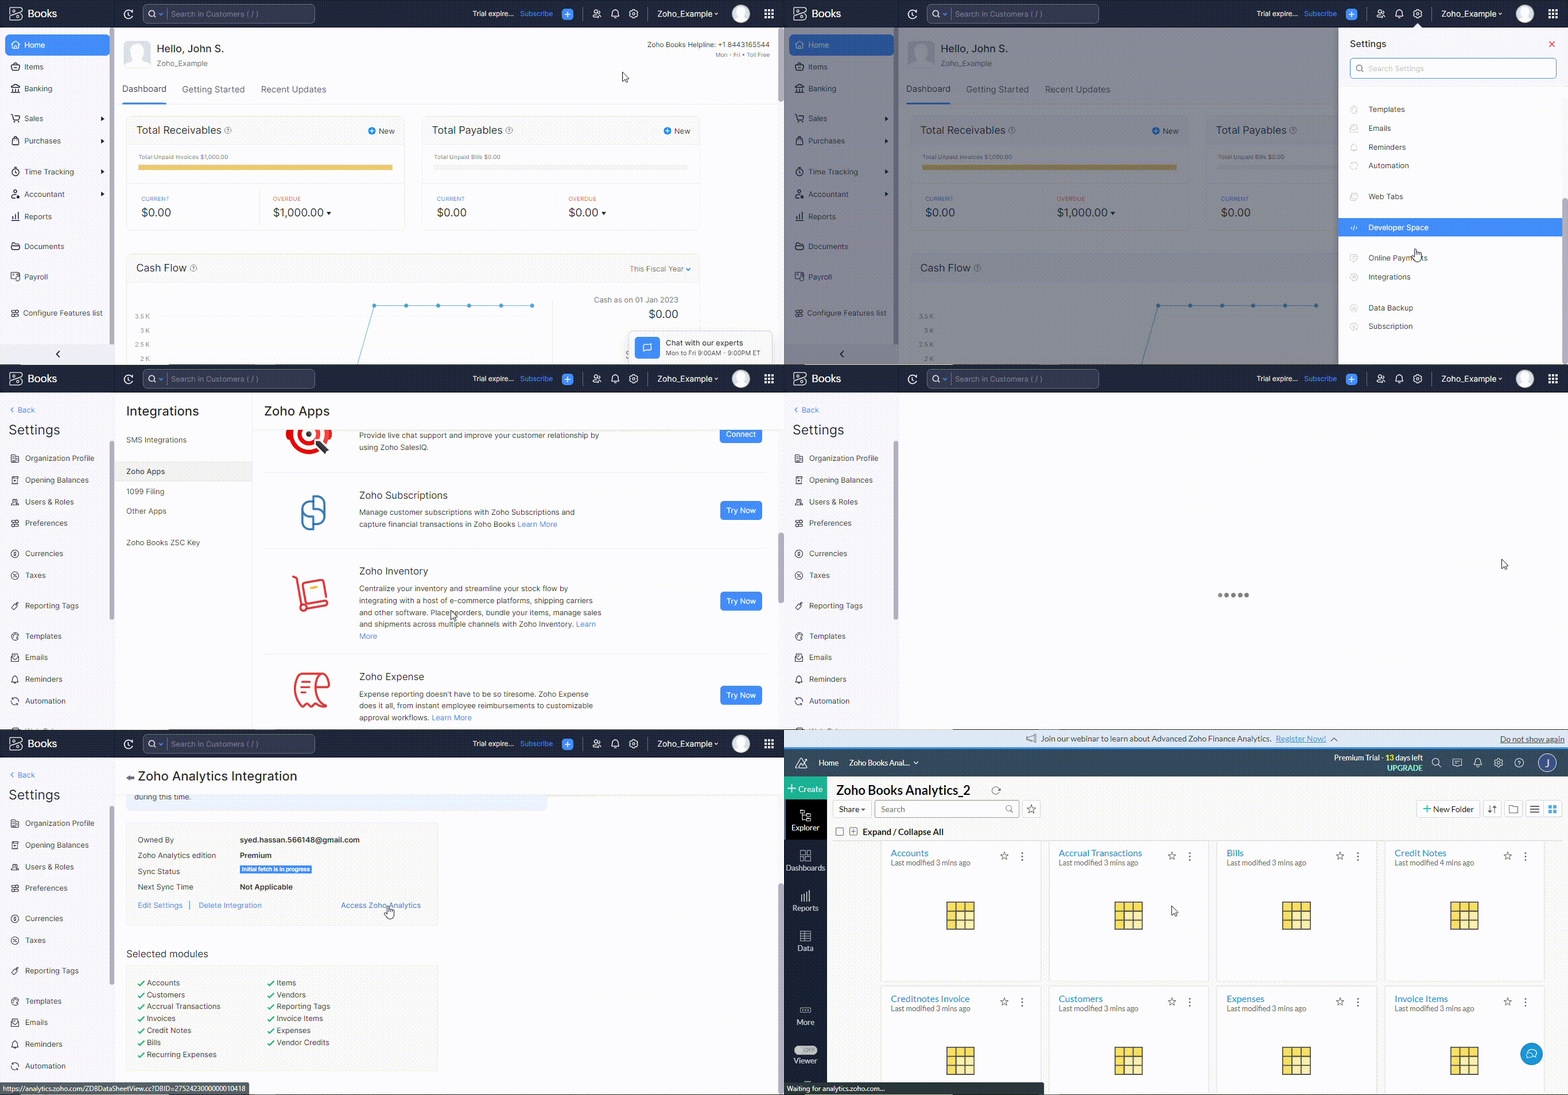
However, check the Synch Status on the Zoho Analytics Integration details page before accessing Zoho Analytics, as the Initial fetch may be in process.
Access Zoho Analysis when the Synch Status is changed from Initial fetch in the process to Completed.
Showing table for Invoices in Zoho Analytics
Once the integration with Zoho Analytics is complete, you can access Zoho Analytics and navigate to the Invoices section.
There, you will find a table containing data from paid invoices, including the Invoice ID, customer information, total payment, commission, and other relevant details.
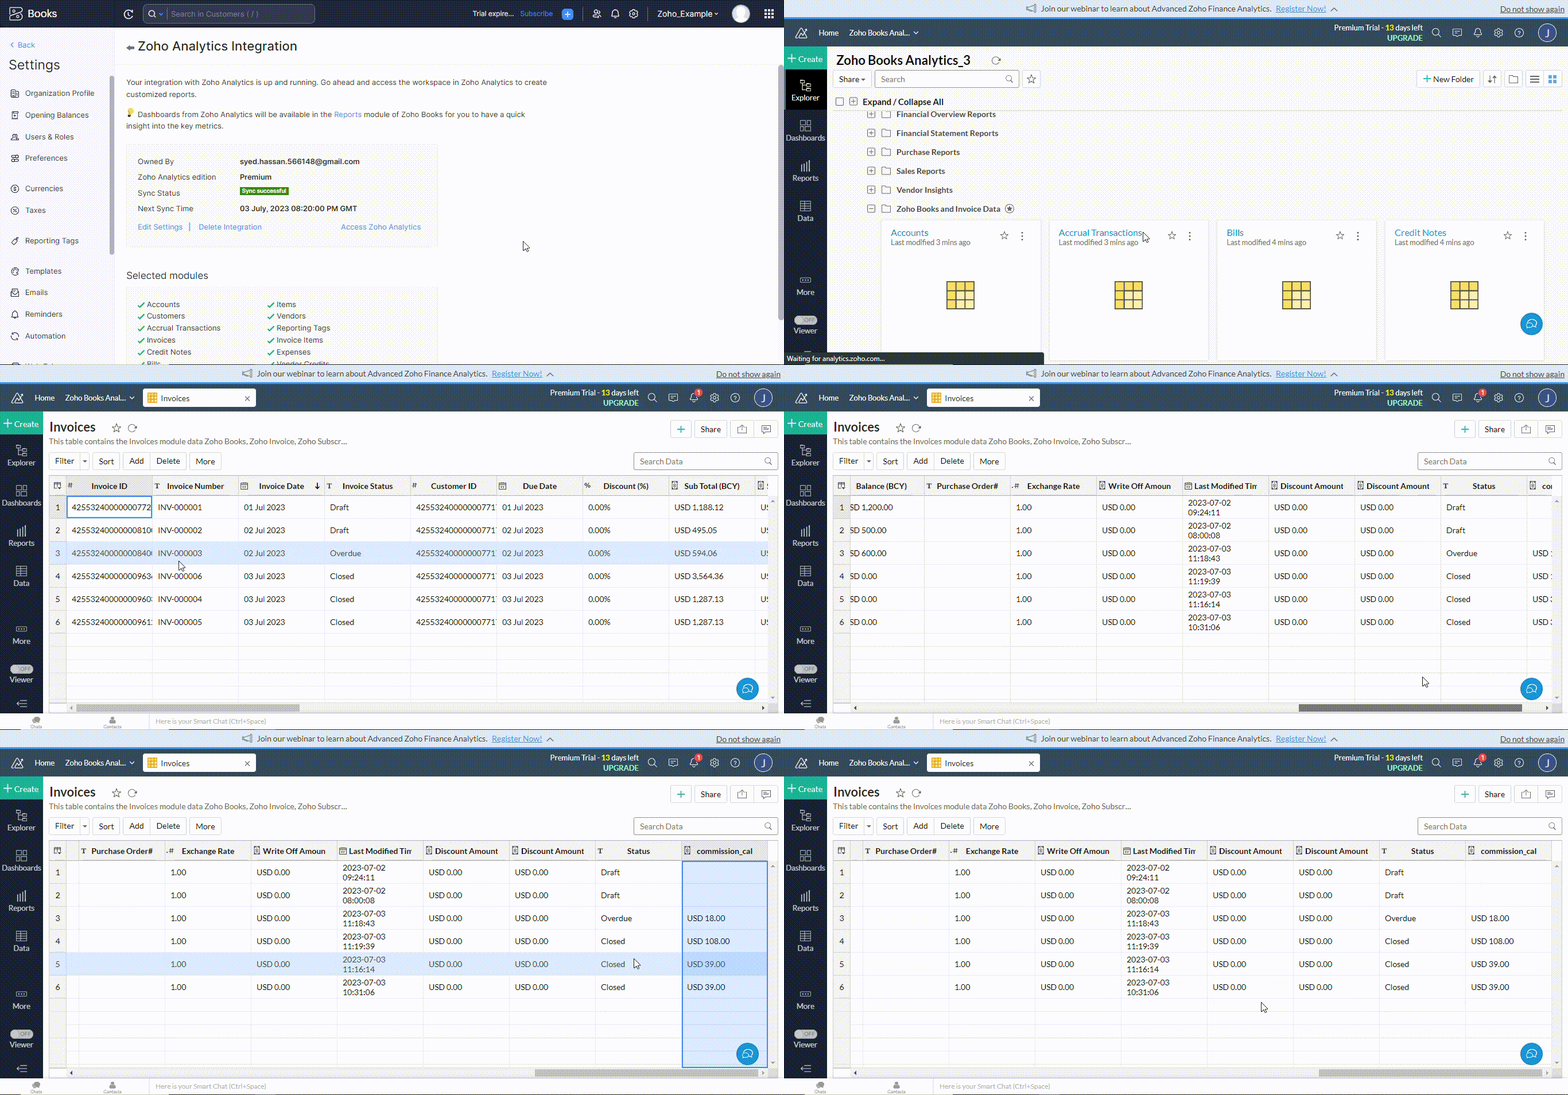
You will see the commission on paid invoices in the Invoices table along with other details and can further analyze it using the in-depth features of Zoho analytics.
Conclusion
You can streamline reporting, gain valuable sales insights, and drive performance by leveraging custom commission reports in Zoho Books. With automated calculations and empowered business owners, optimize commission management for success.
Zoho Books transforms your commission analysis, paving the way for growth. Unlock your sales potential, make informed decisions, and propel your business toward a prosperous future. Embrace this opportunity today.


