How to Set Up Different User Roles and Groups Inside Zoho Projects
Efficient project management hinges on the ability to define user roles and groups effectively, and in this article, we'll guide you through the process of setting up these vital components within Zoho Projects.
Published on October 24, 2023

Who is this feature for?
- Project Managers & Team Leaders
- Administrators
- Collaborative Teams
What progress will you accomplish?
- Improved project organization and enhanced collaboration
- Streamlined access control and increased productivity
- Conflict administration and effective project management
Introduction
Efficient project management hinges on two crucial pillars: collaboration and role clarity. Zoho Projects, an exceptionally robust project management platform, equips you with a diverse range of tools and features aimed at facilitating your success in these areas.
Within the scope of this comprehensive guide, we will guide you through the process of configuring various user roles and groups within Zoho Projects. Our goal is to empower you with the knowledge and capabilities necessary to optimize your project management endeavors.
Your journey toward enhanced project management begins here, and we’re delighted to assist you every step of the way.
User Roles in Zoho Projects
Before we dive into the intricacies of user roles and groups, let’s take a moment to explore the various roles you can find within Zoho Projects. Each role carries specific responsibilities and access levels, designed to provide users with precisely the permissions they need for their tasks.
Understanding these roles is a key step towards successful project management in Zoho Projects, and we’re here to guide you through this essential knowledge.
Project Owner
The Project Owner holds the highest authority in a project. This role is typically reserved for those who initiate the project and are ultimately responsible for its success. Project Owners can:
- Manage all project settings, including access control and permissions.
- Create and assign tasks to team members.
- Monitor project progress and make critical decisions.
To set up a Project Owner role in Zoho Projects:
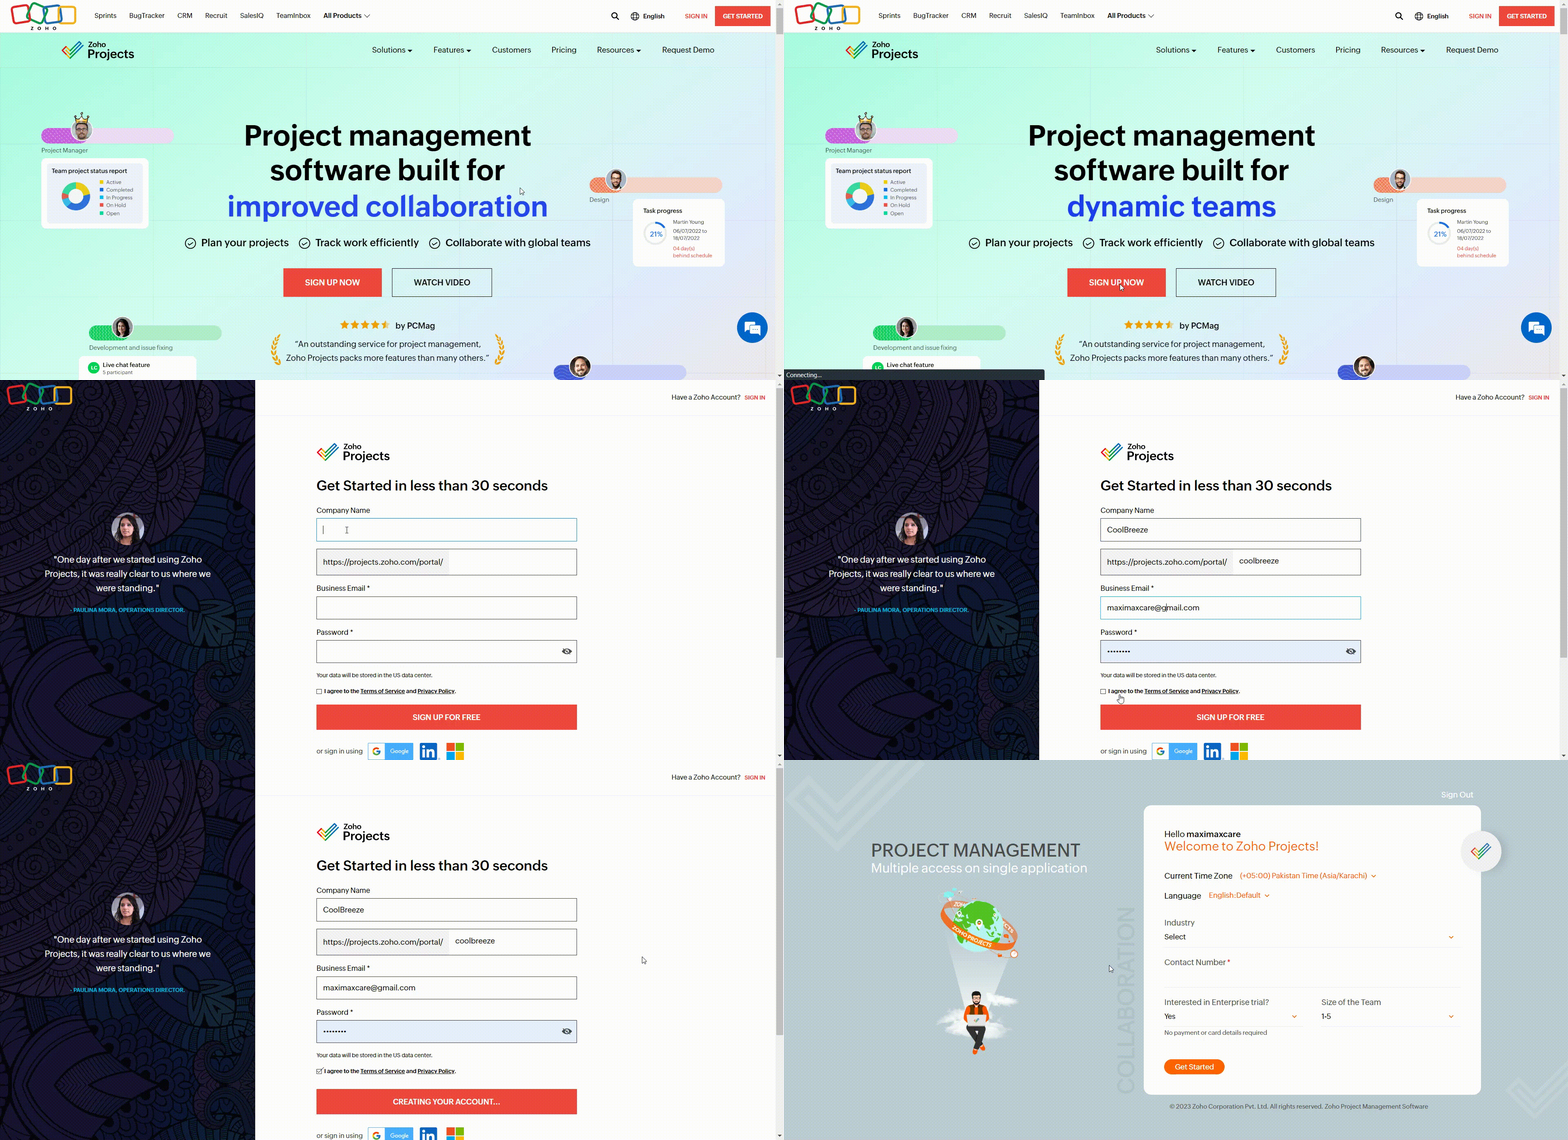
To access your Zoho Projects account or create a new one, navigate to the official Zoho Projects website. There, locate and select the Sign Up option. Proceed by entering your Company Name, Business Email, and Password, and finally, click on Sign Up for Free.
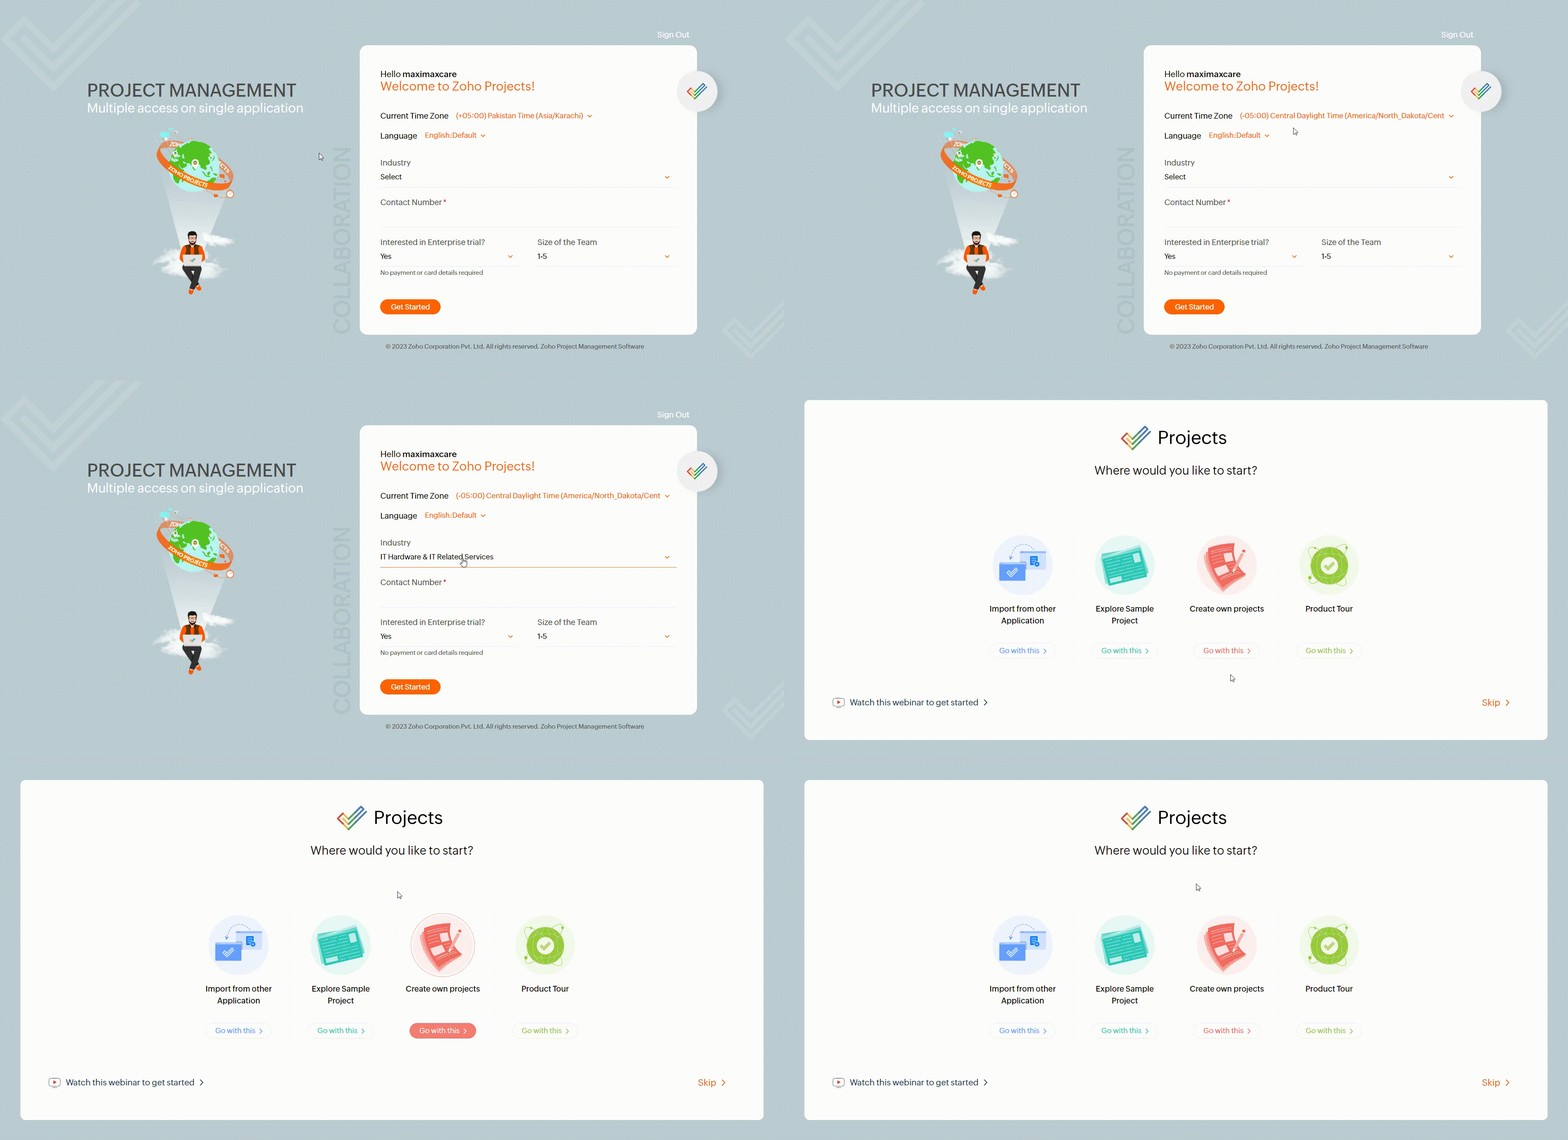
Once you’ve completed the registration process, proceed by selecting your Industry, providing any additional required information, and then clicking the Get Started button.
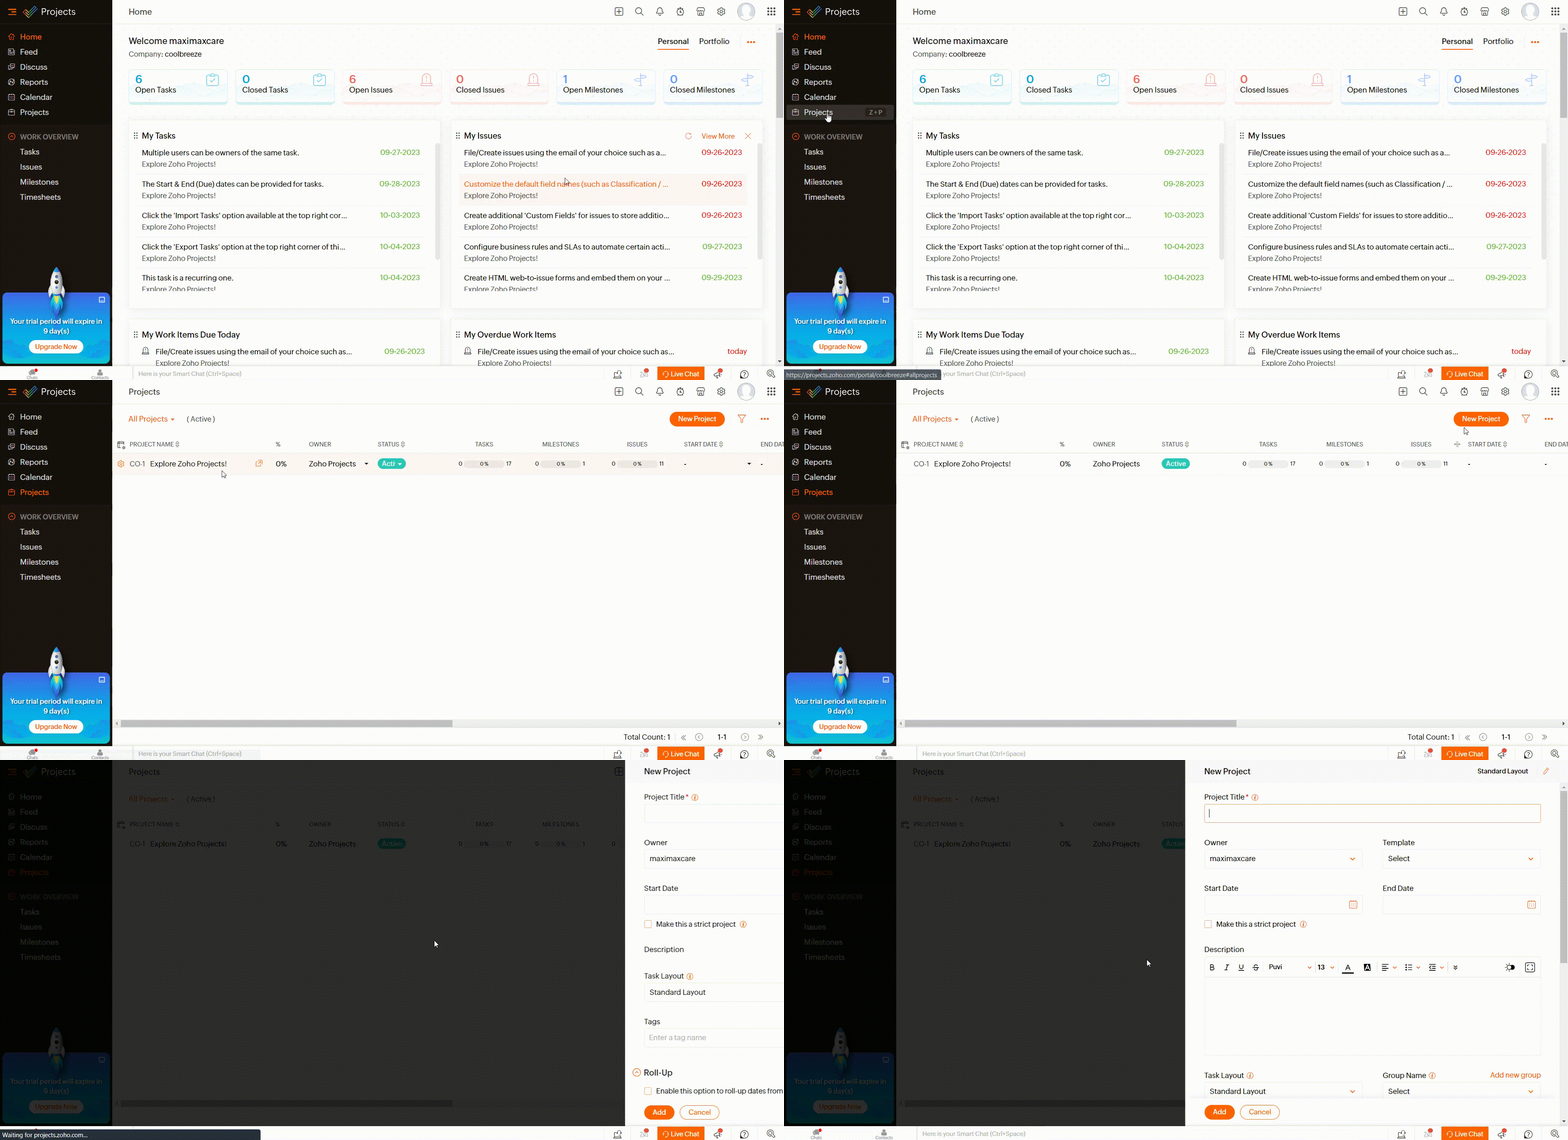
Navigate to the Projects section and choose the specific project to which you’d like to assign a Project Owner. Alternatively, you can create a new project by selecting the New Project option.
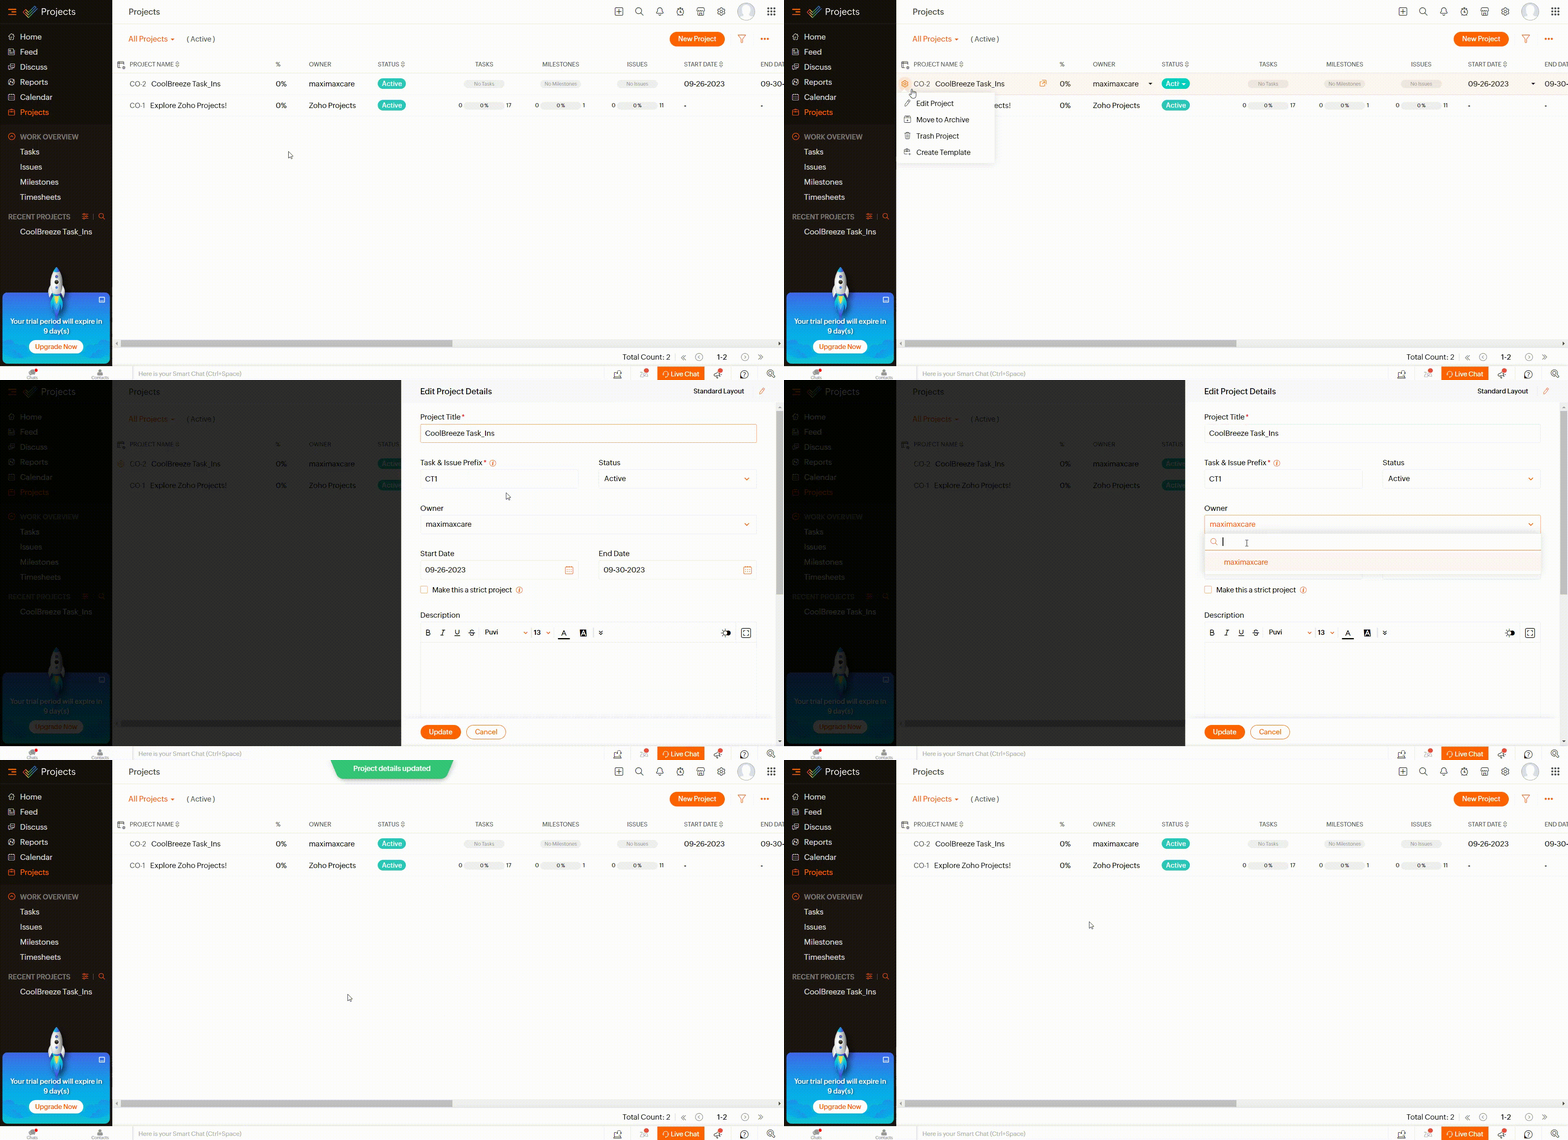
Access the project settings and click on Edit Project. From there, you can select a Project Owner, and then click on Update to save your changes.
When creating a new project, select an Owner, choose a Group Name for organizing your projects into groups, manage Project Access (private or public), and then click on Add to proceed.
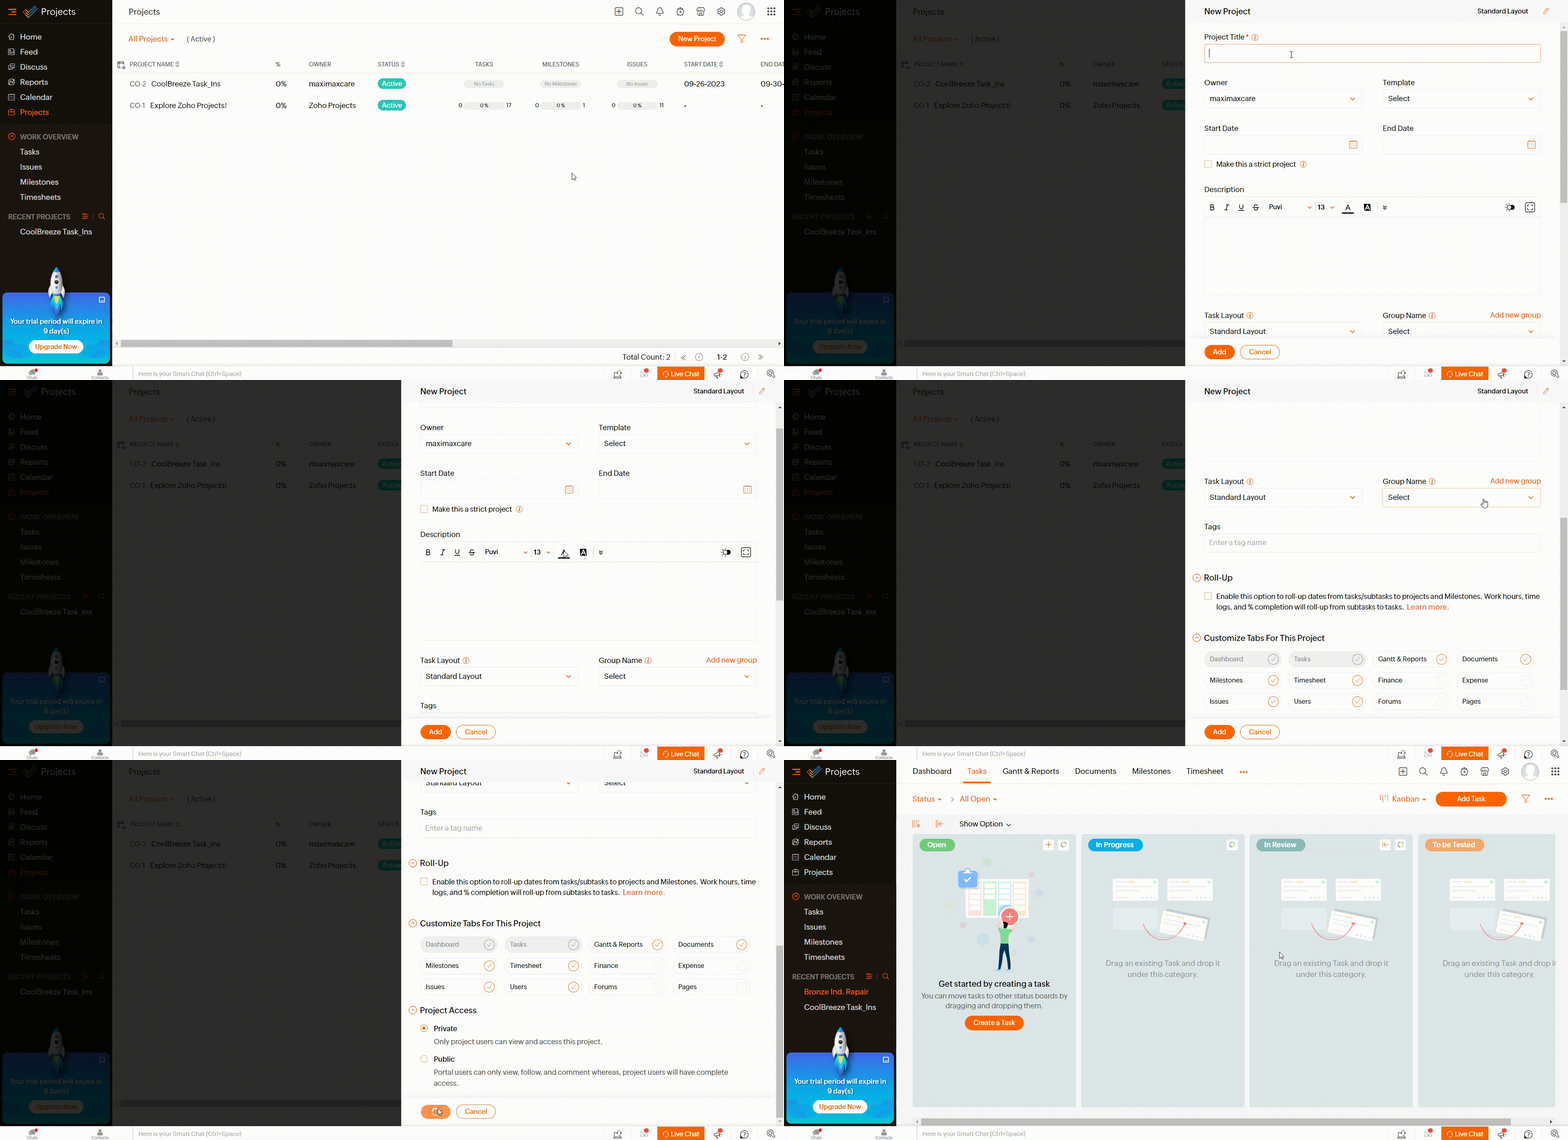
Remember, you can manage user access or assign specific roles to users right from the user creation page within the Users module.
Administrator
Administrators play a pivotal role in managing user access, permissions, and project settings. They ensure that the project operates smoothly by configuring essential parameters. Administrators can:
- Add or remove users from the project.
- Customize user roles and permissions.
- Adjust project settings to align with project goals.
To assign someone as an Administrator:
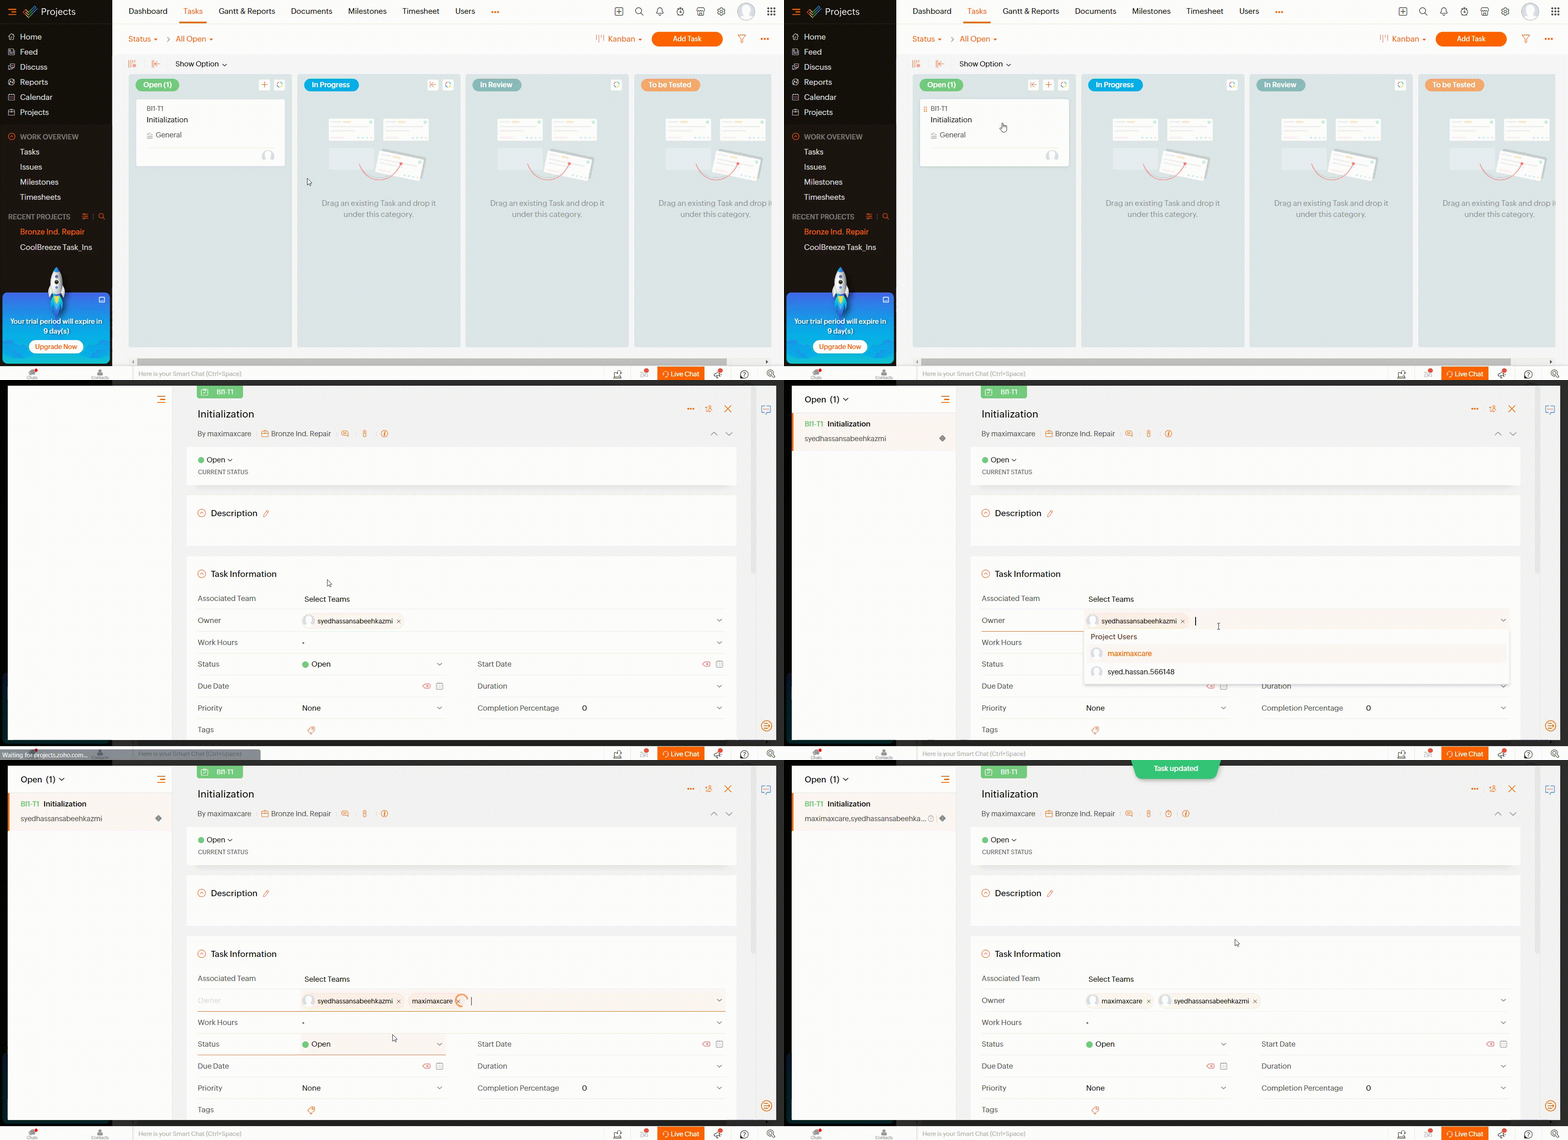
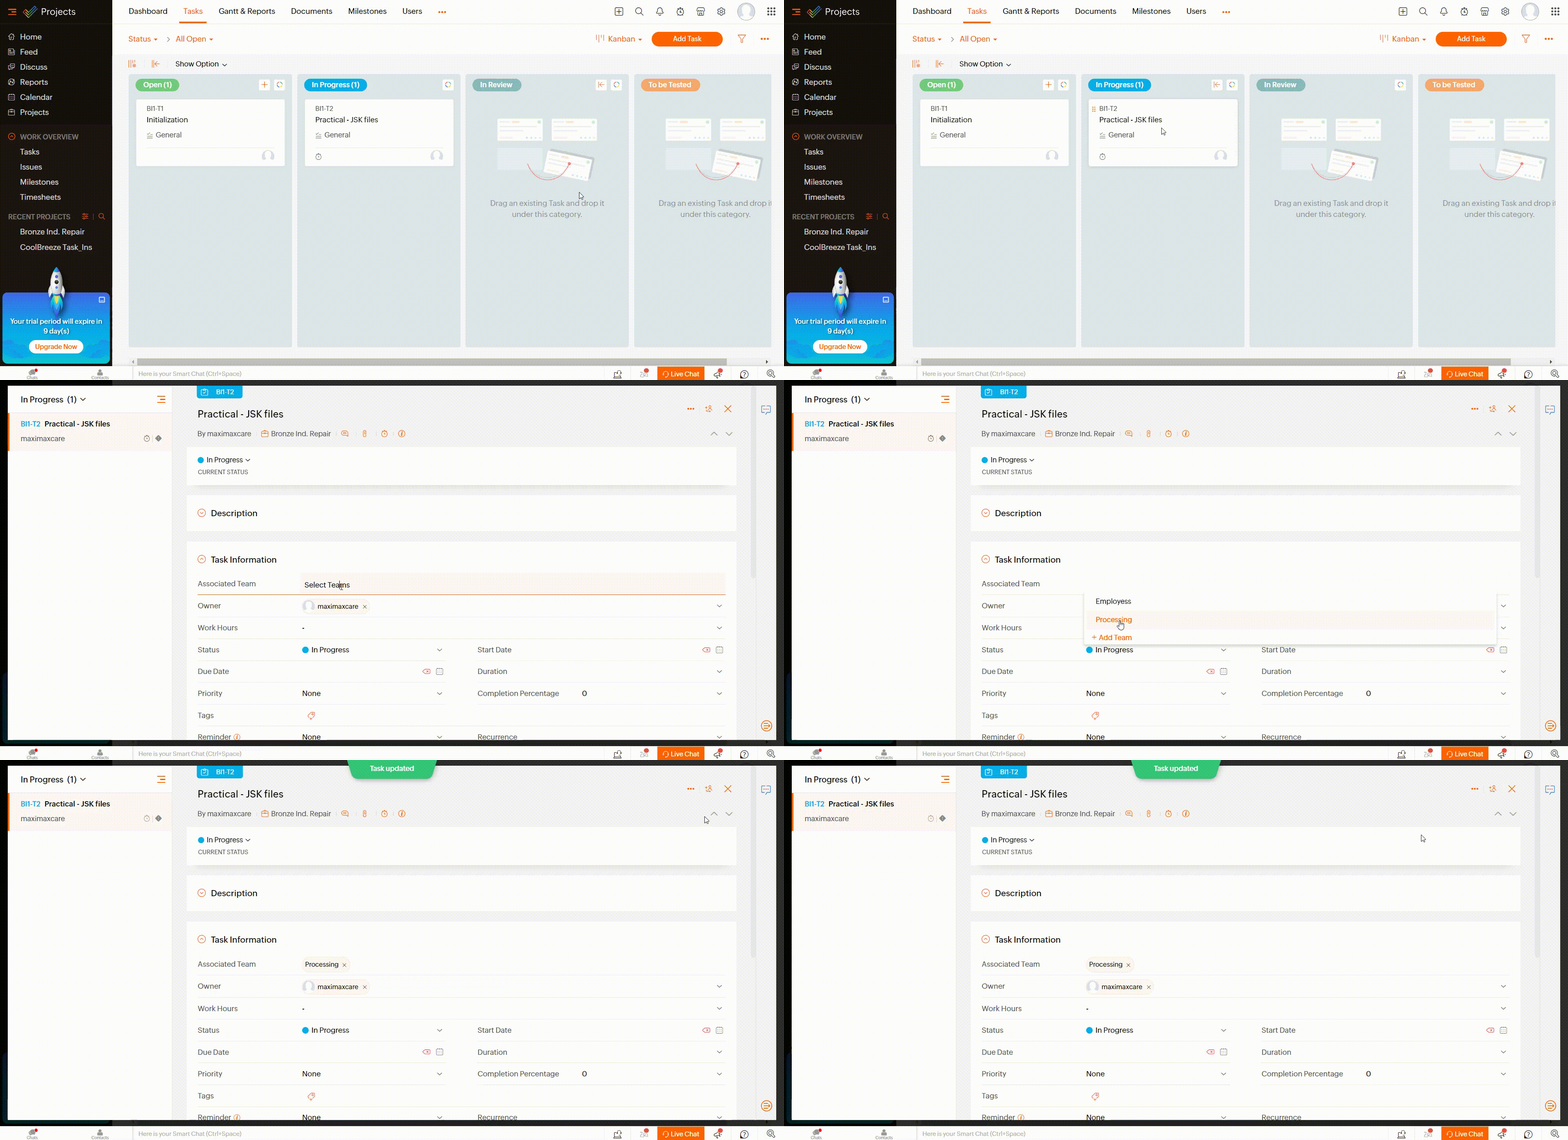
Navigate to the project tasks for a particular project. Click on a Task, select the Owner who holds administrator access and the task will be updated automatically.
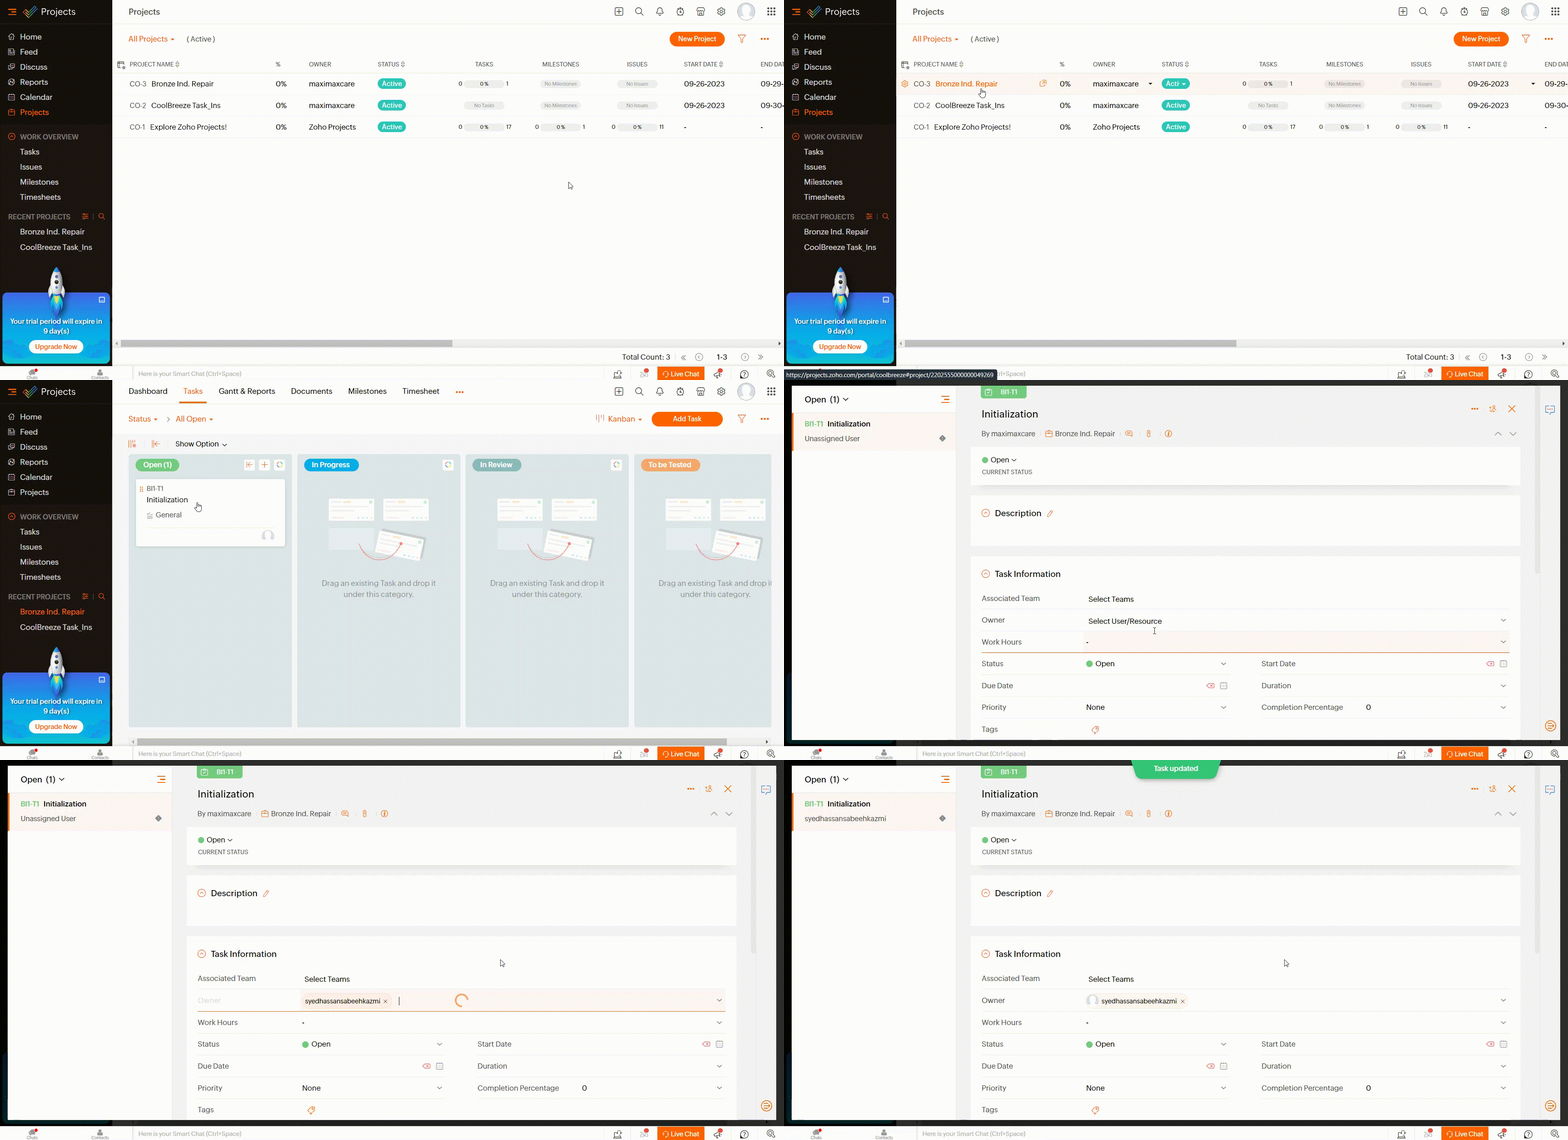
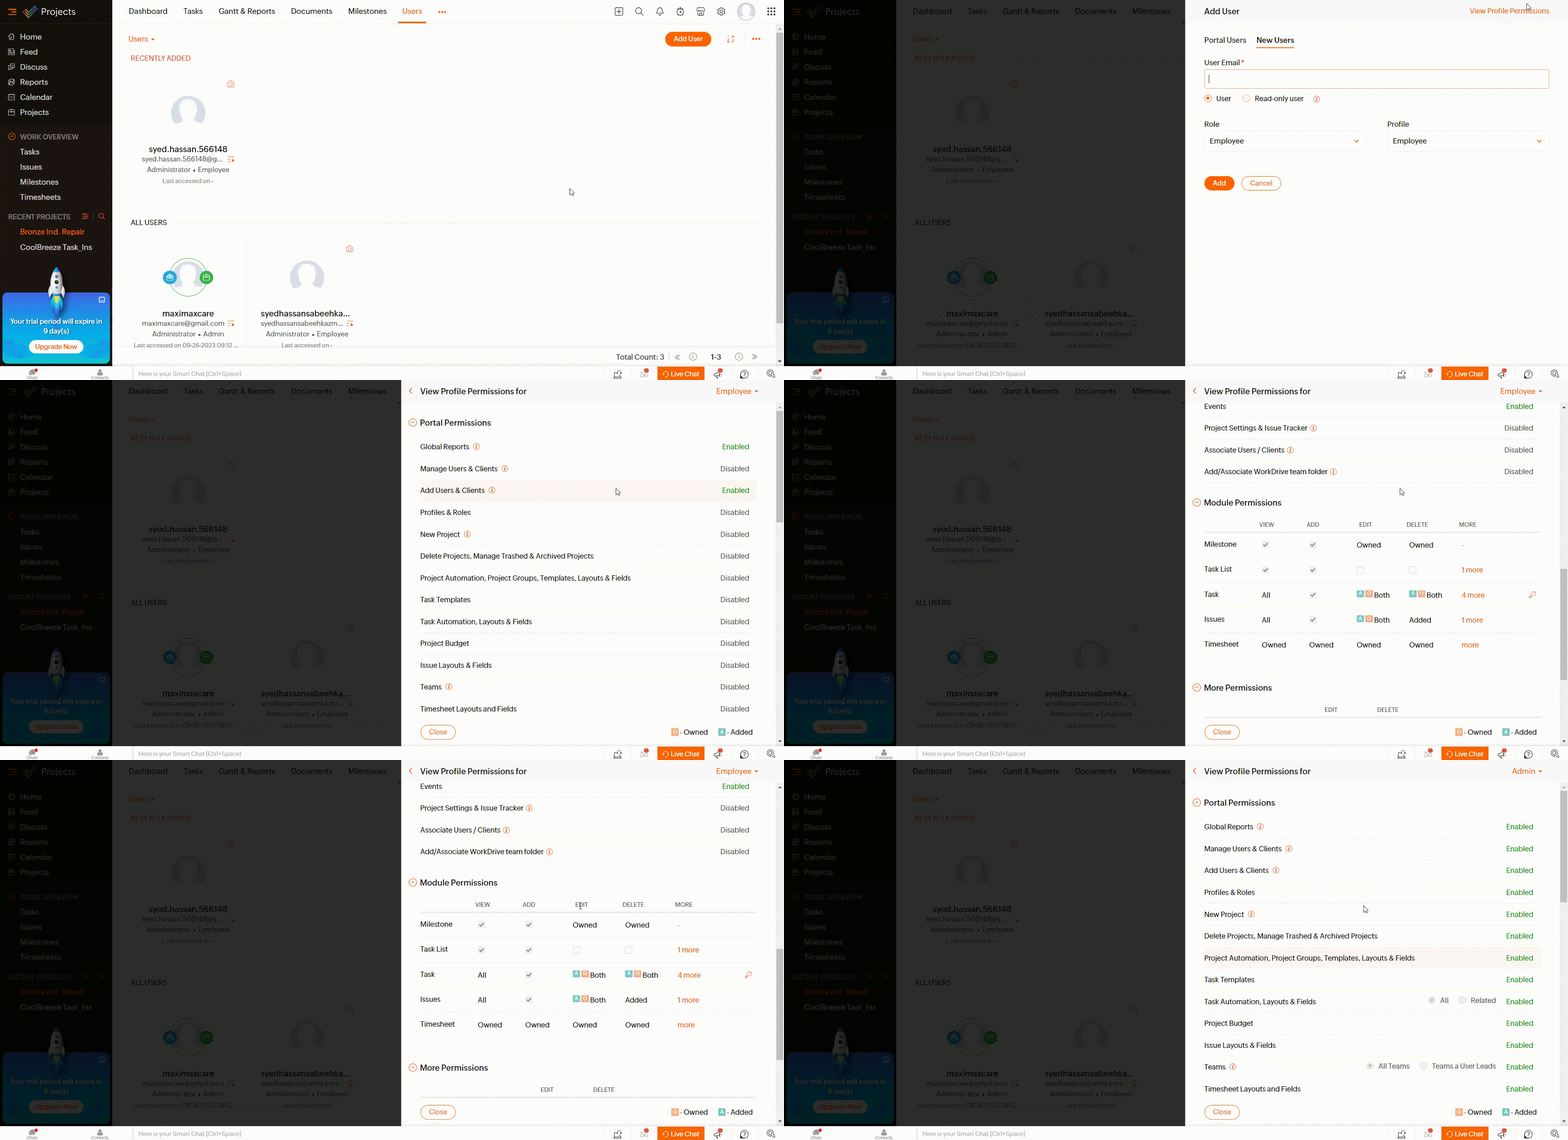
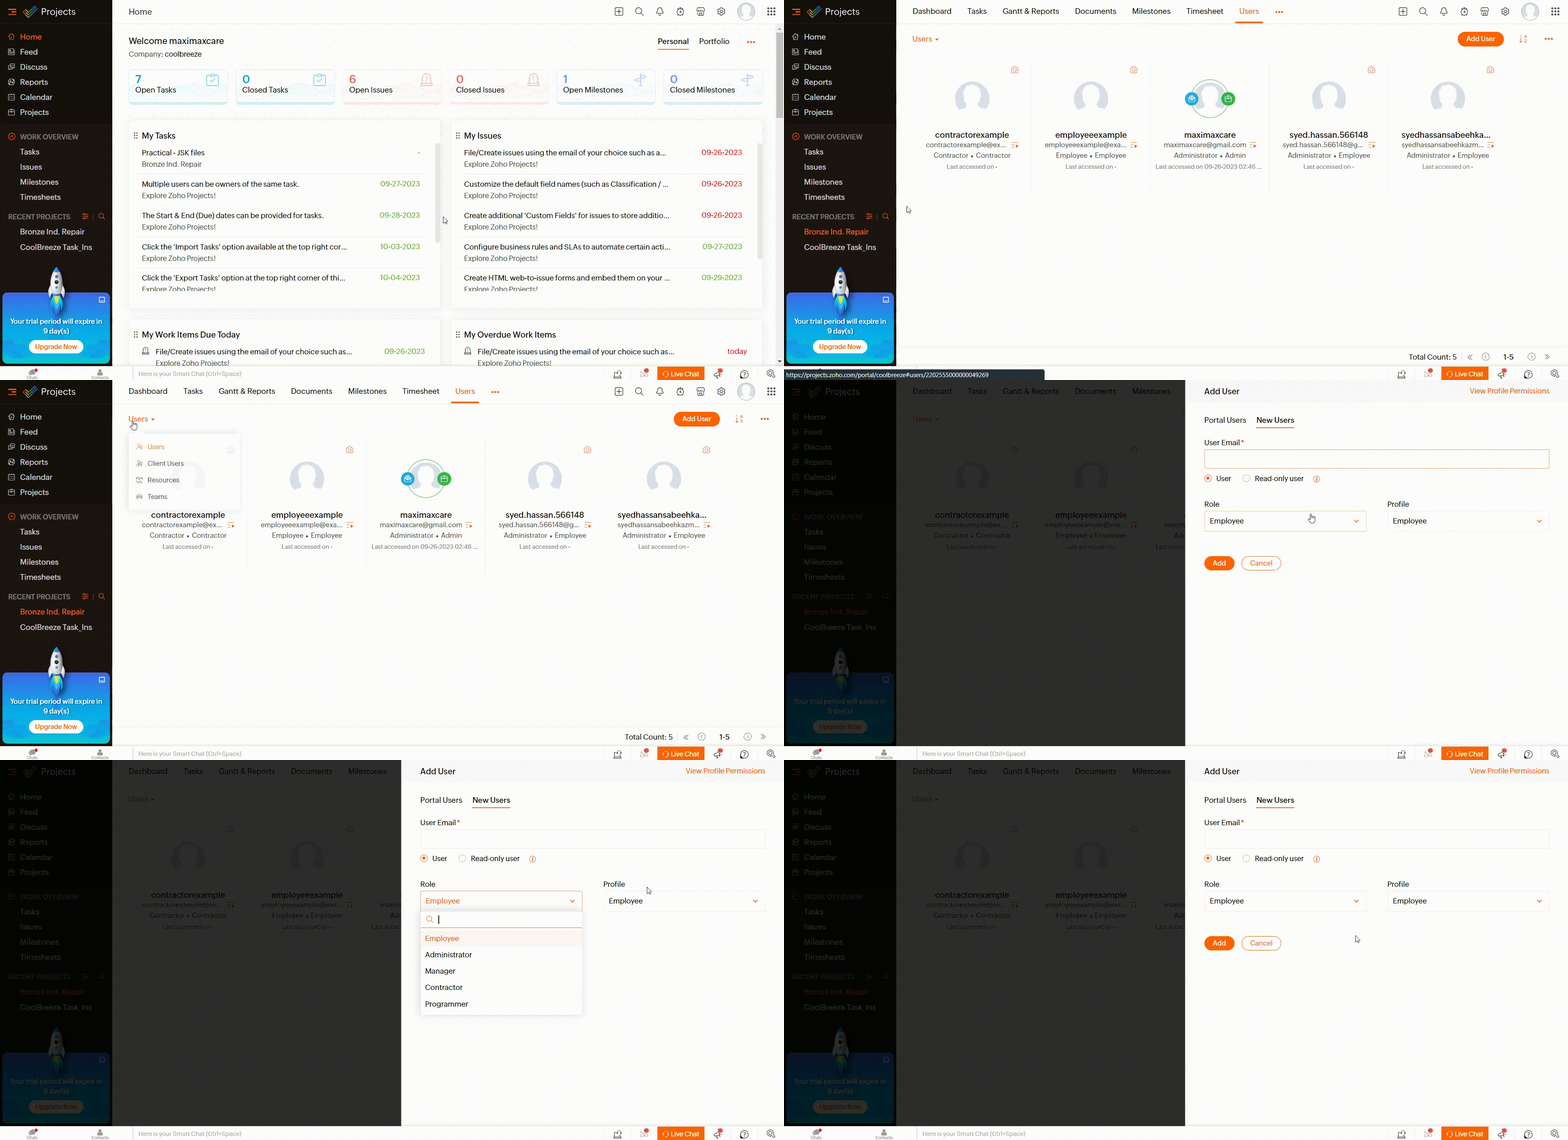
The user you choose must be designated as an administrator. To include new users with administrator privileges, access the Users module and select the Add User option.
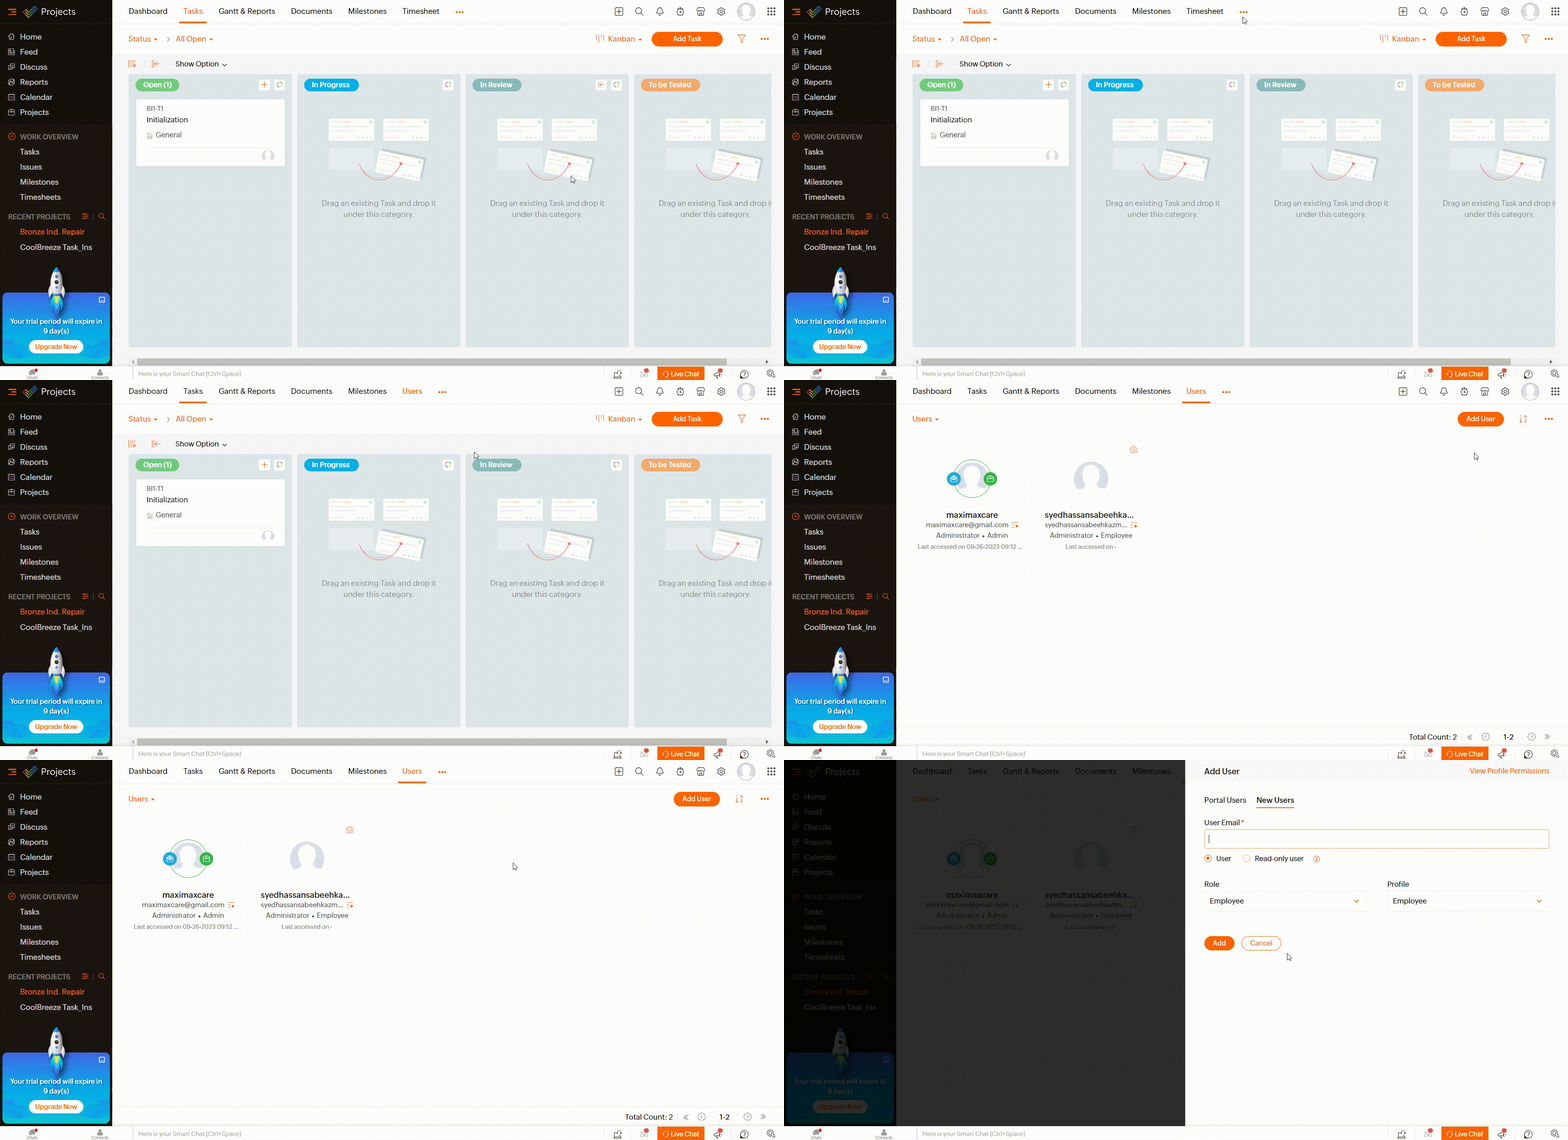
Input the user’s email address and assign them the Administrator role. Click Add to effectively establish a user with administrator privileges.
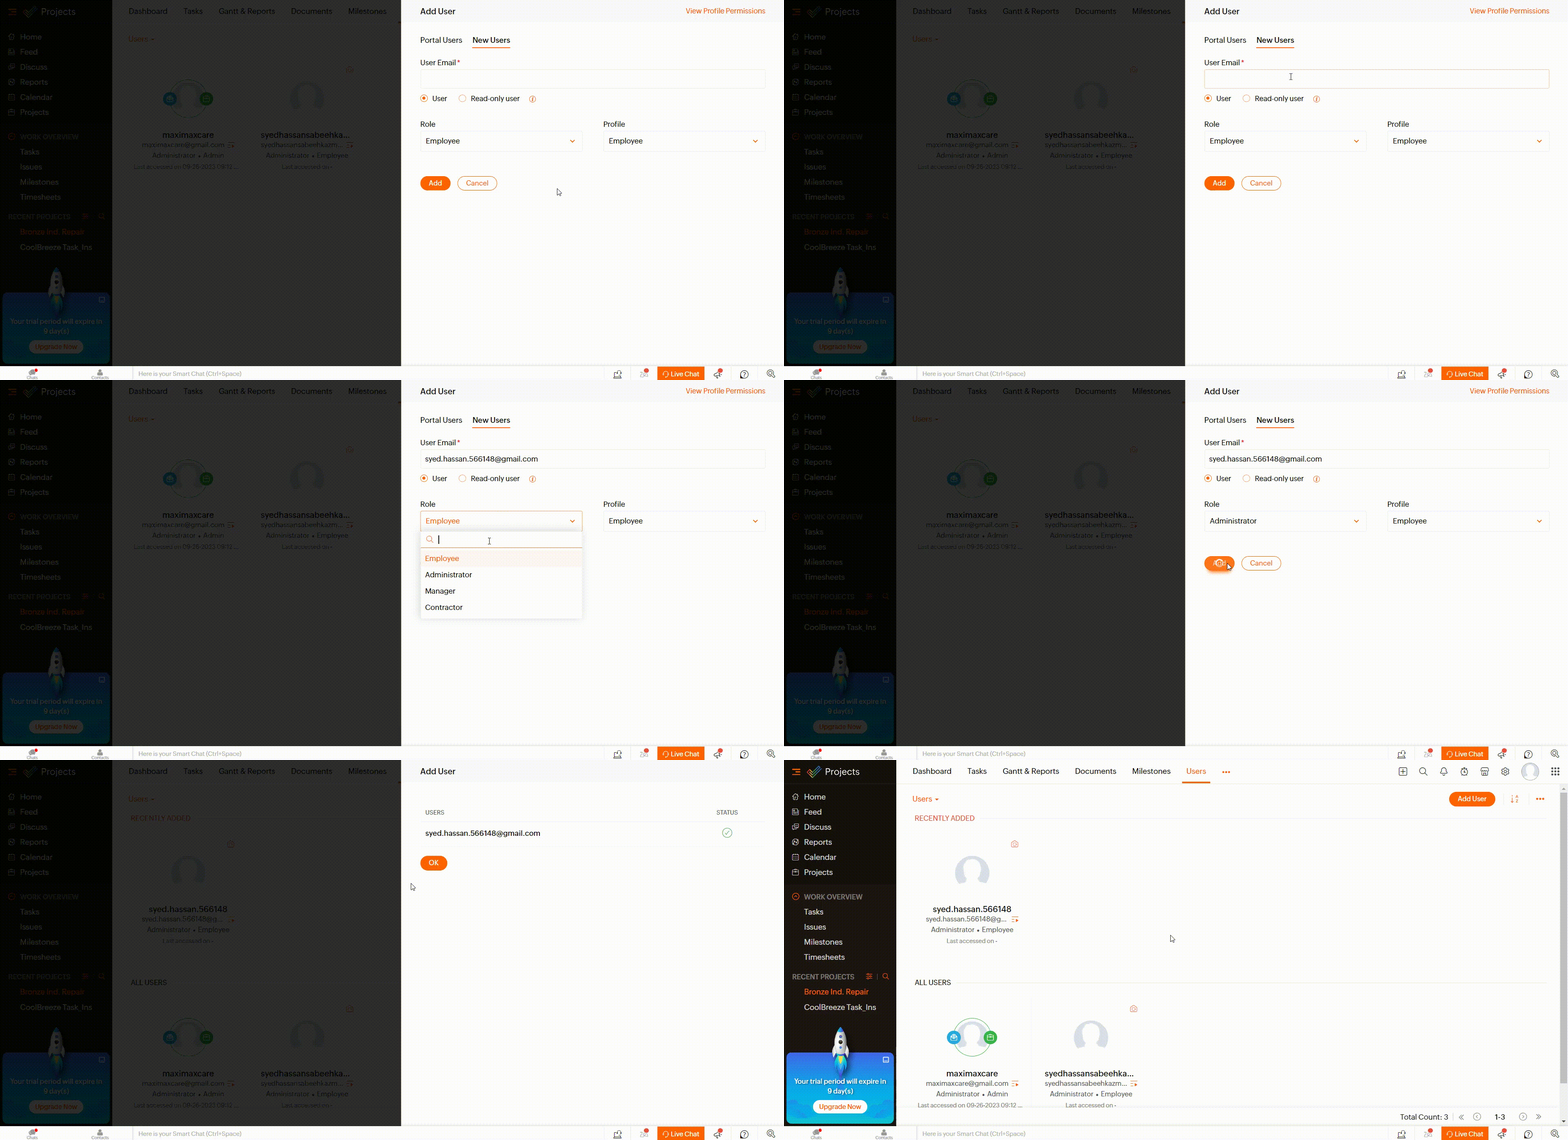
Within the Add User tab, you can review Profile Permissions and make adjustments to permissions or assign a user role as needed.
Manager
Managers assume a crucial position within a project, with the authority to oversee specific aspects or modules. They facilitate efficient project execution by providing guidance and supervision. Managers can:
- Monitor and coordinate tasks within their designated area.
- Assign tasks to team members.
- Provide regular updates and reports to project stakeholders.
To set up a Manager role:
Choose a specific task within a project and designate a user with manager-level access to assign the role appropriately.
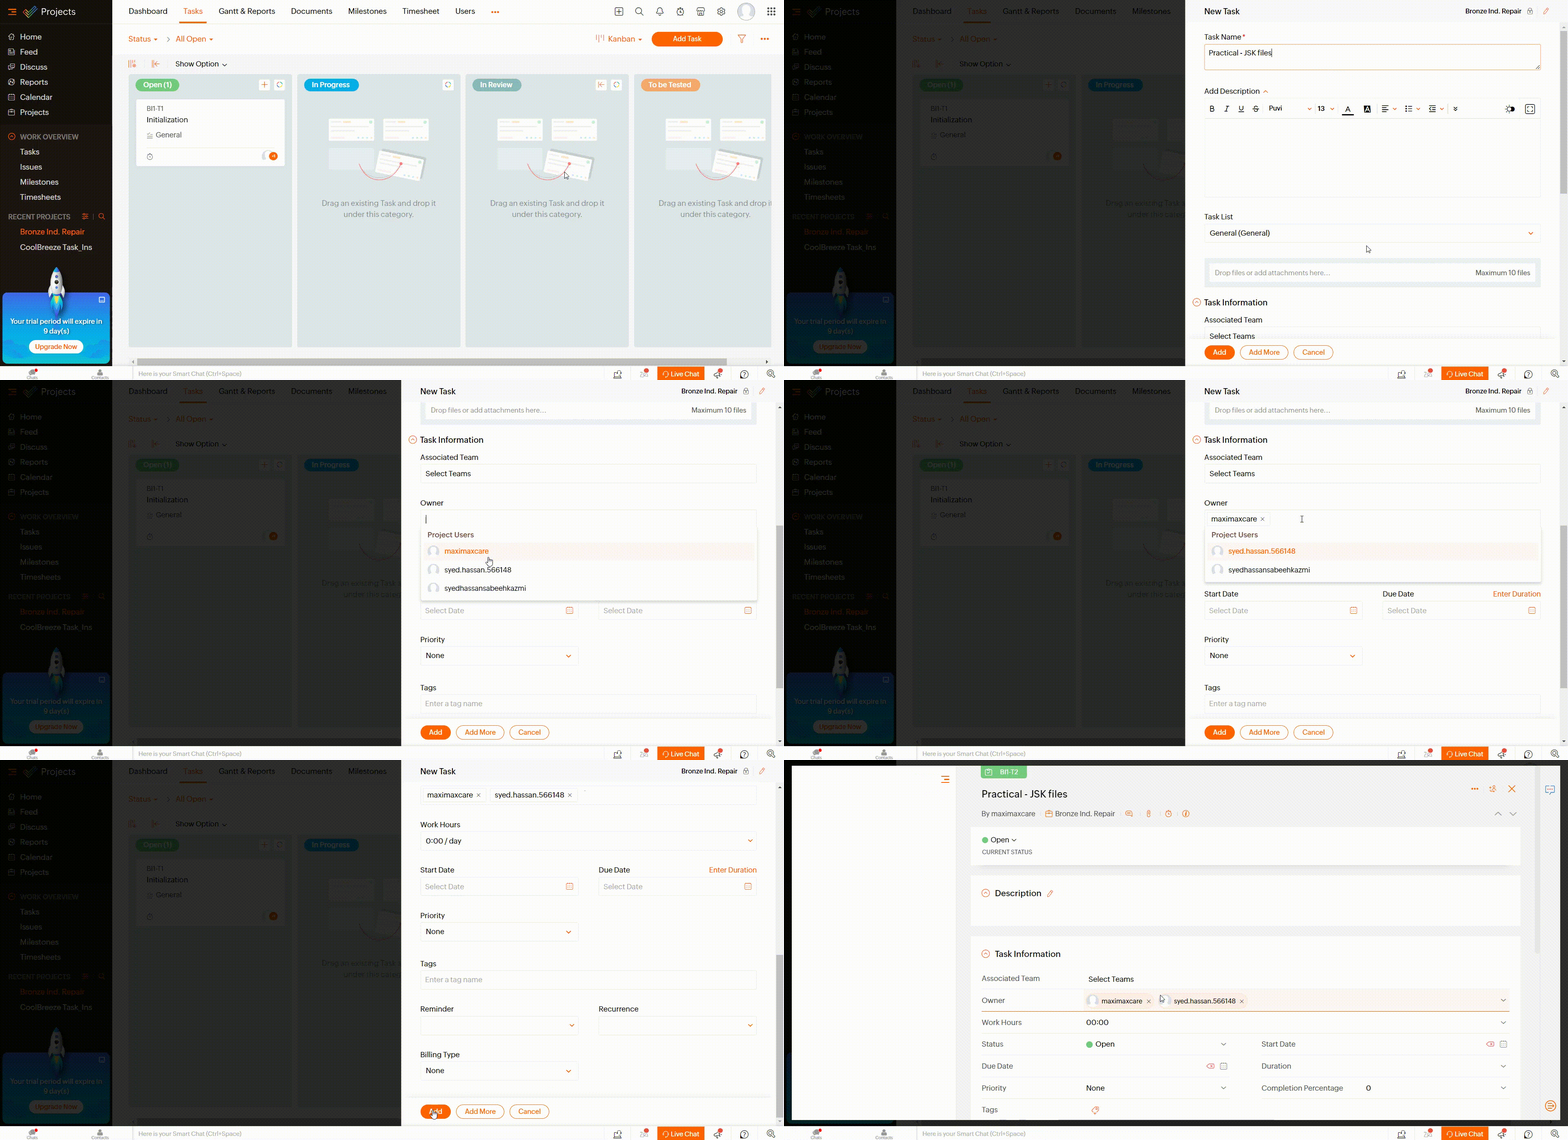
It’s most appropriate to assign Managers to Tasks or in Teams. You can create a Task for a specific project by accessing a project and clicking on Add Task.
Contractor
Contractors play a pivotal role in project execution, bringing their specialized skills and expertise to enhance project outcomes. They actively contribute to project success by performing their designated tasks efficiently.
Contractors have the following capabilities:
- Receive task assignments and stay updated on project developments.
- Engage in collaborative efforts with other team members on shared tasks.
- Maintain task statuses and provide crucial project-related insights.
To include Contractors:
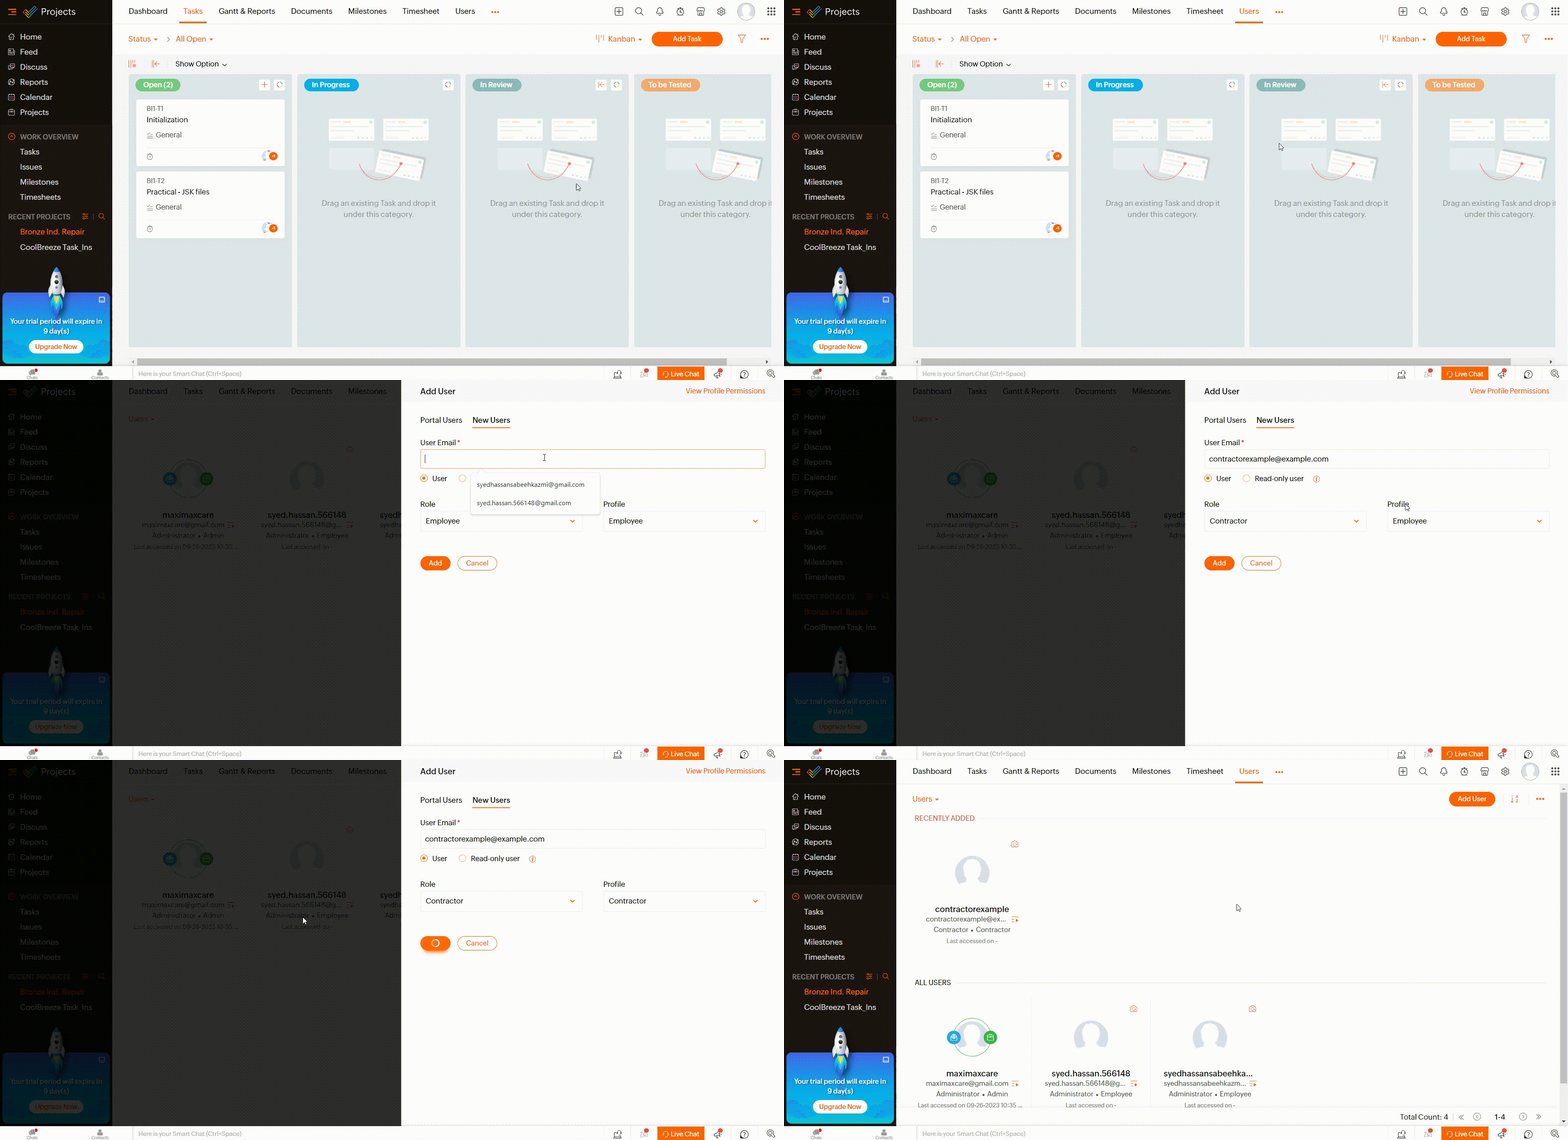
Access the Users module, then select Add User. Assign the user a Contractor Role, ensuring their profile is set as a Contractor, and finally, click Add to confirm.
Employee
Employees are integral members of your organization who require access to project information without the need for extensive project management functionalities. They possess limited access rights and are typically utilized in scenarios where internal collaboration is essential.
Employees can:
- View project progress and stay updated on project-related information.
- Provide feedback or input as needed.
- Remain informed about project developments while maintaining restricted access.
To engage Employees:
Within a project, invite your employees to participate as Team Members, granting them controlled access to project data.
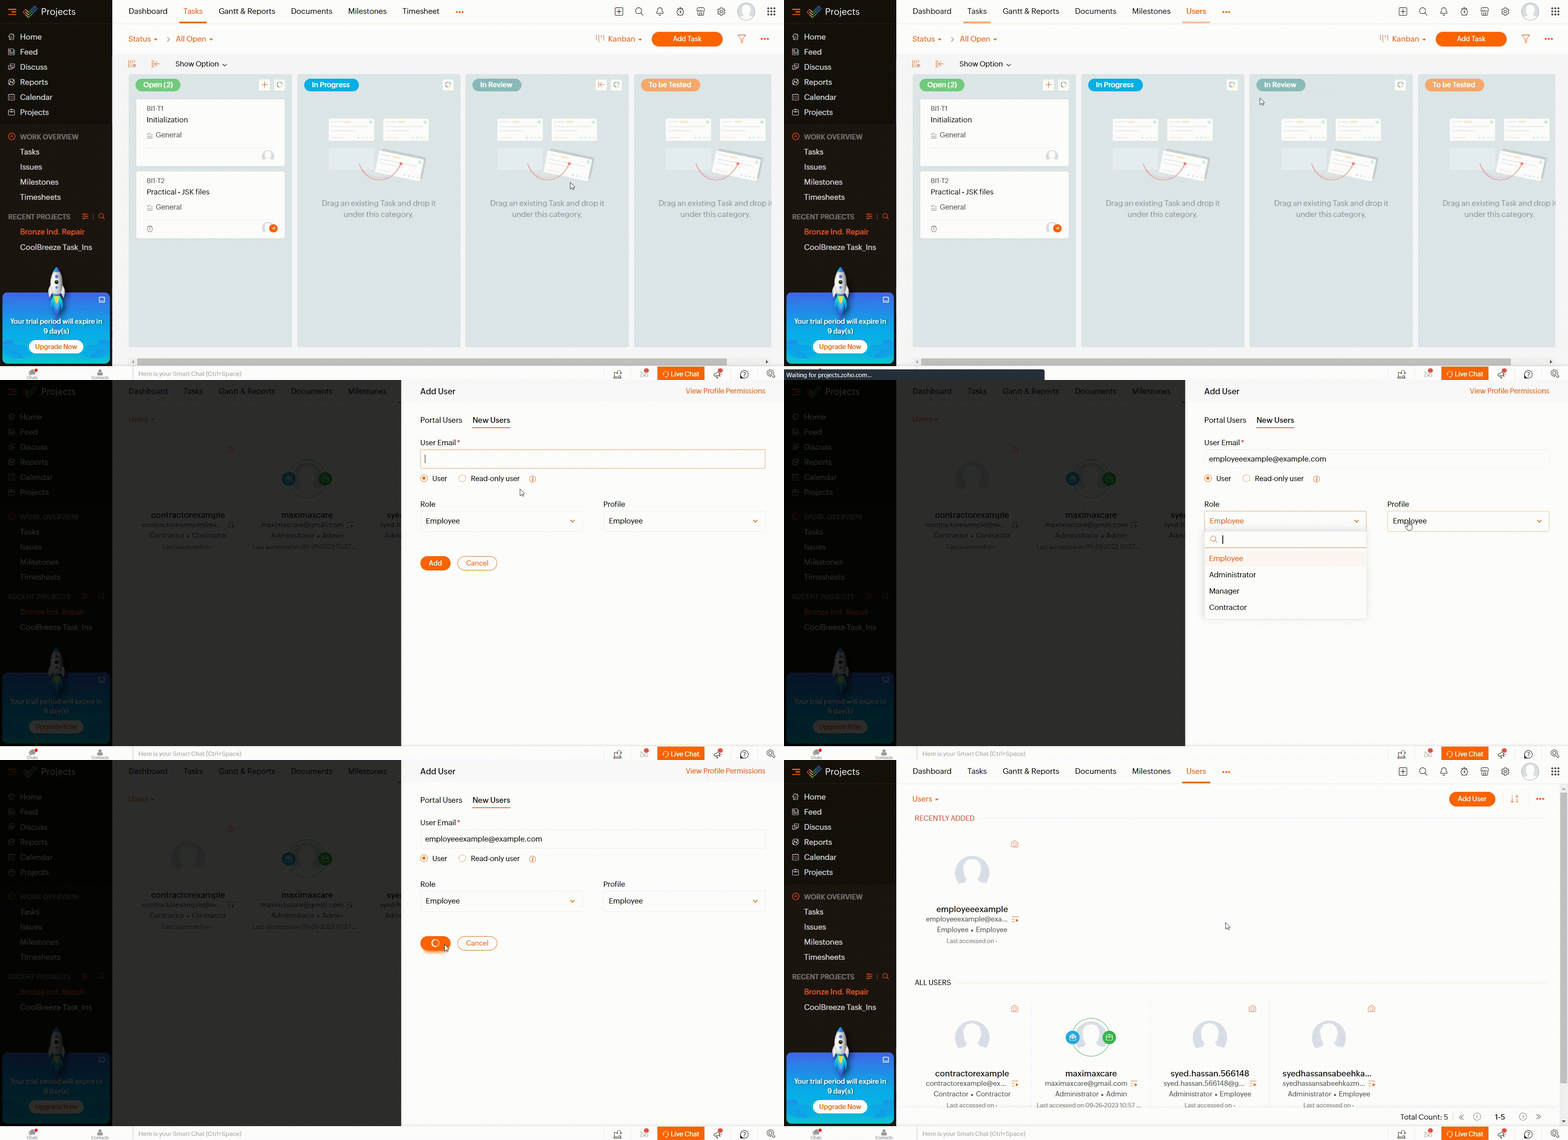
Alternatively, you can add an employee through the Add User option under Users for a specific project. Assign them both a Role and a Profile as Employee, then click Add.
Client
Clients are external stakeholders, often customers or clients, who need access to project details without diving into the nitty-gritty of project management. They have limited access and are ideal for scenarios where external collaboration is necessary.
Clients can:
- View project progress and updates.
- Provide feedback or input as necessary.
- Stay informed about project developments without having complete access.
To involve Clients:
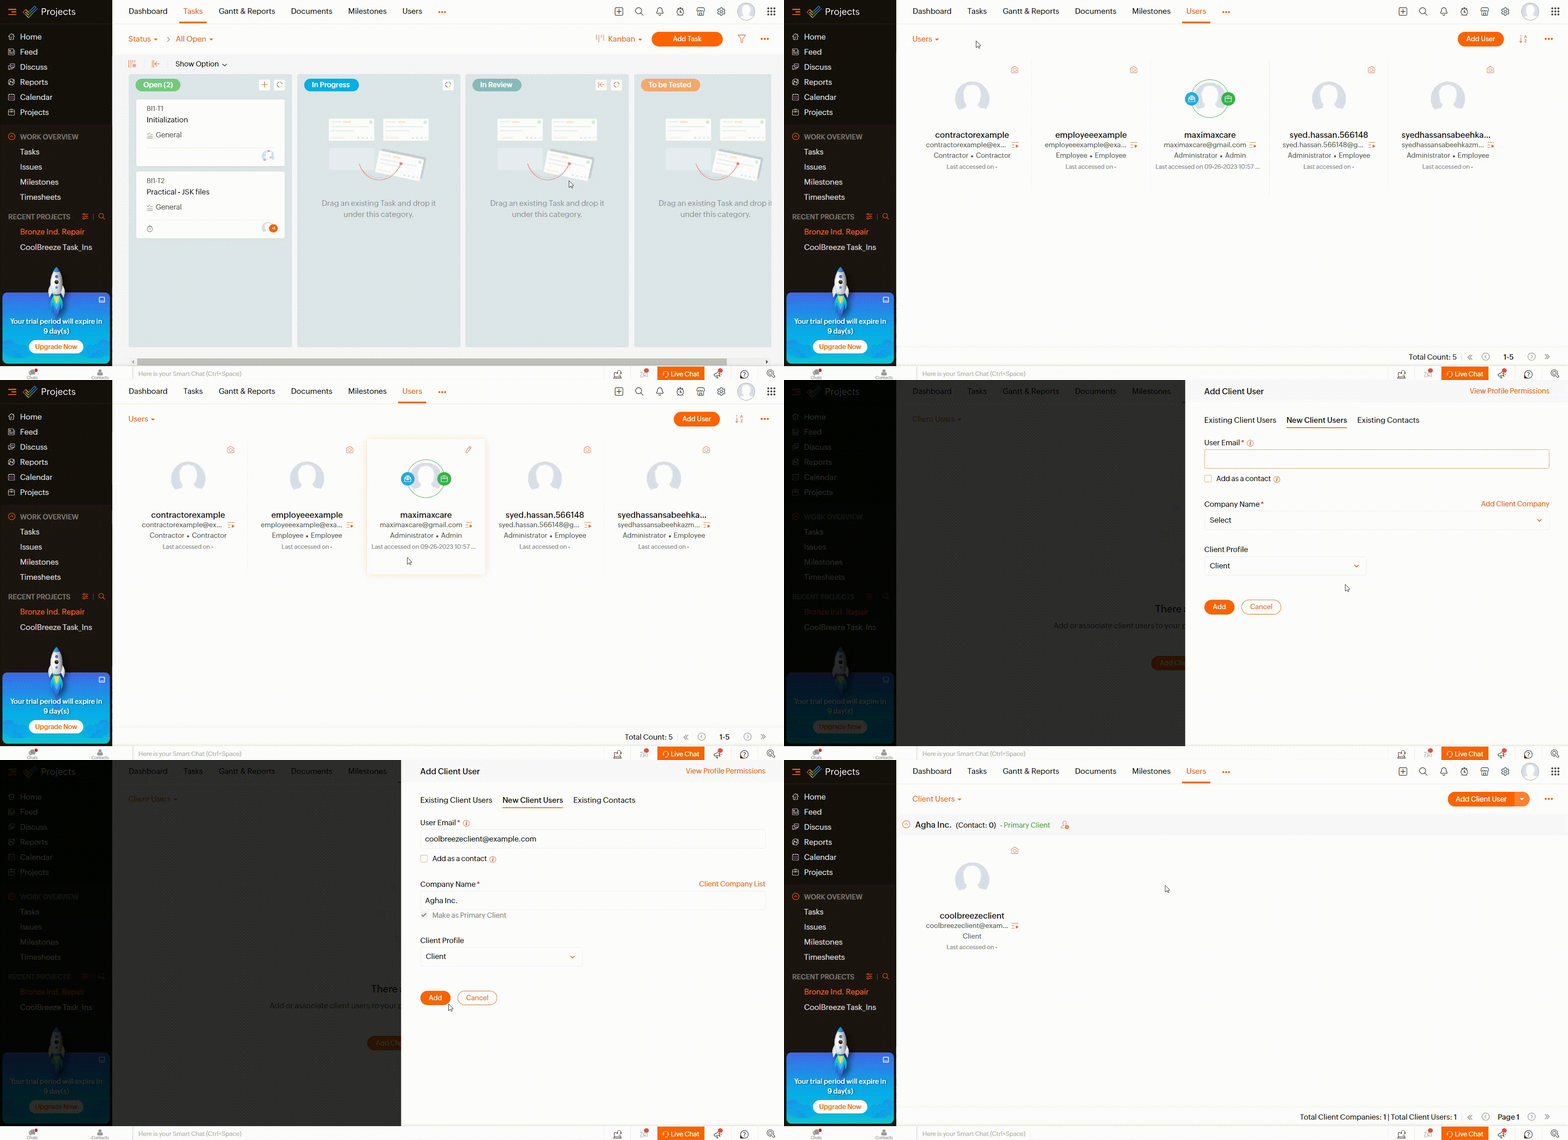
Navigate to the Users module within a project, then choose Client Users. From there, click either Add Client Company or Add Client User and extend an invitation to them, inviting them to participate in the project as Clients.
Custom User Roles
Zoho Projects empowers you to establish tailored roles, allowing for the assignment of users to specific roles and profiles to configure access permissions.
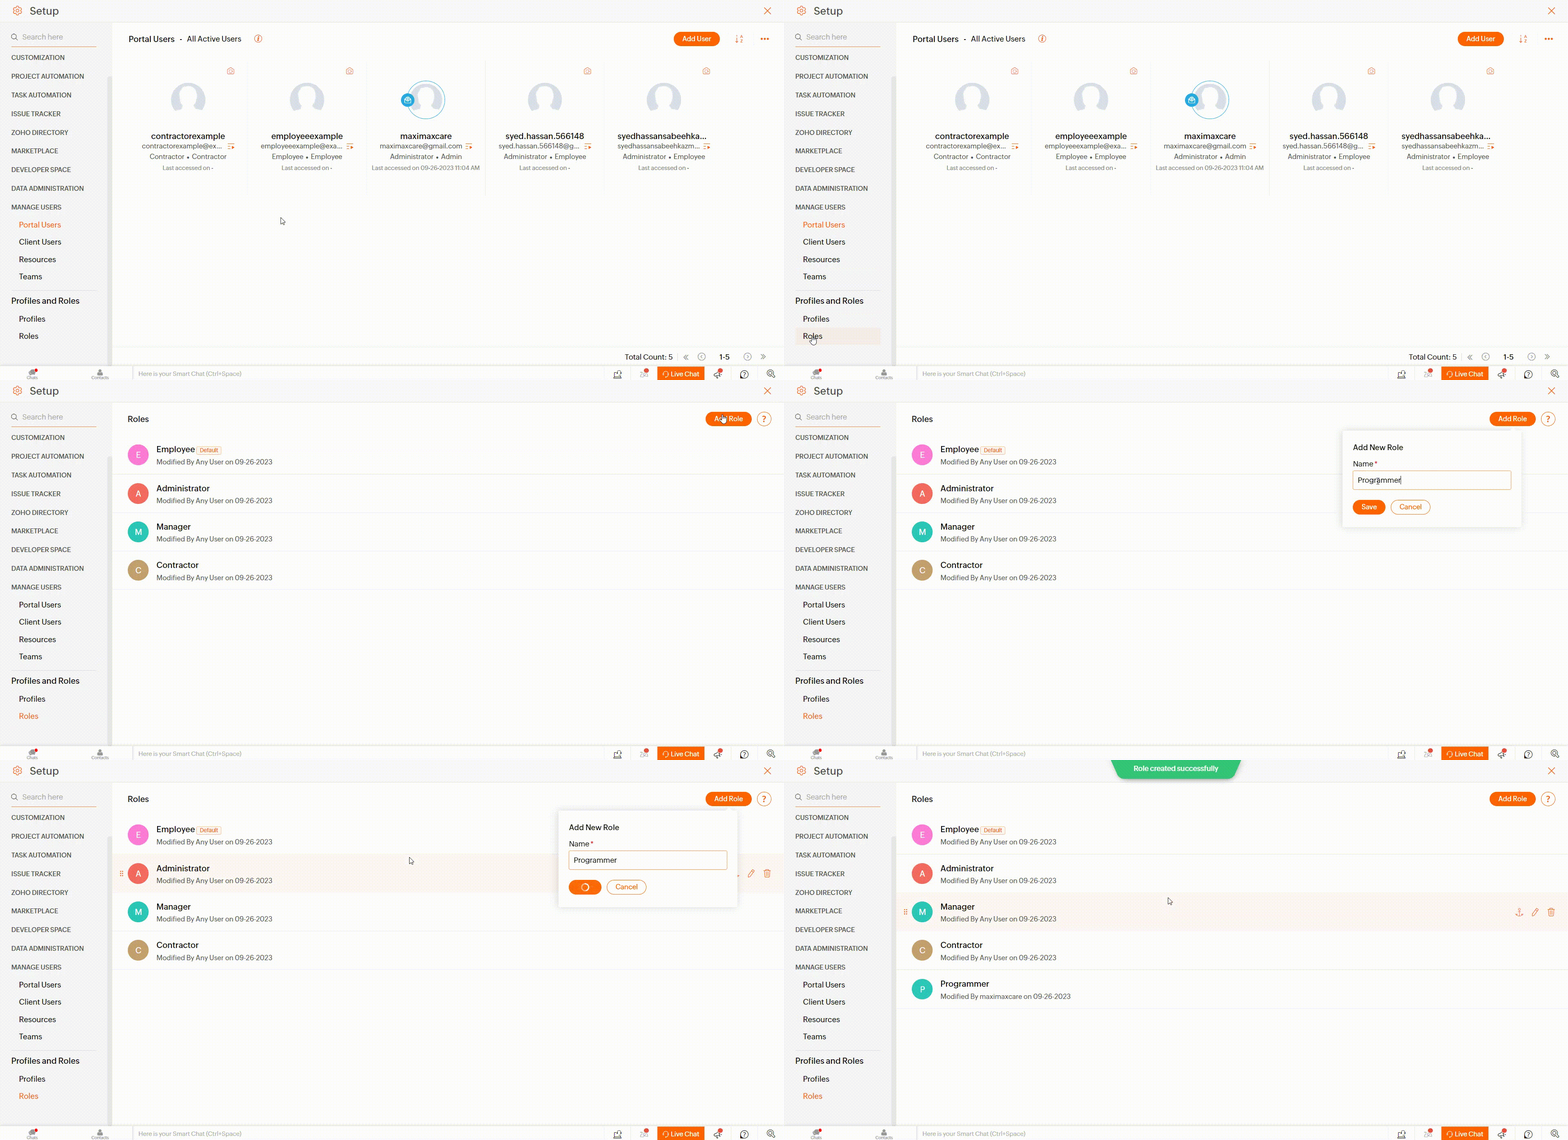
To create a custom role, simply access the Settings menu, proceed to Manage Users, and then select Profiles and Roles.
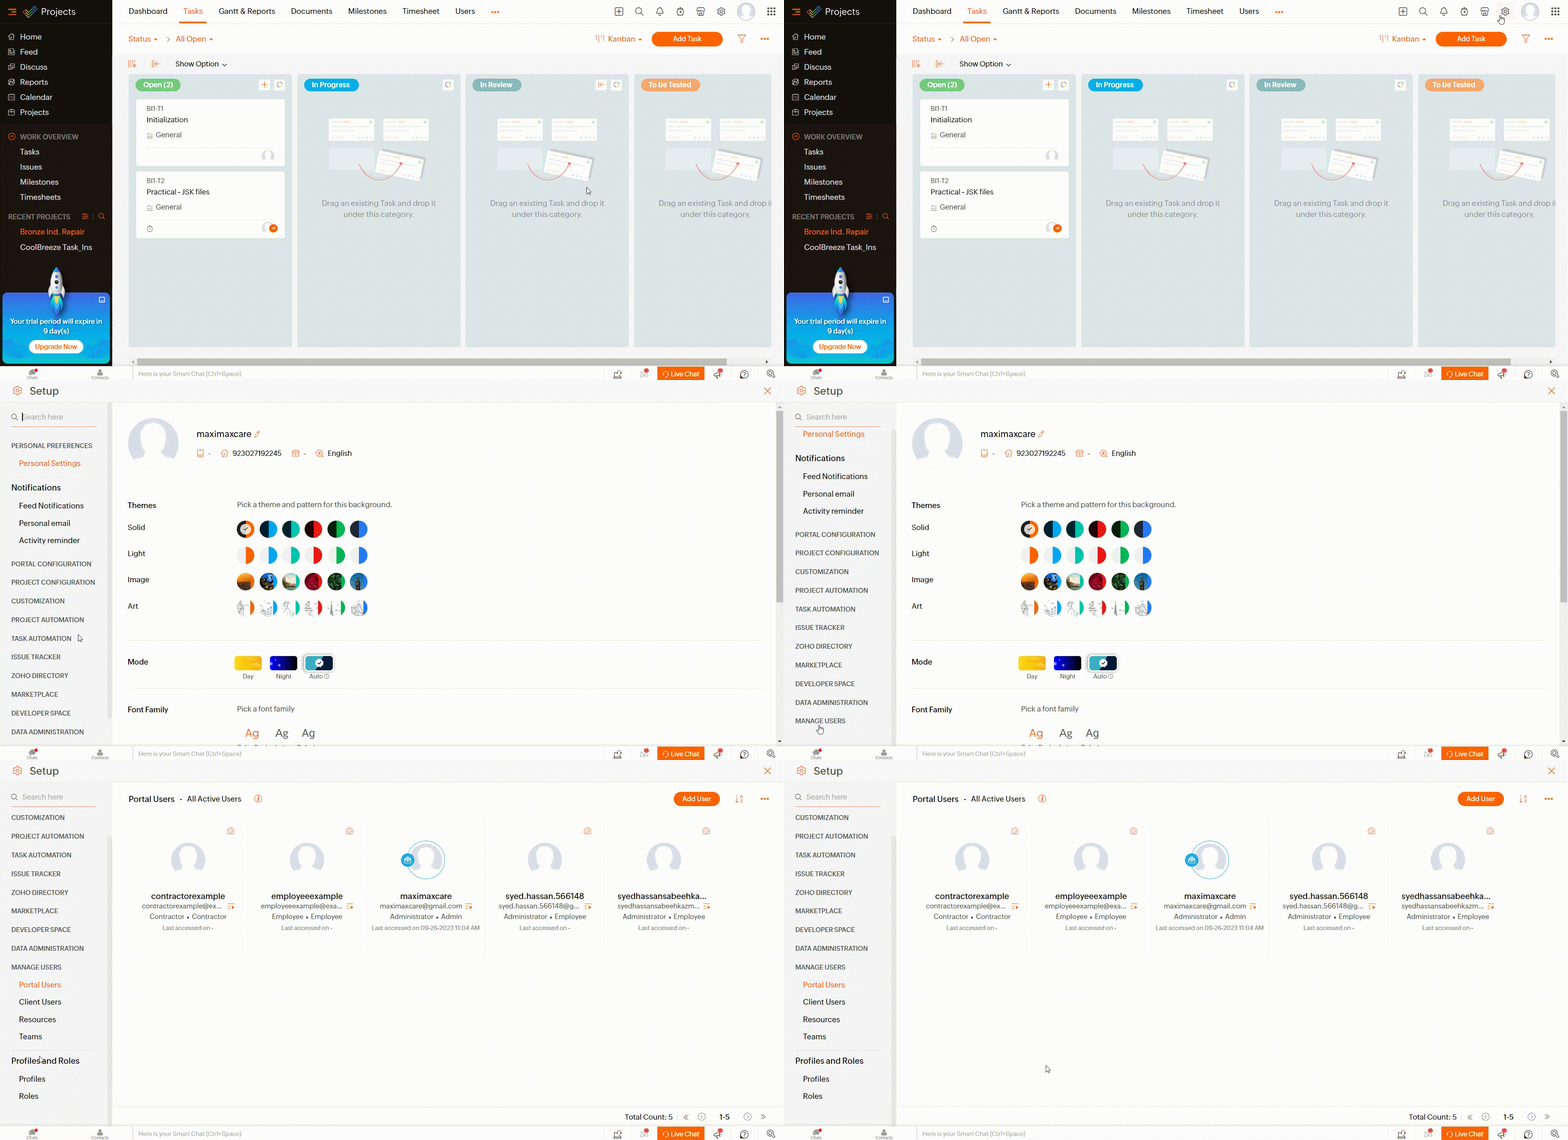
Next, select Roles from this menu and click on Add Role to create a fresh role. Enter the desired role name, and then click Save to save the newly created role.
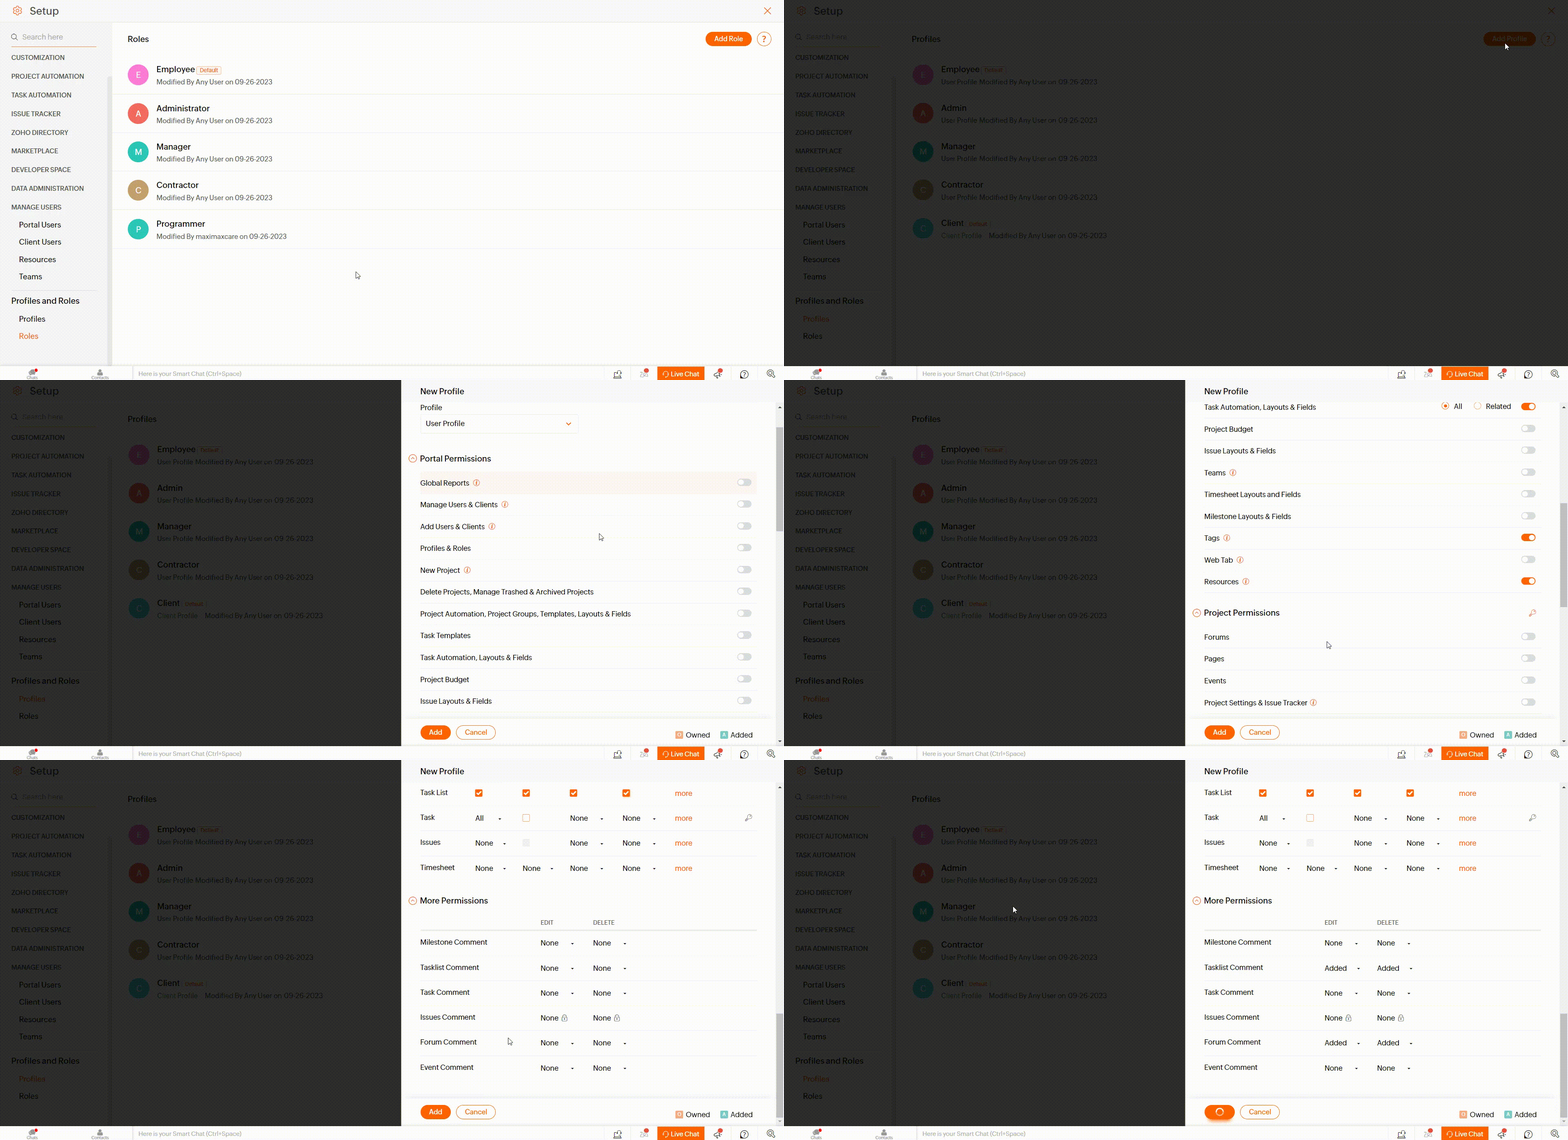
To configure Profile Permissions for your new roles, click on Profiles in Profiles and Roles, click on Add Profile, provide a Name and a Profile, and activate the permissions you wish to grant to all users associated with this profile. Finally, click on Add to save the settings.
User Groups in Zoho Projects
User groups or Teams represent an invaluable feature in Zoho Projects, simplifying user management and access control. By categorizing users into groups and assigning roles accordingly, you can streamline collaboration and ensure that everyone has the right level of access.
Creating User Groups
User groups offer several benefits, such as simplifying role assignment and access control. To create a user group:
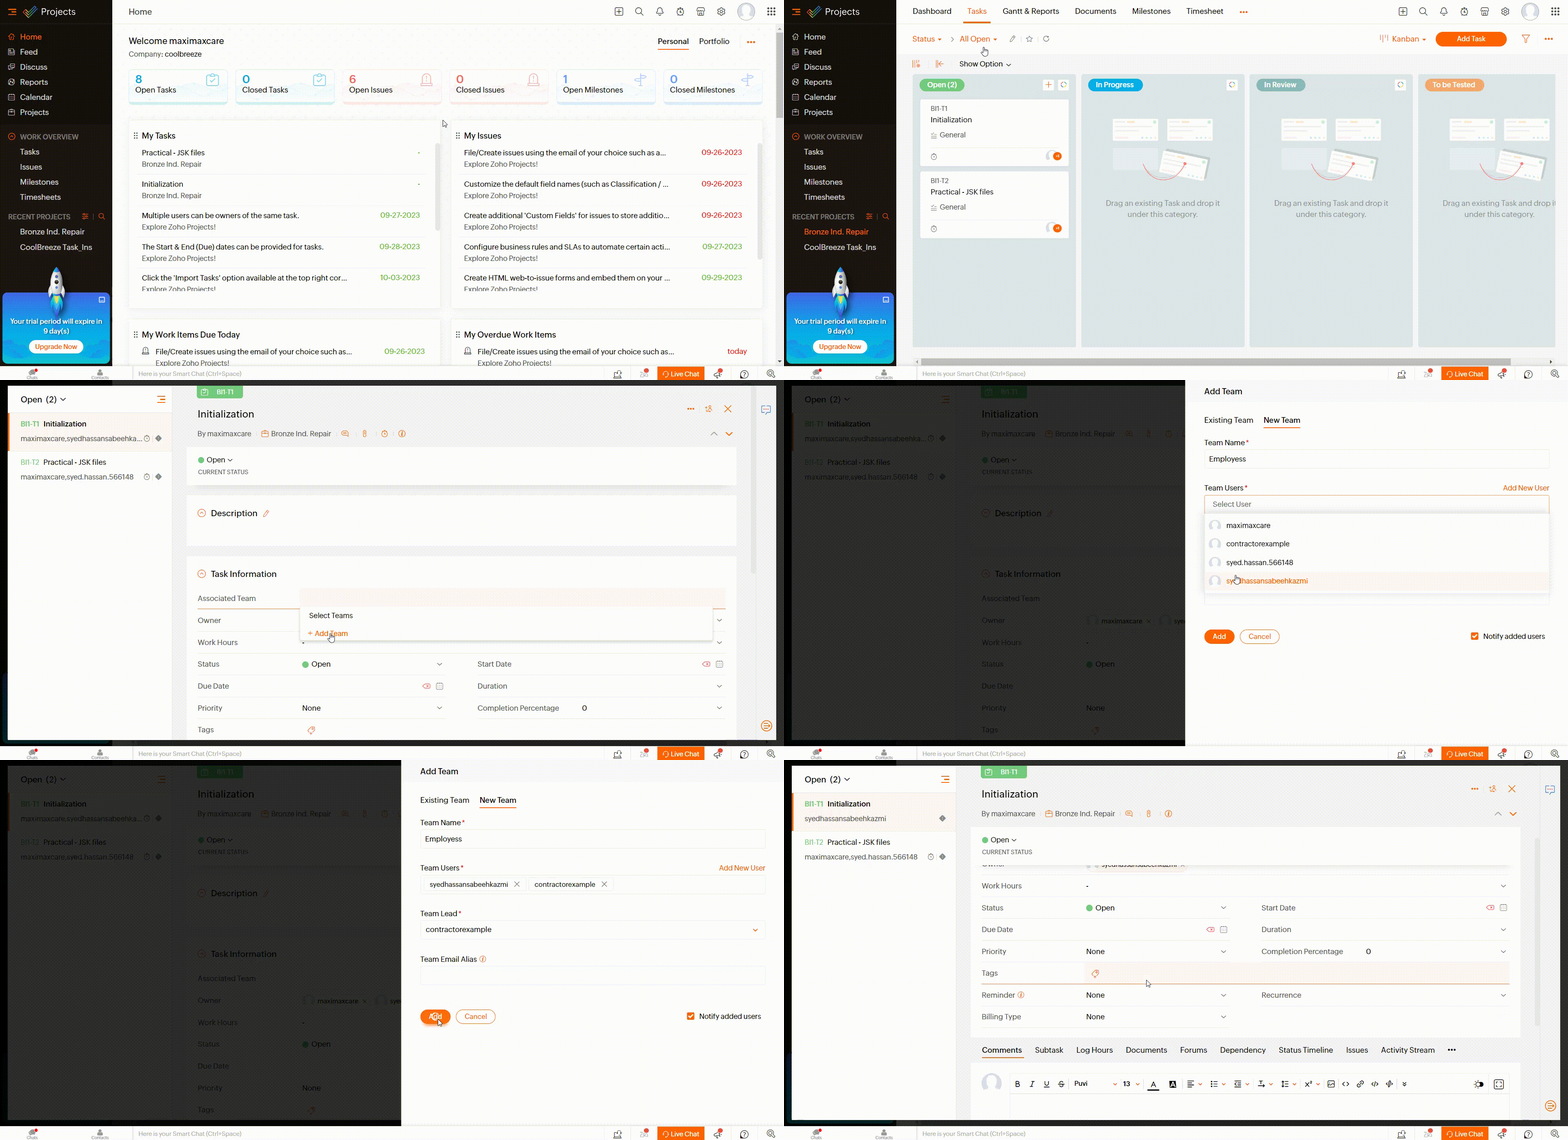
User Groups are known as Teams in Zoho Projects and to create new teams, go to the User module, select Teams, and click on Add Team.
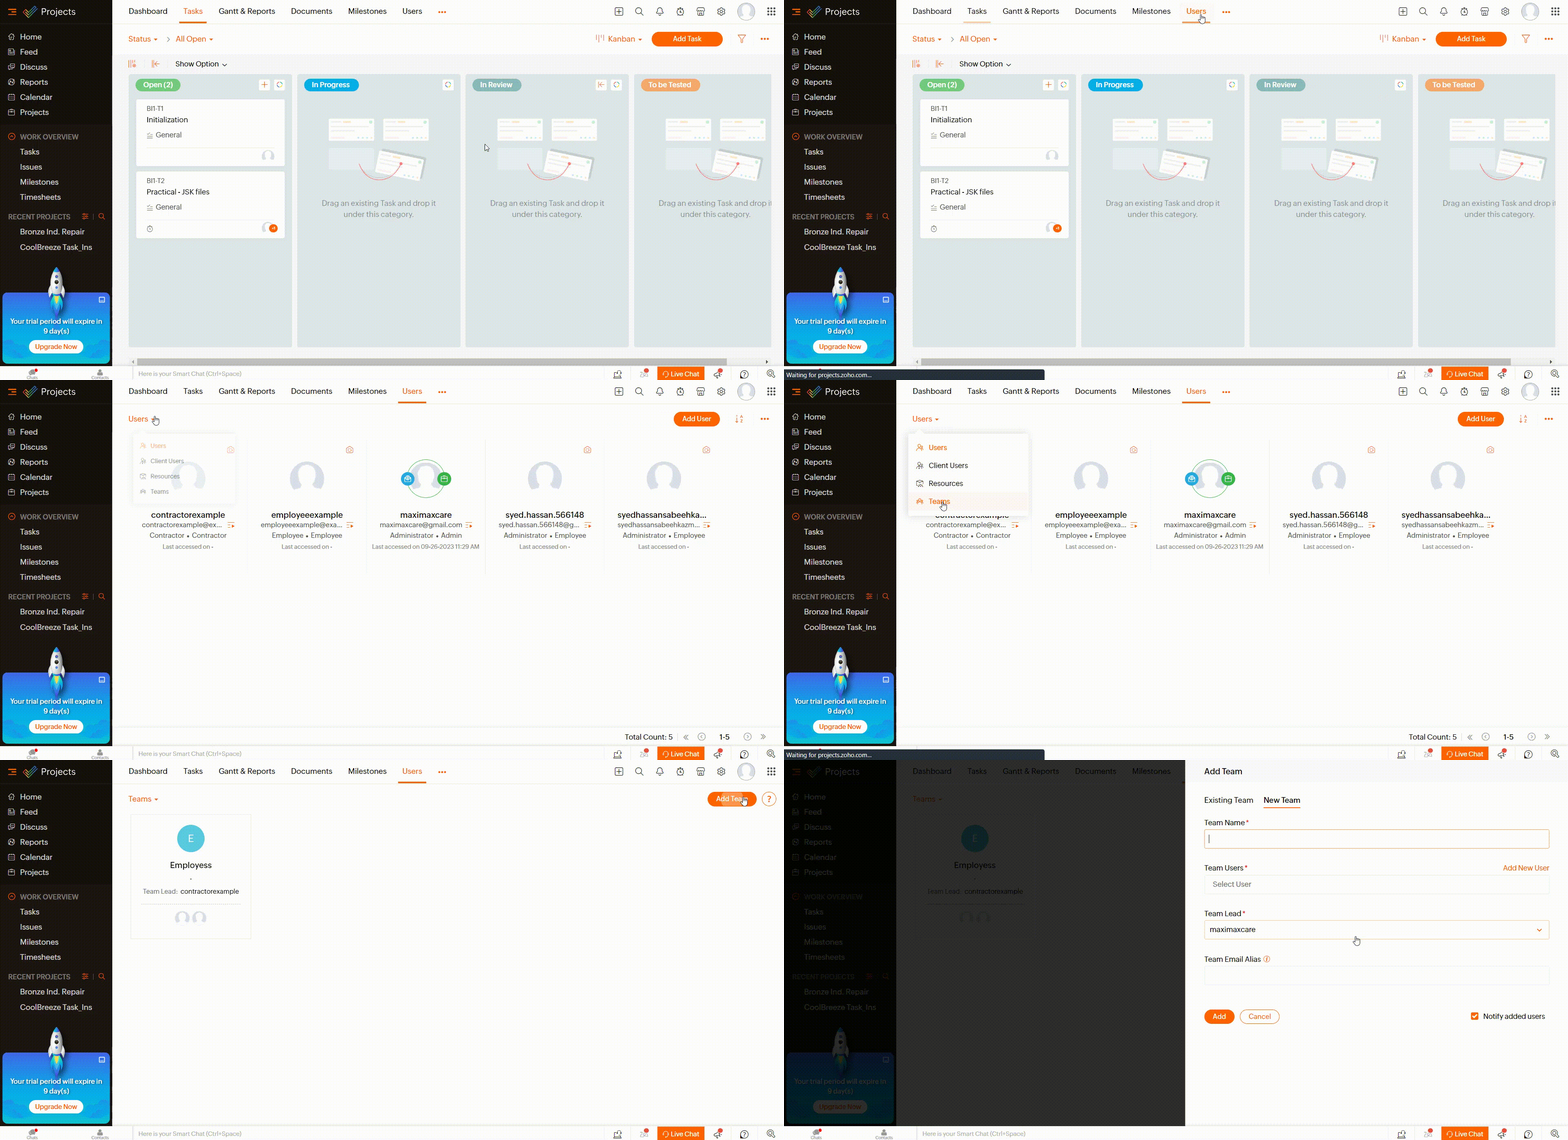
Enter the Team Name, choose the Team Users, designate a Team Lead, and then click the Add button.
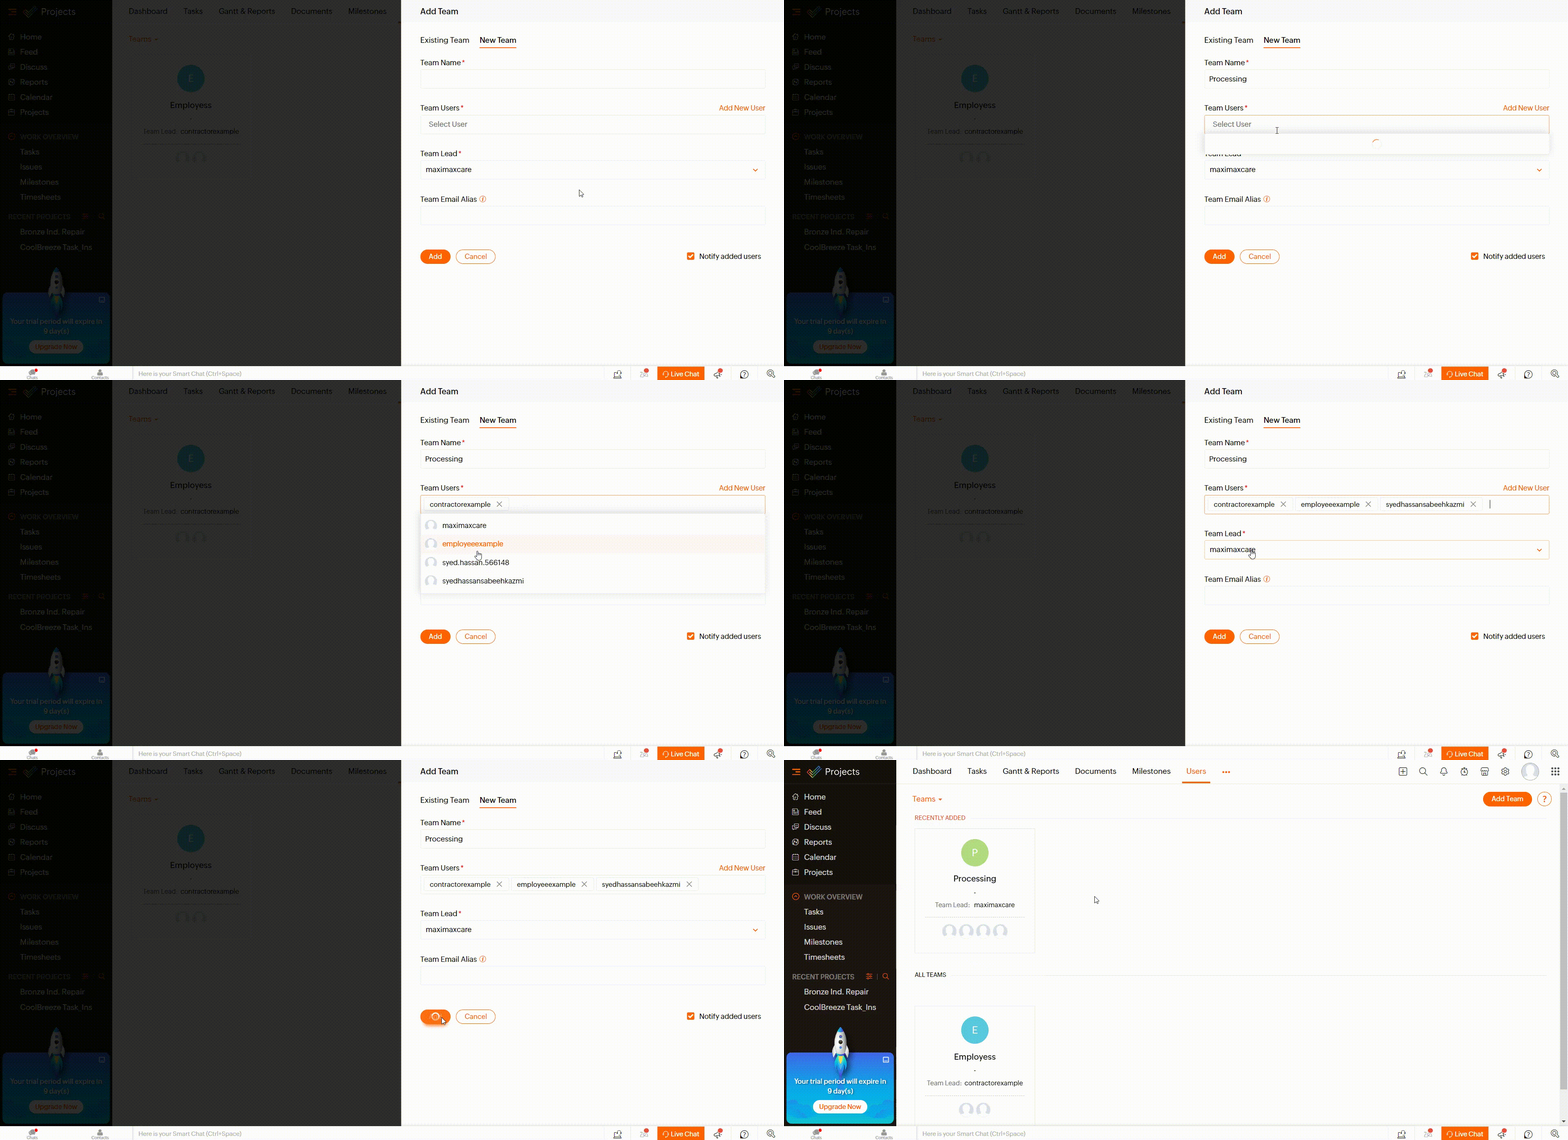
You can now assign tasks from your projects to teams. The role you initially selected for your team members during user creation will be assigned to them.
Assigning Roles to Teams
Teams become powerful when you can assign roles to an entire group of users. This simplifies access control, making it easier to manage permissions for large teams.
To assign roles to user groups:
When adding users to the project, you can manage their roles at this stage. To do so, choose a project, navigate to the Users module, click Add User, and select a Role and Profile for the user.
What Pain Points Does It Solve?
Setting up user roles and groups in Zoho Projects addresses several common pain points in project management:
- Data Security: By restricting access to sensitive information, you can prevent unauthorized access and maintain data security.
- Effective Collaboration: Clear role assignments ensure that each team member knows their responsibilities, streamlining collaboration and communication.
- Optimized Project Organization: With defined roles and access levels, project organization becomes more efficient, leading to smoother workflows and task management.
- Task Delegation: Managers can delegate tasks effectively, ensuring that the right team members are assigned to specific responsibilities.
- External Collaboration: Clients and external stakeholders can participate in projects without compromising sensitive project data, fostering external collaboration.
Conclusion
Mastering user roles and groups within Zoho Projects is a crucial step toward efficient project management. It allows you to tailor access and responsibilities precisely to your project’s needs, fostering collaboration, and enhancing overall project management efficiency.
By implementing the strategies outlined in this guide, you can make the most of these features, driving successful project outcomes and achieving your project management goals.


