Sending and Tracking Custom Documents for Signatures with a Custom Module in Zoho CRM
Learn how to streamline the process of sending custom documents for signature and tracking their signing progress within Zoho CRM. Discover the power of utilizing a custom module to enhance efficiency and collaboration, saving time and ensuring a seamless document signing experience.
Published on February 22, 2024
Who is this feature for?
- Sales professionals & Legal teams
- HR managers & Business owners
- Client-facing teams & Project managers
What progress will you accomplish?
- Streamlined signature process and improved efficiency
- Enhance collaboration and clear document audit trail
- Simplified document management and enhanced client experience
Introduction
In today’s digital era, the ability to send custom documents for signature and track their signing progress is a vital aspect of streamlined business operations. Within the Zoho CRM ecosystem, a custom module offers a powerful solution for this task, ensuring efficiency and collaboration.
This article serves as your guide, unveiling the secrets of sending custom documents for signature and unveiling the potential of seamless tracking within Zoho CRM. Discover how this feature can elevate your business processes to new heights.
Set up the Integration between Zoho CRM and Zoho Sign
Make sure that you have active accounts for both Zoho CRM and Zoho Sign.
To proceed, access the Setup from Zoho CRM, and under the Marketplace section, select Zoho. From there, navigate to Zoho Sign and click on Setup Now.
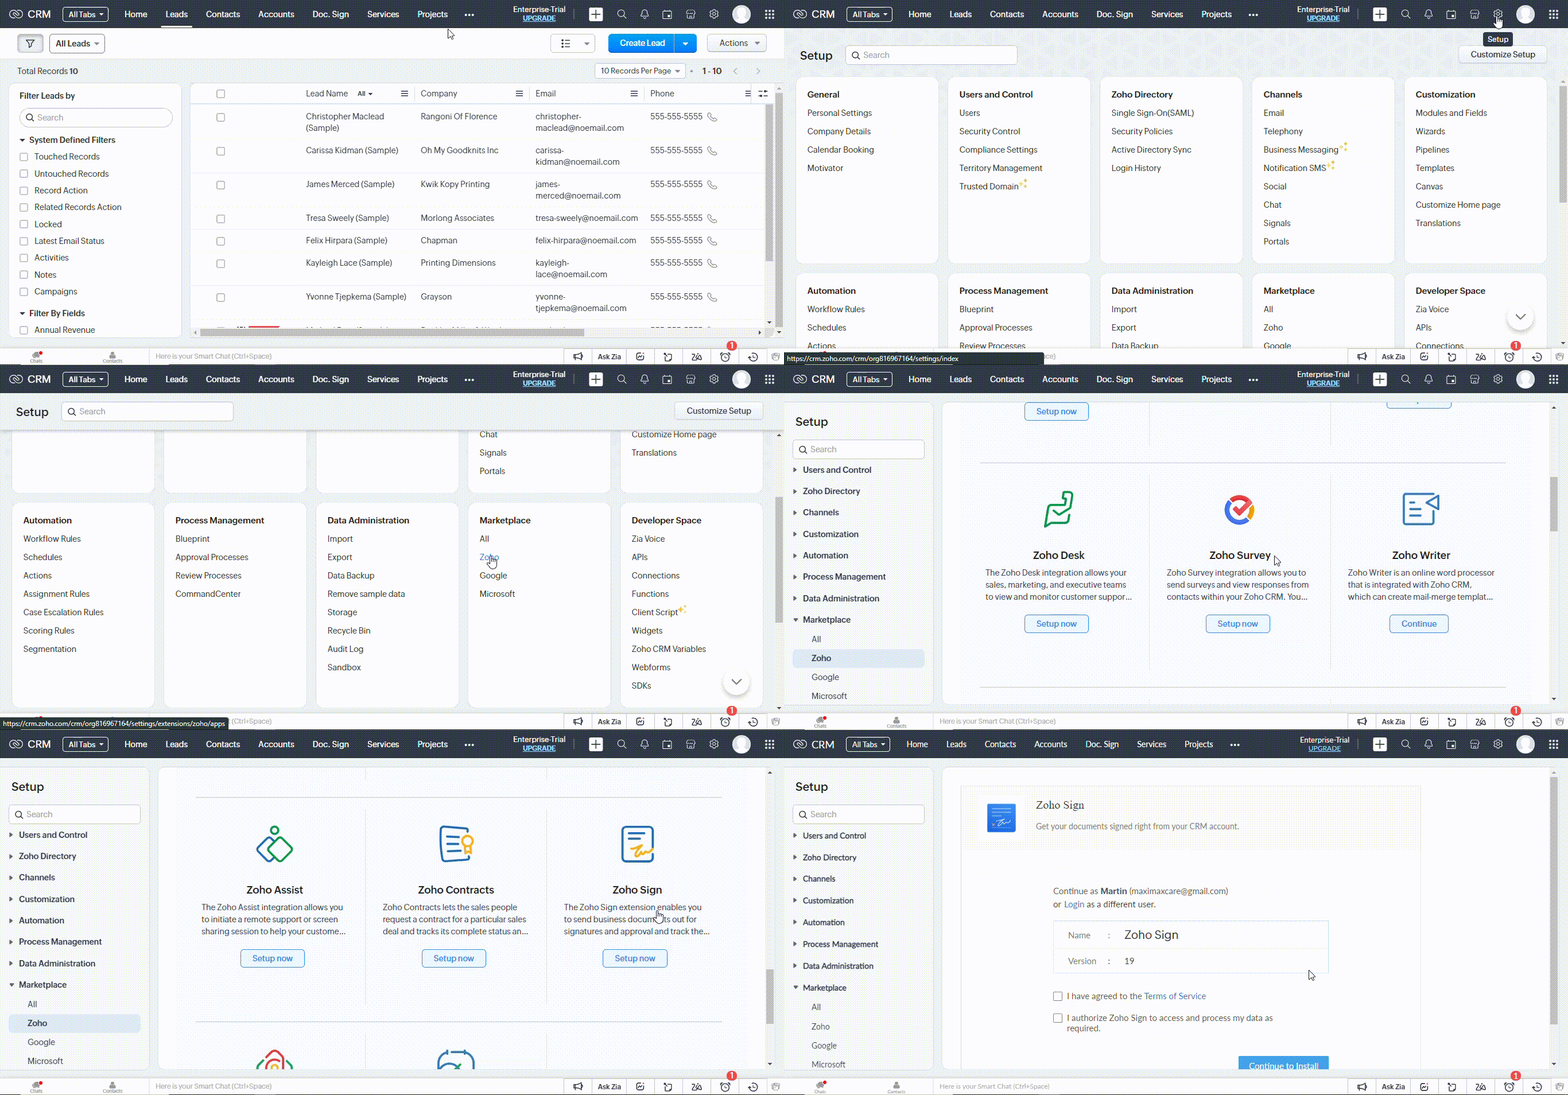
Setting up the integration between Zoho CRM and Zoho Sign
Before proceeding, take the time to review the Terms of Service. Once you have read and agreed to the terms, and granted authorization to Zoho Sign to access and process your data as necessary, click on Continue to Install.
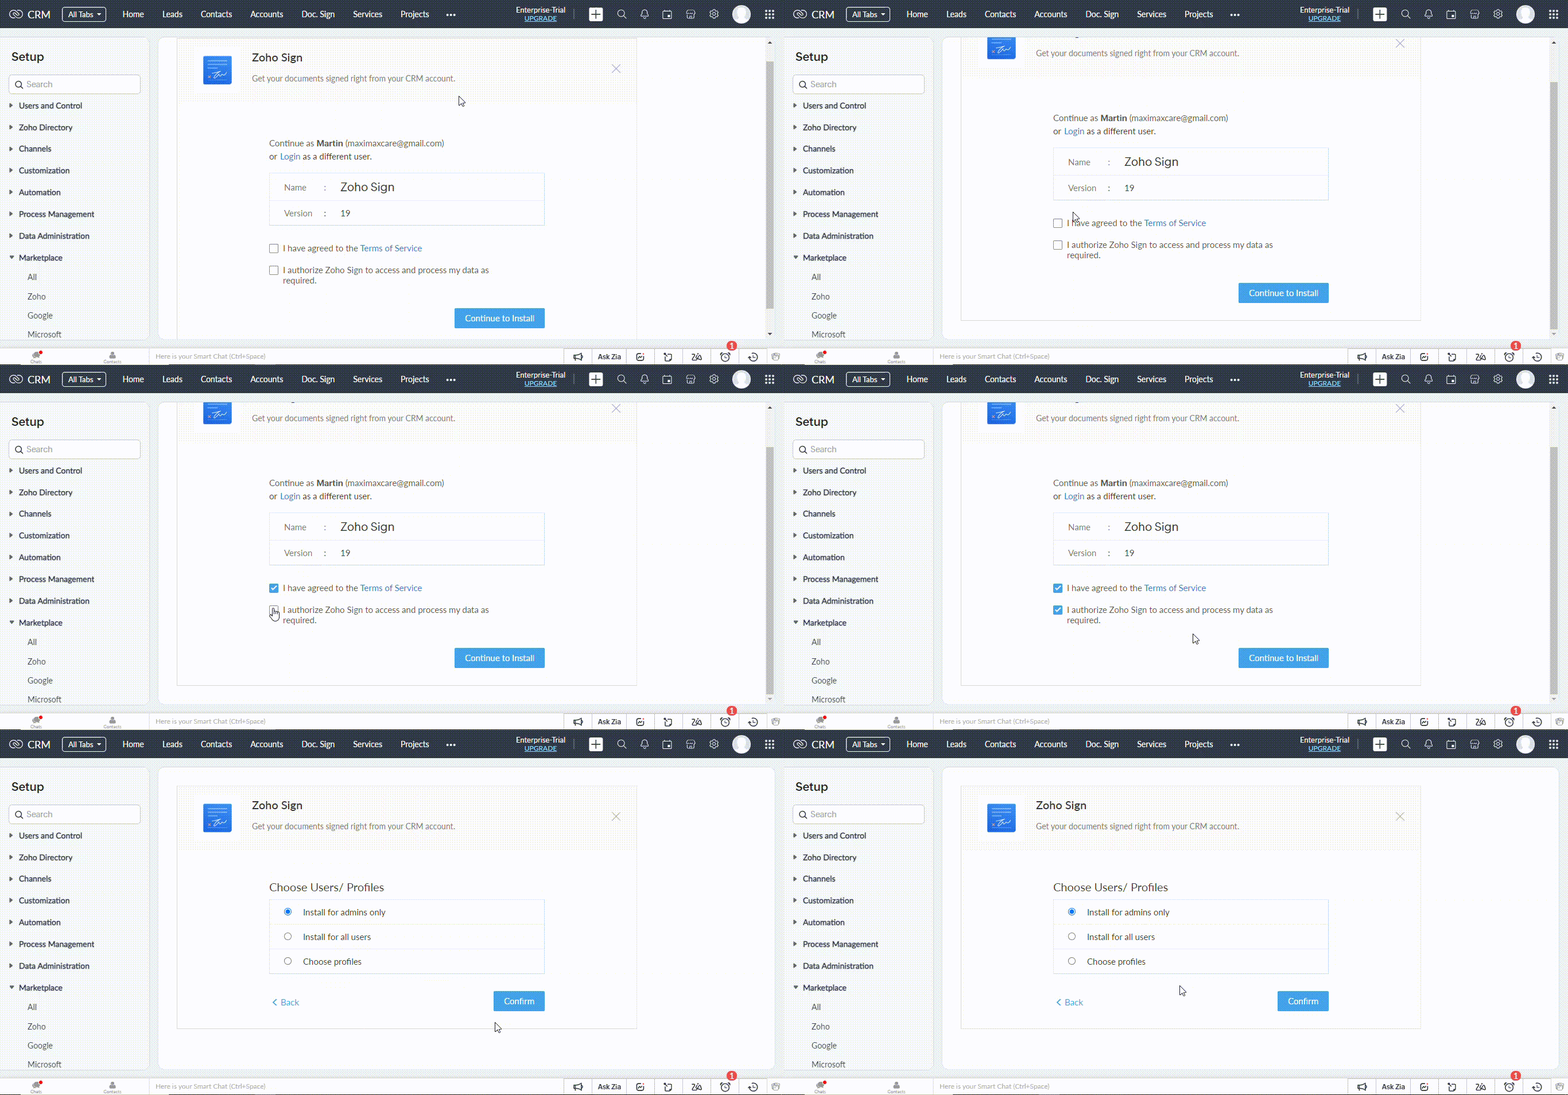
Installing Zoho Sign for Zoho CRM
Select the desired Users/Profiles and proceed by clicking on Confirm.
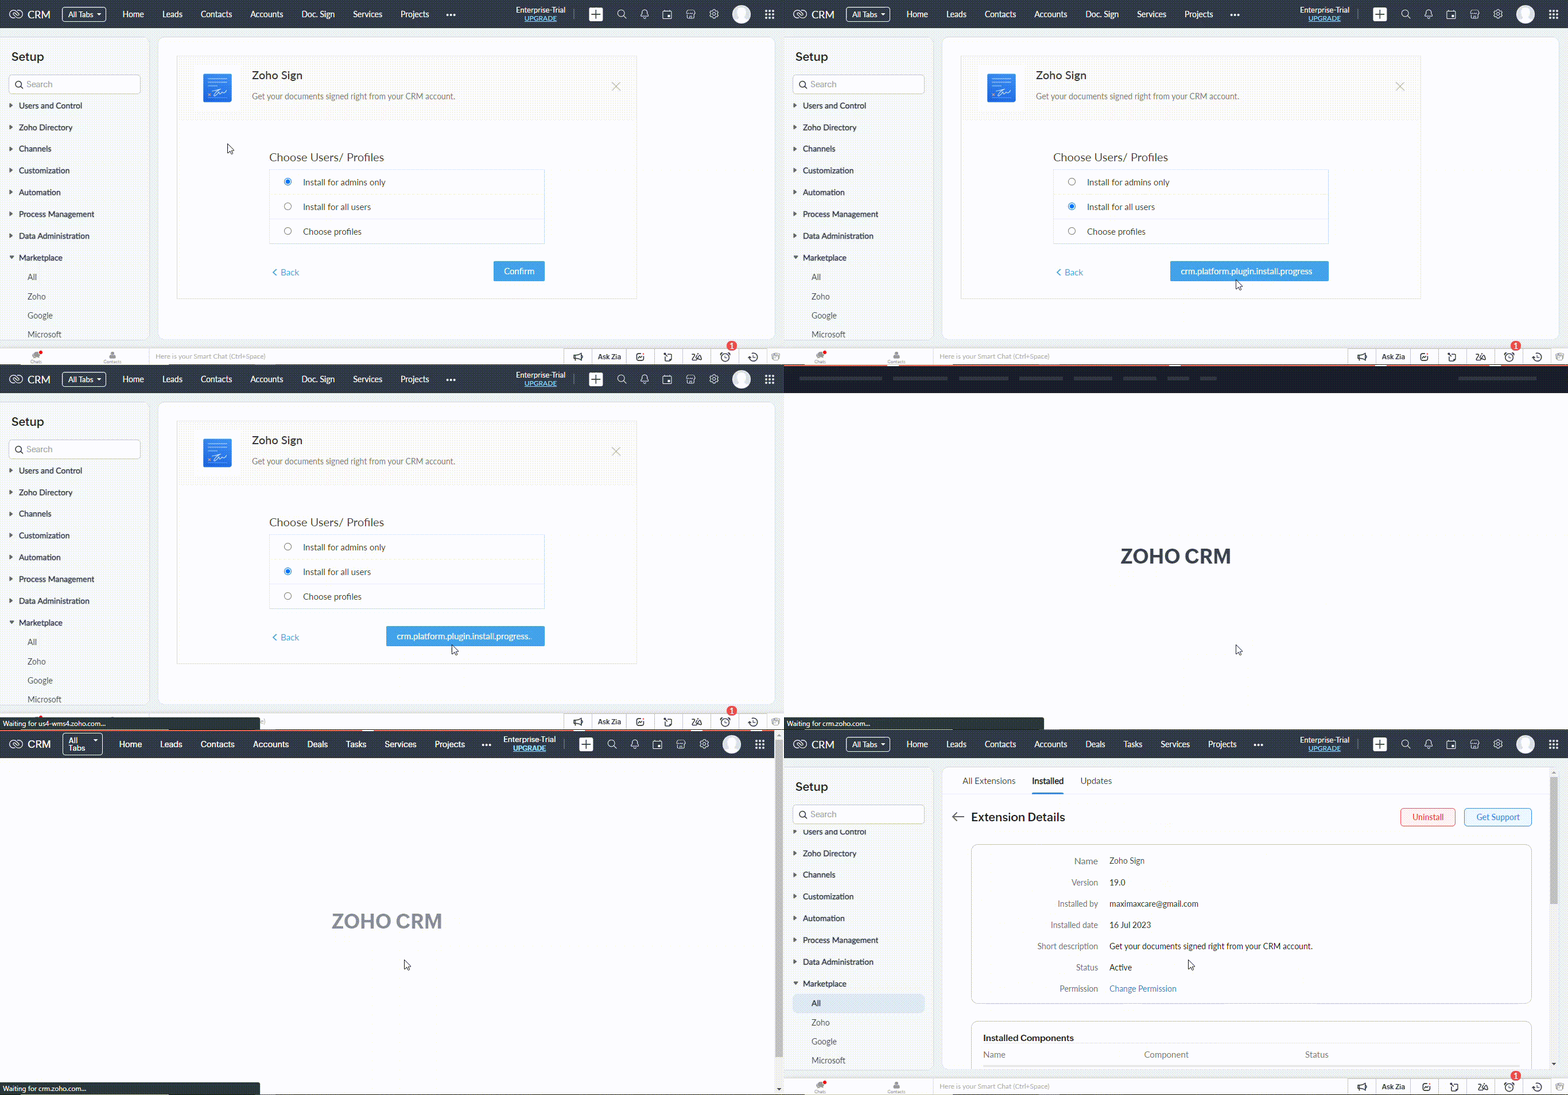
Choosing Users/Profiles for the Zoho Sign integration
The integration has been successfully completed, granting you the ability to uninstall or modify permissions from this location as well.
Create a Custom Module in Zoho CRM
To create a custom module in Zoho CRM, navigate to the Other Modules section and proceed by clicking on + Create New Module.
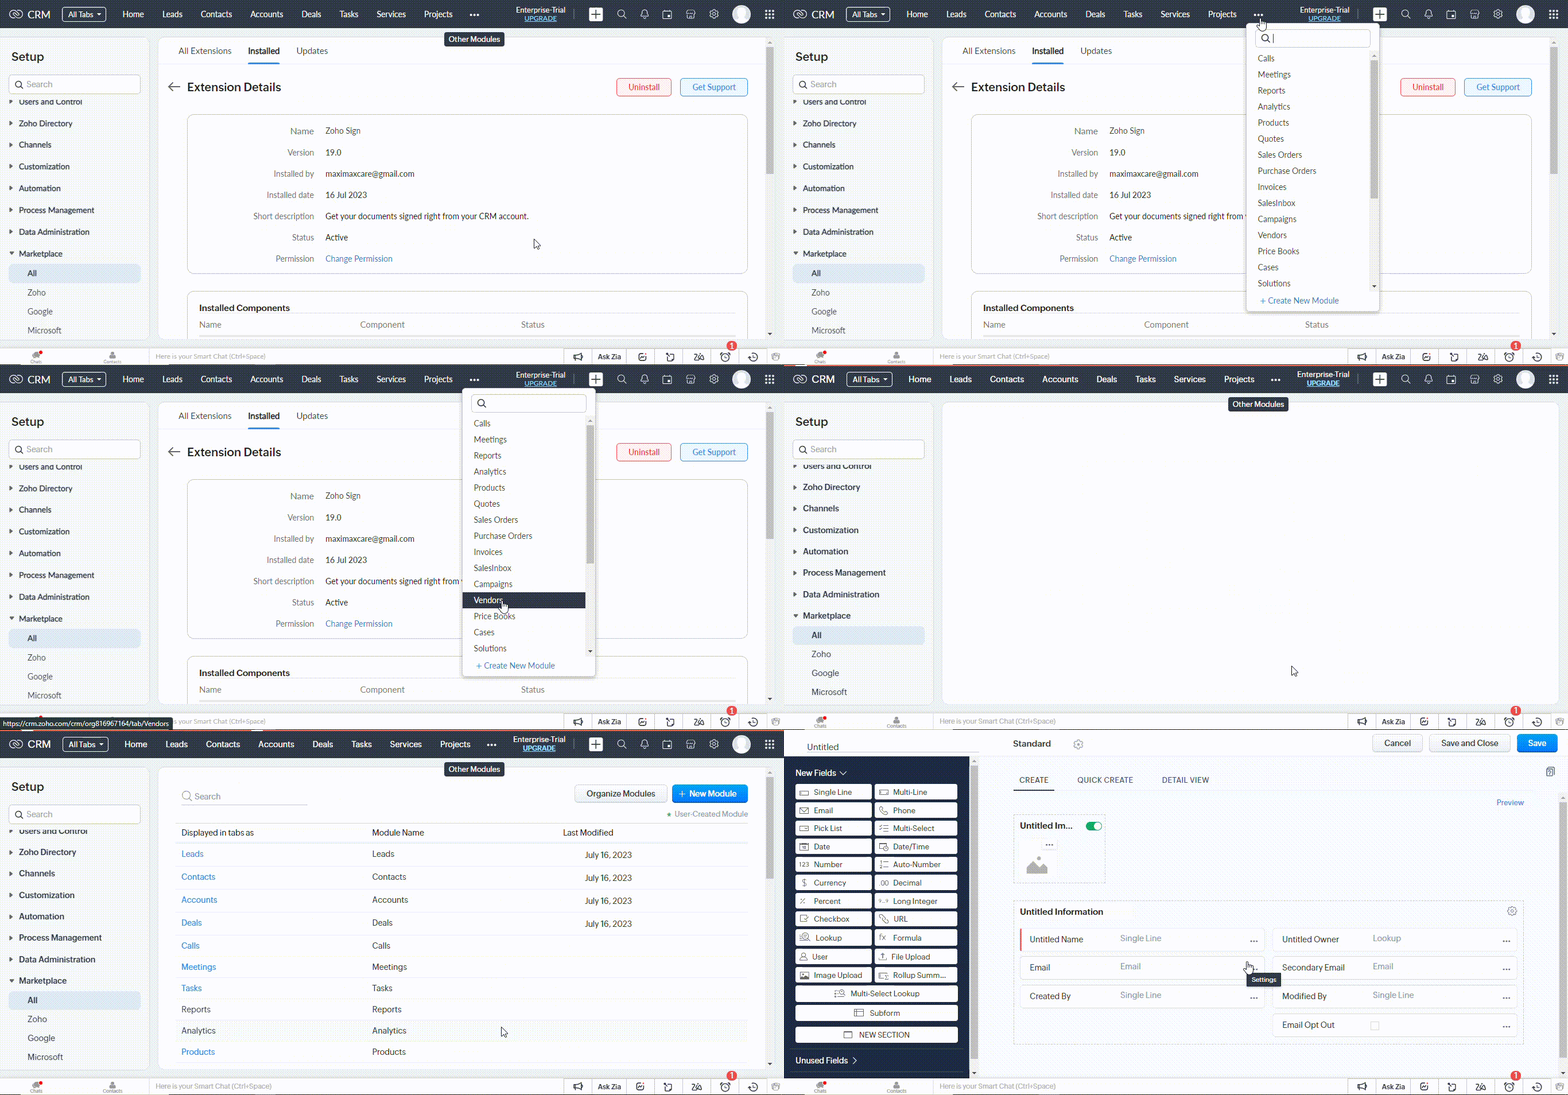
Creating a custom module in Zoho CRM
From here, you have the ability to configure the layout of your custom module. Take advantage of the options available to add fields, subforms, or new sections to appropriately configure your module.
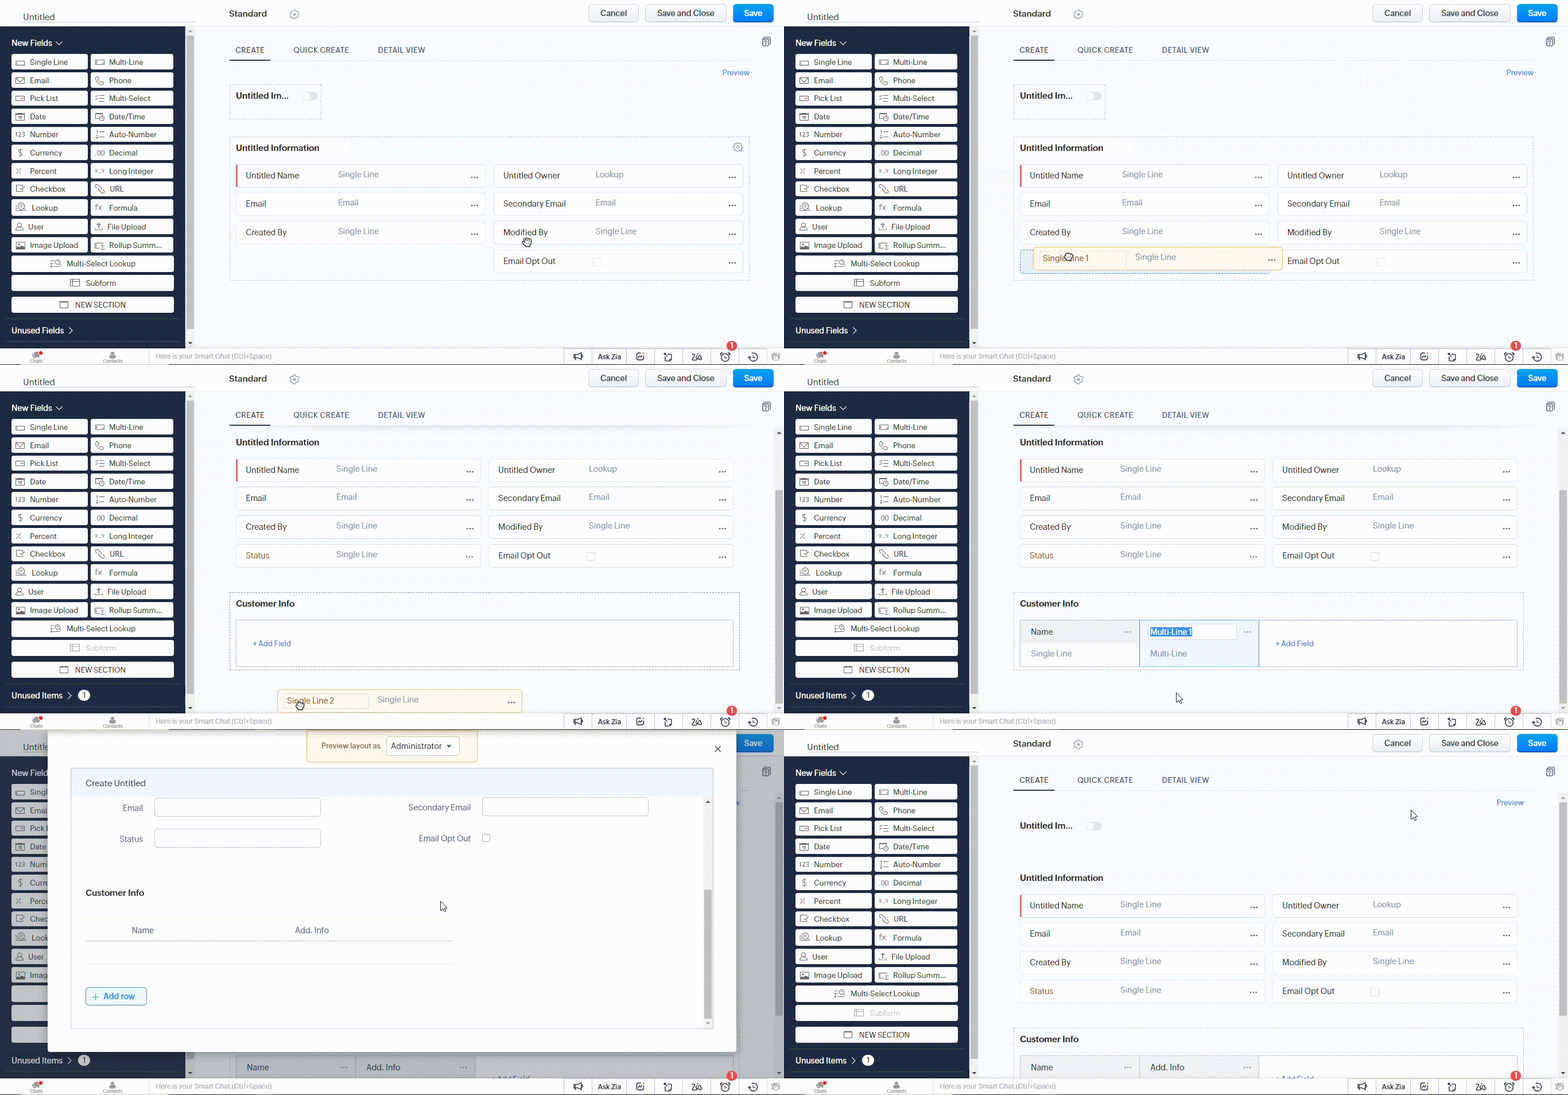
Configuring the default layout of the custom module
Upon completing the configuration, click on Save. Provide a suitable name for your custom module, establish the necessary permissions, and click on Save to save the changes.
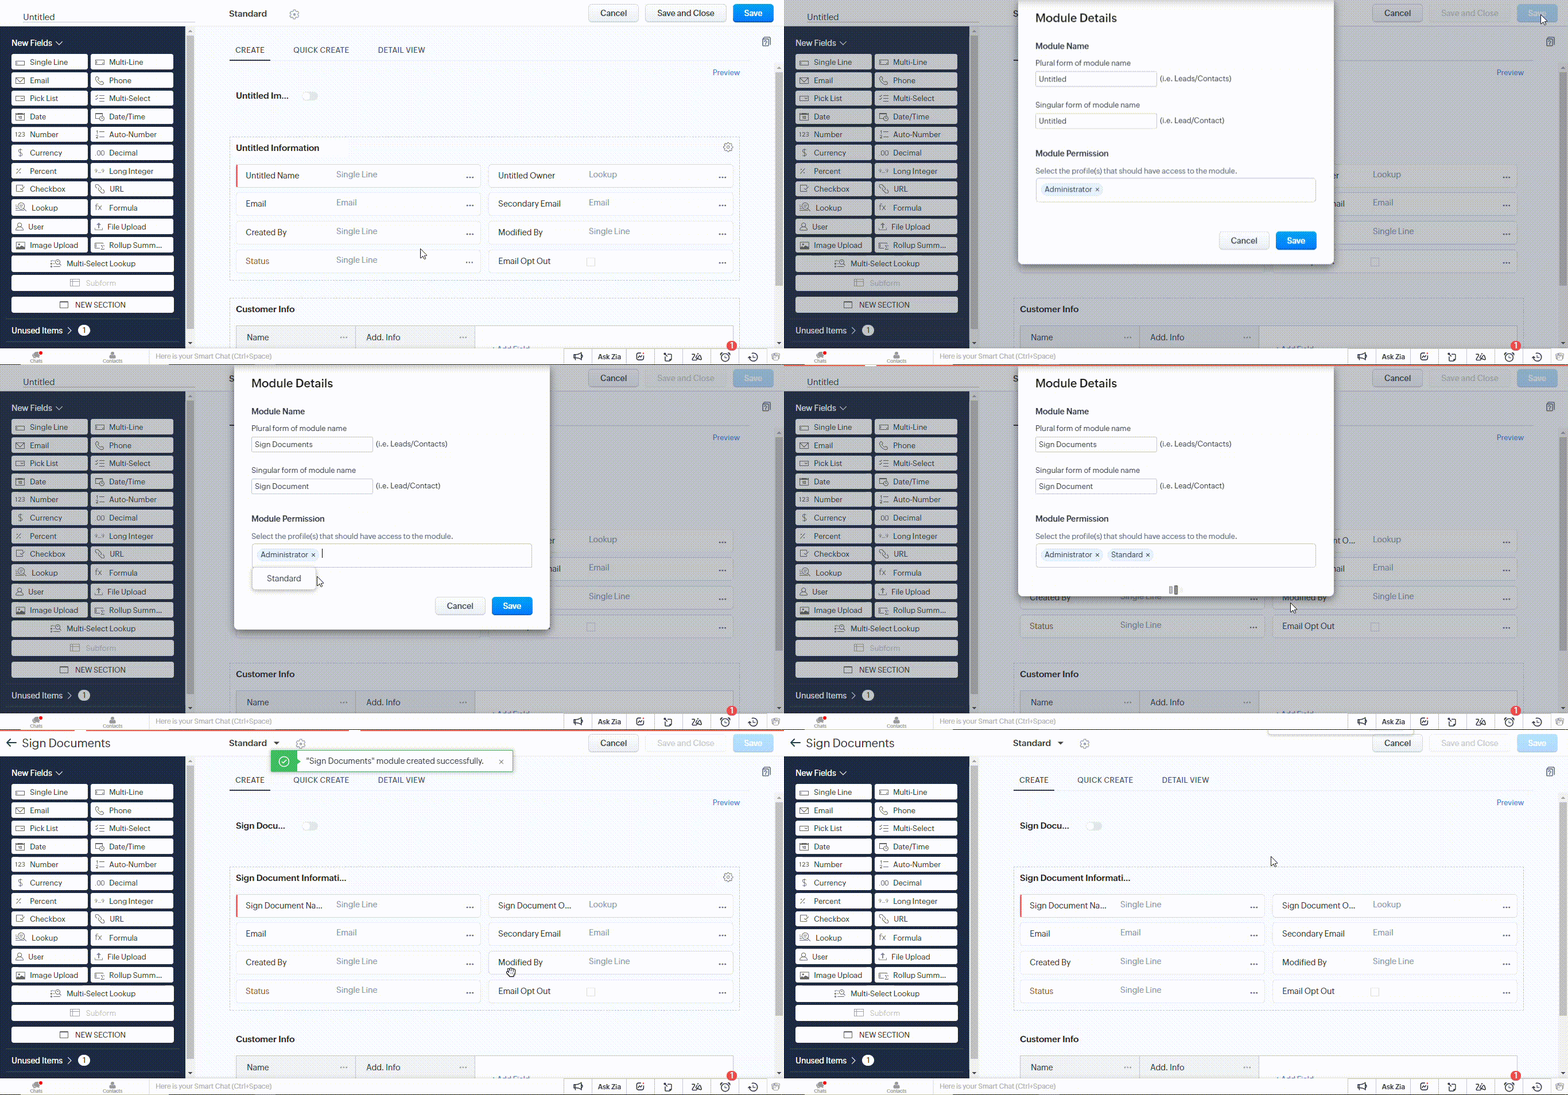
Successfully creating a custom module in Zoho CRM
Creating a Button with Custom Function for Sending Documents using Zoho Sign
Facilitating the process of sending documents for signing and monitoring their progress within a customized module is achievable through the utilization of a button equipped with a custom function.
[Note! Upon successfully integrating Zoho Sign with your Zoho CRM account, you will gain the capability to directly send documents for signatures and track their progress for almost all documents within pre-defined modules. However, please note that this functionality is not available for user-created modules.]Hence, it’s necessary to utilize a button to initiate a custom function and establish a callback function within Zoho CRM. Additionally, a corresponding Webhook needs to be set up in Zoho Sign for this callback function.
Navigate to your custom module, select a document, access the Options menu located in the top-right corner, and proceed to click on Create Button.
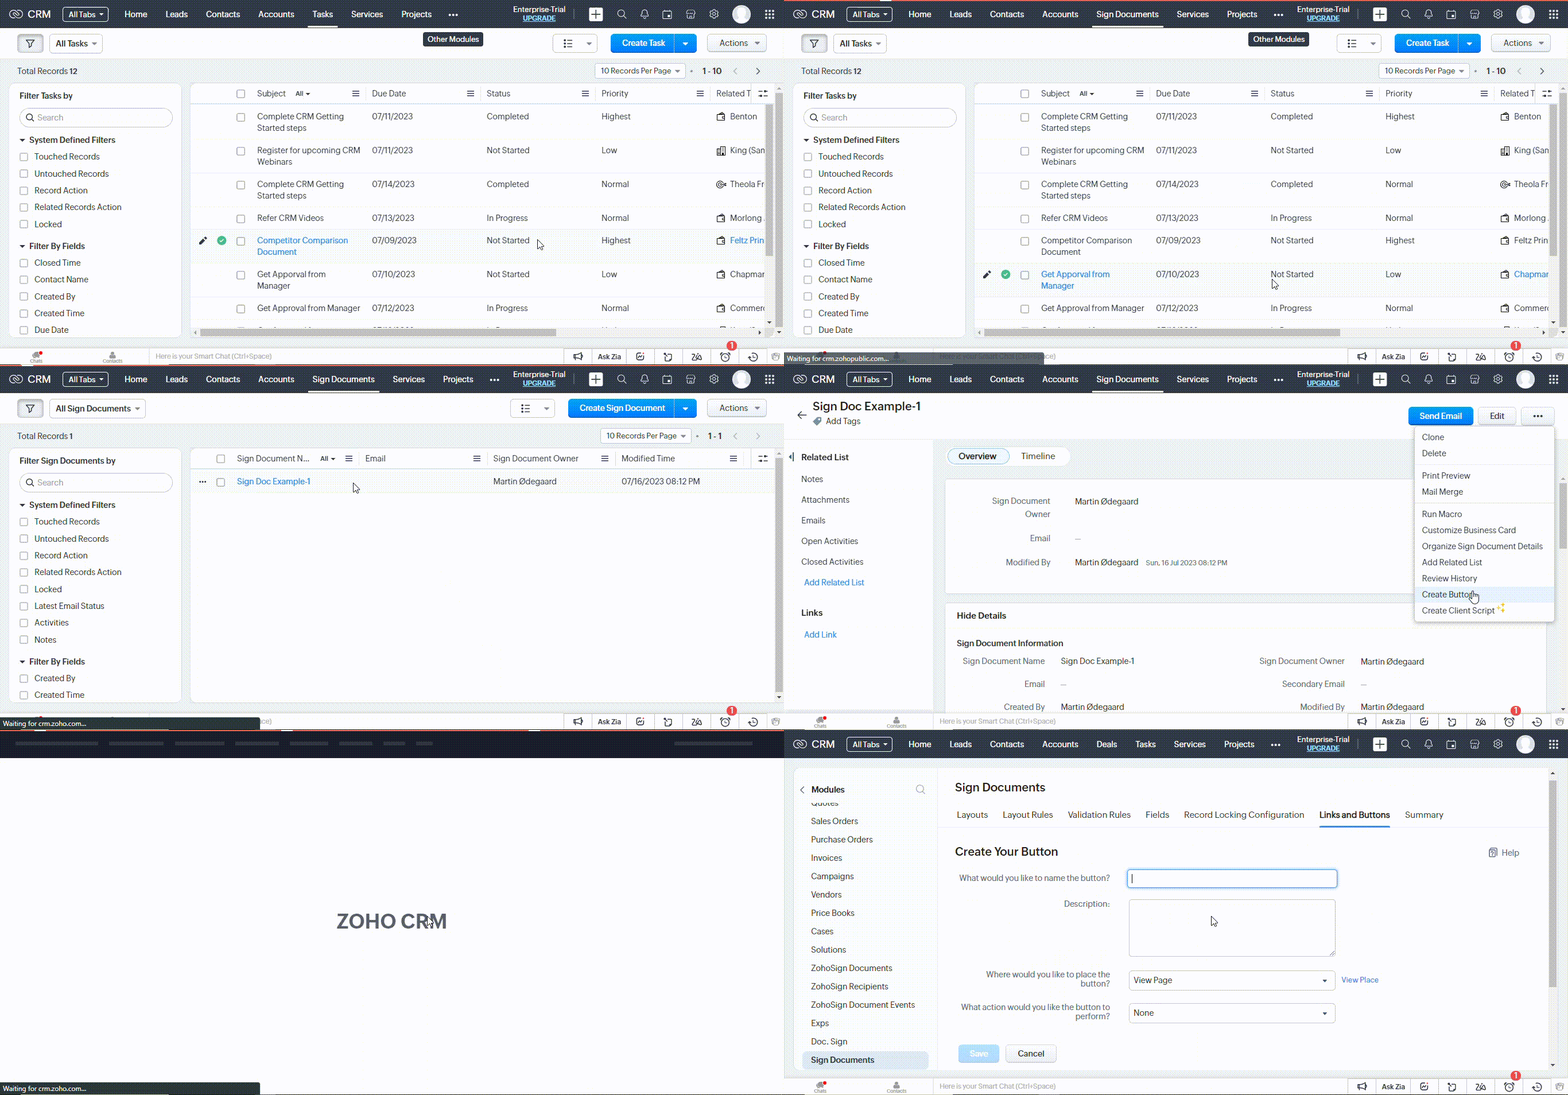
Creating a button for the custom module
Enter the desired name for your button and specify the location where it will be displayed. Then, select the appropriate Writing Function from the available options, indicating the desired action to be performed by the button.
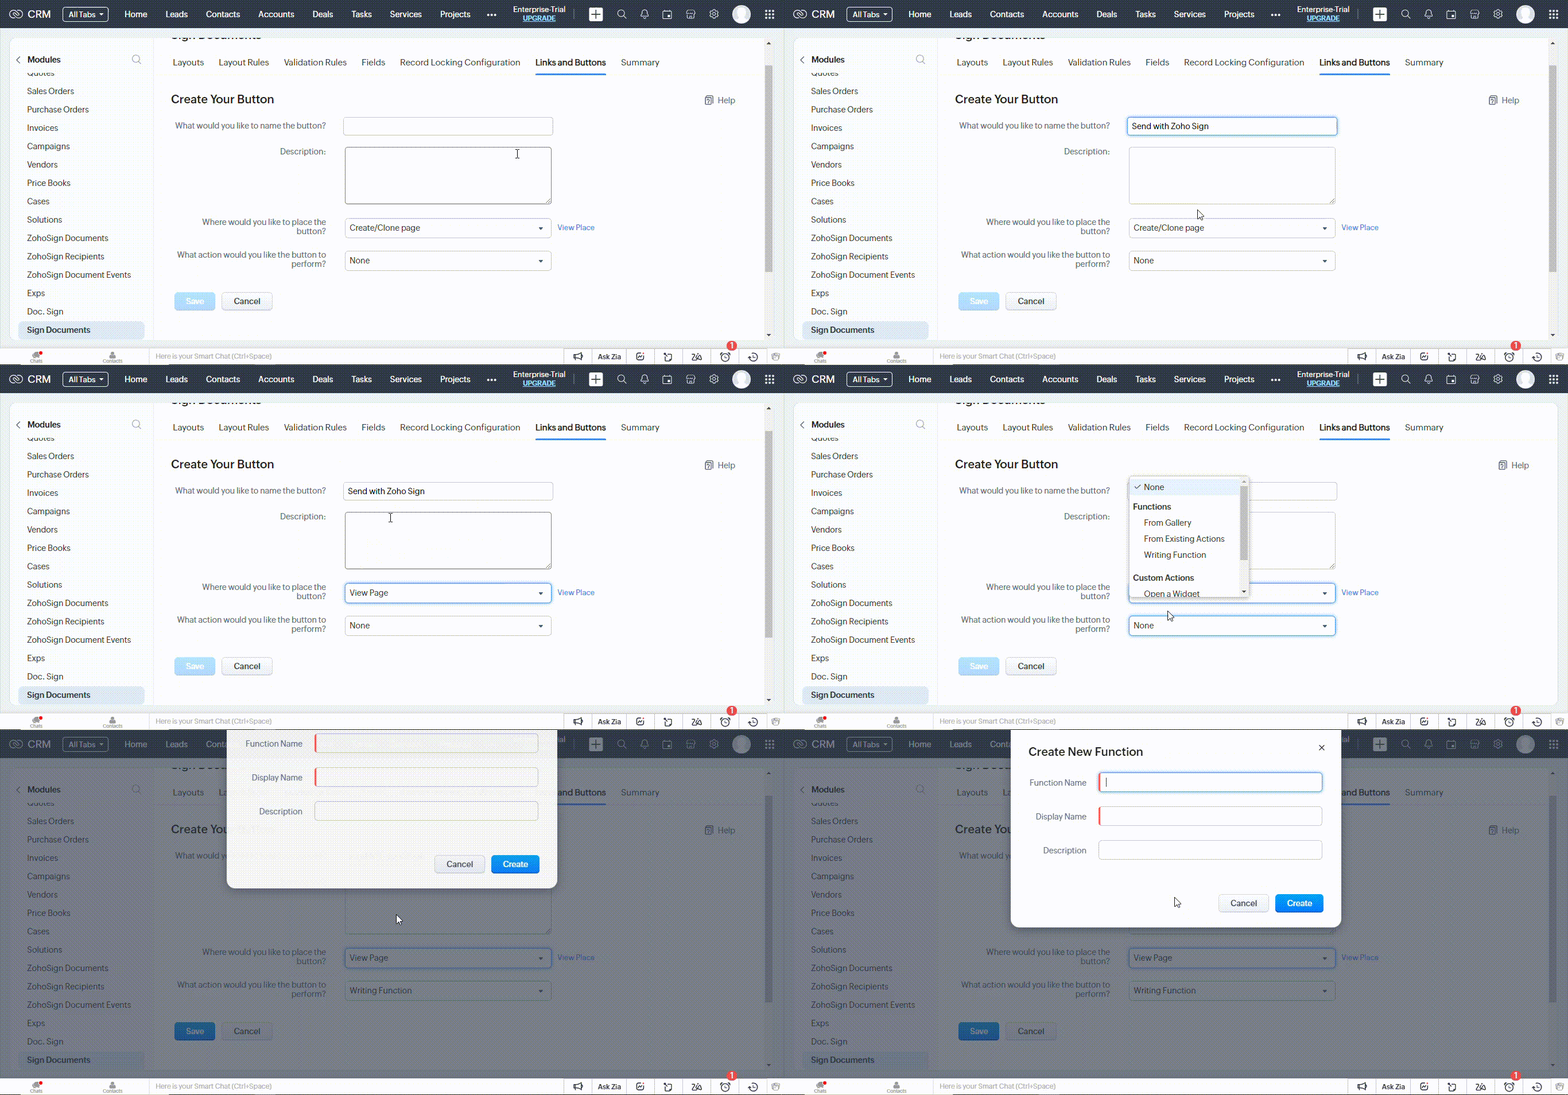
Configuring the action for the button – Button with a custom function
Provide the function name and display name, then proceed by clicking on the Create button.
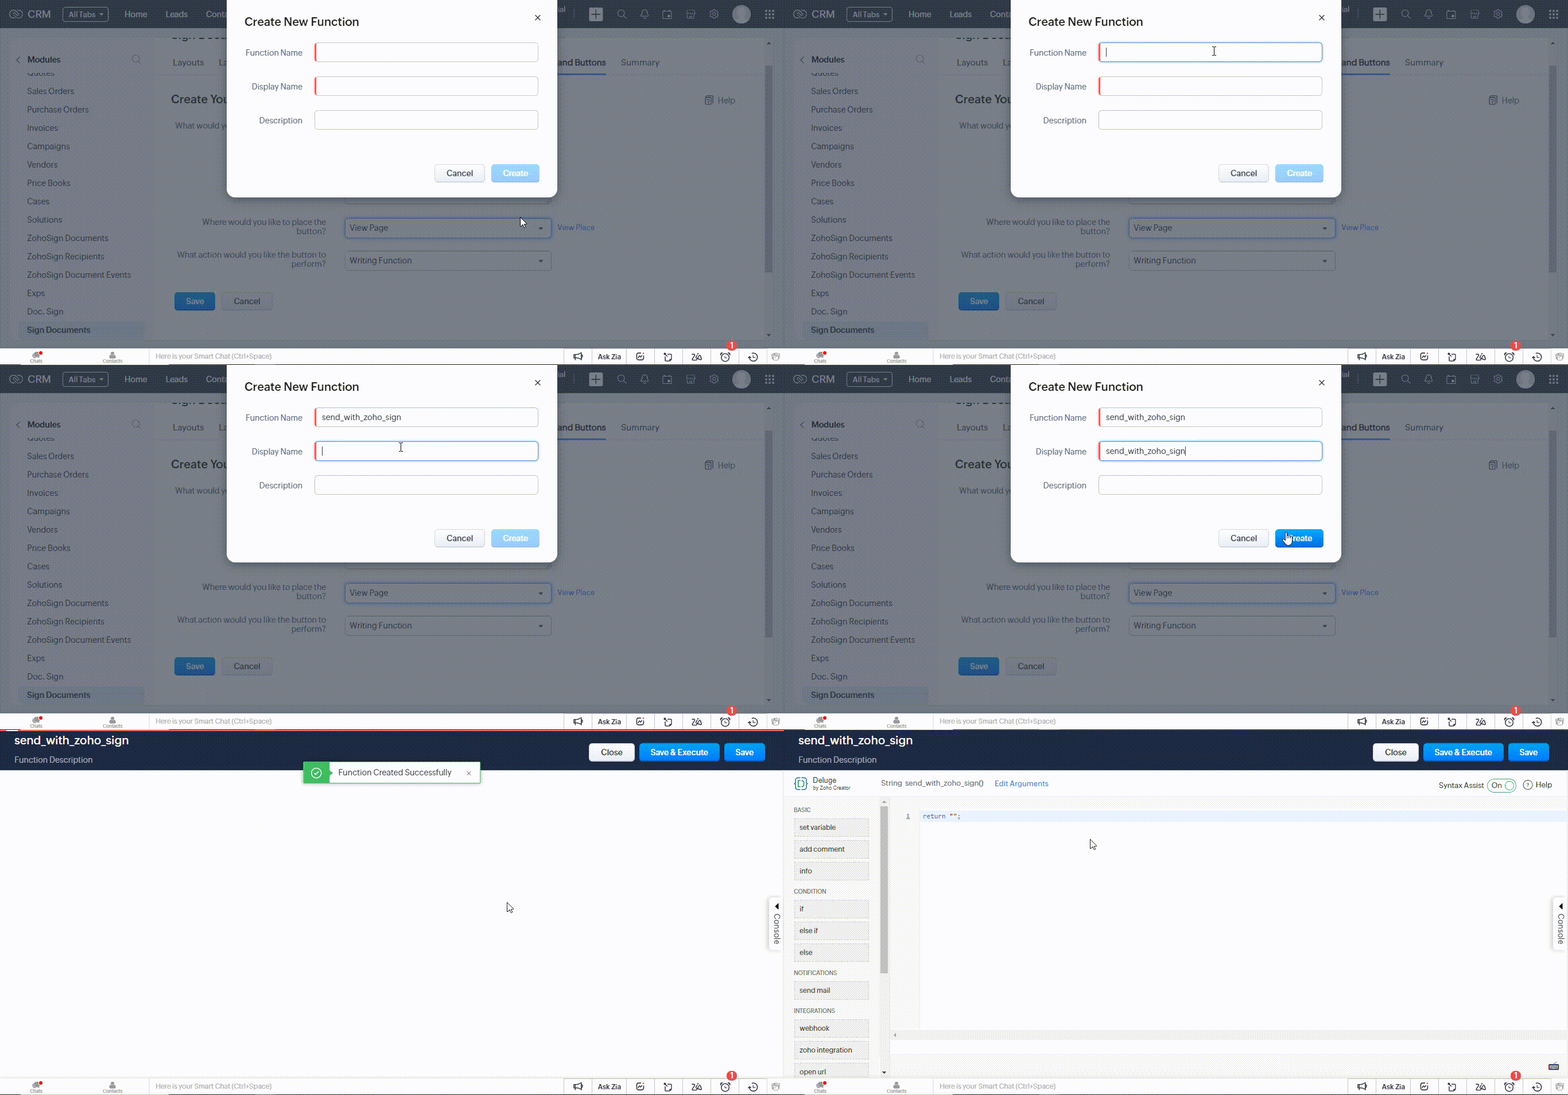
Creating a custom function for the button
Copy and paste the provided code into the Deluge script for your custom function. Next, click on Edit Arguments, specify “crmAPIRequest” as the Name for your Argument Mapping, and select “Request – Parameters”.
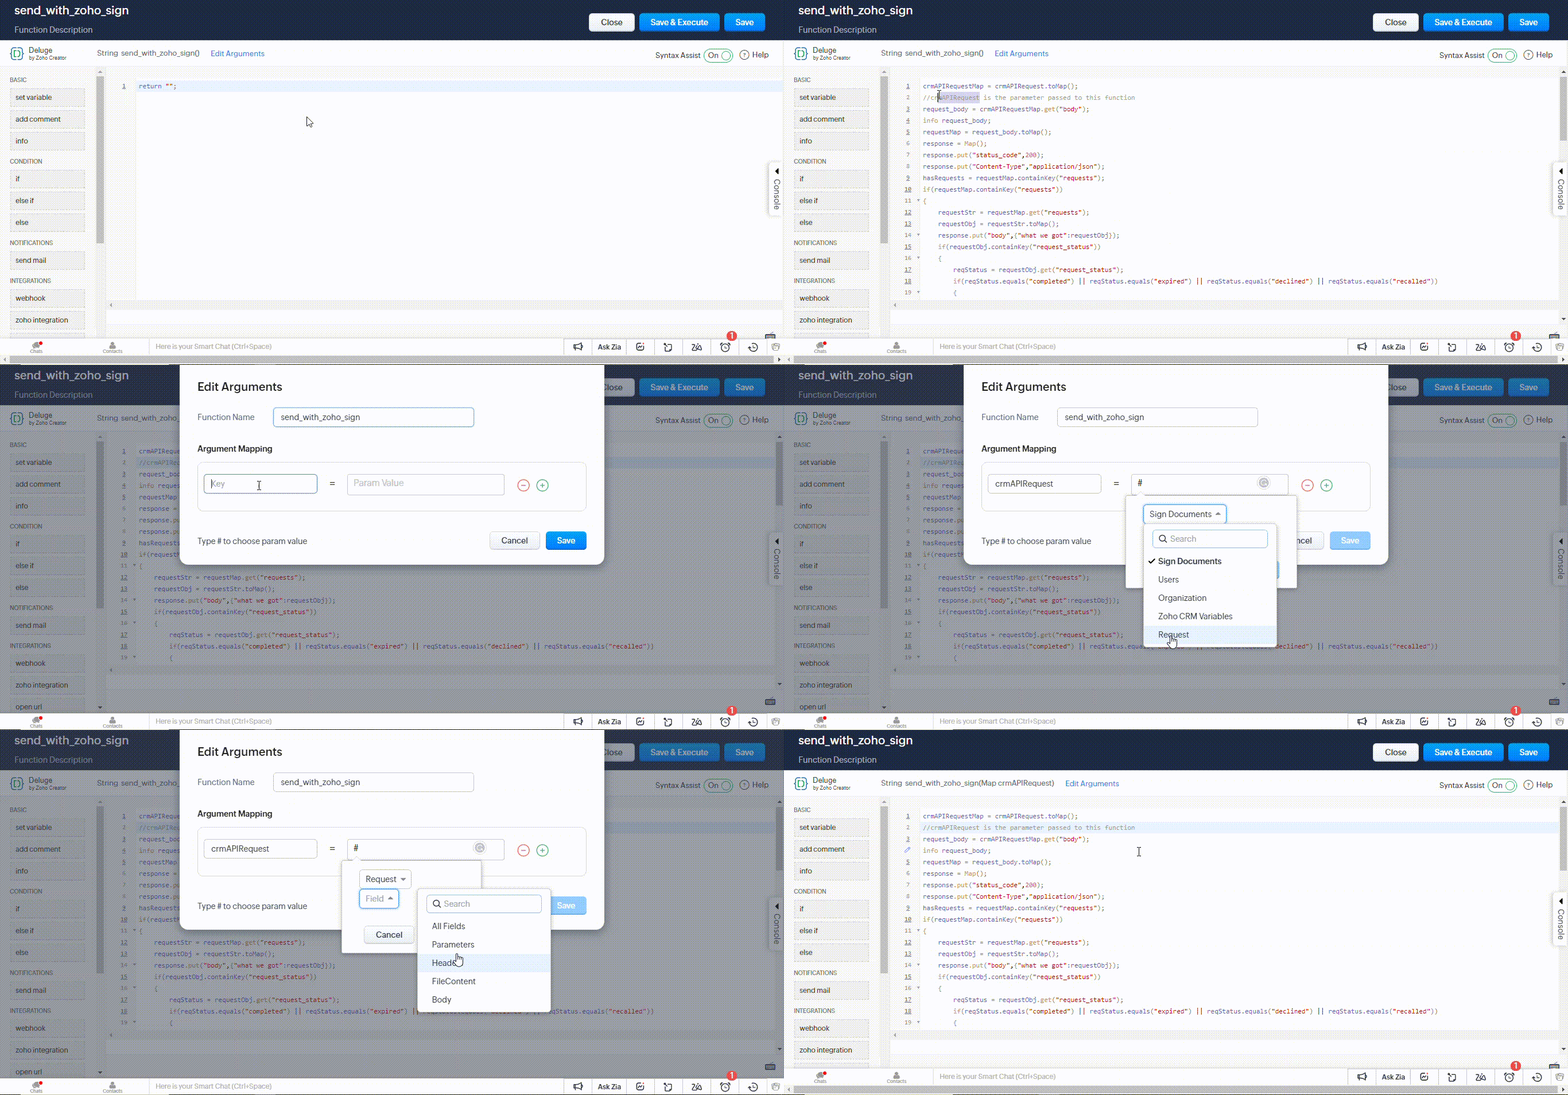
Writing the script for the custom function
crmAPIRequestMap = crmAPIRequest.toMap();
//crmAPIRequest is the parameter passed to this function
request_body = crmAPIRequestMap.get(“body”);
info request_body;
requestMap = request_body.toMap();
response = Map();
response.put(“status_code”,200);
response.put(“Content-Type”,”application/json”);
hasRequests = requestMap.containKey(“requests”);
if(requestMap.containKey(“requests”))
{
requestStr = requestMap.get(“requests”);
requestObj = requestStr.toMap();
response.put(“body”,{“what we got”:requestObj});
if(requestObj.containKey(“request_status”))
{
reqStatus = requestObj.get(“request_status”);
if(reqStatus.equals(“completed”) || reqStatus.equals(“expired”) || reqStatus.equals(“declined”) || reqStatus.equals(“recalled”))
{
requestId = requestObj.get(“request_id”);
response.put(“body”,{“request_id”:requestId});
actions = requestObj.get(“actions”);
info “Record found”;
document_ids = requestObj.get(“document_ids”);
email = “”;
order = 1000;
for each action in actions
{
if(action.get(“action_type”).equals(“SIGN”) && action.get(“signing_order”) < order)
{
order = action.get(“signing_order”);
email = action.get(“recipient_email”);
records = zoho.crm.searchRecords(“CustomModule6″,”(Email:equals:” + email + “)”);
if(records.size() > 0)
{
info “Record found”;
leadid = records.get(0).get(“id”);
for each document in document_ids
{
document_id = document.get(“document_id”);
//Signed Document Download
fileResponse = invokeurl
[url :”https://sign.zoho.com/api/v1/requests/” + requestId + “/documents/” + document_id + “/pdf”
type :GET
connection:”Zoho Sign”
];
zoho.crm.attachFile(“CustomModule6″,leadid,fileResponse);
}
//Completion Certificate Download
fileResponse = invokeurl
[url :”https://sign.zoho.com/api/v1/requests/” + requestId + “/completion certificate”
type :GET
connection:”Zoho Sign”
];
// Attaching the documents to the Custom Module
zoho.crm.attachFile(“CustomModule6”,leadid,fileResponse);
response.put(“body”,{“attached to record”:leadid});
}
}
break;
}
}
else
{
response.put(“body”,{“not completed”:requestObj});
}
}
else
{
response.put(“body”,{“no request status”:requestObj});
}
}
else
{
info “Error”;
response.put(“body”,{“error”:”No requests key”});
}
return {“crmAPIResponse”:response};
It retrieves data from your custom module and populates a Zoho Sign template for signature collection. Any updates or additional data entered by individuals will be saved in Zoho Sign and synchronized with Zoho CRM, allowing you to track the document’s progress.
To execute this code, create a custom callback function in Zoho CRM using Zoho Sign’s Webhooks. Replace “CustomModule6” with the name of your specific custom module and update the connection name you established for Zoho Sign.
After successfully writing the code in the custom function, click Save. The custom function will be selected as the action for the button. Click Save to successfully create the button.
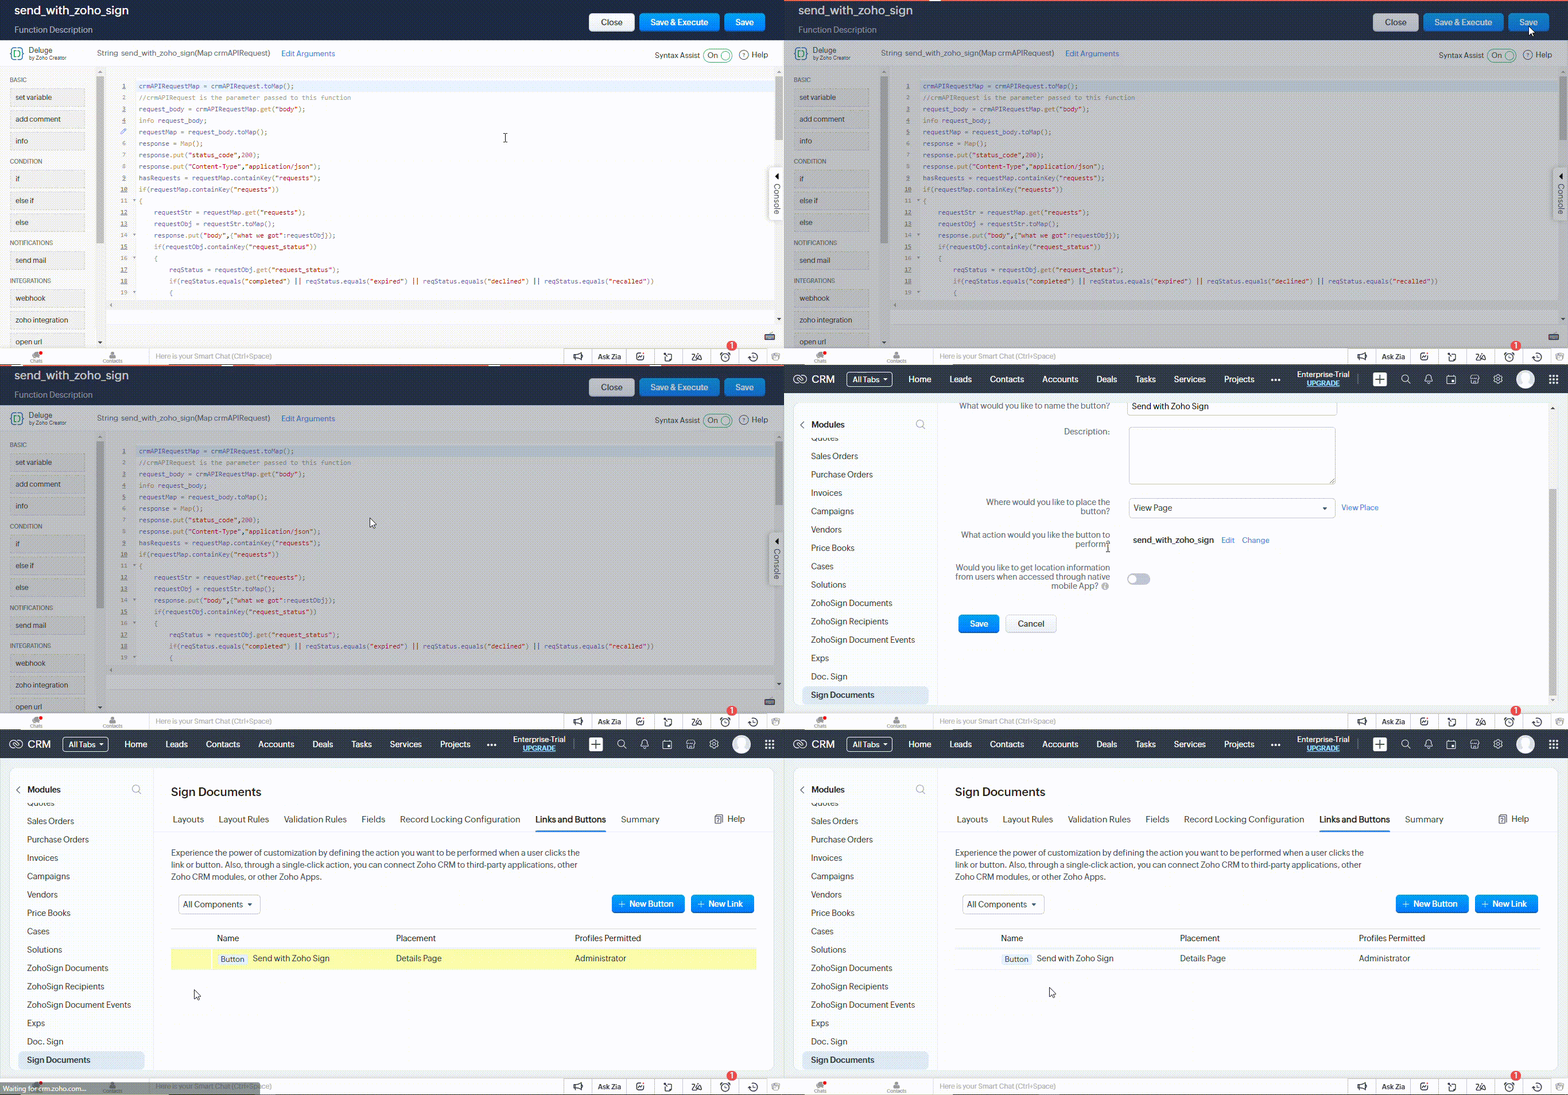
Saving the custom function and successfully creating a button for the custom module
Configure Zoho CRM custom function (For callbacks using Webhooks in Zoho Sign)
Access Zoho CRM and navigate to Settings. Within the Developer Space section, select Functions and proceed to click on New Function.
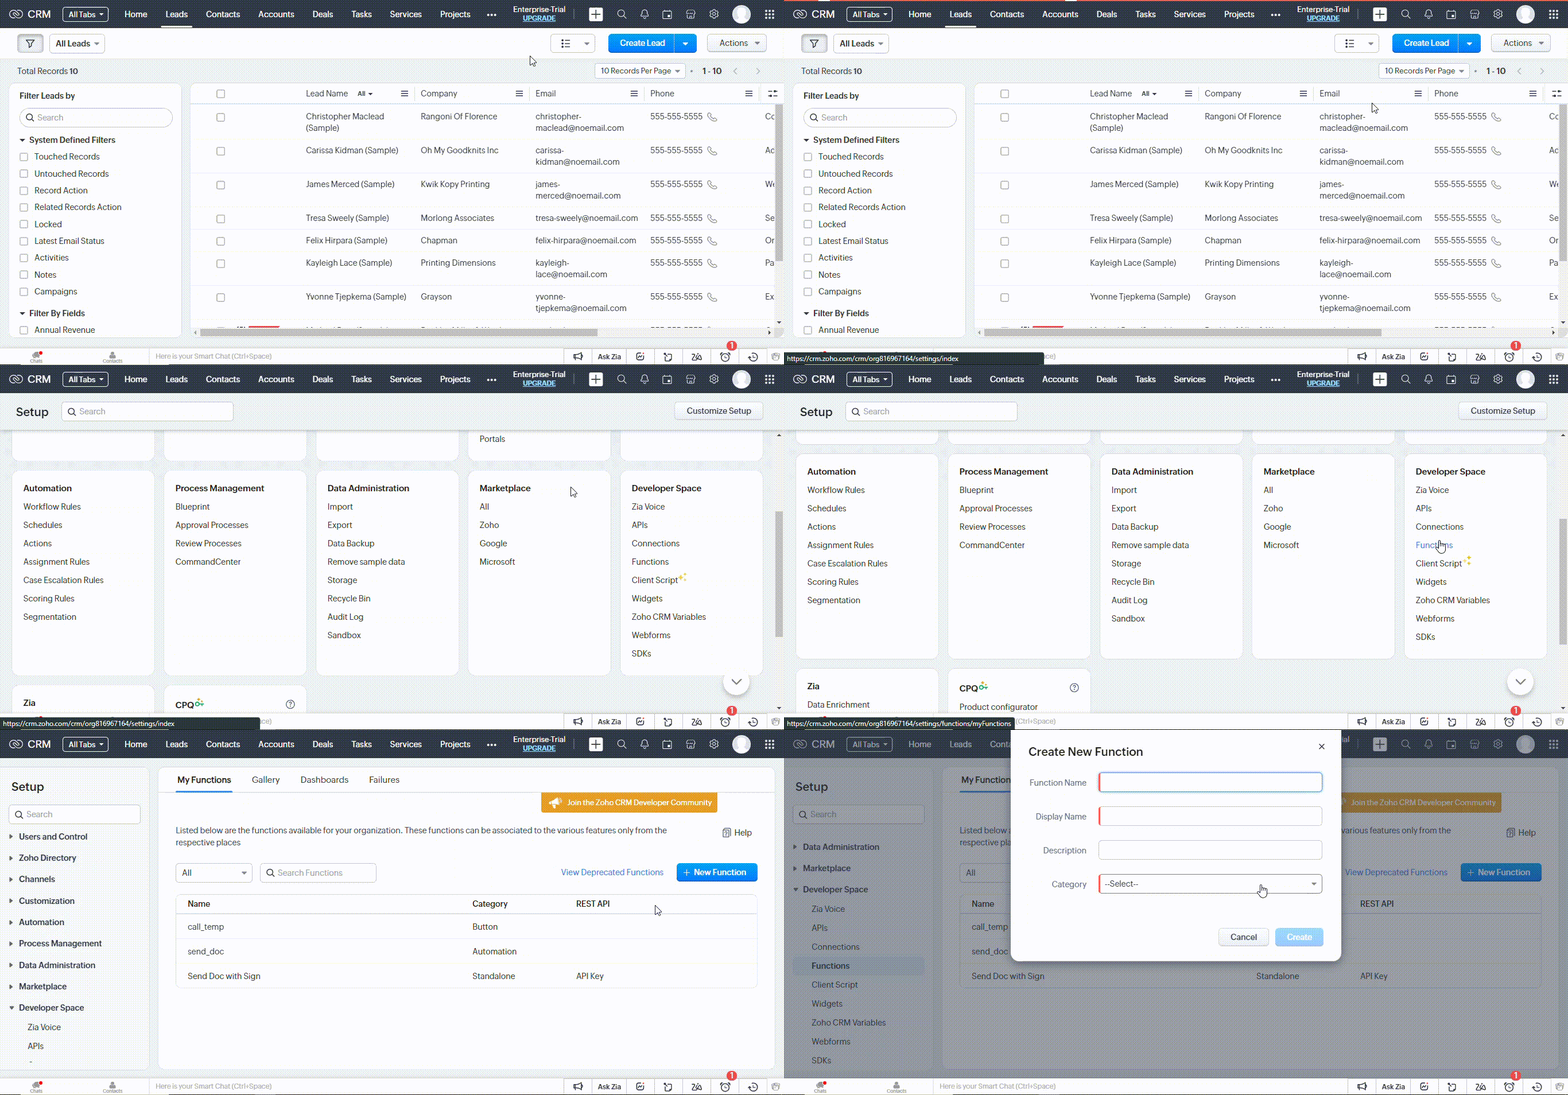
Configuring a custom function in Zoho CRM for callbacks using Webhooks in Zoho Sign
Specify the desired function name and display name. Choose Standalone as the category and click on Create.
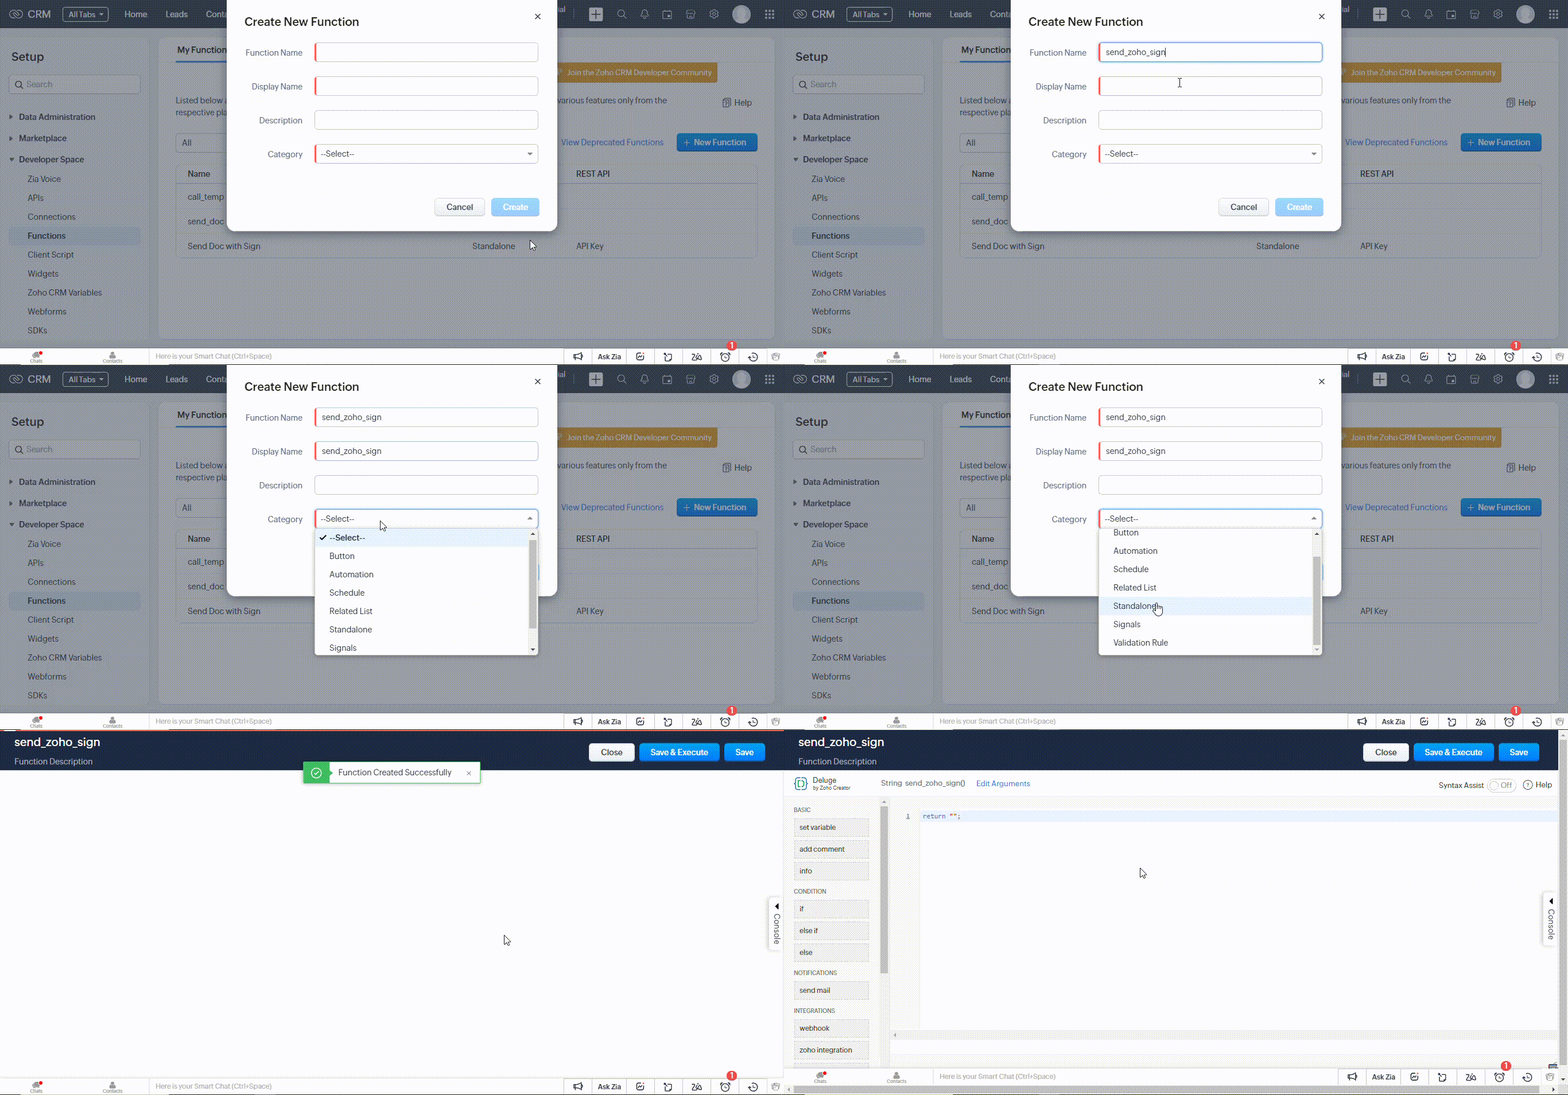
Initializing the custom function
Click on the Edit Argument link located at the top of the page. Enter “crmAPIRequest” as the Parameter Name, select String as the Type from the drop-down menu, and then click the Save button.
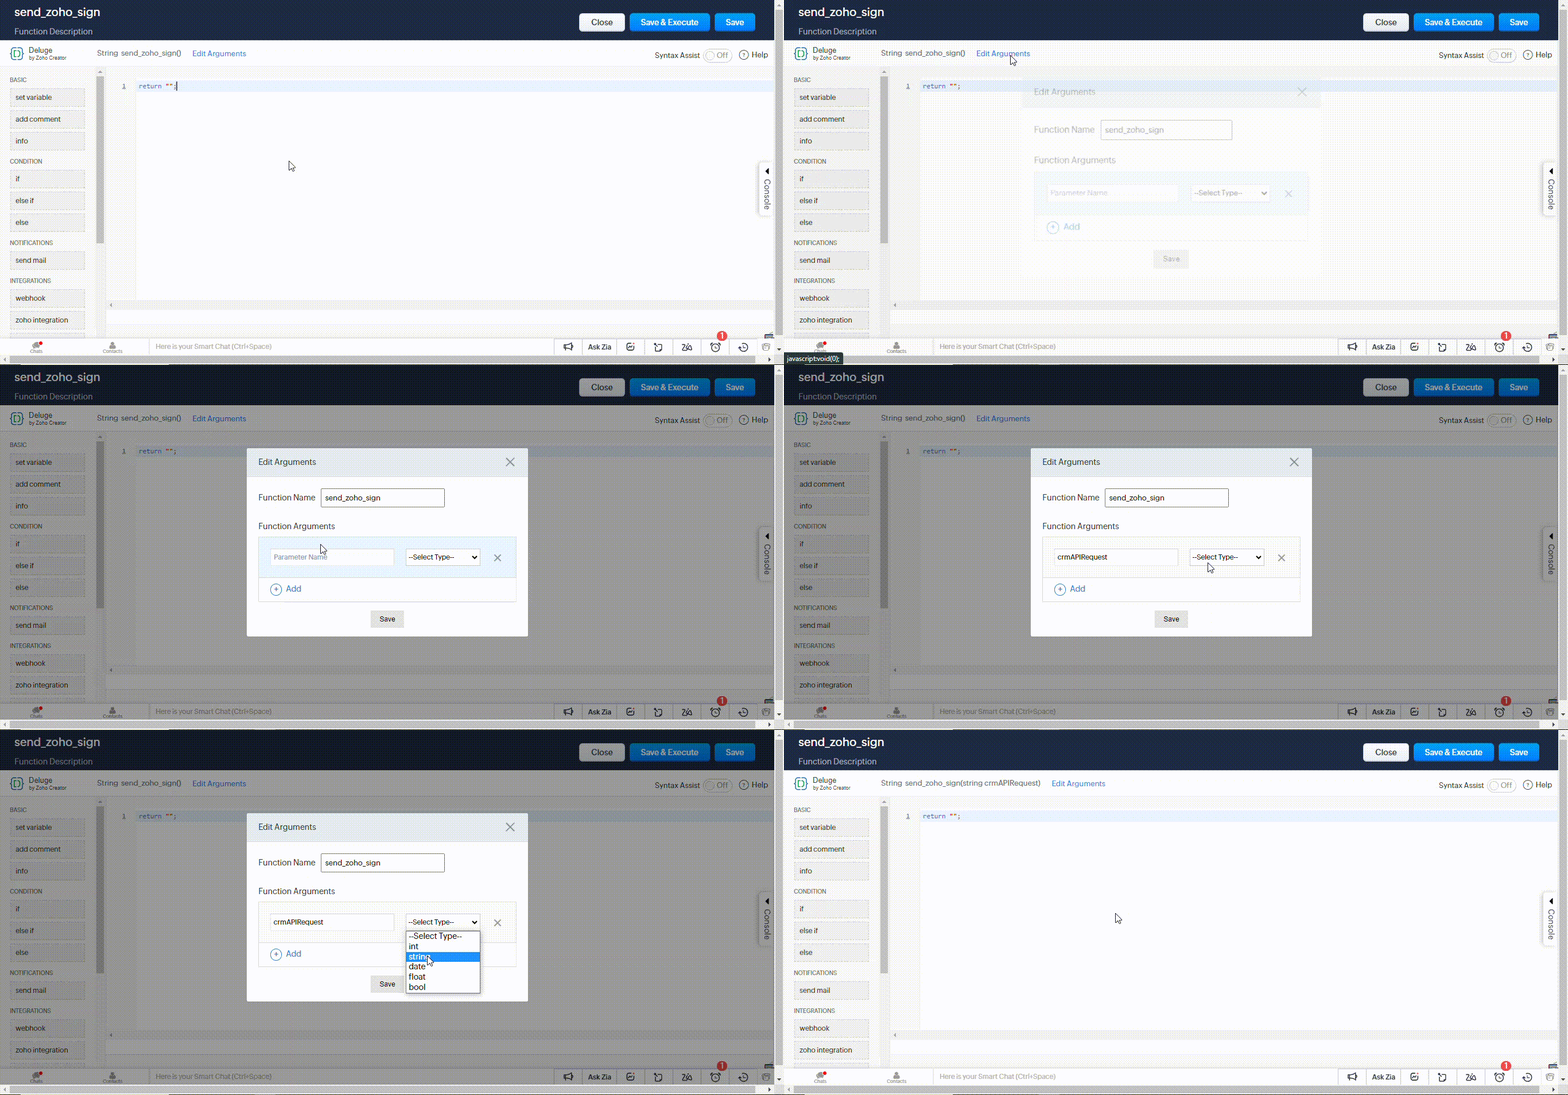
Editing arguments for the custom function
Click Save, then click on the ellipsis next to the function name and select REST API. Enable the API Key option and make sure to copy the generated URL for future reference. Finally, click the Save button.
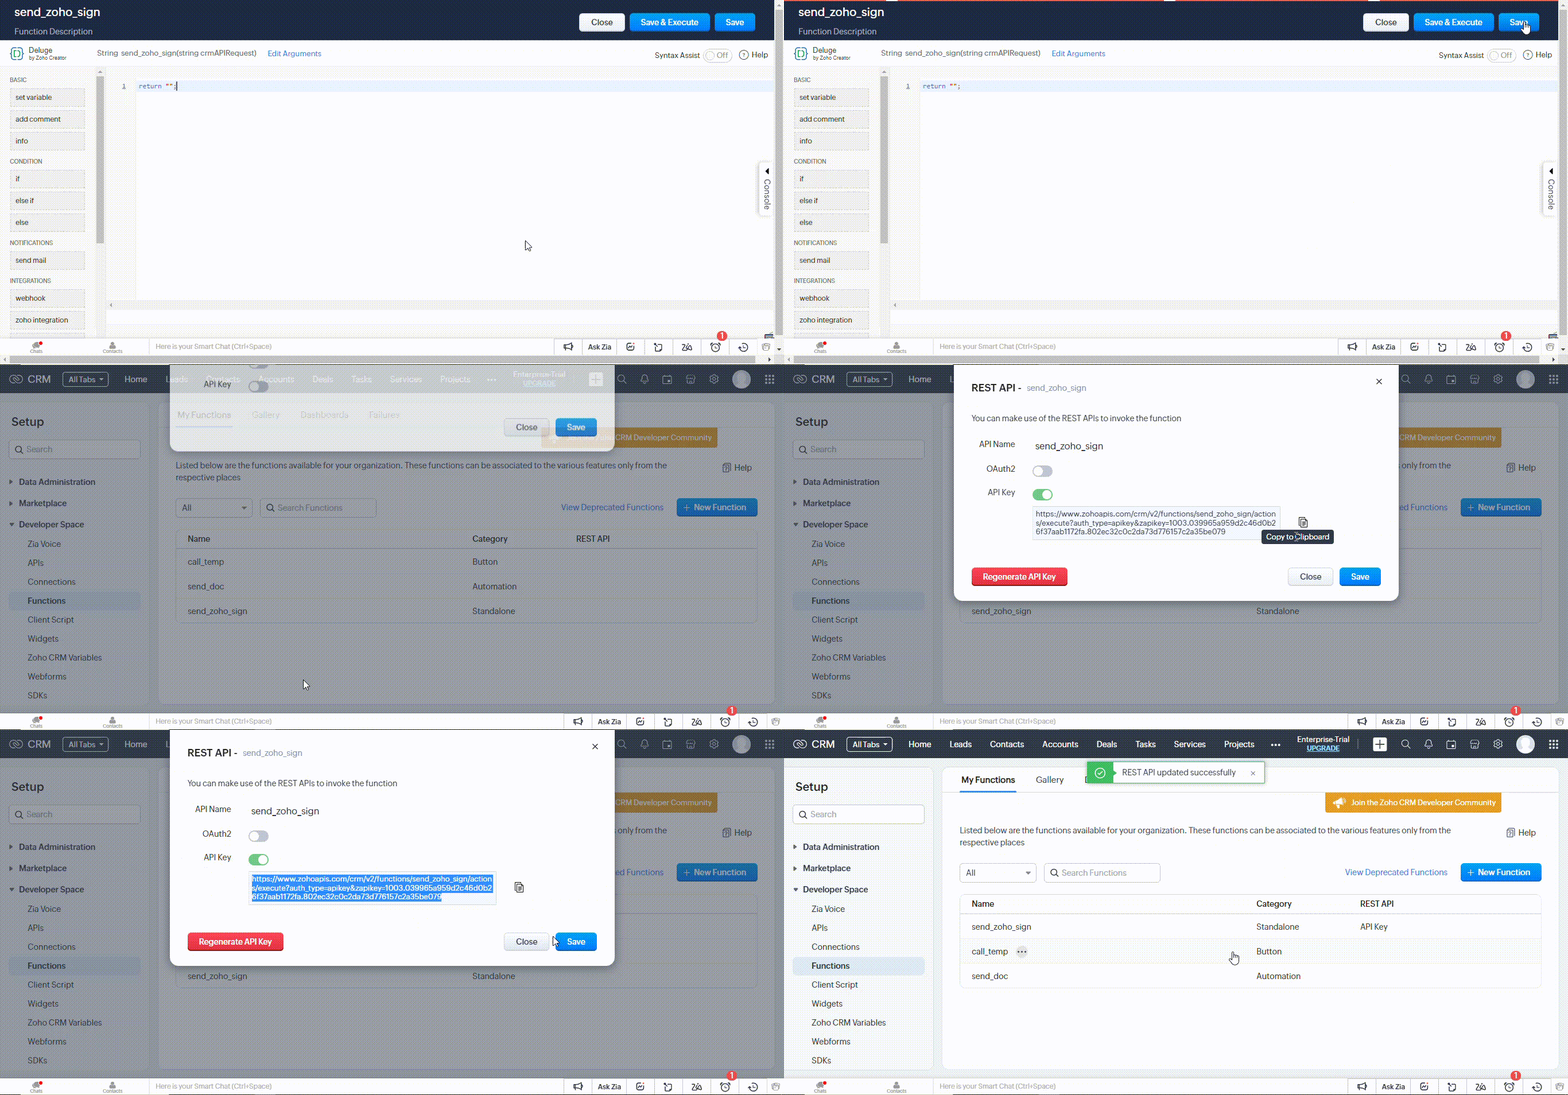
Enabling the REST API for the custom function
Enabling Webhook from Zoho Sign
To enable the triggering of a webhook upon document completion in Zoho Sign, open Zoho Sign, access the Settings menu, navigate to API Settings, and click on + Create Webhook.

Enabling webhook from Zoho Sign for the callback function in Zoho CRM
Paste the previously copied URL into the designated field. Select the desired actions from the provided list to determine the webhook call functionalities. Finally, click the Save button to preserve the changes.
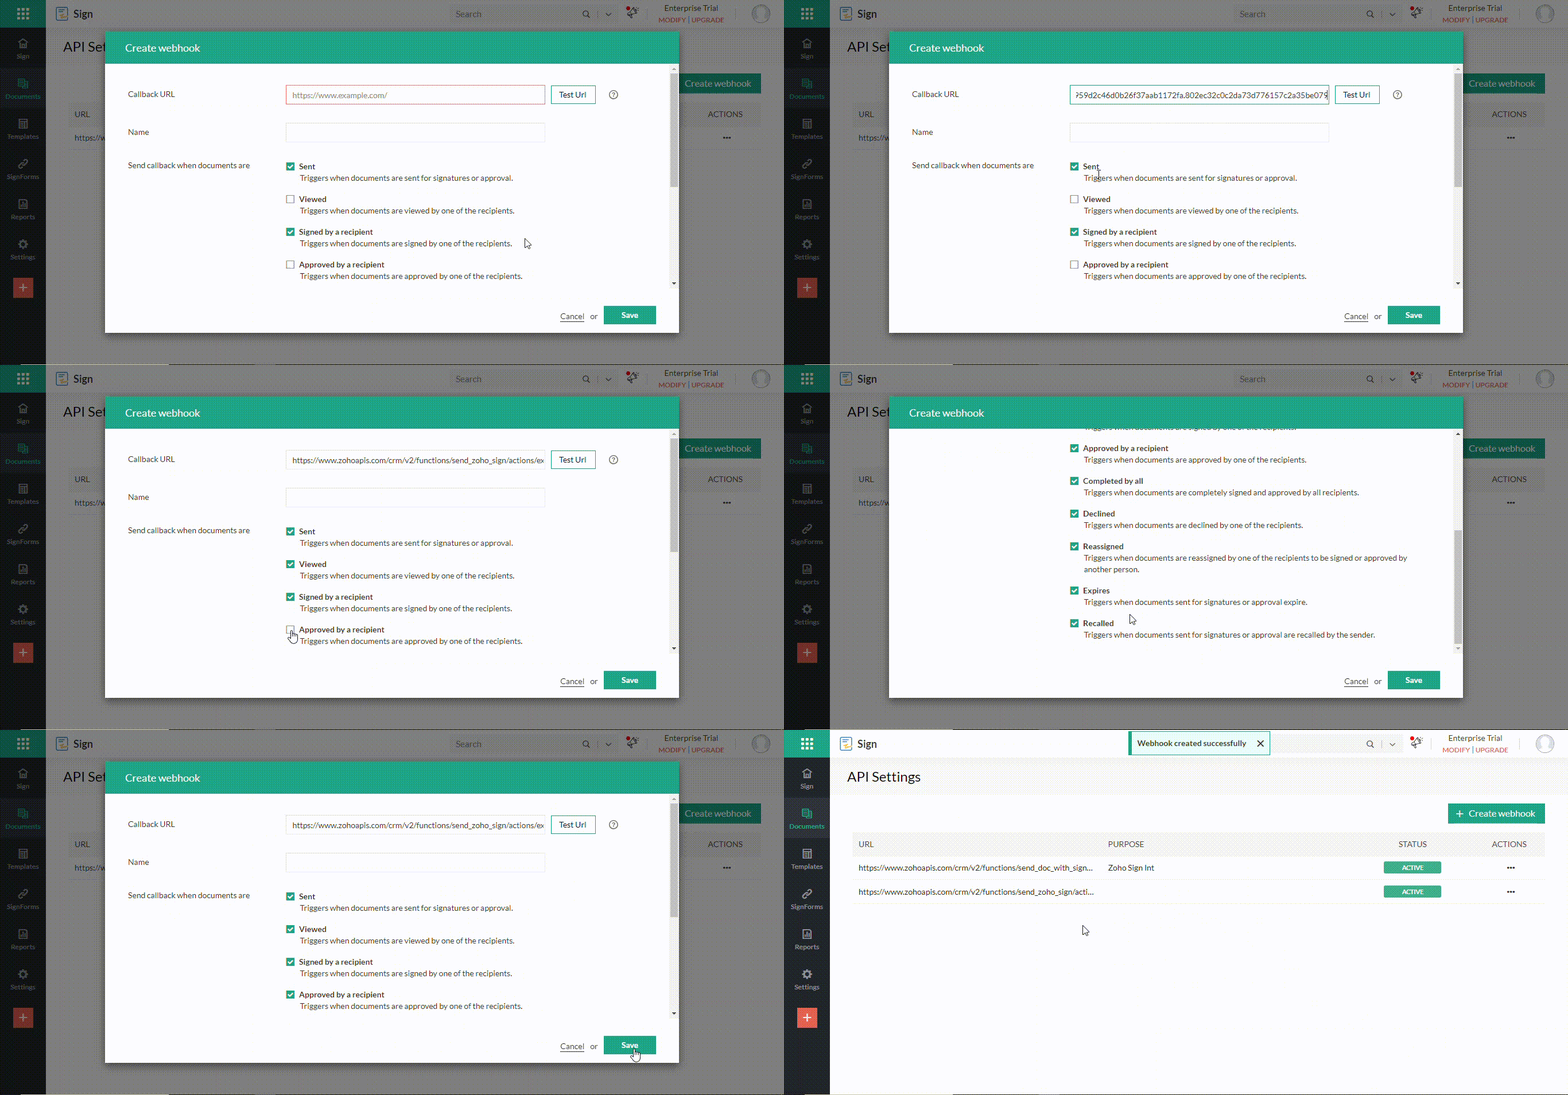
Setting up webhook call functionalities and successfully creating it
Establishing a connection between Zoho CRM and Zoho Sign
Establishing a connection between Zoho CRM and Zoho Sign is crucial, as we will utilize this connection link name in the custom function code for the button created within our custom module.
Navigate to the Setup menu and select Developer Space. From there, access Connections. Within the Connections section, locate and open Default Services under Services.
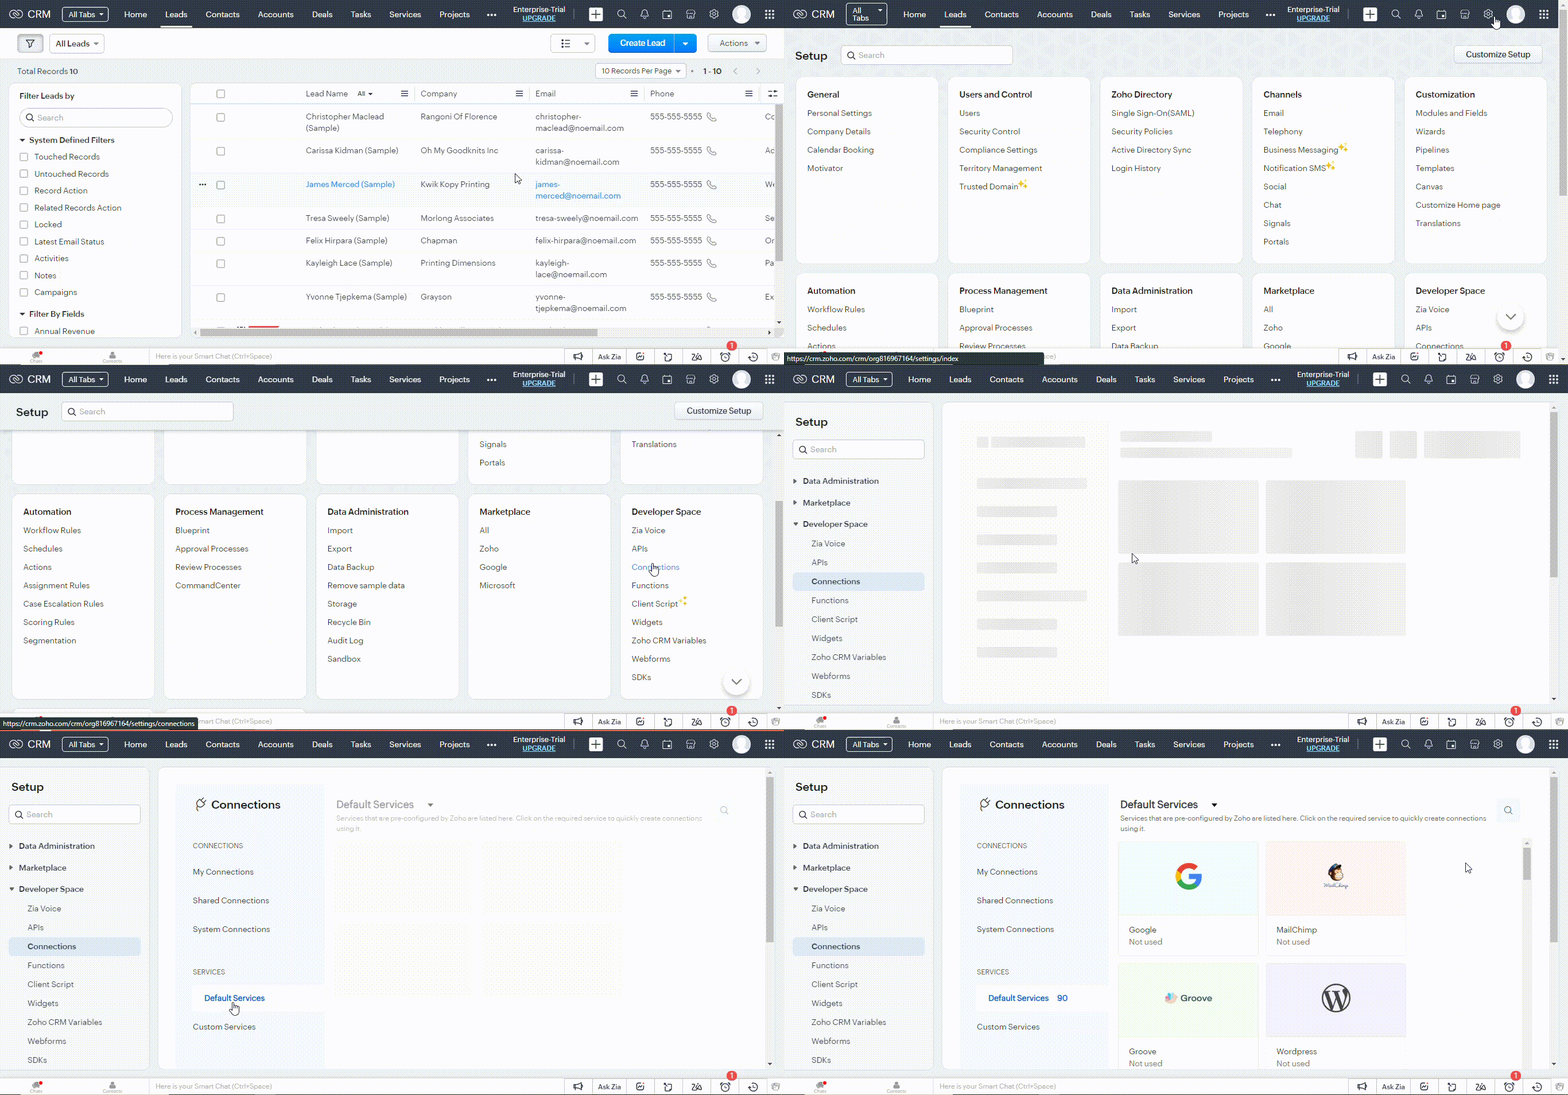
Establishing a connection between Zoho CRM and Zoho Sign
Access Zoho Sign and proceed to click on it. Next, click on the Create Connection button.
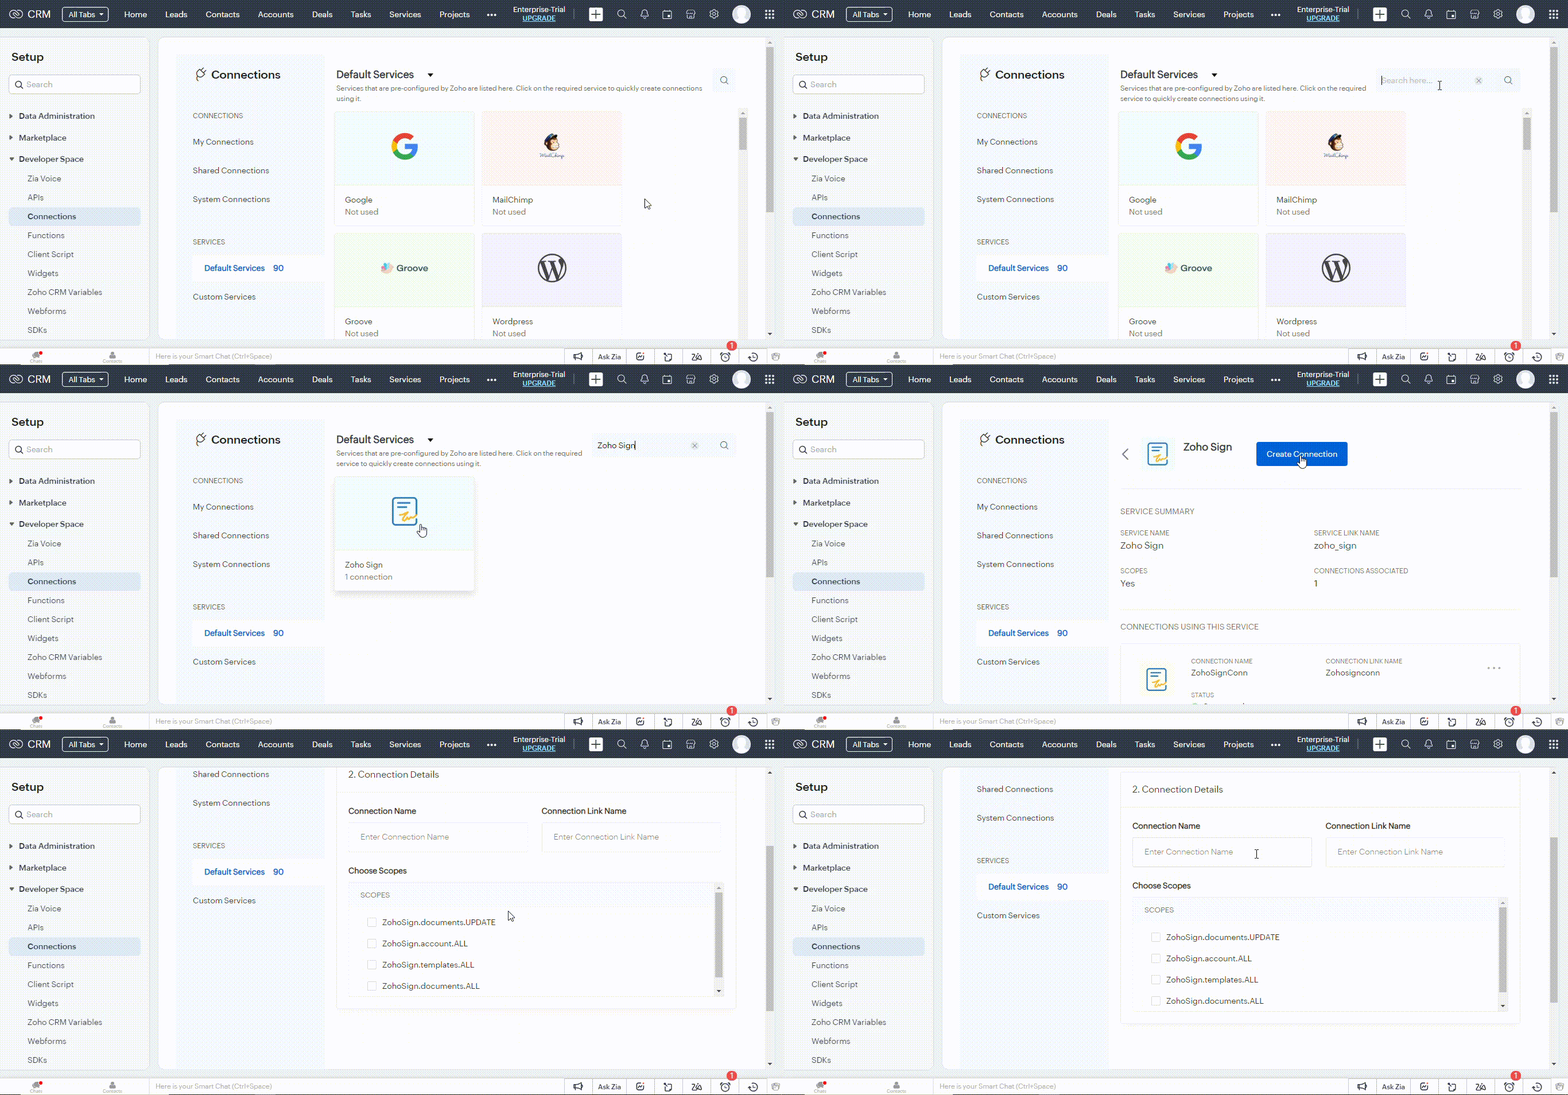
Navigating Zoho Sign and creating a connection
Provide your Connection Name and Connection Link Name, Choose Scopes (choose all four) and click on Create And Connect. Finally, click on Connect to confirm.
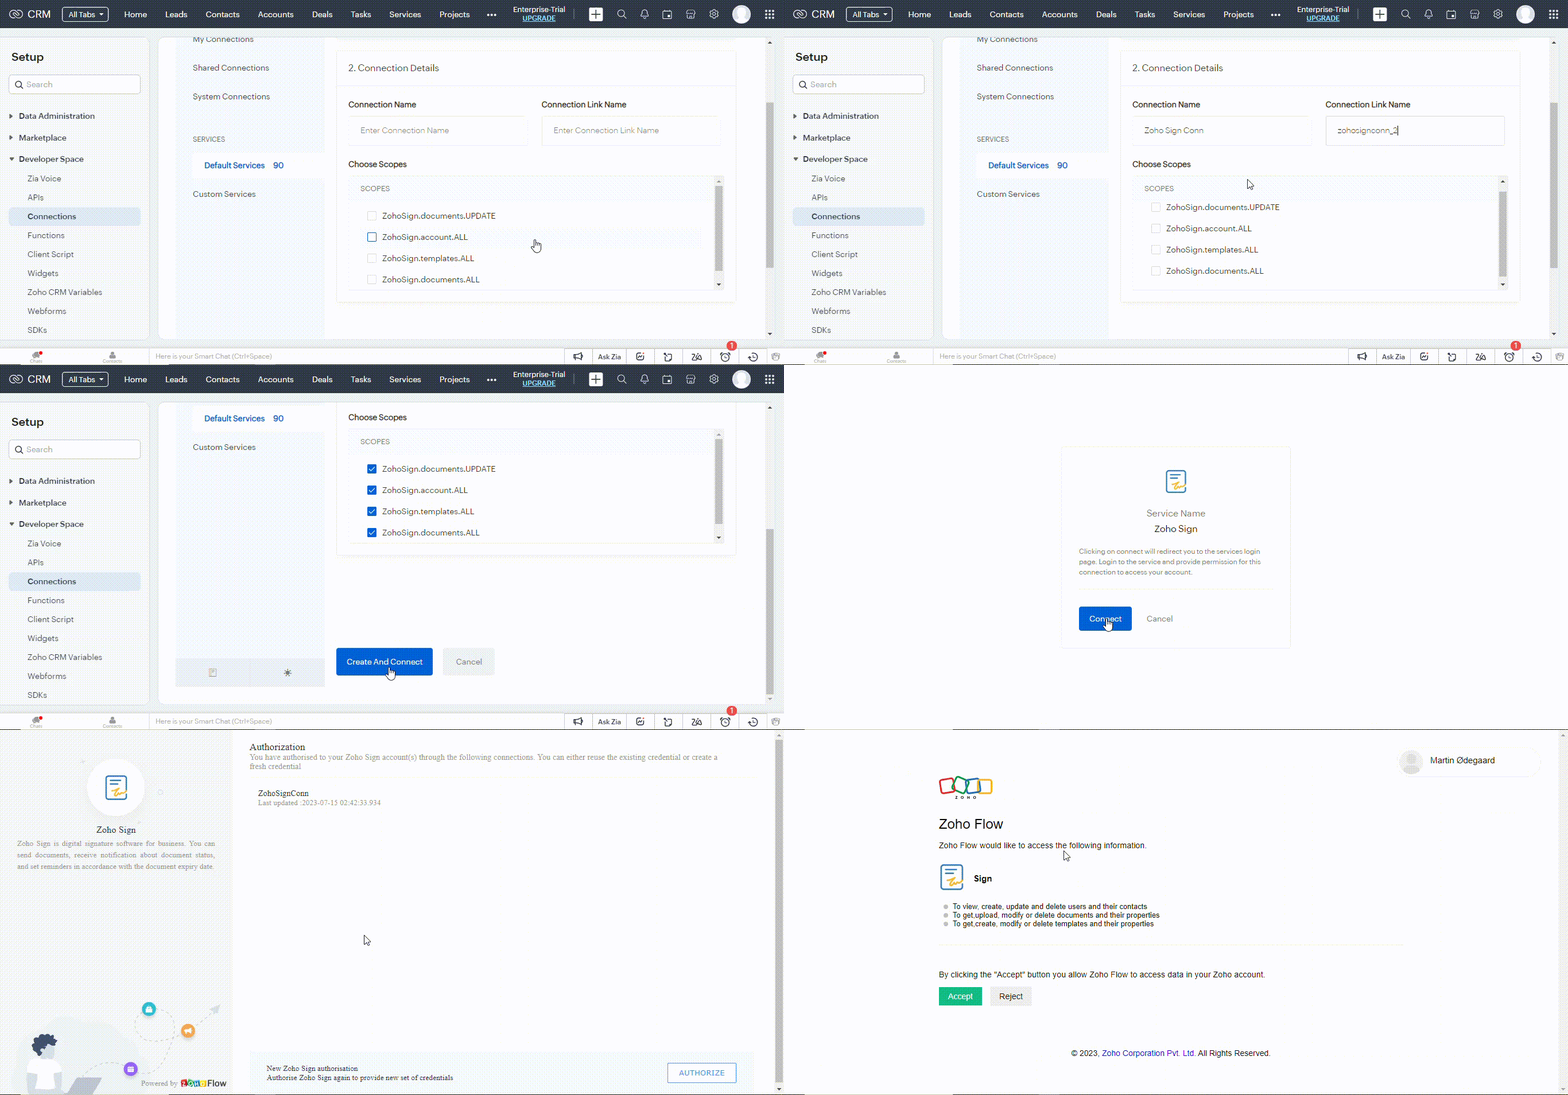
Configuring the connection
A new tab will open, where you should click on Accept to grant Zoho Sign access to your information within Zoho CRM.
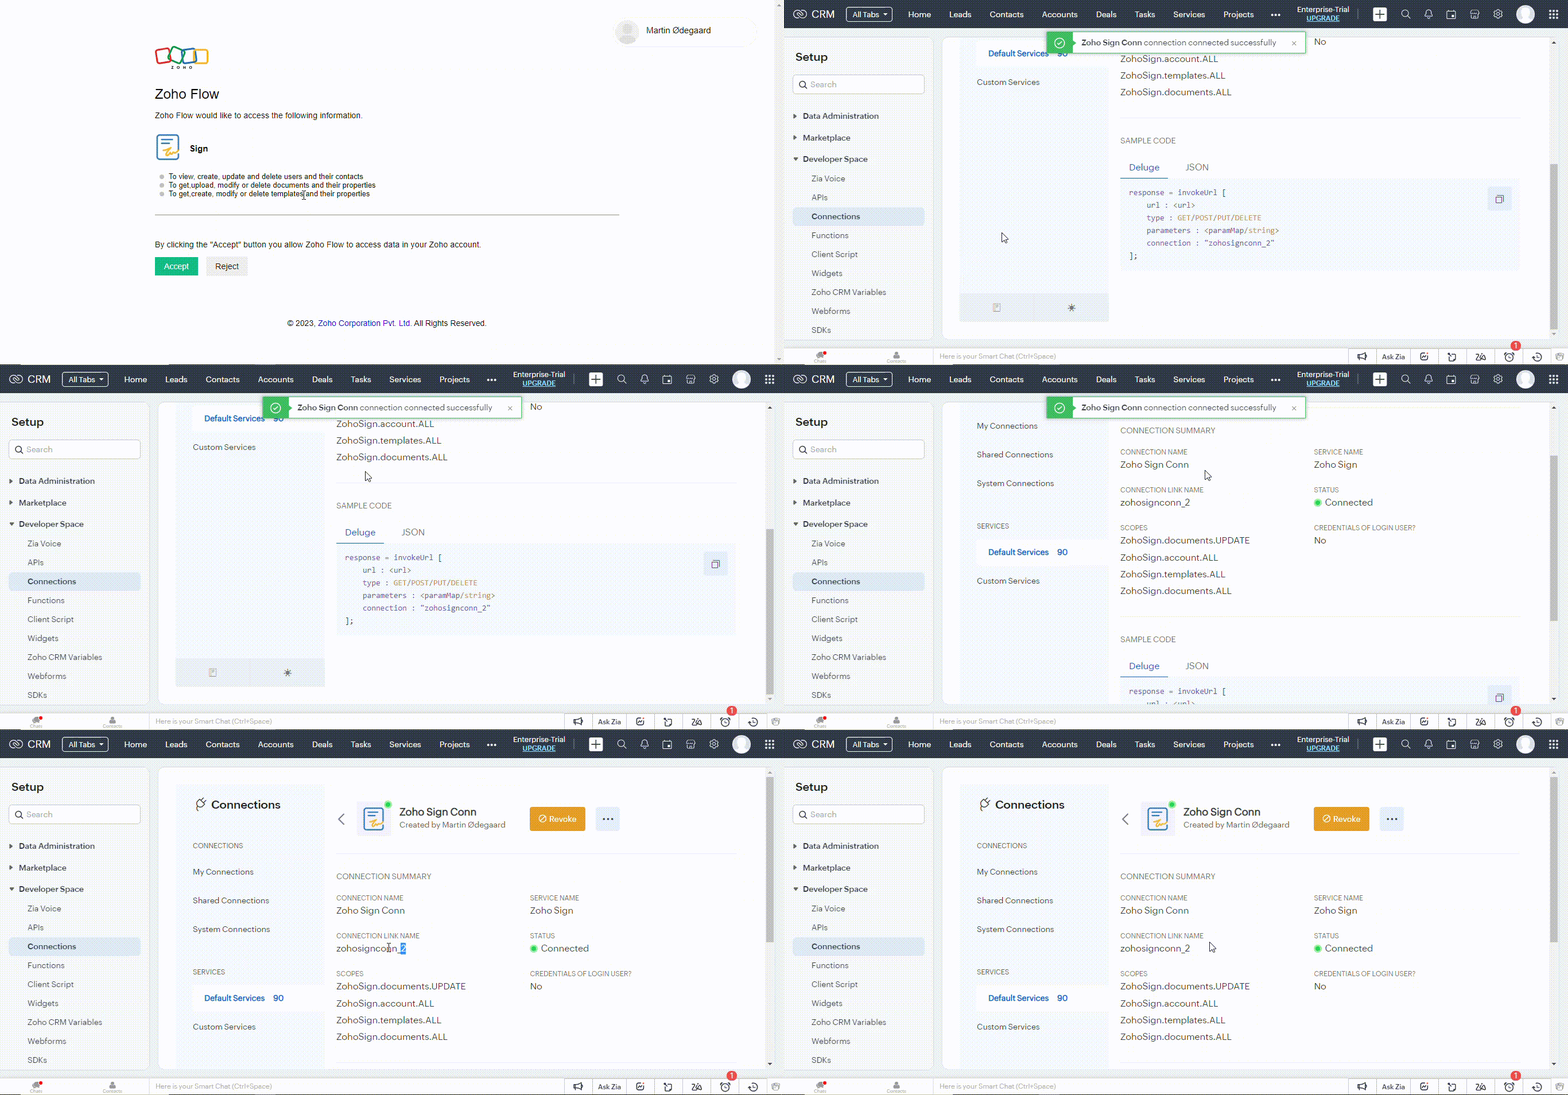
Successfully creating a connection between Zoho CRM and Zoho Sign
Please remember to make a note of your connection name for future reference when writing scripts for your custom functions.
Putting it all together
Proceed to your custom module and select a specific record. Then, click on your custom button.
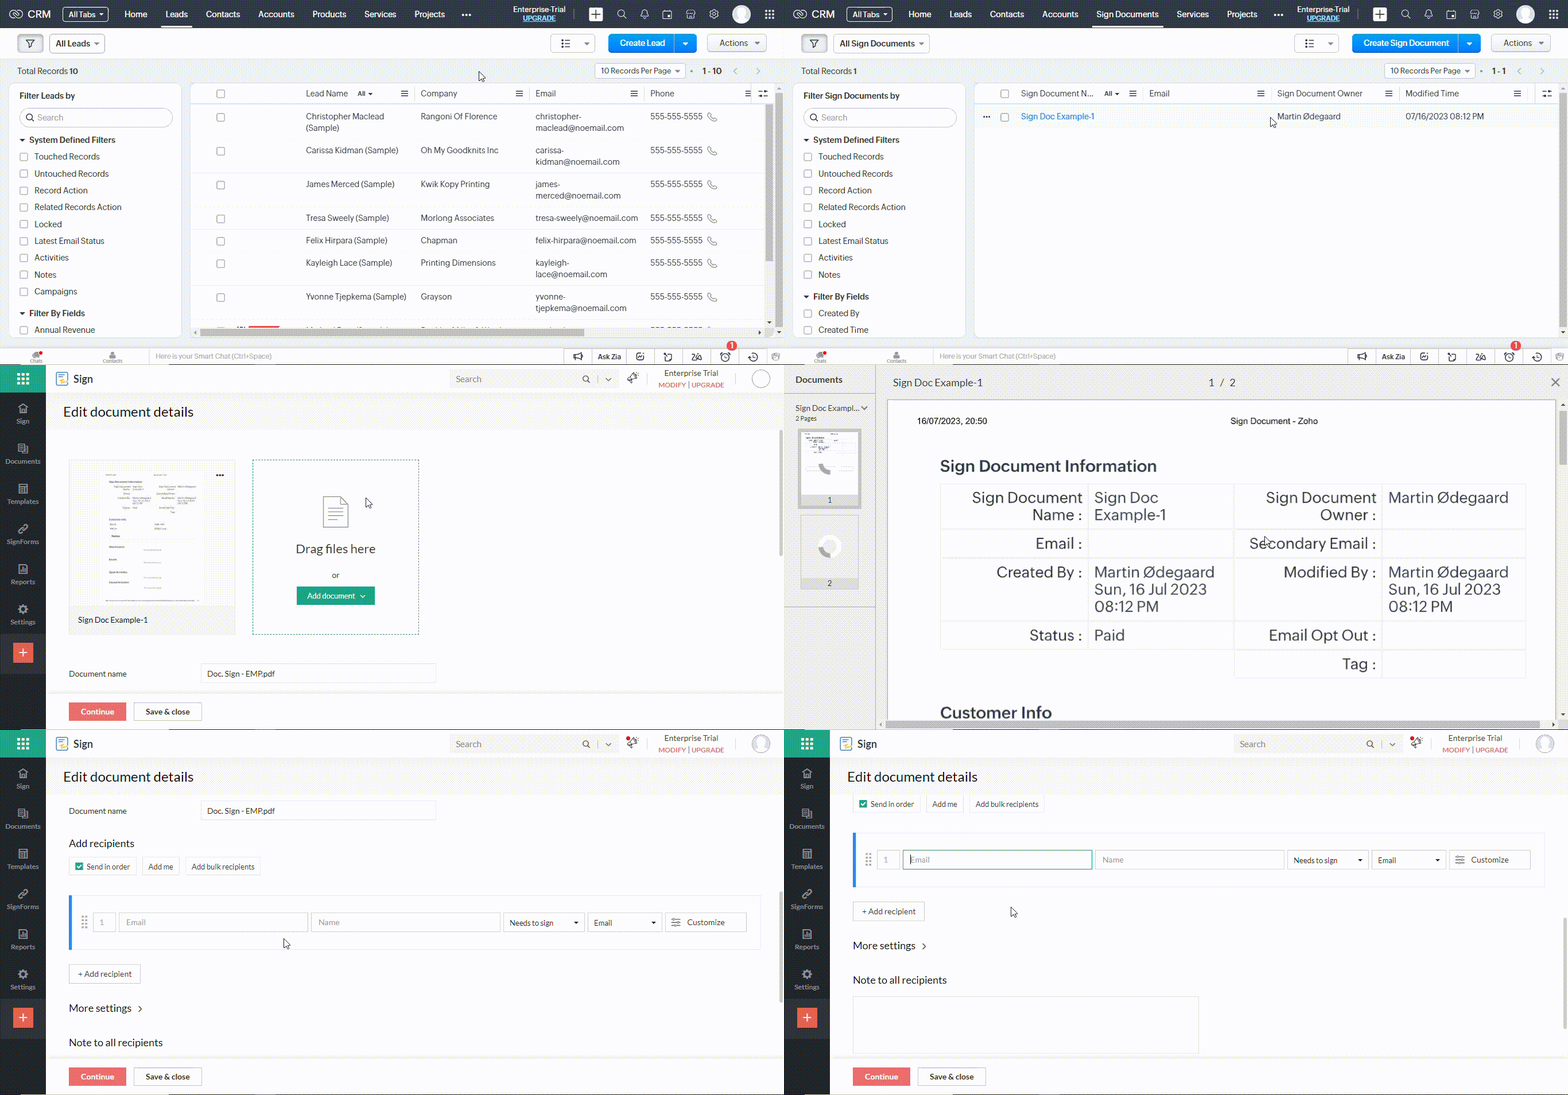
Testing the functionality of the custom button
Enter the email addresses of the recipients for your custom document, and then click on Continue. Proceed by assigning fields to the respective recipients, and finally, click on Send.
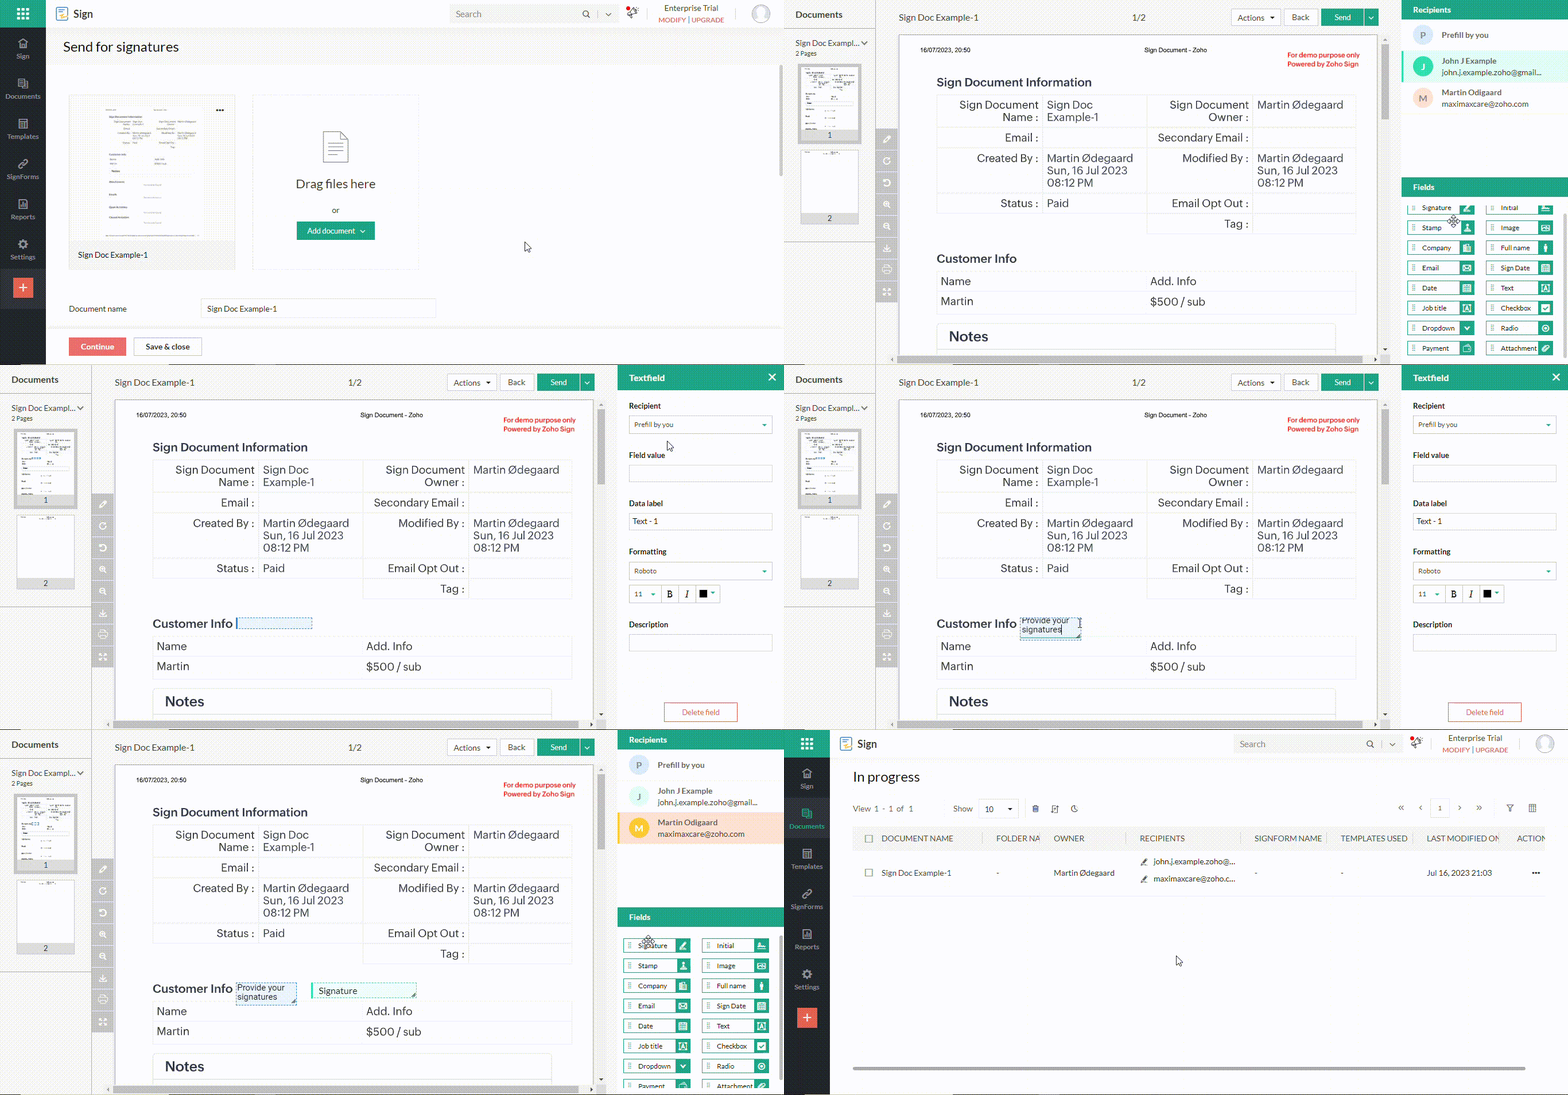
Sending and tracking a custom document for signatures from a custom module
Upon sending the documents for signatures, you will have the ability to track their progress.
What Pain Points Does it Solve?
Discover how to overcome common pain points in the document signing process by learning how to send custom documents for signature and track their signing progress with a custom module in Zoho CRM.
- Manual Document Handling: Eliminate the time-consuming and error-prone process of manually handling physical documents for signatures.
- Delayed Signatures: Streamline the signing process to ensure timely completion and eliminate delays.
- Lack of Visibility: Gain transparency and real-time visibility into the status and progress of document signatures.
- Inefficient Collaboration: Improve collaboration among team members involved in the signing process, ensuring seamless teamwork and faster execution.
- Compliance and Audit Trail: Maintain compliance with legal and regulatory requirements by creating a reliable audit trail for signed documents.
- Manual Follow-ups: Automate reminders and notifications to reduce the need for manual follow-ups on pending signatures.
By addressing these pain points, the article will provide actionable solutions to enhance the document signing process, improve efficiency, and streamline workflows within Zoho CRM.
Conclusion
The integration of a custom module in Zoho CRM revolutionizes the process of sending custom documents for signature and tracking their signing progress.
By embracing this powerful functionality, businesses can achieve enhanced efficiency, streamlined document management, and improved collaboration.
Embrace the capabilities of Zoho CRM’s custom module and unlock the potential for seamless document signing, propelling your business toward success in the digital age.


